Panasonic KX-UT248 Manual
Hide thumbs
Also See for KX-UT248:
- Getting started (108 pages) ,
- Manual (13 pages) ,
- Administrator's manual (312 pages)
Table of Contents
Advertisement
Quick Links
Panasonic KX-UT248 manual
A. Initial operation
1. Requirements and Information
It is currently not possible to connect corded headsets to the Panasonic telephone
systems because they do not feature a headset softkey to activate the headset mode.
On the KX-UT248, only 21 of the 24 function keys are available. The other 3 function keys
are reserved as line keys.
2. Adding an extension
All telephones you receive are preconfigured and connected to the telephone system.
B. Notices
1. Encryption
You have the option of voice encrypting (SRTP) your telephone calls. You can activate this function
for your customer account via the administration portal at any time.
2. "Hot desking"
The basic function of "Hot desking" allows cancelling the registration of existing users and
registering new users to your Panasonic device. This is useful when employees frequently change
1
Advertisement
Table of Contents

Related Manuals for Panasonic KX-UT248


Summary of Contents for Panasonic KX-UT248
- Page 1 It is currently not possible to connect corded headsets to the Panasonic telephone systems because they do not feature a headset softkey to activate the headset mode. On the KX-UT248, only 21 of the 24 function keys are available. The other 3 function keys are reserved as line keys.
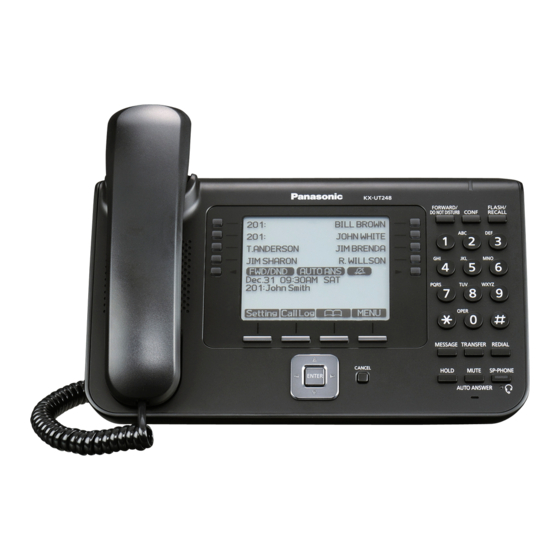
- Page 2 Press the “Enter” softkey to confirm The new extension is now registered. This may take some time. C. Operation 1. Basic functions 1.1. Keys/Connections overview Panasonic KX-UT248 (Front view) LCD: 4,4 inches LCD Enter The KX-UT248 features a Confirms the selected entry.
- Page 3 Used to switch the page of Redial flexible buttons displayed. Used to redial the last There are three pages of eigtl dialled number. flexible buttons. Navigation keys For adjusting the volume or to select the desired entries. Panasonic KX-UT248 (Back view):...
-
Page 4: Placing Calls
1.2. Placing calls There are various methods for placing a call: With the receiver Pick up the receiver, enter the number number and press [ENTER] to confirm the telephone number. or enter the desired telephone number and pick up the receiver. With the speaker / microphone Enter the telephone number and press [SP-PHONE/HEADSET]. -
Page 5: Missed Calls
With the speaker / microphone - Press the [SP-PHONE/HEADSET] key. With the headset - Press the [SP-PHONE/HEADSET] key, when you have connected your headset. 1.4. Missed calls The telephone display indicates missed calls (e.g.: “Missed calls: 001”). and select [Missed call], then confirm with [ENTER]. To view missed calls press the softkey Now, you can see a list of missed calls. - Page 6 4. To end a call, simply hang up the receiver during the active call. 1.8. Conference calls/Toggle calls Your Panasonic system telephone allows you to place a 3-way call. 1. Call party 1. 2. Once party 1 has been reached, press the [CONF] key. The active call is now placed on “Hold”.
-
Page 7: Unattended Call Transfer
3. To switch between the two parties (toggle), please press the respective function keys on the right side of your Panasonic telephone indicating the lines in use (these can only be function keys, which have not yet been programmed). The function key flashes green when the party is placed on “hold”. -
Page 8: Call Forwarding
1.11. Call forwarding You can configure various call forwarding scenarios. For this purpose you can use the call forwarding profiles. Under the telephone menu you can only edit the default profle (catch all / always) to be found under the call forwarding profiles. You can edit the remaining call forwarding profiles via Ncontrol or via the administration portal. -
Page 9: Advanced Telephone Features
The various telephone system functions (e.g. queues, timing, groups, etc.) can be configured on the administration portal. For detailed configuration information, please refer to the administration portal manual. You can also configure the initial settings for the Panasonic telephone using the softkey “Setting” “Application”. The following functions are available after pressing “Application”: Call settings Call waiting indication: define whether this function should be activated. - Page 10 Parallel call: configure another telephone or your mobile phone to ring in addition to your telephone when a call comes in. You can then answer the call with one of the two telephones. Call forwarding: profiles Here you can select your preconfigured call forwarding profiles. For details, please refer to the Ncontrol manual.
- Page 11 Busy Field Light (BFL) 1. You can program any extension to one of your function keys. Pressing the programmed function key starts a telephone call. 2. A flashing LED for the respective function key indicates an incoming call to the extension. To pick up the call, simply press the flashing function key.
- Page 12 Services Program any telephone system feature (queue, caller group, virtual conference room, etc.) to one of your function keys. This requires the service being assigned to an extension. Pressing the programmed function key then initiates a call to the service. Control codes allow direct access to the telephone system’s functions.
- Page 13 If busy, automatic callback activated If busy, automatic callback deactivated Specify primary device within a premium extension (Premium Package) *72+nnnn1 Call skill service nnnn *73+nnnn1 Call eFax additional costs will occur *74+nnnn1 Call time control nnnn *75+nnnn1 Call group nnnn *76+nnnn1 Call announcement nnnn *77+nnnn1...
-
Page 14: Initial Setup
For more detailed information, please refer to the voicemail leaflet. 1. Press the voicemail key on the Panasonic telephone to access the voice menu of the voicemail system. 2. Then select “0 Mailbox Options” to set up your voice mailbox 3. - Page 15 At nfon.com under Service you can find an overview of all documentation, downloads, blogs and portals as well as help pages and further information. nfon.com For any feedback to documentation, please contact redaktion(at)nfon(dot)com The home page of the service site contains various links to manuals, brief portal.nfon.com instructions, software downloads and templates.