Table of Contents
Advertisement
Quick Links
We hope you enjoy your hdd
Please visit
and enter your product name to view:
· FAQ, Frequently Asked Questions
· Latest user manuals
· Latest computer software downloads
· Firmware upgrade files
Since it is possible for you to upgrade your product,
we recommend that you register your product on
www.philips.com/register
new free upgrades become available.
The typeplate is at the back of the set.
www.philips.com/support
so we can inform you as soon as
English
1
Français
17
Deutsch
33
Español
49
Nederlands
65
Italiano
81
Português
97
Svenska
113
1
Advertisement
Table of Contents

Related Manuals for Philips FR-HDD060


Summary of Contents for Philips FR-HDD060
- Page 1 Deutsch Español We hope you enjoy your hdd Nederlands Italiano Português Please visit www.philips.com/support Svenska and enter your product name to view: · FAQ, Frequently Asked Questions · Latest user manuals · Latest computer software downloads · Firmware upgrade files...
-
Page 2: Quick Start
Quick start Charge the battery Connect the supplied multi-voltage adapter/charger to the 5V DC jack on hdd and the main power supply. Charge 1 hour for fast charge or 4 hours for 100% battery power. (Battery life may vary according to use.) Install music software Insert the supplied CD into your PC's CD-ROM drive. - Page 3 English Organize and transfer music Launch your music software from Windows desktop or Start menu. Organize your music. Transfer music files from your PC to your hdd. ➯ Detailed information is given in selected music software’s Help. Safely disconnect hdd Exit your music software.
- Page 4 Left Right...
-
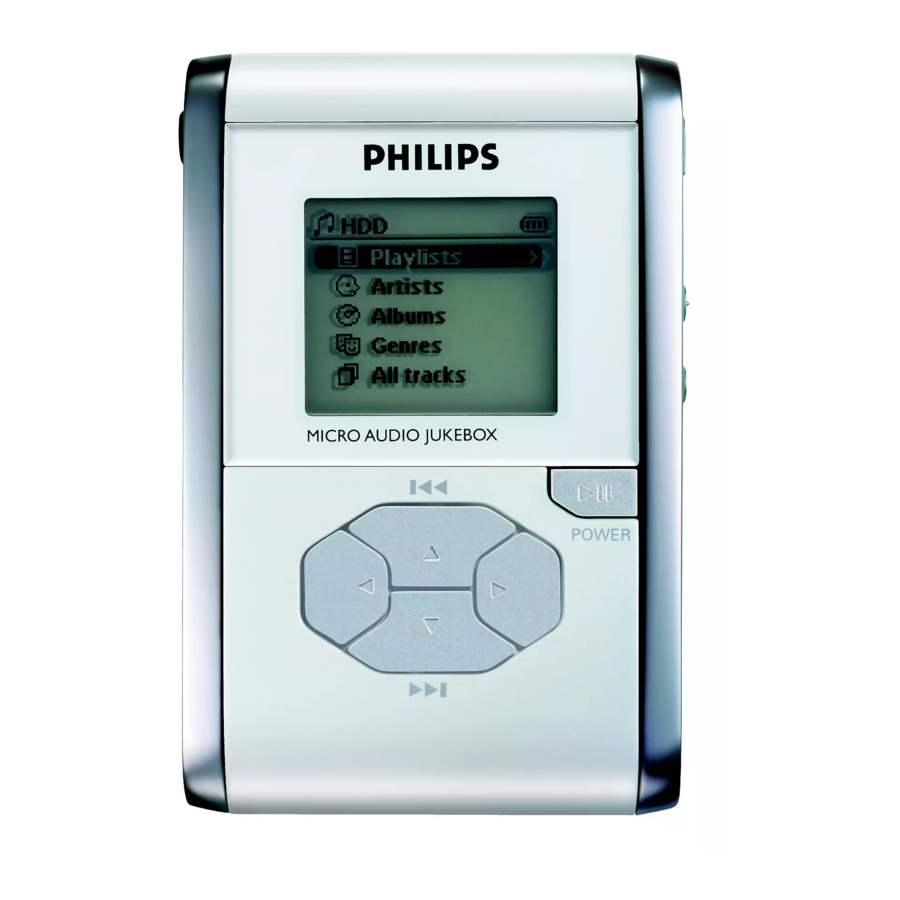
Page 5: Overview Of Controls And Connections
English Overview of controls and connections Headphones jack USB cable connector 5V DC AC converter jack VOLUME + / – Volume control MENU/HOLD For menu options / key locking / preset tuning SOURCE For music library / Radio On / Off and Play / Pause Right 4 / 2™... - Page 6 Music mode: playback Press SOURCE and select HDD to enter the music mode. Press to scroll up or to scroll down for your option. Press for next or for previous levels of library. Press to play or pause your selection. ➯...
- Page 7 English Using hdd controls Troubleshooting Control to press Reset hdd Press and hold [VOLUME +] Restore hdd factory settings Press MENU/HOLD; scroll to Restore settings. Press to confirm Basic Operation Controls to press Switch hdd on / off Press and hold Call up library options Press from the playscreen...
-
Page 8: Customizing Settings
Customizing settings Press MENU/HOLD for settings options. Press to scroll up or to scroll down for your option. Press for next or for previous levels of menu. Press to confirm your selection by checking Press MENU/HOLD to exit the menu display. Options for each setting are shown on hdd's display. - Page 9 English Radio mode: Automatic tuning (for radio models only) Press SOURCE and select Radio to enter the radio mode. Any music playback will stop as you enter the radio mode. Press SOURCE and select Autosearching to automatically select the 10 strongest radio stations. Press any key to abort. Press to scroll up or to scroll down for your preset.
-
Page 10: Environmental Information
Using hdd as an external hard disk hdd can be used as an external hard disk for storage and transfer of any data files. Note that music files transferred from the PC to hdd via Windows Explorer will not be able to play on hdd. -
Page 11: Troubleshooting
If a fault occurs, first check the points listed in the following pages. For further help and other troubleshooting tips, please also check out hdd FAQ at www.philips.com/support. If you are unable to find a solution by following these hints, consult your dealer or service center. -
Page 12: Safety And Maintenance
Traffic safety Do not use while driving or cycling as you may cause an accident. Optimizing playback performance We recommend to only use PHILIPS headphones for hdd. Music volume and / or quality is not guaranteed for other non-PHILIPS headphones. - Page 13 Backup your files. Please ensure that you retain the original files that you have down loaded to hdd. Philips is not responsible for any loss of content if the product becomes damaged or the hard disk not readable / legible.
-
Page 14: Technical Specifications
USB Connection USB2.0 full speed Display Black / White 128 x 96 pixels Backlight White LED Battery Replaceable (by Philips service) 750mAh Li-Ion Lens hardened optical glass Encasing Die-cast molded magnesium Connections Stereo headphone, Mini USB (B-type), DC charger input... - Page 15 English Power supply Built-in 750 mAh Lithium Ion (Li-Ion) rechargeable battery, replaceable by a Philips Service Center Multi-voltage AC adapter/charger AY3192 Battery playtime 10 hours using built-in rechargeable battery (4 hours fully charged, fast charge: 1 hour) Battery life may vary according to use.
-
Page 16: Copyright Information
Copyright information Unauthorized duplication and distribution of Internet/CD recordings violate copyright law and international treaties.You should use hdd and PHILIPS Digital Media Manager (DMM) software for personal use only. In the U.K and certain countries, the copying of material protected by copyright may require the permission of the copyright holders. - Page 17 About Digital Media Manager (DMM) Digital Media Manager contains all the necessary software components you need to work properly with your player. These include: - playlist creation - MP3 / WMA transfer for playback on player - paths and supporting link for software and player firmware upgrades.
- Page 18 Install DMM Insert the supplied CD into your computer’s CD-ROM drive. Follow screen instructions to begin and complete installation. Launch DMM to customize your settings when prompted to do so. Select DMM’s display language* Specify one or more music folder* *Actual display varies with use...
- Page 19 Launch DMM (player connected) Open the USB cover. Connect your player to your computer using the supplied USB cable. The USB connection screen will automatically appear. ✔ Please refer to your computer’s manual for the exact position of your USB port. Look for the USB symbol on the processing unit of your computer.
- Page 20 *Actual display varies with use The mainscreen (player connected) MY MUSIC: displays the contents of your music folders; click on to minimize / maximize. PLAYER MUSIC: displays the contents of your player; click on to minimize / maximize. New playlist: creates a new playlist. Import music: adds music or playlist.
- Page 21 *Actual display varies with use Selector panel and content panel Selector panel: arranges the display order of the content panel. Content panel: displays the contents of MY MUSIC, highlight to drag from MY MUSIC and drop to PLAYER MUSIC. Scroll bar Pull down menus Text area: type your search criteria here.
- Page 22 *Actual display varies with use Indicators on the content panel : expanded view, displays item contents in full. : track / playlist not on the player. Click to highlight an item. Press <Delete> on your keyboard to delete the highlighted item. : indicates track is playing by DMM.
- Page 23 IMPORTANT: KEEP A COPY OF YOUR ORIGINAL FILES! Please keep a copy of the original files transferred to your player. Philips is not responsible for any loss of content if the player is damaged or not readable.
- Page 24 IMPORTANT: KEEP A COPY OF YOUR ORIGINAL FILES! Please keep a copy of the original files transferred to your player. Philips is not responsible for any loss of content if the player is damaged or not readable.
- Page 25 *Actual display varies with use Add a Track to a Playlist by Drag and Drop Click on a track. Drag the selected track to a playlist. Hold the mouse button and move your selection to a destination playlist. Your selected track is now in the playlist. ✔...
-
Page 26: Create Playlists
*Actual display varies with use Create Playlists Click on to create a new playlist. Fill in the information in the pop up window. Follow screen instructions to save your new playlist. You can now drag more tracks to the new playlist. Import Playlists Click on to import a new playlist. -
Page 27: Delete Tracks And Playlists
*Actual display varies with use Delete Tracks and Playlists Click to highlight an item. Drag your selection to to delete. Alternatively, press <Delete> on your keyboard to delete your selection. ✔ Press and hold <Ctrl> on your keyboard and click to select more than one item. To select consecutive items, click the first item, press and hold <Shift>... -
Page 28: Edit Track Information
*Actual display varies with use Edit Track Information Click on a track to edit its information. Click on to call up the ID3 Tag Editor. Click on the text boxes of Track name, Track number, Artist, Album, Genre, Year, Comments to edit relevant information. Click on OK to save the information. -
Page 29: Search For Tracks
*Actual display varies with use Search for Tracks Type a search string in the Search field. Click on to start searching. You will see tracks that contain the search string. You can transfer, delete or drag and drop these tracks as described in previous sections. Click on the Selector panel to exit the search view. - Page 30 DMM Menus and Actions Use menus to customize DMM: File Refresh contents For updating the latest status of the selected window Start player link/ For disconnecting your player from DMM Stop player link Quit For exiting DMM Edit Track information For editing track information User and player name For changing the names of the user and your player...
- Page 31 Make Use of the Different Views DMM provides different view options. This is to minimize content refreshing time. There are a few ways to customize DMM views. Section icons You can click on to expand or minimize respective content panels. Border area Drag the border area between MY MUSIC and PLAYER MUSIC.
- Page 32 Display Tracks Your Way Sorting You can click on the contents header (Track, Artist, Album, Genre) to arrange music tracks according to the order you selected. Detailed / summary view Click on the next to the contents header to turn on / turn off detailed display of item contents.
-
Page 33: Firmware Upgrade
Upgrades We know you will enjoy your product for a long time. For best performance, we recommend that you regularly check in to www.philips.com/support for free upgrades of the latest software nd firmware for your product. Firmware Upgrade Your player is controlled by an internal program called firmware. You can download and install the latest firmware to keep your player updated. - Page 34 Uninstall DMM Close all applications, including DMM. From the Start menu, go to Control Panel. Select Add / Remove Programs. Select DMM from your currently installed programs to uninstall. For further information on uninstalling programs, please refer to Windows’ user manual.