
Related Manuals for Zanussi ZCG63250BA


Summary of Contents for Zanussi ZCG63250BA
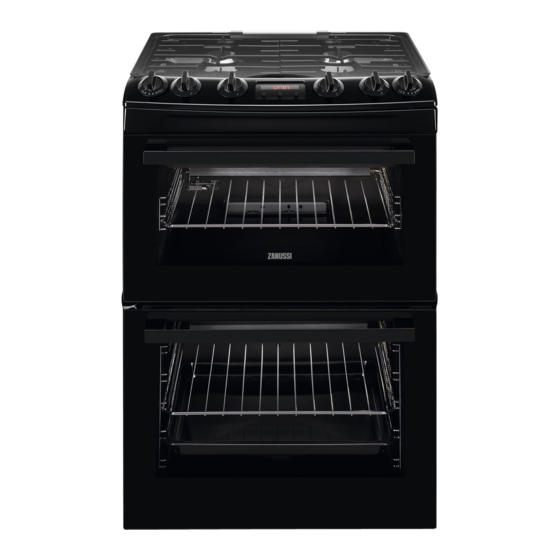
- Page 1 User Manual GETTING STARTED? EASY. ZCG63250BA ZCG63250WA ZCG63250XA EN User Manual Cooker...
-
Page 2: Safety Information
SAFETY INFORMATION Before the installation and use of the appliance, carefully read the supplied instructions. The manufacturer is not responsible for any injuries or damages that are the result of incorrect installation or usage. Always keep the instructions in a safe and accessible location for future reference. - Page 3 Do not install the appliance behind a decorative door in order to • avoid overheating. Do not install the appliance on a platform. • Do not operate the appliance by means of an external timer or • separate remote-control system. WARNING: Unattended cooking on a hob with fat or oil can be •...
-
Page 4: Safety Instructions
WARNING: Use only hob guards designed by the manufacturer • of the cooking appliance or indicated by the manufacturer of the appliance in the instructions for use as suitable or hob guards incorporated in the appliance. The use of inappropriate guards can cause accidents. -
Page 5: Care And Cleaning
• This appliance is not connected to a device, – do not put water directly into the hot which evacuates the products of combustion. appliance. Make sure to connect the appliance according – do not keep moist dishes and food in the to current installation regulations. -
Page 6: Internal Lighting
cavity walls and can cause corrosion. To • The type of light bulb or halogen lamp used for decrease the condensation operate the this appliance is for household appliances only. appliance for 10 minutes before cooking. Do not use it for house lighting. •... -
Page 7: Product Description
PRODUCT DESCRIPTION GENERAL OVERVIEW Control panel and hob Air vents for the cooling fan Grill Lamp Shelf support, removable Shelf positions COOKING SURFACE LAYOUT Steam outlet - number and position depend on the model Semi-rapid burner Auxiliary burner Rapid burner Semi-rapid burner COOKER CONTROL PANEL Knob for the top oven... -
Page 8: Before First Use
BEFORE FIRST USE After approximately 5 seconds, the flashing stops WARNING! Refer to Safety chapters. and the display shows the time of day. To change the time, press again and again until starts to flash. INITIAL CLEANING Remove all accessories and removable shelf PREHEATING supports from the oven. -
Page 9: Burner Overview
BURNER OVERVIEW A. Burner cap B. Burner crown C. Slots D. Thermocouple E. Ignition candle F. Burner body G. Hole for the ignition candle REPLACING BURNER PARTS TURNING THE BURNER OFF 1. Put carefully the burner crown on the burner To put the flame out, turn the knob to the off body. -
Page 10: Hob - Care And Cleaning
Diameter of cookware Diameter of cookware Burner Burner (mm) (mm) Rapid Auxiliary 80 - 160 180 - 240 / 260 1) When a single pot is used on the hob Semi-rapid 120 - 220 / 240 HOB - CARE AND CLEANING 2. -
Page 11: Main Oven Functions
Oven function Application Heat settings Heat settings for Conventional Cooking. 1 - 8 Ignition To activate the top oven. 1) 1 - 155 °C, 2 - 170°C, 3 - 185°C, 4 -200°C, 5 - 220°C, 6 - 250°C, 7 - 275°C, 8 - 295°C MAIN OVEN FUNCTIONS Oven function Application... -
Page 12: Cooling Fan
TURNING OFF THE OVEN BURNERS To put out the flame, turn the knob to the off • All accessories have small position. indentations at the top of the right and left side to increase safety. The USING THE GRILL indentations are also anti-tip 1. -
Page 13: Oven - Clock Functions
OVEN - CLOCK FUNCTIONS DISPLAY A. Minute minder indicator B. Time display C. Time of day indicator BUTTONS Button Function Description MINUS To set the time. CLOCK To set a clock function. PLUS To set the time. SETTING THE MINUTE MINDER 4. -
Page 14: Tips On Baking
Cakes and pastries at different heights do not Trays in the oven can twist during baking. When always brown equally. There is no need to change the trays become cold again, the distortions the temperature setting if an unequal browning disappear. - Page 15 Baking in tins Preheating Food Heat setting Time (min) Shelf position Accessories time (min) Madeira cake 85 - 100 Round tins on wire shelf Rich fruit 115 - 125 Round tin on cake wire shelf Christmas 200 - 240 Round tin on cake wire shelf Victoria...
- Page 16 Preheating Food Heat setting Time (min) Shelf position Accessories time (min) Milk pudding 90 - 120 Tray on wire shelf Soufflés 20 - 30 Ceramic ra- mekins on wire shelf Beef Casser- 150 - 180 Casserole on wire shelf Lamb Cas- 150 - 180 Casserole on serole...
-
Page 17: Grilling In General
Preheating Food Heat setting Time (min) Shelf position Accessories time (min) Fish trout 40 - 40 Trivet in Grill-/Roast- ing pan Pork / Veal / 80 -90 Grill-/Roast- ing pan Chicken 80 - 90 Trivet in Grill-/Roast- ing pan Turkey / 150 - 180 Trivet in Goose... -
Page 18: Information For Test Institutes
Preheating Grilling time Shelf posi- Food Accessories time (min) (min) tion Pork chops 25 - 35 Trivet in Grill-/ Roasting pan Whole trout / Mackerel 20 - 30 Trivet in Grill-/ Roasting pan Plaice / Cod fillet 20 - 30 Trivet in Grill-/ Roasting pan Kebabs... -
Page 19: Oven - Care And Cleaning
Top oven - grill Preheating time Food Time (min) Shelf position Accessories (min) Beef burgers 15 - 20 first side Trivet with Grill-/ 5 - 10 second Roasting pan side Toast 2 - 3 Trivet with Grill-/ Roasting pan OVEN - CARE AND CLEANING WARNING! Refer to Safety chapters. -
Page 20: Removing And Cleaning The Door Glasses - Main Oven
2. Pull the rear end of the shelf support away from the side wall and remove it. 3. Pull the door trim to the front to remove it. 4. Remove the glass panels. To install the panels, do the same steps in reverse. REMOVING AND CLEANING THE DOOR GLASSES - MAIN OVEN The door glass in your product can be... -
Page 21: Replacing The Lamp
REPLACING THE LAMP 1. Turn the lamp glass cover counterclockwise to remove it. WARNING! Risk of electric shock. 2. Clean the glass cover. The lamp can be hot. 3. Replace the oven lamp with a suitable 300 °C heat-resistant oven lamp. 1. -
Page 22: Installation
Problem Possible cause Remedy Steam and condensation settle You left the dish in the oven for Do not leave the dishes in the on the food and in the cavity of too long. oven for longer than 15 - 20 the oven. -
Page 23: Gas Burners
2. Mark the position of the wall and this gives anchor point for the stability chain. Dimension less than 400 LEVELLING OF THE APPLIANCE 180 mm 30 mm OTHER TECHNICAL DATA WARNING! These instructions are only valid in the countries whose symbols appear on this booklet's Use small feet on the bottom of appliance to set the cover. -
Page 24: Pressure Test
WARNING! Only a qualified and Dimension competent person can do the gas installation. Before you connect te gas, disconnect the appliance from the electricity supply or switch off the fuse in the fuse box. Close the primary valve of the gas supply. Supply piping should not be less than R3/8. -
Page 25: Electrical Installation
WARNING! The power cable must not touch the part of the appliance shaded in the illustration. ENERGY EFFICIENCY PRODUCT INFORMATION FOR HOB ACCORDING TO EU 66/2014 Model identification ZCG63250BA ZCG63250WA ZCG63250XA Type of hob Hob inside Freestanding Cooker Number of gas burners... -
Page 26: Environmental Concerns
6.46 MJ/cycle Number of cavities Heat source Top oven: 36 l Volume Main oven: 83 l Type of oven Oven inside Freestanding Cooker ZCG63250BA 62.1 kg Mass ZCG63250WA 62.7 kg ZCG63250XA 62.4 kg EN 15181 Measuring method of the energy Keep breaks between baking as short as possible consumption of gas fired ovens. - Page 28 WWW.ZANUSSI.COM/SHOP...