
Related Manuals for AEG SKE818E9ZC


Summary of Contents for AEG SKE818E9ZC
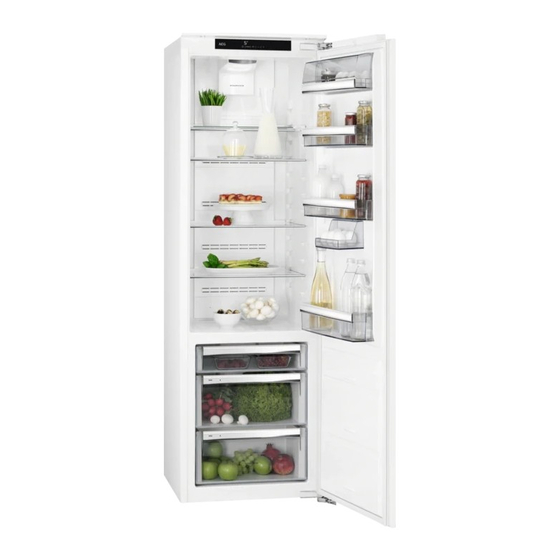
- Page 1 SKE818E9ZC User Manual Refrigerator Istruzioni per l’uso Frigorifero USER MANUAL...
-
Page 2: Table Of Contents
11. INFORMATION FOR TEST INSTITUTES............... 19 FOR PERFECT RESULTS Thank you for choosing this AEG product. We have created it to give you impeccable performance for many years, with innovative technologies that help make life simpler – features you might not find on ordinary appliances. Please spend a few minutes reading to get the very best from it. - Page 3 ENGLISH usage. Always keep the instructions in a safe and accessible location for future reference. 1.1 Children and vulnerable people safety This appliance can be used by children aged from 8 • years and above and persons with reduced physical, sensory or mental capabilities or lack of experience and knowledge if they have been given supervision or instruction concerning the use of the appliance in a...
-
Page 4: Safety Instructions
– refrigerator, so that it is not in contact with or drip onto other food. WARNING: Keep ventilation openings, in the • appliance enclosure or in the built-in structure, clear of obstruction. - Page 5 ENGLISH • Before carrying out any operations on access to the mains plug after the the appliance (e.g. reversing the installation. door), remove the plug from the • Do not pull the mains cable to power socket. disconnect the appliance. Always pull •...
-
Page 6: Installation
• Before maintenance, deactivate the are only available to professional appliance and disconnect the mains repairers, and that not all spare parts plug from the mains socket. are relevant for all models. • This appliance contains hydrocarbons • Door gaskets will be available for 10 in the cooling unit. - Page 7 ENGLISH 3.1 Dimensions Overall dimensions Space required in use 1769 1780 1) the height, width and depth of the appliance including the handle, plus the space necessary for 1) the height, width and depth of the appliance free circulation of the cooling air without the handle and feet Overall space required in use Space required in use...
- Page 8 • The appliance must be earthed. The power supply cable plug is provided Overall space required in use with a contact for this purpose. If the domestic power supply socket is not 1085 earthed, connect the appliance to a...
-
Page 9: Control Panel
ENGLISH 4. CONTROL PANEL Display Mode Temperature warmer button ON/OFF Temperature colder button It is possible to change predefined Mode and temperature colder button for sound of buttons by pressing together a few seconds. Change is reversible. 4.1 Display A. Timer indicator B. - Page 10 1. Press Mode until the corresponding the Coolmatic function to chill the icon appears. products more rapidly and to avoid The ChildLock indicator flashes. warming the other food which is already 2. Press OK to confirm.
-
Page 11: Daily Use
ENGLISH 5. DAILY USE 5.1 Positioning the door shelves To permit storage of food packages of various sizes, the door shelves can be placed at different heights. 1. Gradually pull the shelf up until it comes free. 2. Reposition as required. Do not move the glass shelf above the vegetable drawer to ensure correct air... -
Page 12: Hints And Tips
The drawers marked with water drop symbols: can be used according to the desired storage conditions independently of each other with lower or higher humidity. Regulation for each drawer is separate and is controlled using the slide valve at the front of the drawer. - Page 13 ENGLISH • To avoid the cross-contamination place in a special drawer (vegetable between cooked and raw food, cover drawer). the cooked food and separate it from • It is advisable not to keep the exotic the raw one. fruits like bananas, mangos, papayas •...
- Page 14 Type of food Air humidity adjustment Storage time Spring onions, radishes, as- up to 7 days “humid” paragus, spinach Fruit up to 1 month “humid” Pears, dates (fresh), straw- berries, peaches Plums up to 21 days “humid” rhubarb, gooseberries...
-
Page 15: Care And Cleaning
ENGLISH to return to room temperature will improve the texture and flavour. 7. CARE AND CLEANING 1. Clean the inside and accessories with WARNING! lukewarm water and some neutral Refer to Safety chapters. soap. 2. Regularly check the door seals and 7.1 Cleaning the interior wipe them clean to ensure they are clean and free from debris. - Page 16 Problem Possible cause Solution There is no voltage in the Connect a different electrical mains socket. appliance to the mains sock- et. Contact a qualified elec- trician. The appliance is noisy. The appliance is not suppor- Check if the appliance ted properly.
- Page 17 ENGLISH Problem Possible cause Solution The lamp is defective. Contact the nearest Author- ized Service Centre. There is too much frost and The door is not closed cor- Refer to "Closing the door" ice. rectly. section. The gasket is deformed or Refer to "Closing the door"...
- Page 18 Problem Possible cause Solution The door is not closed cor- Refer to "Closing the door" rectly. section. The food products' tempera- Let the food products tem- ture is too high. perature decrease to room temperature before storage. Many food products are Store less food products at stored at the same time.
-
Page 19: Noises
ENGLISH 9. NOISES SSSRRR! BRRR! CLICK! HISSS! BLUBB! 10. TECHNICAL DATA The technical information is situated in other documents provided with this the rating plate on the internal side of appliance. the appliance and on the energy label. It is also possible to find the same The QR code on the energy label information in EPREL using the link https://eprel.ec.europa.eu and the... - Page 20 12. ENVIRONMENTAL CONCERNS appliances marked with the symbol Recycle materials with the symbol with the household waste. Return the Put the packaging in relevant containers product to your local recycling facility or to recycle it. Help protect the contact your municipal office.
-
Page 21: Informazioni Di Sicurezza
11. INFORMAZIONI PER GLI ISTITUTI DI PROVA............40 PER RISULTATI PERFETTI Grazie per aver scelto di acquistare questo prodotto AEG. Lo abbiamo creato per fornirvi prestazioni impeccabili per molti anni, grazie a tecnologie innovative che vi semplificheranno la vita - funzioni che non troverete sulle normali apparecchiature. - Page 22 Conservare sempre le istruzioni in un luogo sicuro e accessibile per poterle consultare in futuro. 1.1 Sicurezza dei bambini e delle persone vulnerabili Questa apparecchiatura può essere usata da bambini • a partire dagli 8 anni e da adulti con limitate capacità...
- Page 23 ITALIANO non aprire la porta per lunghi periodi; – pulire regolarmente le superfici che possono venire – a contatto con gli alimenti e i sistemi di drenaggio accessibili; conservare la carne e il pesce crudo in contenitori – adeguati in frigorifero, in modo che non venga a contatto con altri alimenti e non goccioli su altri alimenti.
-
Page 24: Istruzioni Di Sicurezza
2. ISTRUZIONI DI SICUREZZA 2.1 Installazione 2.2 Collegamento elettrico AVVERTENZA! AVVERTENZA! L’installazione Rischio di incendio e scossa dell'apparecchiatura deve elettrica. essere eseguita da personale qualificato. AVVERTENZA! In fase di posizionamento • Rimuovere tutti i materiali di dell'apparecchiatura, imballaggio. verificare che il cavo di •... - Page 25 ITALIANO ispezionata esclusivamente da personale qualificato. L'apparecchiatura contiene gas • Controllare regolarmente lo scarico infiammabile, isobutano (R600a), un gas dell'apparecchiatura e, se necessario, naturale con un alto livello di pulirlo. L'ostruzione dello scarico può compatibilità ambientale, Fare causare un deposito di acqua di attenzione a non danneggiare il circuito sbrinamento sul fondo refrigerante che contiene isobutano.
-
Page 26: Installazione
• Non danneggiare i componenti dell'unità refrigerante che si trovano vicino allo scambiatore di calore. 3. INSTALLAZIONE AVVERTENZA! AVVERTENZA! Fare riferimento ai capitoli Fissare l'apparecchio sulla sicurezza. secondo le istruzioni di installazione per evitare il AVVERTENZA! rischio di instabilità... - Page 27 ITALIANO 3.3 Posizionamento Dimensioni complessive Questa apparecchiatura deve essere installata in una posizione interna 1769 asciutta e ben ventilata. Questa apparecchiatura è destinata ad essere utilizzata a temperature ambiente che vanno da 10°C a 38°C. 1) l'altezza, la larghezza e la profondità dell'appa- In caso di dubbi sul luogo di recchio senza l'impugnatura e i piedini installazione...
-
Page 28: Pannello Dei Comandi
3.6 Possibilità di invertire la min. 5 cm porta 200 cm Fare riferimento al documento separato con le istruzioni per l'installazione e l'inversione della porta. ATTENZIONE! In ogni fase di inversione min. 200 cm della porta proteggere il pavimento da graffi con un materiale resistente. - Page 29 ITALIANO 4.2 Accensione 1. Premere Mode finché appare l'icona corrispondente. 1. Inserire la spina nella presa di La spia Coolmatic lampeggia. alimentazione. 2. Premere OK per confermare. 2. Premere il tasto ON/OFF La spia Coolmatic viene visualizzata. dell'apparecchiatura se il display è Questa funzione si arresta spento.
-
Page 30: Utilizzo Quotidiano
1. Premere Mode finché non appare segnale acustico. Premere OK per l'icona corrispondente. spegnere il segnale acustico e porre fine La spia ChildLock lampeggia. alla funzione. 2. Premere OK per confermare. Per terminare la funzione, ripetere la La spia ChildLock viene visualizzata. - Page 31 ITALIANO Questo modello è dotato di un (come pesce, carne, frutti di mare ecc.) in contenitore a dimensione variabile quanto mantiene i relativi valori per la conservazione che può essere nutrizionali ed un'elevata umidità più a spostato lateralmente. lungo rispetto al normale frigorifero. 5.2 Ripiani rimovibili 5.4 Controllo dell'umidità...
-
Page 32: Consigli E Suggerimenti Utili
Il simbolo sulla parete raffreddamento degli alimenti e una laterale dell'apparecchiatura indica la temperatura più uniforme nel vano. zona più fredda del frigorifero. Questo dispositivo si attiva Se compare OK (A), mettere il cibo automaticamente quando necessario. - Page 33 ITALIANO • Per evitare lo spreco di cibo, la nuova • Le verdure come pomodori, patate, scorta di cibo dovrebbe essere cipolle e aglio non devono essere sempre collocata dietro a quella conservate in frigorifero. vecchia. • Burro e formaggio: riporli in un apposito contenitore sottovuoto 6.3 Consigli per la oppure avvolgerli in un foglio di...
- Page 34 Tipo di alimento Regolazione dell'umidità Tempo di conservazione Frutta fino a 1 mese "umido" Pere, datteri (freschi), frago- le, pesche Prugne fino a 21 giorni "umido" rabarbaro, uva spina Mele (che non risentono del fino a 20 giorni "umido"...
-
Page 35: Pulizia E Cura
ITALIANO acquisiscono una consistenza e un sapore migliori. 7. PULIZIA E CURA 2. Ispezionare regolarmente le AVVERTENZA! guarnizioni della porta ed eliminare Fare riferimento ai capitoli con un panno umido tracce di sporco sulla sicurezza. e residui. 3. Risciacquare e asciugare 7.1 Pulizia dell'interno accuratamente. - Page 36 Problema Causa possibile Soluzione Assenza di tensione nella Collegare alla presa di ali- presa di alimentazione. mentazione un altro appa- recchio elettrico. Rivolgersi ad un elettricista qualificato. L'apparecchiatura è rumoro- L'apparecchiatura non è ap- Controllare se l'apparecchia- poggiata in modo corretto tura è...
- Page 37 ITALIANO Problema Causa possibile Soluzione La porta non si apre facil- Hai cercato di ri-aprire la Attendere alcuni secondi fra mente. porta subito dopo averla la chiusura e la riapertura chiusa. della porta. La lampadina non si accen- La lampadina è in modalità Chiudere e riaprire la porta.
- Page 38 Problema Causa possibile Soluzione Impossibile impostare la La funzione "Coolmatic" è Disattivare manualmente la temperatura. attiva. "Coolmatic" oppure aspet- tare finché la funzione si di- sattiva automaticamente per impostare la temperatura. Vedere la sezione "Funzione Coolmatic". La temperatura all'interno La temperatura non è...
-
Page 39: Rumori
ITALIANO Problema Causa possibile Soluzione Problema al sensore della Contattare il Centro di Assi- Appare il simbolo temperatura. stenza Autorizzato più vicino anziché i numeri sul di- (il sistema refrigerante conti- splay della temperatura. nuerà a mantenere gli ali- menti freddi, ma non sarà possibile regolare la tempe- ratura). -
Page 40: Dati Tecnici
10. DATI TECNICI I dati tecnici sono riportati sulla targhetta energetica come riferimento insieme al dei dati applicata sul lato esterno manuale d'uso e a tutti gli altri dell'apparecchiatura e sull'etichetta dei documenti forniti con questo valori energetici. apparecchio. - Page 41 ITALIANO...
- Page 42 www.aeg.com...
- Page 43 ITALIANO...
- Page 44 www.aeg.com/shop...