Advertisement
Quick Links
Thank you for purchasing a Sealey product. Manufactured to a high standard, this product will, if used according to these
instructions, and properly maintained, give you years of trouble free performance.
IMPORTANT: PLEASE READ THESE INSTRuCTIONS CAREFuLLY. NOTE THE SAFE OPERATIONAL REQuIREMENTS, WARNINGS & CAuTIONS. uSE THE
PRODuCT CORRECTLY AND WITH CARE FOR THE PuRPOSE FOR WHICH IT IS INTENDED. FAILuRE TO DO SO MAY CAuSE DAMAGE AND/OR
PERSONAL INJuRY AND WILL INVALIDATE THE WARRANTY. KEEP THESE INSTRuCTIONS SAFE FOR FuTuRE uSE.
1. SAFETY
disconnect the tyre inflator from the air supply before changing accessories, servicing or performing any maintenance.
Keep children and unauthorised persons away from the work area.
Keep the gauge lcd screen and tyre inflator clean.
replace damaged parts with genuine sealey parts. unauthorised parts may be dangerous and will invalidate the warranty.
check condition of the batteries regularly.
check tyre pressures when they are cold.
D O NOT direct the tyre inflator outlet at yourself or others including animals.
D O NOT carry the tyre inflator by the hose, or tug the hose from the air supply.
D O NOT use the tyre inflator for a task which it is not designed to perform.
D O NOT operate the tyre inflator when you are tired or under the influence of intoxicating medicines, drugs or alcohol.
D O NOT operate the tyre inflator if parts are missing or the lcd is damaged, this could be dangerous.
DO NOT drop or bump the tyre inflator.
DO NOT get the tyre inflator wet.
DO NOT operate near appliances with strong magnetic fields, corrosive gasses or corrosive liquids.
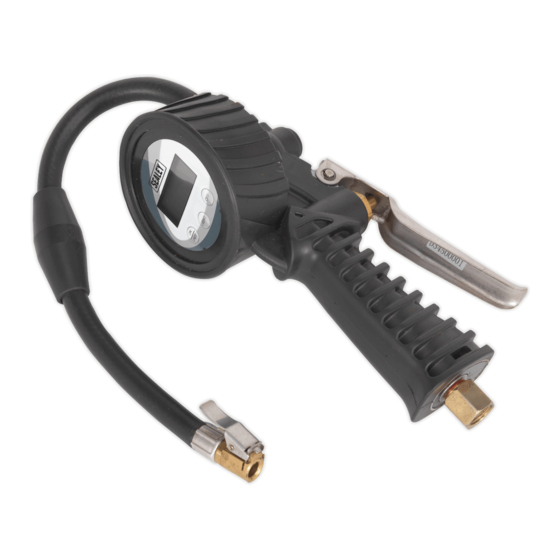
2. INTRODuCTION
composite body with backlit lcd digital display and rubber protector. select between bar, psi, kg/cm² or kPa. supplied with 300mm rubber hose
and clip-on connector. Powered by 2 x cr2032 batteries (supplied)
3. SPECIFICATION
Model No: . . . . . . . . . . . . . . . . . . . . . . . . . . . . . . . . . . . . . . . . . . . . . . . SA392
range:. . . . . . . . . 5-150psi(0.344-10.34bar, 0.35-10.55kg/cm², 34.5-1034kPa)
Pressure units:. . . . . . . . . . . . . . . . . . . . . . . . . . . . . . . . . psi, bar, kg/cm², kPa
Air supply maximum:. . . . . . . . . . . . 150psi, 10.34bar, 10.55kg/cm², 1034kPa
Inlet size: . . . . . . . . . . . . . . . . . . . . . . . . . . . . . . . . . . . . . . . . . . . . . . .1/4"BsP
Batteries (lithium button cell):. . . . . . . . . . . . . . . . . . . . 2 x cr2032 (supplied)
4. INSTALLATION
4.1.
AIR SuPPLY
recommended hook-up is shown in fig.1. (to avoid possible damage to the gauge see note in fig.1 *IMPORTANT!)
WARNING! ensure the air supply is clean and dry. A suitable filter/water trap will be required in the supply line.
4.1.1.
An air line pressure up to 150psi can be delivered to the tyre inflator. Please note the maximum available pressure cannot exceed the
supply pressure.
4.1.2.
drain the air tank daily. Water in the air line must be kept to a minimum.
4.1.3.
clean the air inlet filter weekly.
4.1.4.
the minimum hose diameter should be 1/4" I.d. and fittings must have the same inside dimensions.
4.1.5.
Keep hoses away from heat, oil and sharp edges. check hoses for wear, and make certain that all connections are secure.
*IMPORTANT!
Hold with spanner when fitting nipple.
SA392
CLIP-ON
CONNECTOR
5. OPERATION
5.1
To Inflate
5.1.1.
Be aware of the tyre pressure requirement for the vehicle.
5.1.2.
switch on (fig.2) the tyre inflator and the lcd will display zero. Press and hold the "on_unIt" icon to select the units, then release.
5.1.3.
depress the small clip on the tyre inflator connector and plug on to the tyre valve, then release the clip.
Note!
Always turn on the gauge before connecting to the tyre valve.
5.1.4.
depress the operating lever fully, momentarily and release to display the tyre pressure.
5.1.5.
depress the operating lever for an appropriate period. release the lever frequently to check the pressure avoiding over inflation.
5.2.
To Deflate
5.2.1.
depress the small clip on the tyre inflator connector and plug on to the tyre valve, then release the clip.
5.2.2.
depress the operating lever partially until air can be heard escaping. Hold for an appropriate period. Fully depress the operating lever
momentarily, then release to display new pressure.
IMPORTANT! Always fully depress the operating lever momentarily and release before reading the tyre pressure. If the gauge
switches off whilst attached to the tyre valve, remove the inflator from the valve before switching back on again.
© Jack sealey limited
InstructIons For:
DIGITAL TYRE INFLATOR WITH
CLIP-ON CONNECTOR
SA392
model no:
Original Language Version
(150psi max)
sA392
fig. 1
Issue: 1 - 04/07/14
Advertisement


