Table of Contents
Advertisement
OWNER'S MANUAL
COMMERCIAL DRYER
Please read this manual carefully before operating
your dryer and retain it for future reference.
MODEL
GD1329CGS / GD1329CES
GD1329CGD / GD1329CED
GD1329CGW / GD1329CEW
GD1329CGS2 / GD1329CES2
GD1329CGD2 / GD1329CED2
GD1329CGW2 / GD1329CEW2
P/NO. : MFL62512817
GD1329QGS / GD1329QES
GD1329QGD / GD1329QED
GD1329QGW / GD1329QEW
GD1329QGS2 / GD1329QES2
GD1329QGD2 / GD1329QED2
GD1329QGW2 / GD1329QEW2
GD1329LGS / GD1329LES
GD1329LGD / GD1329LED
GD1329LGW / GD1329LEW
GD1329LGS2 / GD1329LES2
GD1329LGD2 / GD1329LED2
GD1329LGW2 / GD1329LEW2
www.lg.com
Advertisement
Table of Contents

Related Manuals for LG GD1329CGW


Summary of Contents for LG GD1329CGW
- Page 1 MODEL GD1329CGS / GD1329CES GD1329QGS / GD1329QES GD1329LGS / GD1329LES GD1329CGD / GD1329CED GD1329QGD / GD1329QED GD1329LGD / GD1329LED GD1329CGW / GD1329CEW GD1329QGW / GD1329QEW GD1329LGW / GD1329LEW GD1329CGS2 / GD1329CES2 GD1329QGS2 / GD1329QES2 GD1329LGS2 / GD1329LES2 GD1329CGD2 / GD1329CED2...
-
Page 2: Product Features
PRODUCT FEATURES PRODUCT FEATURES OUTSTANDING PERFORMANCE The dryer features the largest capacity, quick drying times, quiet operation, and an energy-saving system. ARTISTIC DESIGN Modern front panel look and big clear glass door make your dryer look stylish EASY OF USE An entire selection of user-friendly functions makes operating the dryer easy. -
Page 3: Important Safety Instructions
IMPORTANT SAFETY INSTRUCTIONS IMPORTANT SAFETY INSTRUCTIONS READ ALL INSTRUCTIONS BEFORE USE WARNING For your safety, the information in this manual must be followed to minimize the risk of fire or explosion, electric shock, or to prevent property damage, injury to persons, or death. Your Safety and the safety of others is very important. -
Page 4: California Safe Drinking Water And Toxic Enforcement Act
IMPORTANT SAFETY INSTRUCTIONS IMPORTANT SAFETY INSTRUCTIONS READ ALL INSTRUCTIONS BEFORE USE WARNING For your safety, the information in this manual must be followed to minimize the risk of fire or explosion, electric shock, or to prevent property damage, injury to persons, or death. •... -
Page 5: Grounding Instructions
IMPORTANT SAFETY INSTRUCTIONS IMPORTANT SAFETY INSTRUCTIONS READ ALL INSTRUCTIONS BEFORE USE WARNING For your safety, the information in this manual must be followed to minimize the risk of fire or explosion, electric shock, or to prevent property damage, injury to persons, or death. GROUNDING INSTRUCTIONS This appliance must be grounded. - Page 6 IMPORTANT SAFETY INSTRUCTIONS IMPORTANT SAFETY INSTRUCTIONS READ ALL INSTRUCTIONS BEFORE USE WARNING For your safety, the information in this manual must be followed to minimize the risk of fire or explosion, electric shock, or to prevent property damage, injury to persons, or death. SAFETY INSTRUCTIONS FOR INSTALLATION Exhaust/Ducting: •...
-
Page 7: Safety Instructions For Connecting Electricity
IMPORTANT SAFETY INSTRUCTIONS IMPORTANT SAFETY INSTRUCTIONS READ ALL INSTRUCTIONS BEFORE USE WARNING For your safety, the information in this manual must be followed to minimize the risk of fire or explosion, electric shock, or to prevent property damage, injury to persons, or death. SAFETY INSTRUCTIONS FOR CONNECTING ELECTRICITY WARNING To reduce the risk of fire, electric shock, or injury to persons when using this appliance, follow basic precautions,... -
Page 8: Table Of Contents
CONTENTS CONTENTS PRODUCT FEATURES 7. Regular priced dryer cycle time 8. Special priced dryer cycle time 9. Value of coin 1 10. Value of coin 2 (Set up for top off price IMPORTANT SAFETY and e-suds coin pulse) INSTRUCTIONS 11. Penny increment pricing offset 12. -
Page 9: Specifications
SPECIFICATIONS SPECIFICATIONS ■ Type : Electric and Gas Dryer ■ Rating : Please refer to the rating label regarding detailed information. ■ Single dryer size : 686mm(W) x 764mm(D) x 983mm(H) 27in(W) x 30in(D) x 38.7in(H) ■ Stack dryer size : 686mm(W) x 764mm(D) x 1954(H) 27in(W) x 30in(D) x 76.9in(H) ■... -
Page 10: Identification
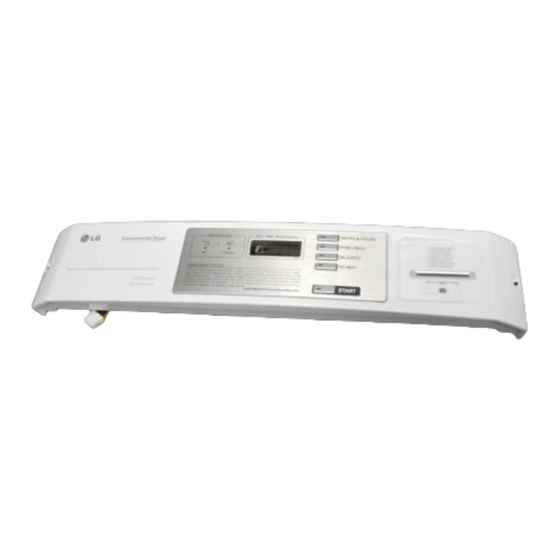
IDENTIFICATION IDENTIFICATION ■ CARD TYPE - SIDE BY SIDE(GD1329CGS, GD1329CES, GD1329CGS2, GD1329CES2) - STACK UPPER(GD1329CGW, GD1329CEW, GD1329CGW2, GD1329CEW2) - STACK LOWER(GD1329CGD, GD1329CED, GD1329CGD2, GD1329CED2) ■ OPL TYPE - SIDE BY SIDE(GD1329LGS, GD1329LES, GD1329LGS2, GD1329LES2) - STACK UPPER(GD1329LGW, GD1329LEW, GD1329LGW2, GD1329LEW2) - STACK LOWER(GD1329LGD, GD1329LED, GD1329LGD2, GD1329LED2) 1. - Page 11 IDENTIFICATION ■ COIN TYPE - SIDE BY SIDE(GD1329QGS, GD1329QES, GD1329QGS2, GD1329QES2) ■ COIN TYPE - STACK UPPER(GD1329QGW, GD1329QEW, GD1329QGW2, GD1329QEW2) ■ COIN TYPE - STACK UPPER(GD1329QGD, GD1329QED, GD1329QGD2, GD1329QED2) 1. DISPLAY LED 3. START BUTTON 2. CYCLE BUTTON 4. STATUS LED...
- Page 12 IDENTIFICATION STATUS LED DISPLAY LED CYCLE BUTTON START BUTTON DISPLAY LED START BUTTON The Display shows the vend price, remaining time, and The Start LED flashes when the full vend price has been programming options. satisfied then the cycle has been chosen or the machine Error codes are also displayed here.
-
Page 13: Operating Your Dryer
OPERATING YOUR DRYER OPERATING YOUR DRYER 1. Ready mode 4. Top off (To add more time) 1) Coin / Card type ■ After a debit card is inserted, the operating time can - The cycle LEDs flash at the same time, when the be increased to 15 minutes/25¢... -
Page 14: Programming Mode
PROGRAMMING MODE PROGRAMMING MODE 1. Programming mode You can check machine information or change setting on Program setup or Diagnostic test. There are two methods that you can enter programming mode. ■ How to enter “Programming mode” ■ How to use button You can enter programming mode only for Idle state You can change Dryer vend price, cycle time and Cycle and pause state. -
Page 15: Programming Mode - Coin/Card
PROGRAMMING MODE PROGRAMMING MODE - COIN/CARD ■ Algorithm Flow Chart shows how to control programming mode. ■ Before program set, check the structure of programming mode. 1. Turn on/off toggle switch or Insert the service card to entering set up mode. 2. -
Page 16: Programming Mode - Opl
PROGRAMMING MODE PROGRAMMING MODE - OPL ■ Algorithm Flow Chart shows how to control programming mode. ■ Before program set, check the structure of programming mode. OPL Type 1) Push the High Temp. and Low Temp. button at the same time. 2) Push the Med Temp. -
Page 17: Programming Mode - Setup Mode
PROGRAMMING MODE PROGRAMMING MODE - Setup Mode Setup Mode : (display) ■ You can change dryer vend price, cycle time, and cycle parameters, etc. ■ Entering set up mode • Coin type - Turn on/off toggle switch. • Card type - Insert the service card. •... -
Page 18: How To Change Special Price
PROGRAMMING MODE 2. How to change special price Entering set up Button Display mode. You will see LqC1 Press the High Temp. button. Press the Med Temp. or the Low Temp. button until appears in the display. Press the Start button. Press the Med Temp. -
Page 19: How To Enter The Fea1
PROGRAMMING MODE 3. How to enter the Entering set up Button Display mode. You will see LqC1 Press the High Temp. button. Press the Med Temp. or the Low Temp. button until appears in the display. Press the Start button. Press the Med Temp. -
Page 20: Special Price Day Setup
PROGRAMMING MODE 3-1. Special price day setup Entering set up Button Display mode. You will see LqC1 Press the High Temp. button. Press the Med Temp. or the Low Temp. button until appears in the display. Press the Start button. Press the Med Temp. -
Page 21: Vend Type Setup - Card Type Or Coin Type Setup
PROGRAMMING MODE 3-2. Vend type setup - card type or coin type setup Entering set up Button Display mode. You will see LqC1 Press the High Temp. button. Press the Med Temp. or the Low Temp. button until appears in the display. Press the Start button. -
Page 22: Top Off Apply Or Not Setup
PROGRAMMING MODE 3-3. Top off apply or not setup Entering set up Button Display mode. You will see LqC1 Press the High Temp. button. Press the Med Temp. or the Low Temp. button until appears in the display. Press the Start button. Press the Med Temp. -
Page 23: How To Enter The Special Price Day Setup
PROGRAMMING MODE 4. How to enter the special price day setup Entering set up Button Display mode. You will see LqC1 Press the High Temp. button. Press the Med Temp. or the Low Temp. button until appears in the display. Press the Start button. -
Page 24: How To Change Sunday
PROGRAMMING MODE 4-1. How to change sunday Entering set up Button Display mode. You will see LqC1 Press the High Temp. button. Press the Med Temp. or the Low Temp. button until appears in the display. Press the Start button. Press the Med Temp. -
Page 25: Special Price Beginning Time Setup
PROGRAMMING MODE 5. Special price beginning time setup Entering set up Button Display mode. You will see LqC1 Press the High Temp. button. Press the Med Temp. or the Low Temp. button until appears in the display. Press the Start button. Press the Med Temp. -
Page 26: Special Price Ending Time Setup
PROGRAMMING MODE 6. Special price ending time setup Entering set up Button Display mode. You will see LqC1 Press the High Temp. button. Press the Med Temp. or the Low Temp. button until appears in the display. Press the Start button. Press the Med Temp. -
Page 27: 27 7. Regular Priced Dryer Cycle Time
PROGRAMMING MODE 7. Regular priced dryer cycle time Entering set up Button Display mode. You will see LqC1 Press the High Temp. button. Press the Med Temp. or the Low Temp. button until appears in the display. Press the Start button. Press the Med Temp. -
Page 28: 28 8. Special Priced Dryer Cycle Time
PROGRAMMING MODE 8. Special priced dryer cycle time Entering set up Button Display mode. You will see LqC1 Press the High Temp. button. Press the Med Temp. or the Low Temp. button until appears in the display. Press the Start button. Press the Med Temp. -
Page 29: 29 9. Value Of Coin
PROGRAMMING MODE 9. Value of coin 1 Entering set up Button Display mode. You will see LqC1 Press the High Temp. button. Press the Med Temp. or the Low Temp. button until appears in the display. Press the Start button. Press the Med Temp. - Page 30 PROGRAMMING MODE 10. Value of coin 2 (Set up for top off price and e-suds coin pulse) Entering set up Button Display mode. You will see LqC1 Press the High Temp. button. Press the Med Temp. or the Low Temp. button until appears in the display.
-
Page 31: Penny Increment Pricing Offset
PROGRAMMING MODE 11. Penny increment pricing offset This represents the cent increment price offset used when debit card is setup. Entering set up Button Display mode. You will see LqC1 Press the High Temp. button. Press the Med Temp. or the Low Temp. button until appears in the display. -
Page 32: Top Off Time
PROGRAMMING MODE 12. Top off time Entering set up Button Display mode. You will see LqC1 Press the High Temp. button. Press the Med Temp. or the Low Temp. button until appears in the display. Press the Start button. Press the Med Temp. or the Low Temp. button until appears in the display. -
Page 33: Beep Volume
PROGRAMMING MODE 13. Beep volume Entering set up Button Display mode. You will see LqC1 Press the High Temp. button. Press the Med Temp. or the Low Temp. button until appears in the display. Press the Start button. Press the Med Temp. or the Low Temp. button until appears in the display. -
Page 34: Time To Keep The Coin (Use Only For Coin Type)
PROGRAMMING MODE 14. Time to keep the coin (Use only for coin type) Entering set up Button Display mode. You will see LqC1 Press the High Temp. button. Press the Med Temp. or the Low Temp. button until appears in the display. Press the Start button. -
Page 35: Programming Mode - Test Mode
PROGRAMMING MODE PROGRAMMING MODE - Test Mode Diagnostic tests : (display) This program has been added for testing the dryer and detecting errors. Entering the test mode Data Machine Button Display Description Name 1. Entering Insert service card (card type), Turn on/off toggle switch programming (Coin type). -
Page 36: Lqc1
PROGRAMMING MODE Pressing the Start button cycles to the next test function. Number of times the Start Checking point Display button is pressed None LqC 1 ■ COIN/CARD TYPE Version and code of machine (All LED on) CARD/COIN - ELECTRIC TYPE : US:OE machine - Display US:OE or US:Og and gU:XX - GAS TYPE : US:Og alternately. -
Page 37: Factory Reset - Eept
PROGRAMMING MODE 2. Factory reset - EEPt After a factory reset, all values are reset to the default values. Entering set up Button Display mode. You will see LqC1 Press the Med Temp. or the Low Temp. Button until appears in the display. Press the Start button. -
Page 38: Time Set Up
PROGRAMMING MODE 3. Time Set Up Entering set up Button Display mode. You will see LqC1 Press the Med Temp. or the Low Temp. button until appears in the display. Press the Start button. The display cycles through 2000 --> 0101 --> Sat --> 0000. Press the Start button. -
Page 39: Courtesy Cycle
PROGRAMMING MODE 4. Courtesy cycle Courtesy cycle is like a complimentary cycle given to the customer when the dryer goes out of order when the customer has made the payment to dry one’s clothes. Entering set up Button Display mode. You will see LqC1 Press the Med Temp. -
Page 40: Cycle Kill
PROGRAMMING MODE 5. Cycle Kill ■ Coin type Entering set up Button Display mode. You will see LqC1 Press the Med Temp. or the Low Temp. Button until appears in the display. Press the Start button. Press the Med Temp. button until appears in the display. -
Page 41: Programming Mode - Collect Mode
PROGRAMMING MODE PROGRAMMING MODE - Collect Mode Collect Information Data : CLCt (display) The dryer collects the usage data so that the owner can check various information like number of various cycles used, how many times card or coins used, etc. Entering the collect mode Data Name Button... - Page 42 PROGRAMMING MODE ■ Collect Mode Data lists Abbreviation Meaning Description ACFC Accumulated Token Cycles Number of Token cycles (0~65535) ACrt Accumulated Run Time Number of Running minutes ( 0~65535 ) Itnr Interval No Runs Itnr is not available in dryer. Ittb Interval Trouble Cycles Ittb is not available in dryer.
-
Page 43: Maintenance
MAINTENANCE MAINTENANCE ■ Regular cleaning Cleaning the Lint Filter Always clean the lint filter after every cycle. WARNING To reduce the risk of fire, electric shock, or injury to persons when using this appliance, follow basic precautions, including the following: •... -
Page 44: Stack Machine Installation Instructions
STACK MACHINE INSTALLATION INSTRUCTIONS STACK MACHINE INSTALLATION INSTRUCTIONS 1. SUITABLE MODEL FOR STACKING Stack type Upper Dryer Lower Dryer Lower Washer GD1329CGW/GD1329CEW GD139CGD/GD1329CED GCW1069CD GD1329QGW/GD1329QEW GD1329QGD/GD1329QED GCW1069QD GD1329LGW2/GD1329LEW2 GD1329LGD/GD1329LED GCW1069LD Model Name GD1329CGW2/GD1329CEW2 GD139CGD2/GD1329CED2 GCW1069CD2 GD1329QGW2/GD1329QEW2 GD1329QGD2/GD1329QED2 GCW1069QD2 GD1329LGW2/GD1329LEW2 GD1329LGD2/GD1329LED2 GCW1069LD2 2. - Page 45 STACK MACHINE INSTALLATION INSTRUCTIONS 3. Stacking the machine - Install two sliding brackets on the top plate of lower washer. - Remove the legs from the leg brackets. - Remove the four(4) leg brackets from the bottom of upper dryer. - Assemble the four(4) slide pads on the base.
-
Page 46: Error Mode
ERROR MODE / POWER FAIL RECOVERY / DEFAULT DRYER SETTINGS ERROR MODE ■ Meaning of Error Codes that LED displays during occurrence or problem. Dryer error code PROBLEM POSSIBLE CAUSE SOLUTION It is displayed when thermistor is opened or Thermistor should be replaced. shorted It is displayed when thermistor temperature have increased about 17 degrees for...