
Related Manuals for LG LMVH1750


Summary of Contents for LG LMVH1750
-
Page 1: Microwave Oven
OWNER’S MANUAL & COOKING GUIDE MICROWAVE OVEN Please read this owner’s manual thoroughly before operating LMVH1750SB LMVH1750ST LMVH1750SW 3828W5A4629 www.lg.com... -
Page 2: Precautions To Avoid Possible Exposure To Excessive Microwave Energy
Thank you for purchasing an LG microwave oven. Please record the model number and serial number of this unit for future reference. We also suggest you record the details of your contact with LG (LG Electronics U.S.A., Inc.) concerning this unit. -
Page 3: Table Of Contents
PRECAUTIONS TO AVOID POSSIBLE EXPOSURE TO EXCESSIVE MICROWAVE ENERGY... TABLE OF CONTENTS ... SAFETY INFORMATION MICROWAVE COOKING TIPS ... OPERATION ... TABLE OF CONTENTS COOKING ... MAINTENANCE... TROUBLESHOOTING... WARRANTY ... Inside Back Cover... -
Page 4: Safety
IMPORTANT SAFETY INSTRUCTIONS The safety instructions below will tell you how to use your oven and avoid harm to yourself or damage to your oven. WARNING - To reduce the risk of burns, electric shock, fire, injury to persons, or exposure to excessive microwave energy. - Page 5 Wash hands after handling.
-
Page 6: Information
Please read this owner’s manual. It will tell you how to use all the fine features of this microwave oven. LOCATION OF MODEL NUMBER To request service information or replacement parts, the service center will require the complete model number of your microwave oven. The number is on the oven front as shown in the illustration below. -
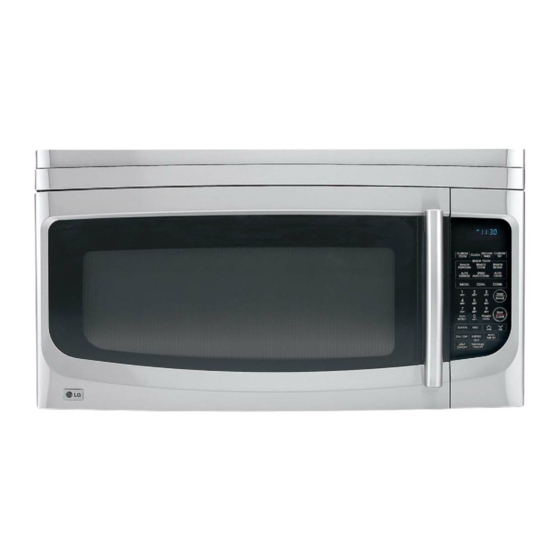
Page 7: Microwave Oven Features
MICROWAVE OVEN FEATURES Your microwave oven is designed to make your cooking experience as enjoyable and productive as possible. To get you up and running quickly, the following is a list of the oven’s basic features: 1. Convection Rack 2. Metal Tray/Drip Pan 3. - Page 8 INFORMATION CONTROL PANEL FEATURES Your microwave oven control panel lets you select the desired cooking function quickly and easily. All you have to do is touch the necessary Command Pad. The following is a list of all the Command and Number Pads located on the control panel.
- Page 9 1. DISPLAY: The Display includes a clock and indicators to tell you time of day, cooking time settings, and cooking functions selected. 2. CUSTOM COOK: Touch this pad to recall one cooking instruction previously programmed into memory. 3. CLOCK: Touch this pad to enter the time of day. 4.
-
Page 10: Microwave Cooking Tips
MICROWAVE COOKING TIPS Amount of food • If you increase or decrease the amount of food you prepare, the time it takes to cook that food will also change. For example, if you double a recipe, add a little more than half the original cooking time. Check for doneness and, if necessary, add more time in small increments. -
Page 11: Using Aluminum Foil
MICROWAVE COOKING TIPS Using aluminum foil Metal containers should not be used in a microwave oven. There are, however, some exceptions. If you have purchased food which is prepackaged in an aluminum foil container, refer to the instructions on the package. - Page 12 MICROWAVE COOKING TIPS Cooking Comparison Guide Cooking with your new oven offers a wide variety of food preparation options: microwave cooking, convection cooking, and combination cooking. Microwave cooking uses very short, high-frequency radio waves. The movement of the microwaves through the food generates heat and cooks most foods faster than regular methods, while retaining their natural texture and moisture.
-
Page 13: Cookware Guide
MICROWAVE COOKING TIPS COOKWARE GUIDE Microwave Cooking Most heat-resistant, non-metallic cookware is safe for use in your microwave oven. To test cookware before using, follow these steps: 1. Place the empty cookware in the microwave oven. 2. Measure 1 cup of water in a glass measuring cup and place it in the oven beside the cookware. -
Page 14: How To Use Accessories
MICROWAVE COOKING TIPS HOW TO USE ACCESSORIES Glass Turntable Metal Tray Notes : • Do not operate the oven when it is empty except preheating in the convection mode only. NEVER operate the microwave while the oven is empty. Metal Rack MICROWAVE CONVECTION - 14 -... -
Page 15: Operation
LEARN ABOUT YOUR MICROWAVE OVEN This section discusses the concepts behind microwave cooking and introduces you to the basics you need to know to operate your microwave oven. Please read this information before using your oven. CAUTION To avoid risk of personal injury or property damage, do not use stoneware, aluminum foil, metal utensils, or metal trimmed utensils in the oven. -
Page 16: Vent Fan Auto Time Set
TIMER Your microwave oven can be used as a timer. You can set up to 99 minutes and 99 seconds. Example: To set 3 minutes. 1. Touch TIMER. 2. Enter the time by using the number key pad. 3. Touch START/ENTER. When the time is over, you will hear seven beeps and END will display. - Page 17 TURNTABLE ON/OFF For best cooking results, leave the turntable on. It can be turned off for large dishes. Touch TURNTABLE ON/OFF to turn the turntable on or off. NOTES: • This option is not available in sensor cook and defrost modes. •...
-
Page 18: Cooking At Lower Power Levels
COOKING AT LOWER POWER LEVELS HIGH power cooking does not always give you the best results with foods that need slower cooking, such as roasts, baked goods, or custards. Your oven has 10 power settings in addition to HIGH. Example: To cook food for 7 minutes 30 seconds at 70% power. -
Page 19: Cooking Guide For Lower Power Levels
COOKING GUIDE FOR LOWER POWER LEVELS The nine power levels in addition to HIGH allow you to choose the best power level for the food you are cooking. Below are listed all the power levels, MICROWAVE OUTPUT POWER LEVEL HIGH OPERATION examples of foods best cooked at each level, and the amount of microwave power you are using. -
Page 20: Soften Table
SOFTEN The oven uses low power to soften foods (butter, ice cream, cream cheese, and frozen juice) See the following table. Example for quart of ice cream. 1. Touch SOFTEN. 2. Choose the category. Touch 2 for ice cream. 3. Touch 2. 4. -
Page 21: Weight Conversion Table
AUTO DEFROST Five defrost sequences are preset in the oven. The auto defrost feature provides you with the best defrosting method for frozen foods. The Auto Defrost Table will show you which defrost sequence is recommended for the food you are defrosting. For added convenience, the Auto Defrost includes a built-in beep mechanism that reminds you to check, turn over, separate, or rearrange to get... -
Page 22: Auto Defrost Table
AUTO DEFROST TABLE Meat setting FOOD SETTING BEEF Ground Beef, Remove thawed portions with fork. MEAT Bulk Turn over. Return remainder to oven. Ground Beef, MEAT Separate and rearrange. Patties Round Steak Turn over. Cover warm areas with MEAT aluminum foil. Tenderloin MEAT Turn over. - Page 23 AUTO DEFROST TABLE (CONT.) Poultry setting FOOD SETTING CHICKEN Whole POULTRY Turn over (finish defrosting breast- (up to 6 lbs) side down). Cover warm areas with aluminum foil. Cut-up Separate pieces and rearrange. Turn over. Cover warm areas with aluminum foil. CORNISH HENS Turn over.
-
Page 24: Defrosting Tips
AUTO DEFROST TABLE (CONT.) Bread setting FOOD SETTING Bagel BREAD Turn over and rearrange. Dinner Roll Muffin Hamburger Hot Dog Bun Slices of Bread Loaf of Bread DEFROSTING TIPS • When using Auto Defrost, the weight to be entered is the net weight in pounds and tenths of pounds (the weight of the food minus the container). -
Page 25: Sensor Operating Instructions
SENSOR OPERATING INSTRUCTIONS Sensor Cook allows you to cook most of your favorite foods without selecting cooking times and power levels. The oven automatically determines required cooking time for each food item. When the internal sensor detects a certain amount of humidity coming from the food, it will tell the oven how much longer to heat. -
Page 26: Sensor Cook Table
SENSOR COOK TABLE TOUCH PAD CATEGORY NUMBER Baked Potato Frozen Vegetable Fresh Vegetable Canned Vegetable Frozen Entree Rice SENSOR REHEAT TABLE TOUCH PAD CATEGORY NUMBER Dinner Plate Soup/Sauce Casserole Pizza Slice OPERATION DIRECTION Pierce each potato with a fork and place the oven tray around the edge, at least one inch apart. -
Page 27: Auto Cook
AUTO COOK Auto Cook lets you heat common microwave-prepared foods without selecting cooking times and power levels. Auto Cook has preset cook powers for 6 food functions. Example: To cook bacon 2 slices. 1. Touch AUTO COOK. 2. Choose food category. 3. -
Page 28: Tips For Convection Cooking
TIPS FOR CONVECTION COOKING This section gives you cooking instructions and procedures for operating each convection function. Please read these instructions carefully. Convection cooking circulates hot air through the oven cavity with a fan. The constantly moving air surrounds the food to heat the outer portion quickly, creating even browning and sealed-in flavor by the constant motion of hot air over the food surfaces. - Page 29 CONVECTION During convection cooking, a heating element is used to raise the temperature of the air inside the oven. Convection cooking temperature ranges from 100°F to 450°F. It is best to preheat the oven when convection cooking. Note: Lower oven temperature by 25°F from package recommended temperature, instructions.
-
Page 30: Tips For Combination Cooking
TIPS FOR COMBINATION COOKING This section gives you instructions to operate each combination cooking function. Please read these instructions carefully. Sometimes combination microwave-convection cooking is suggested to get the best cooking results since it shortens the cooking time for foods that normally need a long time to cook. This cooking process also leaves meats juicy on the inside and crispy on the outside. -
Page 31: Speed Auto Combination
SPEED AUTO COMBINATION This oven can cook food without entering cooking time or power level on combination mode. SPEED AUTO COMBINATION has 4 food categories. See the SPEED AUTO COMBINATION CHART on this page for the settings available. For best results, place food on the rack. When cooking meats, use the metal tray/drip pan to catch drippings. -
Page 32: Cooking
CONVECTION BAKING GUIDELINES 1. Always use the metal rack when convection baking. Place food directly on rack or place in metal tray and then place tray on rack. 2. Aluminum pans conduct heat quickly. For most convection baking, light, shiny finishes give best results because they prevent overbrowning in the time it takes to cook the center areas. - Page 33 CONVECTION BAKING GUIDELINES (CONT'D) FOOD Pies, Frozen Pie Pastries Meringue-Topped Two-Crust Quiche Pastry Shell Meat, Chicken, Casseroles Seafood Combinations Pasta Potatoes, scalloped Vegetable Convenience Frozen Bread Dough Foods Frozen Entree Frozen Pizza Rising Crust Frozen Pizza French Fries Crinkle Frozen Waffle Frozen Cheese Sticks Frozen Turnovers Meat Loaf...
- Page 34 MEAT ROASTING GUIDELINES FOR CONVECTION COOKING FOOD Beef Ribs (2 to 4 lbs.) Rare Medium Well Boneless Ribs, Top Sirloin Rare Medium Well Beef Tenderloin Rare Medium Pot Roast (2 Chuck, Rump Meat Loaf (2 lbs.) Canned (3-lb. fully cooked) Butt (5-lb.
-
Page 35: Combination Roast Cooking Guide
COMBINATION ROAST COOKING GUIDE FOOD Beef Turn over after half of cooking time. Ribs (2 to 4 lbs.) Rare Medium Well Boneless Ribs, Top Sirloin Rare Medium Well Beef Tenderloin Rare Medium Chuck, Rump or Pot Roast (2 (Use cooking bag for best results.) Turn over after half of cooking time. -
Page 36: Combination Bake Cooking Guide
COMBINATION BAKE COOKING GUIDE FOOD Pies, Pastries Quiche Convenience Frozen Entrée Foods Frozen Pizza Rolls, Egg Rolls Pizza Vegetables Baked Potatoes COOKING OVEN TEMP. TIME, MIN. 425°F 15 to 17 375°F 39 to 43 450°F 4 to 6 450°F 23 to 26 450°F 36 to 40 - 36 -... - Page 37 HEATING / REHEATING GUIDE To heat or reheat successfully in a microwave oven, it is important to follow several guidelines. Measure the amount of food in order to determine the time needed to reheat. Arrange the food in a circular pattern for best results.
-
Page 38: Fresh Vegetable Guide
FRESH VEGETABLE GUIDE VEGETABLE AMOUNT Artichokes 2 medium (8 oz.each) 4 medium Asparagus, 1 Ib. Fresh, Spears Beans, Green 1 lb. and Wax Beets, Fresh 1 Ib. Broccoli, Fresh, 1 Ib. Spears Cabbage, 1 Ib. Fresh, Chopped Carrots, Fresh, 2 cups Sliced Cauliflower, 1 lb. -
Page 39: Maintenance
CARING FOR YOUR MICROWAVE OVEN To make sure your microwave oven looks good and works well for a long time, you should maintain it properly. For proper care, please follow these instructions carefully. For interior surfaces: Wash often with warm, sudsy water and a sponge or soft cloth. -
Page 40: Cleaning The Grease Filters
CLEANING THE GREASE FILTERS 1. Unplug microwave oven. 2. To remove grease filters, slide each filter to the side. Pull filters downward and push to the other side. The filter will drop out. 3. Soak grease filters in hot water and a mild detergent. - Page 41 COOKTOP/COUNTERTOP LIGHT REPLACEMENT 1. Unplug the microwave oven. 2. Remove the bulb cover mounting screws. 3. Replace bulb(s) with candelabra-base 20 watt bulb. 4. Replace bulb cover and mounting screw. 5. Plug in the microwave oven. OVEN LIGHT REPLACEMENT 1. Unplug the microwave oven. 2.
-
Page 42: Microwave Utensil Guide
MICROWAVE UTENSIL GUIDE OVENPROOF GLASS (treated for high intensity heat): utility dishes, loaf dishes, pie plates, cake plates, liquid measuring cups, casseroles and bowls without metallic trim. CHINA: bowls, cups, serving plates, and platters without metallic trim. PLASTIC: Plastic wrap (as a cover)-- lay the plastic wrap loosely over the dish and press it to the sides. -
Page 43: Troubleshooting
BEFORE CALLING FOR SERVICE Check the following list to be sure a service call is really necessary. A quick reference of this manual as well as reviewing additional information on items to check may prevent an unneeded service call. If nothing on the oven operates: •... - Page 44 MEMO...
- Page 45 MEMO...
- Page 46 MEMO...
- Page 47 LMVH1750SB/LMVH1750ST/LMVH1750SW...
- Page 48 Thank you for purchasing an LG microwave oven.
- Page 49 USA, Consumer User USA, Commercial User CANADA...