
Related Manuals for Beko HPI 51012 B


Summary of Contents for Beko HPI 51012 B
- Page 1 Induction Hob User Manual HPI 51012 B EN / TH / ID / VN 01M-8910423200-5120-01 / 01M-8910463200-5120-01 / 01M-8910473200-5120-01...
-
Page 2: Meanings Of The Symbols
Please read this manual first! Dear Customers! Thank you for preferring a Beko product. We hope that you get the best results from your product which has been manufactured with high quality and state-of-the-art technology. Therefore, please read this entire user manual and all other accompanying documents carefully before using the product and keep it as a reference for future use. - Page 3 CONTENTS ENGLISH 4-14 3 / EN Induction Hob / User Manual...
-
Page 4: Important Instructions And Warnings For Safety And Environment
Important instructions and warnings for safety and environment This section contains safety in- - By clients in hotels, and other structions that will help protect residential type environments; from risk of personal injury or prop- - Bed and Breakfast type environ- erty damage. -
Page 5: Product Safety
Important instructions and warnings for safety and environment age and protection as specified in In case of any damage, switch off • the “Technical specifications”. Have the product and disconnect it from the grounding installation made by the mains. To do this, turn off the a qualified electrician while using fuse at home. - Page 6 Important instructions and warnings for safety and environment als close to the product as the sides the bottom of the pot can cause the may become hot during use. pot to move. Therefore, make sure that the oven surface and bottom of Keep all ventilation slots clear of ob- •...
-
Page 7: Disposing Of The Old Product
Important instructions and warnings for safety and environment Ensure liquid or moisture is not acces- 1.6 Disposing of the old • sible to the electrical connection point. product Compliance with RoHS Directive: 1.4 Intended use The product you have purchased complies This product is designed for domes- with EU RoHS Directive (2011/65/EU). -
Page 8: General Information
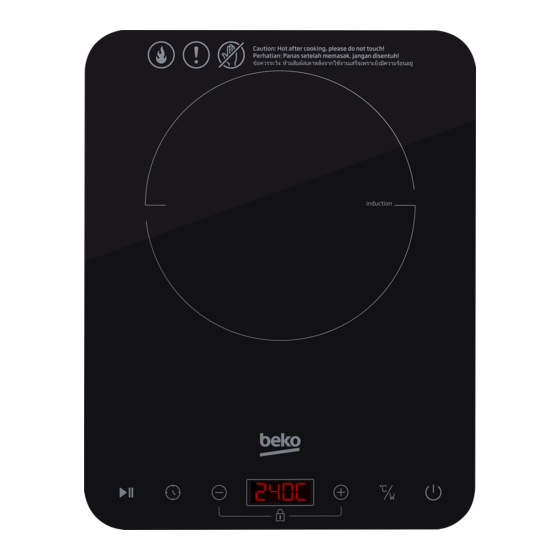
General information 2.1 Overview 2.2 Technical data 1. Ceramic plate 2. Control bar 3. LED display Applied voltage/ 220-240 V ~ 50-60Hz frequency 4. Fans (exhaust) 5. Ring Rated power 2000 W Dimension (cm) 29x37x4 cm Net weight approx. 2.4 kg 8 / EN Induction Hob / User Manual... -
Page 9: Control Panel
General information 2.3 Control panel 1. Pause / Go button • Allow the appliance to cool completely. 2. Timer button • The buttons on the control panel are touch-sen- 3. “-”- button sitive. This means that there is no need to press 4. -
Page 10: Setting The Temperature
General information 2.8 Setting the timer • The single hob is equipped with overheating protection. If the cookware becomes too hot, • First set the power or temperature. the appliance switches off automatically and • Press the timer button to activate the timer the error message “E5”... - Page 11 General information 2.10 Pause/go function • Press the pause/go button, the indicator will light up. The cooker stops heating. Press the pause/go button again, the indicator will disap- pear. The cooker returns to heat. 2.11 Overflowed water protection • The water overflowed from a pot or a pan and covers any three buttons, the cooker will stop working.
-
Page 12: Compatible Cookware
Compatible cookware Iron oil frying pan Stainless steel pot Iron pan Iron kettle Enamel stainless Enamel cooking Iron plate steel kettle utensil • Only use cookware that is mentioned • After first use, white stains may ap- in this instruction manual: flat bot- pear on the bottom of the cookware tom pots/pans with16-26 cm base used. -
Page 13: Cleaning And Maintenance
Cleaning and maintenance WARNING: Before performing cleaning or maintenance, turn off the appliance, disconnect the mains plug from the wall socket and wait until the appliance has completely cooled down. • Do not immerse the appliance in water or other liquids. -
Page 14: Troubleshooting
Troubleshooting If the appliance is not working properly, please follow these steps: 1. Check that you have followed the operating instructions precisely and correctly. 2. Check whether the table below offers a feasible solution. 3. Check that all fuses are intact. Error Problem Solution... - Page 15 àµÒáÁ‹ à ËÅç ¡ ä¿¿‡ Ò ¤Ù ‹ Á × Í ¡ÒÃ㪌 § Ò¹ EN / TH / ID / VN...
- Page 16 ¢Í¢Íº¾ÃÐ¤Ø ³ ·Õ è · ‹ Ò ¹àÅ× Í ¡«× é Í ¼ÅÔ µ ÀÑ ³ ± ¢ ͧ Beko àÃÒËÇÑ § Ç‹ Ò ·‹ Ò ¹¨Ðä´Œ Ã Ñ º ¼ÅÅÑ ¾ ¸ · Õ è ´ Õ · Õ è...
- Page 17 3 / TH àµÒáÁ‹ à ËÅç ¡ ä¿¿‡ Ò / ¤Ù ‹ Á × Í ¡ÒÃ㪌 § Ò¹...
- Page 18 ¤í Ò á¹Ð¹í Ò ·Õ è Ê í Ò ¤Ñ Þ áÅФí Ò àµ× Í ¹´Œ Ò ¹¤ÇÒÁ»ÅÍ´ÀÑ Â áÅÐÊÔ è § áÇ´ÅŒ Í Á - ·Õ è ¾ Ñ ¡ ·Õ è Á Õ ¡ ÒÃàµÃÕ Â ÁÍÒËÒÃઌ Ò ãËŒ à¹×...
- Page 19 ¢Œ Í á¹Ð¹í Ò ·Õ è Ê í Ò ¤Ñ Þ áÅФí Ò àµ× Í ¹´Œ Ò ¹¤ÇÒÁ»ÅÍ´ÀÑ Â áÅÐÊÔ è § áÇ´ÅŒ Í Á ¡ÒÃµÔ ´ µÑ é § ÊÒÂ´Ô ¹ ¨ÐµŒ Í §´í Ò à¹Ô ¹ ¡ÒÃâ´Âª‹ Ò §ä¿ •...
- Page 20 ¢Œ Í á¹Ð¹í Ò ·Õ è Ê í Ò ¤Ñ Þ áÅФí Ò àµ× Í ¹´Œ Ò ¹¤ÇÒÁ»ÅÍ´ÀÑ Â áÅÐÊÔ è § áÇ´ÅŒ Í Á • Í‹ Ò ãËŒ Á Õ Ç Ñ µ ¶Ø ã ´æ » ´ ¡Ñ é ¹ ·Õ è ª ‹ Í §ÃкÒÂÍÒ¡ÒÈ â»Ã´µÃǨÊͺãËŒ...
- Page 21 ¤í Ò á¹Ð¹í Ò ·Õ è Ê í Ò ¤Ñ Þ áÅФí Ò àµ× Í ¹´Œ Ò ¹¤ÇÒÁ»ÅÍ´ÀÑ Â áÅÐ ÊÔ è § áÇ´ÅŒ Í Á 1.4 ÇÑ µ ¶Ø » ÃÐʧ¤ ¡ ÒÃ㪌 § Ò¹ 1.7 ¤ÇÒÁÊÍ´¤ÅŒ Í §¡Ñ º ¢Œ Í ¡í Ò Ë¹´¢Í§ WEEE •...
- Page 22 ¢Œ Í ÁÙ Å ·Ñ è Ç ä» ¢Œ Í ÁÙ Å ·Ñ è Ç ä» 2.1 Ê‹ Ç ¹µ‹ Ò §æ ¢Í§àµÒáÁ‹ à ËÅç ¡ ä¿¿‡ Ò 2.2 ¢Œ Í ÁÙ Å ·Ò§à·¤¹Ô ¤ 1. ˹Œ Ò àµÒà«ÃÒÁÔ ¡ áç´Ñ...
- Page 23 ¢Œ Í ÁÙ Å ·Ñ è Ç ä» 2.3 ἧ¤Çº¤Ø Á • »Ø † Á ¡´º¹á¼§¤Çº¤Ø Á ໚ ¹ »Ø † Á ·Õ è ä ǵ‹ Í ¡ÒÃÊÑ Á ¼Ñ Ê 1. »Ø † Á ËÂØ ´ ªÑ è Ç ¢³Ð/àÃÔ è Á ·í Ò §Ò¹ 2.
- Page 24 ¢Œ Í ÁÙ Å ·Ñ è Ç ä» • àµÒáÁ‹ à ËÅç ¡ ä¿¿‡ Ò ÁÕ ¿ ˜ § ¡ ª Ñ è ¹ ¡Òû‡ Í §¡Ñ ¹ ¤ÇÒÁÃŒ Í ¹ • ÊÑ Á ¼Ñ Ê »Ø † Á +/- à¾× è Í à¾Ô è Á ËÃ× Í Å´ÍØ ³ ËÀÙ Á Ô ¤ÃÑ...
- Page 25 ¢Œ Í ÁÙ Å ·Ñ è Ç ä» Ë¹Œ Ò ¨Í LED ¨ÐáÊ´§¤‹ Ò àÃÔ è Á µŒ ¹ ¤× Í "OFF" 2.9 ¡ÒÃÅç Í ¤àµÒáÁ‹ à ËÅç ¡ ä¿¿‡ Ò ·‹ Ò ¹ÊÒÁÒöÅç Í ¤àµÒáÁ‹ à ËÅç ¡ ä¿¿‡ Ò à¾× è Í »‡ Í §¡Ñ ¹ ¡ÒÃà»...
- Page 26 Compatible cookware ÀÒª¹Ð·í Ò ÍÒËÒÃ·Õ è à ËÁÒÐÊÁ ¡Ãззʹ·Õ è · í Ò ¨Ò¡àËÅç ¡ ËÁŒ Í Êáµ¹àÅÊ ¡ÃзÐàËÅç ¡ ¡Ò¹í é Ò ·í Ò ¨Ò¡àËÅç ¡ Iron oil frying pan Stainless steel por Iron pan Iron kettle Enamel stainless Enamel cooking ¡Ò¹í...
- Page 27 ¡Ò÷í Ò ¤ÇÒÁÊÐÍÒ´áÅСÒô٠á ÅÃÑ ¡ ÉÒ ¡‹ Í ¹·í Ò ¤ÇÒÁÊÐÍÒ´ËÃ× Í ¤í Ò àµ× Í ¹: ´Ù á ÅÃÑ ¡ ÉÒàµÒáÁ‹ à ËÅç ¡ ä¿¿‡ Ò ãËŒ · ‹ Ò ¹ » ´ ÊÇÔ µ ª à ¤Ã× è Í §¶Í´»ÅÑ ê ¡ ä¿ÍÍ¡¨Ò¡ ൌ...
- Page 28 ¡ÒÃá¡Œ ä ¢»˜ Þ ËÒ ËÒ¡àµÒáÁ‹ à ËÅç ¡ ä¿¿‡ Ò ·í Ò §Ò¹¼Ô ´ »¡µÔ â»Ã´»¯Ô º Ñ µ Ô µ ÒÁ¢Ñ é ¹ µÍ¹àËÅ‹ Ò ¹Õ é : 1. µÃǨÊͺãËŒ á ¹‹ 㠨Nj Ò ·‹ Ò ¹ä´Œ » ¯Ô º Ñ µ Ô µ ÒÁ¤í Ò á¹Ð¹í Ò ã¹¤Ù ‹ Á × Í ¡ÒÃ㪌 § ҹ͋ Ò §à¤Ã‹ § ¤ÃÑ ´ áÅж٠¡ µŒ Í §ËÃ× Í äÁè 2.
-
Page 29: Panduan Pengguna
Kompor Listrik Panduan Pengguna HPI 51012 B IMKG. 2515.11.2020 EN / TH / ID / VN 01M-8910423200-5120-01 / 01M-8910463200-5120-01 / 01M-8910473200-5120-01... - Page 30 Harap baca panduan pengguna ini terlebih dahulu! Pelanggan yang terhormat, Terima kasih telah membeli produk Beko. Kami harap Anda mendapatkan hasil terbaik dari produk kami yang telah dipabrikasi dengan kualitas tinggi dan teknologi canggih. Oleh karena itu, harap baca seluruh panduan pengguna ini dan seluruh do kumen yang menyertainya dengan benar sebelum menggunakan produk tersebut dan simpan sebagai referensi untuk penggunaan dimasa yang akan datang.
- Page 31 KONTEN BAHASA INDONESIA 4-14 3 / ID Kompor Listrik / Panduan Pengguna...
- Page 32 Instruksi penting untuk keselamatan dan lingkungan Oleh klien di hotel dan lingkungan Bagian berisi petunjuk hunian lainnya. keselamatan yang akan membantu Tempat akomodasi Bed & Breakfast. melindungi dari resiko cedera pada diri sendiri atau kerusakan properti. Tidak cocok digunakan untuk industri. Kegagalan untuk mengikuti petunjuk Prosedur pemasangan dan perbaikan harus •...
- Page 33 Instruksi penting untuk keselamatan dan lingkungan kontak/saluran yang diarde dengan tegangan • Jika terjadi kerusakan, matikan produk dan dan perlindungan sebagaimana ditentukan lepaskan dari listrik. Untuk melakukan ini, dalam "Spesifikasi teknis". Pemasangan arde matikan sekring di rumah. harus dilakukan oleh ahli listrik yang Pastikan nilai sekring kompatibel dengan •...
- Page 34 Instruksi penting untuk keselamatan dan lingkungan sisinya dapat menjadi panas selama eksternal atau sistem kendali jarak jauh terpisah. penggunaan. Tekanan uap yang terbentuk karena • • Jauhkan semua slot ventilasi dari kelembapan permukaan kompor atau penghalang. dibawah pot bisa menyebabkan pot Jangan gunakan pembersih uap untuk bergerak.
- Page 35 Instruksi penting untuk keselamatan dan lingkungan 1.7 Kepatuhan dengan Jangan gunakan kabel rusak atau kabel • Petunjuk WEEE tegang. Pembuangan Produk Pastikan cairan atau uap air tidak dapat • Limbah: diakses ke titik sambungan listrik. Produk ini sesuai dengan aturan EU WEEE 1.4 Saran Penggunaan (2012/19/EU).
-
Page 36: Informasi Umum
Informasi Umum 2.1 Gambaran Pelat keramik 2.2 Technical data Pengontrol Tampilan LED 220-240 V ~ 50-60Hz Tegangan/frekuensi Kipas yang diterapkan (pembuangan) 2000 W Daya Ring 29x37x4 cm Dimensi (cm) approx. 2.4 kg Berat alat 8 / ID Kompor Listrik / Panduan Pengguna... - Page 37 Informasi Umum 2.3 Control panel Biarkan peralatan sampai menjadi benar-benar dingin. Tombol pause/go Tombol-tombol pada panel kontrol peka terhadap Tombol pengaturan waktu sentuhan. Hal ini berarti bahwa tidak perlu Tombol “-“ (minus) menekannya dengan kuat. Gunakan ujung jari Anda, Tampilan jendela bukan dengan kuku Anda, saat menekannya.
- Page 38 Informasi Umum 2.8 Pengaturan Waktu pesan error "E5" atau "E6" muncul pada tampilan. Langkah pertama atur daya atau suhu. Tunggu beberapa menit dan biarkan kompor menjadi dingin jika alat sudah terlalu panas. Tekan tombol timer untuk mengaktifkan mode timer. ...
- Page 39 Informasi Umum 2.10 Fungsi pause/go Tekan tombol pause/go, indikator akan menyala. Kompor berhenti melakukan proses pemanasan. Tekan kembali tombol pause/go, indikator akan menghilang pada layar tampilan. Kompor akan kembali melakukan proses pemanasan. 2.11 Perlindungan terhadap air yang meluap Jika air yang meluap dari panci atau wajan dan menutupi ketiga tombol apapun, kompor akan berhenti bekerja.
- Page 40 Peralatan masak yang kompatibel Wajan minyak besi Baja tahan karat Ketel besi Wajan besi Ketel baja tahan Alat masak Pelat besi karat enamel enamel Gunakan hanya peralatan masak yang Setelah penggunaan pertama, noda putih disebutkan dalam instruksi panduan ini: mungkin akan muncul pada bagian bawah Fiat bawah panci / wajan dengan peralatan masak yang digunakan.
- Page 41 Pembersihan dan pemeliharaan WARNING: Sebelum melakukan pembersihan atau perawatan, buat alat menjadi off terlebih dahulu, cabut steker listrik dari stopkontak dinding dan tunggu sampai alat sudah benar-benar dingin. Jangan merendam alat di dalam air atau cairan lainnya. Jangan pernah menggunakan bahan...
-
Page 42: Penyelesaian Masalah
Penyelesaian masalah Jika alat tidak berfungsi dengan benar, ikuti langkah-langkah berikut: 1. Periksa apakah Anda telah mengikuti instruksi pengoperasian dengan tepat dan benar. 2. Periksa apakah tabel di bawah ini menawarkan solusi yang layak. 3. Periksa apakah semua sekring masih utuh. Kode Masalah Solusi... - Page 43 User Manual HPI 51012 B EN / TH / ID / VN 01M-8910423200-5120-01 / 01M-8910463200-5120-01 / 01M-8910473200-5120-01...
- Page 44 Kính chào khách hàng! Cảm ơn bạn đã lựa chọn sản phẩm của Beko. Chúng tôi hy vọng rằng bạn sẽ nhận được kết quả tốt nhất từ sản phẩm được sản xuất với chất lượng cao và công nghệ hiện đại.
- Page 45 Các hướng dẫn và cảnh báo quan trọng về an toàn và môi trường Phần này bao gồm các hướng dẫn an Không phù hợp để sử dụng trong toàn sẽ giúp bảo vệ khỏi nguy cơ công nghiệp. thương tích cá nhân hoặc thiệt hại tài Quy trình lắp đặt và...
- Page 46 Các hướng dẫn và cảnh báo quan trọng về an toàn và môi trường Trong trường hợp có bất kỳ hư hỏng Yêu cầu thợ điện có chuyên môn lắp nào, hãy tắt sản phẩm và ngắt kết đặt tiếp đất khi sử dụng sản phẩm nối với nguồn điện.
- Page 47 Các hướng dẫn và cảnh báo quan trọng về an toàn và môi trường làm di chuyển nồi. Do đó, hãy đảm bảo gần sản phẩm do các bề mặt bếp có rằng mặt bếp và đáy nồi luôn khô ráo. thể...
- Page 48 Các hướng dẫn và cảnh báo quan trọng về an toàn và môi trường 1.6 Thải bỏ sản phẩm cũ Đảm bảo chất lỏng hoặc hơi ẩm không tiếp cận được với điểm kết nối điện. Tuân thủ Chỉ thị RoHS: Sản phẩm này tuân thủ...
- Page 49 Thông tin chung 2.1 Thông tin chung 2.2 Thông số kĩ thuật 1. Mặt sứ 2. Thanh điều khiển 3. Màn hình LED Điện áp / tần số 220-240 V ~ 50-60Hz áp dụng 4. Quạt (ống xả) 5. Vùng nhiệt Công suất định mức 2000 W Kích thước (cm)
- Page 50 Thông tin chung 2.3 Bảng điều khiển 1. Nút Pause/Go (Dừng/Chạy) Để thiết bị nguội hoàn toàn. 2. Nút hẹn giờ 3. Nút "-" (Giảm) Các nút trên bảng điều khiển cảm ứng rất nhạy; 4. Cửa sổ hiển thị do đó...
- Page 51 Thông tin chung Bếp đơn được trang bị bảo vệ quá nhiệt. Nếu 2.8 Đặt hẹn giờ dụng cụ nấu trở nên quá nóng, thiết bị sẽ tự Đầu tiên hãy cài đặt nguồn điện hoặc nhiệt độ. động tắt và thông báo lỗi "E5" hoặc "E6" xuất Nhấn nút hẹn giờ...
- Page 52 Thông tin chung 2.10 Chức năng tạm dừng / chạy Nhấn nút tạm dừng/chạy, đèn báo sẽ sáng. Bếp ngừng đun. Nhấn lại nút tạm dừng/chạy, chỉ báo sẽ biến mất. Bếp trở lại nhiệt. 2.11 Bảo vệ chống nước tràn Khi nước tràn ra khỏi nồi hoặc chảo và...
- Page 53 Dụng cụ nấu nướng tương thích Chảo sắt chiên dầu Nồi thép không gỉ Chảo sắt Ấm sắt đun nước Ấm thép đun nước Dụng cụ nấu Đĩa sắt không gỉ tráng men tráng men Chỉ sử dụng dụng cụ nấu nướng được đề cập Sau lần sử...
- Page 54 Làm sạch và bảo dưỡng CẢNH BÁO : Trước khi tiến hành vệ sinh hoặc bảo trì, hãy tắt thiết bị, rút phích cắm điện ra khỏi ổ cắm trên tường và đợi cho đến khi thiết bị nguội hẳn. Không nhúng thiết bị...
-
Page 55: Khắc Phục Sự Cố
Khắc phục sự cố Nếu thiết bị không hoạt động bình thường, hãy làm theo các bước sau: 1. Đảm bảo rằng bạn đã tuân theo các hướng dẫn vận hành chính xác 2. Tham khảo các giải pháp khả thi trong bảng dưới đây. 3. - Page 56 www.beko.com...