Advertisement
Quick Links
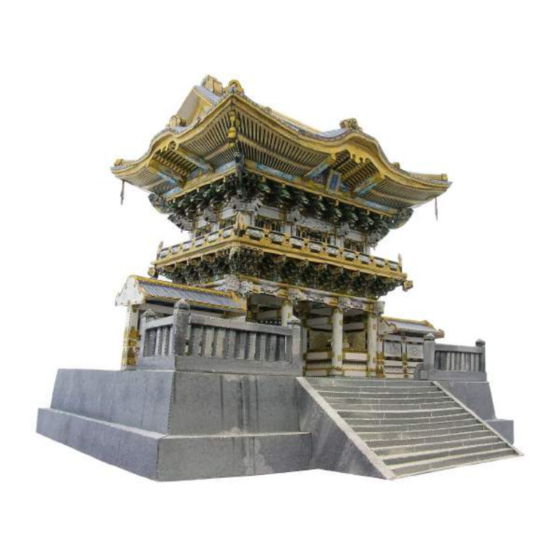
Nikko Toshogu Shrine (Yomeimon) : Assembly Instructions
Nikko Toshogu is a shrine in Nikko City, Tochigi Prefecture. It was designated as a World
Heritage Site in 1999.
"Yomeimon", a gate that is the most well-known section of Nikko Toshogu, is adorned with
approximately 500 engravings and richly-colored decorations representing the stylishness of
the Edo culture. It is also called "Higurashimon", meaning "gate of sundown", because of its
sophistication and splendor that continue to take your breath away even after gazing at it all
day long.
*This model was designed for Papercraft and may differ from the original in some respects.
*In this picture, the edges of the completed model have been touched up with paint.
Assembly Instructions
Mountain fold(dotted line)
Make a mountain fold.
Valley fold
(dashed and dotted line)
Make a valley fold.
Scissors line (solid line)
Cut along the line.
Cut In Line (solid line)
Cut along the line.
PAGE01
The glue spot(colored dot)
shows where to apply the glue.
Glue spot (Red dot)
Glue parts with the same number together.
Glue spot (Green dot)
Glue whithin the same part.
Glue spot (Blue dot)
Glue to the rear of the other part.
Glue spot (White circle)
Attach to the edges of the other parts.
Parts sheet (Pattern) : Twenty-two A4 sheets
No. of Parts : 411 parts
Assembly Instructions : Sixteen A4 sheets
* Build the model by carefully reading the Assembly Instructions, in the parts sheet page order.
Write down the number on the back of each part as you cut them out.
Since many of the parts are complicated and very small, do a trial assembly before actually
Hint
attaching them together.
The finished piece will look more realistic if you paint the edges of the parts with colors similar
to the parts.
Tools and materials
Assembly tip
Scissors, set square, glue (We
Trace along the folds with a
recommend stick glue),pencil,
ruler and a used pen (no ink) to
used ballpoint pen, toothpicks,
get a sharper, easier fold.
tweezers,
(useful for handling small parts)
Caution
Glue, scissors and other tools
may be dangerous to young
children so be sure to keep them
out of the reach of young
children.
Advertisement

Related Manuals for Canon Creative Park Nikko Toshogu Shrine Yomeimon


Summary of Contents for Canon Creative Park Nikko Toshogu Shrine Yomeimon
- Page 1 Nikko Toshogu Shrine (Yomeimon) : Assembly Instructions Nikko Toshogu is a shrine in Nikko City, Tochigi Prefecture. It was designated as a World Parts sheet (Pattern) : Twenty-two A4 sheets Heritage Site in 1999. No. of Parts : 411 parts "Yomeimon", a gate that is the most well-known section of Nikko Toshogu, is adorned with Assembly Instructions : Sixteen A4 sheets approximately 500 engravings and richly-colored decorations representing the stylishness of...
- Page 2 Nikko Toshogu Shrine (Yomeimon) : Assembly Instructions Fold and cut out. Where to attach 1N and 1P. Assembling the handrail (right side) Use the 2nd page of the parts sheet. Assemble 1D and 1H. There are thirteen 1Ls; attach them to 1F and 1J. Assemble the parts made in to 1D and 1H.
- Page 3 Nikko Toshogu Shrine (Yomeimon) : Assembly Instructions Fold and cut out. Where to attach 1O and 1Q. Assembling the handrail (left side) Use the 2nd page of the parts sheet. Assemble 1I and 1E. There are thirteen 1Ms; attach them to 1G and 1K. Assemble the parts made in to 1I and 1E.
- Page 4 Nikko Toshogu Shrine (Yomeimon) : Assembly Instructions Assembling the base. Use 2nd to 7th pages of the parts sheet. Assemble 2A and 2B, 3A and 3B, and 4A and 4B. Then, attach them all. Attach the three parts assembled in into a U-shape.
- Page 5 Nikko Toshogu Shrine (Yomeimon) : Assembly Instructions 7C ~ 7H Using a thin, round stick to roll the piece will result in a neat finish. Assembling the 1st floor part (right side) Use the 8th and 10th pages of the parts sheet. Fold 7L along the fold lines, attach the back side, and attach 7Q and 7R (which you have made into square tubular shapes) to the respective glue tabs (make four sets).
- Page 6 Nikko Toshogu Shrine (Yomeimon) : Assembly Instructions 8C ~ 8H Using a thin, round stick to roll the piece will result in a neat finish. Assembling the 1st floor part (left side) Use the 9th and 10th pages of the parts sheet. Fold 8L along the fold lines, attach the back side, and attach 8Q and 8R (which you have made into square tubular shapes) to the respective glue tabs (make four sets).
- Page 7 Nikko Toshogu Shrine (Yomeimon) : Assembly Instructions Assembling the 1st floor part Use the 8th to 10th pages of the parts sheet. Assemble 7N (8N) and 7M (8M) and attach them to the right-hand and left-hand sides of the first floor section. Attach the right and left sides of the first floor section to the base.
- Page 8 Nikko Toshogu Shrine (Yomeimon) : Assembly Instructions Assembling the Walls Use the 11th page of the parts sheet. Fold parts 10G to 10J (mountain fold) in half to assemble them. Assemble 10A and 10B, 10E and 10F, and 10C and 10D and attach them as shown in the diagram. Attach the two assembled parts to the base.
- Page 9 Nikko Toshogu Shrine (Yomeimon) : Assembly Instructions When attaching the piece to 13B, align the strips neatly. Diagram b View from the back side 11J,12J Position it around the back side. Assembling the area between the first and second floors Use the 12th to 14th pages of the parts sheet.
- Page 10 Nikko Toshogu Shrine (Yomeimon) : Assembly Instructions Diagram a 14G ~ 14P Using a thin, round stick to roll the piece will result in a neat finish. Slot the slits on the top and bottom of the pillar like this. Assembling the second floor section Use the 15th and 18th pages of the parts sheet.
- Page 11 Nikko Toshogu Shrine (Yomeimon) : Assembly Instructions View from the back side To 17B 15A(16A) 15B(16B) 15E(16E) 15C(16C) 15D(16D) 15D(16D) 15C(16C) 15H(16H) Attach it in 15B(16B) four places. 15E(16E) 15A(16A) Assembling the area between the second floor and the roof Use the 16th to 18th pages of the parts sheet.
- Page 12 Nikko Toshogu Shrine (Yomeimon) : Assembly Instructions View from the side Assembling the lower portion of the roof Use the 22nd page of the parts sheet. Attach 21I to 21C by following the curve (make two sets). *You will find a short blue line in the center of the side that needs to be attached. Follow that line to attach, starting from the center to the outer side. Attach 21A to 21C and 21B to 21D (make two sets each).
- Page 13 Nikko Toshogu Shrine (Yomeimon) : Assembly Instructions Assembling the Roof Use the 19th and 20th pages of the parts sheet. Fold 18A and 19A (mountain fold) at the dotted blue line in the diagram and attach the light blue parts together (attach them neatly by putting the corners together). Fold the right and left sides of 18A and 18B that have been attached into a 45-degree angle.
- Page 14 Nikko Toshogu Shrine (Yomeimon) : Assembly Instructions Roof tile parts Curve each roof tile part along each curve and attach the glue tabs to the straight part of the Add some glue on the edge to attach. bottom side. 20I(20S) 20H(20R) 20Q(20G) 18E(19E)
- Page 15 Nikko Toshogu Shrine (Yomeimon) : Assembly Instructions PAGE14 After attaching them together, attach them to the corners of the roof. PAGE09,10 PAGE12 After assembling them, attach the glue tabs neatly to the corners. PAGE11 Connecting all the parts together PAGE08 Use the 2nd to 22th pages of the parts sheet.
- Page 16 Nikko Toshogu Shrine (Yomeimon) : Assembly Instructions Assemble 5B and 5C. Then, attach them all. Complete PAGE16...