Advertisement
Quick Links
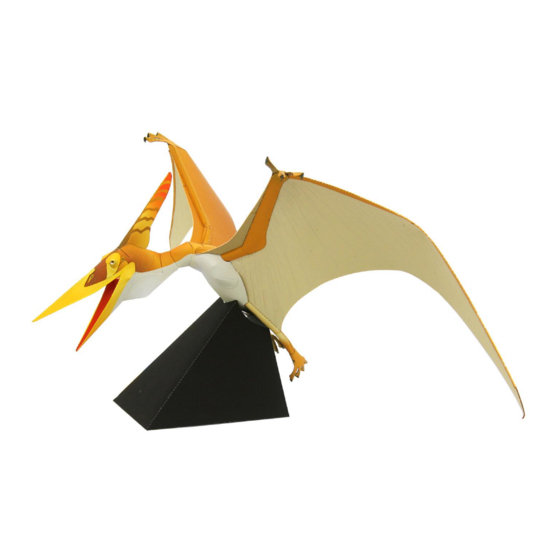
Pteranodon
This is a paper craft of a pteranodon
in flight with its wings spread wide.
The pteranodon is one of the most
well-known winged dinosaurs.
Believed to have existed in the late
Cretaceous period of the Mesozoic
era, pteranodons have large,
distinctive crests, and a wingspan of
around 7 to 9 meters. Display this
paper craft by placing it on the stand
included, or use string to hang it from
the ceiling!
Assembly Instructions
1: Carefully cut out the parts.
2: Fold along the dotted lines, making mountain or valley folds
as indicated.
3: Attach the glue tabs on each part to assemble the model.
(Read the assembly instruction for more information.)
4: Attach the parts in order.
(Read the assembly instruction for more information.)
5: Your paper craft model is finished!
Scissors, glue (We recommend craft glue.)
Keep scissors and glue away from small children.
Be careful not to cut your fingers when using scissors.
Pteranodon : Assembly Instructions
Tools
Caution
Explanation of Symbols
Cut line
Valley fold
Mountain fold
Glue up to this line
Cut in line
Glue tab
Attach to a point within the same piece
Glue tab
Attach to a separate piece
Advertisement

Related Manuals for Canon Creative Park Pteranodon


Summary of Contents for Canon Creative Park Pteranodon
- Page 1 Pteranodon : Assembly Instructions Pteranodon This is a paper craft of a pteranodon in flight with its wings spread wide. The pteranodon is one of the most well-known winged dinosaurs. Believed to have existed in the late Cretaceous period of the Mesozoic era, pteranodons have large, distinctive crests, and a wingspan of around 7 to 9 meters.
- Page 2 Pteranodon : Assembly Instructions Assemble the head 1. Add curves to , and assemble it. 2. Assemble , and attach it to Assemble by attaching these two glue tabs only. 3. After assembling , attach them to . Then, fit it on to the head and attach it in place. Tuck these two glue tabs under the bill Attach in line with the curved parts.
- Page 3 Pteranodon : Assembly Instructions 4. Attach to the head by inserting it inside. Then, assemble , fit it on to the head from the bottom and attach it in place. Assemble by attaching these two glue tabs only. Insert this part into the head. 5.
-
Page 4: Assemble The Wings
Pteranodon : Assembly Instructions Assemble the wings 1. Assemble , and attach it to . Next, cut away the piece on marked by the curved line. After attaching the pieces together, fold these parts back and then glue them down. Align these straight lines and attach together. - Page 5 Pteranodon : Assembly Instructions Assemble the body 1. After assembling , attach , and cut away the piece marked by the curved line. If you want to hang it up with string, Glue firmly to the straight lines If you have threaded string, tie it up thread the string through at the two (marked here in green).
- Page 6 Pteranodon : Assembly Instructions 4. Assemble , and attach it to the body. 5. Assemble , and attach it to the body. Assemble the feet 1. After attaching , attach them to the wings. Glue the tips of the claws together too. *Assemble in the same way.
- Page 7 Pteranodon : Assembly Instructions 2. After assembling , cut away the piece marked by the curved line. Do not put glue on these areas. *Assemble in the same way. 3. Attach to the wings, and attach the head to the body. 4.
-
Page 8: Assemble The Stand
Pteranodon : Assembly Instructions 5. Assemble , and attach it to *Assemble in the same way. 6. Attach the legs to the body, and your pteranodon is complete. Assemble the stand 1. Attach , place the pteranodon on top, and you're done! *Do not apply glue.