Table of Contents
Advertisement
Available languages
Available languages
Quick Links
Advertisement
Chapters
Table of Contents

Related Manuals for Electrolux GK58TSITO


Summary of Contents for Electrolux GK58TSITO
- Page 1 GK58TSITO User Manual Kochfeld Benutzerinformation...
-
Page 2: Table Of Contents
13. ENVIRONMENTAL CONCERNS..............24 WE’RE THINKING OF YOU Thank you for purchasing an Electrolux appliance. You’ve chosen a product that brings with it decades of professional experience and innovation. Ingenious and stylish, it has been designed with you in mind. So whenever you use it, you can be safe in the knowledge that you’ll get great results every time. - Page 3 ENGLISH responsible for any injuries or damage that are the result of incorrect installation or usage. Always keep the instructions in a safe and accessible location for future reference. 1.1 Children and vulnerable people safety This appliance can be used by children aged from 8 •...
-
Page 4: Safety Instructions
WARNING: The appliance must not be supplied • through an external switching device, such as a timer, or connected to a circuit that is regularly switched on and off by a utility. CAUTION: The cooking process has to be supervised. - Page 5 ENGLISH • Do not install or use a damaged applicable) can make the terminal appliance. become too hot. • Follow the installation instructions • Use the correct electricity mains supplied with the appliance. cable. • Keep the minimum distance from •...
- Page 6 • This appliance is for household • Be careful not to let objects or (indoors) use only. cookware fall on the appliance. The • Do not change the specification of this surface can be damaged. appliance. • Do not activate the cooking zones •...
-
Page 7: Installation
ENGLISH • Contact your municipal authority for • Cut off the mains electrical cable information on how to dispose of the close to the appliance and dispose of appliance. • Disconnect the appliance from the mains supply. 3. INSTALLATION 3.3 Connection cable WARNING! Refer to Safety chapters. - Page 8 R5 min. 1500 min. min. min. Find the video tutorial "How to install your Electrolux Induction Hob - Worktop installation" by typing out the full name indicated in the graphic below. www.youtube.com/electrolux www.youtube.com/aeg How to install your Electrolux Induction Hob - Worktop installation Find the video tutorial "How to install...
-
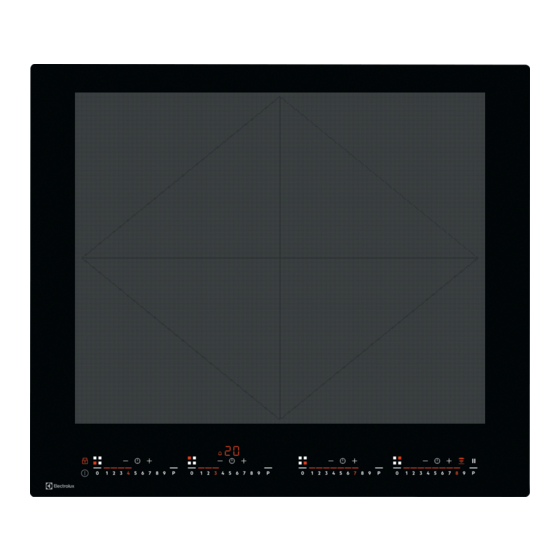
Page 9: Product Description
ENGLISH www.youtube.com/electrolux www.youtube.com/aeg How to install your Electrolux induction hob flush installation 4. PRODUCT DESCRIPTION 4.1 Cooking surface layout Induction cooking surface Control panel 4.2 Control panel layout Use the sensor fields to operate the appliance. The displays, indicators and sounds tell which functions operate. -
Page 10: Daily Use
Sensor field Comment Timer display: 00 - 99 minutes. To activate and deactivate Bridge and to switch between the modes. To select Timer functions. To increase and decrease the time. To activate and deactivate Hob²Hood. To activate and deactivate Pause. - Page 11 ENGLISH deactivates. Remove the object or clean the control panel. • the hob gets too hot (e.g. when a saucepan boils dry). Let the cooking zone cool down before you use the hob again. • you do not deactivate a cooking zone or change the heat setting.
- Page 12 5.6 Using the control panel and zone indicators • Cookware with the bottom diameter between 240 mm and 350 mm should be placed on four triangles. Two single triangles combined create a standard cooking zone and are indicated by the A B C D indicators.
- Page 13 ENGLISH For the combination indicated above, there are four active control bars. The left front pot is indicated by A indicator visible on the first control bar. The left rear pot is indicated by B indicator on the second control bar. The middle pot is indicated by indicators A B C D visible on the third control bar.
- Page 14 For maximum duration values, refer to "Technical data". 5.10 Timer • Count Down Timer You can use this function to set the length of a single cooking session. First set the heat setting for the cooking zone, then set the function.
-
Page 15: Additional Functions
ENGLISH the Timer symbols, place a pot on a When the time comes to an end, a signal cooking zone. sounds and 00 flashes. Touch to stop the signal. To activate the function: touch until the indicator turns red. Touch To deactivate the function: touch to set the time. - Page 16 6.5 Power management For most of the hoods, the remote system is originally If multiple zones are active and the deactivated. Activate it consumed power exceeds the limitation before you use the function. of the power supply, this function divides...
-
Page 17: Care And Cleaning
ENGLISH When you reach an intensive level and 5. Touch to select an automatic press again, you set the fan speed to mode. 0, which deactivates the hood fan. The To operate the hood directly symbol turns red. To start the fan again on the hood panel deactivate at the fan speed 1 touch the automatic mode of the... - Page 18 8.1 Cookware Cookware types Depending on the cookware type you For induction cooking zones use, the hob determines the appropriate a strong electro-magnetic bridge mode. For example: field creates the heat in the Single triangles, standard cooking cookware very quickly.
- Page 19 ENGLISH • clicking: electric switching occurs. is not linear. When you increase the heat • hissing, buzzing: the fan operates. setting, it is not proportional to the The noises are normal and do not increase of the consumption of power. It indicate any malfunction.
-
Page 20: Troubleshooting
• Do not cover the hob control panel. consumer website. The Electrolux cooker • Do not interrupt the signal between hoods that work with this function must the hob and the hood (e.g. with the... - Page 21 ENGLISH Problem Possible cause Remedy You do not set the heat Activate the hob again and setting for 10 seconds. set the heat setting in less than 10 seconds. You touched 2 or more Touch only one sensor field. sensor fields at the same time.
-
Page 22: Technical Data
Make sure, you operated the hob correctly. If not the 10. TECHNICAL DATA 10.1 Rating plate Model GK58TSITO PNC 949 599 186 00 Typ 62 B4A 06 AA 220 - 240 V / 400 V 2N 50 - 60 Hz Induction 7.35 kW... -
Page 23: Energy Efficiency
For more information on the recommended cookware dimensions, refer to "Induction cooking surface" in "Daily use". 11. ENERGY EFFICIENCY 11.1 Product information* Model identification GK58TSITO Type of hob Built-In Hob Number of cooking areas Heating technology Induction Length (L) and width (W) of the cooking area L 48.1 cm... -
Page 24: Guarantee
Energy consumption measured • When you heat up water, use only the according to the illustration: amount you need. • If it is possible, always put the lids on the cookware. • Before you activate the cooking zone 210mm put the cookware on it. - Page 25 ENGLISH recycling waste of electrical and For Switzerland: electronic appliances. Do not dispose of Where should you take your appliances marked with the symbol old equipment? with the household waste. Return the Anywhere that sells new product to your local recycling facility or equipment or hand it in to contact your municipal office.
- Page 26 12. GARANTIE..................... 50 13. UMWELTTIPPS....................51 WIR DENKEN AN SIE Vielen Dank für Ihren Kauf eines Electrolux-Geräts. Sie haben ein Produkt gewählt, das jahrzehntelange professionelle Erfahrung und Innovation mit sich bringt. Das ausgeklügelte und stilvolle Produkt wurde für Sie entwickelt. So können Sie jedes Mal, wenn Sie das Produkt verwenden, sicher sein, dass Sie...
-
Page 27: Sicherheitshinweise
DEUTSCH SICHERHEITSHINWEISE Lesen Sie vor der Montage und dem Gebrauch des Geräts zuerst die Bedienungsanleitung. Bei Verletzungen oder Schäden infolge nicht ordnungsgemäßer Montage oder Verwendung übernimmt der Hersteller keine Haftung. Bewahren Sie die Anleitung zum Nachschlagen an einem sicheren und zugänglichen Ort auf. - Page 28 1.2 Allgemeine Sicherheit WARNUNG: Das Gerät und die zugänglichen • Geräteteile werden während des Betriebs heiß. Seien Sie vorsichtig und berühren Sie niemals die Heizelemente. WARNUNG: Kochen mit Fett oder Öl auf einem • unbeaufsichtigten Kochfeld ist gefährlich und kann ggf.
-
Page 29: Sicherheitsanweisungen
DEUTSCH um die Stromversorgung zu unterbrechen. Verständigen Sie in jedem Fall den autorisierten Kundendienst. Wenn das Netzkabel beschädigt ist, muss es vom • Hersteller, seinem autorisierten Kundenservice oder einer gleichermaßen qualifizierten Person ausgetauscht werden, um Gefahrenquellen zu vermeiden. WARNUNG: Verwenden Sie nur Schutzabdeckungen •... - Page 30 2.2 Elektrischer Anschluss der Netzstecker nach der Montage noch zugänglich ist. WARNUNG! • Falls die Steckdose lose ist, schließen Brand- und Sie den Netzstecker nicht an. Stromschlaggefahr. • Ziehen Sie nicht am Netzkabel, wenn Sie das Gerät von der •...
- Page 31 DEUTSCH • Ist die Oberfläche des Geräts • Kochgeschirr aus Gusseisen, gesprungen, trennen Sie das Gerät Aluminium oder mit beschädigten sofort von der Stromversorgung. So Böden kann die Glas- bzw. vermeiden Sie einen elektrischen Glaskeramikoberfläche verkratzen. Schlag. Heben Sie das Kochgeschirr stets an, •...
-
Page 32: Montage
2.6 Entsorgung • Trennen Sie das Gerät von der Stromversorgung. WARNUNG! • Schneiden Sie das Netzkabel in der Verletzungs- und Nähe des Geräts ab, und entsorgen Erstickungsgefahr. Sie es. • Informationen zur Entsorgung des Geräts erhalten Sie von Ihrer Gemeindeverwaltung. - Page 33 Grafik angegeben ist. min. min. min. www.youtube.com/electrolux www.youtube.com/aeg How to install your Electrolux Induction Hob - Worktop installation Sie finden das Video-Tutorial „So installieren Sie Ihre Electrolux Induktionskochfläche“, indem Sie den vollständigen Namen eingeben, der in der folgenden Grafik angegeben ist.
-
Page 34: Gerätebeschreibung
How to install your Electrolux induction hob flush installation 4. GERÄTEBESCHREIBUNG 4.1 Kochfeldanordnung Induktionskochfläche Bedienfeld 4.2 Bedienfeldanordnung Bedienen Sie das Gerät über die Sensorfelder. Die Anzeigen, Kontrolllampen und akustischen Signale informieren Sie über die aktiven Funktionen. Sensorfeld Kommentar Ein- und Ausschalten des Kochfeldes. -
Page 35: Täglicher Gebrauch
DEUTSCH Sensorfeld Kommentar Timer-Display: 00 - 99 Minuten. Zum Ein- und Ausschalten von Bridge und zum Umschalten zwischen den Modi. Zum Auswählen der Timer-Funktionen. Erhöhen und Verringern der Zeit. Ein- und Ausschalten von Hob²Hood. Ein- und Ausschalten von Pause. Zum Einschalten von PowerBoost. Einstellen der Kochstufe: 0-9. - Page 36 5.4 Gebrauch des Kochfeldes • Wenn Sie nicht innerhalb von 50 Sekunden nach Platzieren des Die Induktionskochfläche besteht Kochgeschirrs eine Kochstufe insgesamt aus 8 einzelnen dreieckigen einstellen, Kochzonen. Die dreieckigen Zonen • Wenn das Bedienfeld mehr als 10 können getrennt eingeschaltet oder Sekunden mit verschütteten...
- Page 37 DEUTSCH • Stellen Sie mittelgroßes Kochgeschirr Das Kochgeschirr muss 3 mit einem Bodendurchmesser oder 4 Dreiecke zwischen 160 und 210 mm auf ein bedecken. Dreieckspaar. 5.6 Gebrauch des Bedienfelds und der Zonenanzeigen • Stellen Sie Kochgeschirr mit einem Bodendurchmesser zwischen 240 und 350 mm auf vier Dreiecke.
- Page 38 Kochgeschirrpositionen und Zonenanzeigen Für die oben angegebene Kombination gibt es vier aktive Einstellskalen. Der Topf vorne links wird durch die A- Anzeige in der ersten Einstellskala angezeigt. Der Topf hinten links wird durch die B-Anzeige der zweiten Einstellskala angezeigt. Der mittlere Topf wird durch die Anzeigen A B C D der dritten Einstellskala angezeigt.
- Page 39 DEUTSCH Einschalten der Funktion für die Kochzone: Berühren Sie . Das Symbol leuchtet rot. Die Funktion wird automatisch ausgeschaltet. Bezüglich der maximalen Einschaltdauer siehe „Technische Daten“. 5.10 Timer 5.8 Bridge • Countdown-Timer Sie können diese Funktion verwenden, Wenn Sie Kochgeschirr auf zwei oder um die Dauer eines einzelnen mehr Standard-Kochzonen stellen, und Kochvorgangs einzustellen.
-
Page 40: Zusatzfunktionen
Einschalten der Funktion: berühren Sie automatisch nach 4 Sekunden. Die zweimal. Die Anzeige leuchtet rot, Kontrolllampen , und der Timer wird automatisch gestartet. erlöschen. leuchtet weiterhin rot. Ausschalten der Funktion: berühren Wenn Sie diese Funktion einstellen, . Wenn die Kontrolllampen können Sie den Topf entfernen. - Page 41 DEUTSCH 6.4 OffSound Control (Ein- und Siehe Abbildung für mögliche Kombinationen, wie die Leistung unter Ausschalten der Signaltöne) den Kochzonen verteilt werden kann. Schalten Sie das Kochfeld aus. Drücken 3 Sekunden lang. Das Display wird ein- und ausgeschaltet. Drücken Sie 3 Sekunden lang.
- Page 42 Automatikmodi 5. Berühren Sie , um einen Automatikmodus auszuwählen. Auto‐ Ko‐ Bra‐ Schalten Sie den mati‐ chen Automatikmodus der sche Funktion aus, um die Be‐ Dunstabzugshaube direkt leuch einzuschalten. tung Modus H0 Wenn Sie das Garen beenden und das Kochfeld...
-
Page 43: Reinigung Und Pflege
DEUTSCH Einschalten der Beleuchtung Die Beleuchtung der Sie können das Kochfeld so einstellen, Dunstabzugshaube schaltet dass die Beleuchtung automatisch sich 2 Minuten nach dem eingeschaltet wird, wenn Sie das Ausschalten des Kochfelds Kochfeld einschalten. Stellen Sie hierzu aus. den Automatikmodus auf H1 – H6 ein. 7. - Page 44 • Wasser sehr schnell auf einer Kochzone kocht, die auf die höchste Erhitzungsstufe geschaltet ist. • Ein Magnet auf den Boden des Kochgeschirrs zieht. Abmessungen des Kochgeschirrs 180 mm 100 mm Siehe „Induktionskochfläche“ unter „Täglicher Gebrauch“. • Induktionskochzonen passen sich 210 mm automatisch an die Größe des...
- Page 45 DEUTSCH Die Geräusche sind normal und Kochzone ist nicht linear. Bei einer weisen nicht auf eine Störung hin. höheren Kochstufe steigt der Energieverbrauch nicht proportional an. 8.3 Öko Timer (Öko-Timer) Das bedeutet, dass eine Kochzone, die auf eine mittlere Kochstufe eingestellt ist, Um Energie zu sparen, schaltet sich die weniger als die Hälfte ihrer maximalen Kochzonenheizung vor dem Signal des...
-
Page 46: Fehlersuche
Dunstabzugshauben, die mit dieser Kochfelds nicht ab. Funktion ausgestattet sind, finden Sie • Unterbrechen Sie den Signalfluss auf unserer Kunden-Website. Electrolux zwischen dem Kochfeld und der Dunstabzugshauben, die mit dieser Dunstabzugshaube nicht (z. B. mit der Funktion ausgestattet sind, haben das Hand, einem Kochgeschirrgriff oder großen Topf). - Page 47 DEUTSCH Störung Mögliche Ursache Problembehebung Die Sicherung ist durchge‐ Vergewissern Sie sich, dass brannt. die Sicherung die Ursache für die Störung ist. Brennt die Sicherung wiederholt durch, wenden Sie sich an eine qualifizierte Elektrofach‐ kraft. Sie haben die Kochstufe Schalten Sie das Kochfeld nicht innerhalb von 10 Se‐...
- Page 48 Störung Mögliche Ursache Problembehebung Die Sensorfelder werden Das Kochgeschirr ist zu Stellen Sie großes Kochge‐ heiß. groß oder Sie haben es zu schirr nach Möglichkeit auf nahe an die Bedienelemen‐ die hinteren Kochzonen. te gestellt. Es ertönt kein Signalton, Der Ton ist ausgeschaltet.
-
Page 49: Technische Daten
DEUTSCH 10. TECHNISCHE DATEN 10.1 Typenschild Modell GK58TSITO Produkt-Nummer (PNC) 949 599 186 00 Typ 62 B4A 06 AA 220–240 V/400 V 2N ~ 50–60 Hz Induktion 7.35 kW Hergestellt in Deutschland Ser.-Nr....7.35 kW ELECTROLUX 10.2 Technische Daten der Kochzonen Induktionskochflä‐... -
Page 50: Garantie
Kochfeldtyp Einbau-Kochfeld Anzahl der Kochflächen Heiztechnik Induktion Länge (L) und Breite (B) der Kochfläche L 48,1 cm W 38,8 cm Energieverbrauch der Kochfläche (EC electric 188,7 Wh / kg cooking) Energieverbrauch des Kochfelds (EC electric 188,7 Wh/kg hob) * Für die Europäische Union gemäß EU 66/2014. Für Weißrussland gemäß STB 2477-2017 Anhang A. -
Page 51: Umwelttipps
DEUTSCH Servicestellen Morgenstrasse 131 3018 Bern Langgasse 10 9008 St. Gallen Am Mattenhof 4a/b 6010 Kriens Schlossstrasse 1 4133 Pratteln Comercialstrasse 19 7000 Chur Ersatzteilverkauf Industriestrasse 10, Material, Arbeits- und Reisezeit. Die 5506 Mägenwil, Tel. 0848 848 111 Garantieleistung entfällt bei Nichtbeachtung der Fachberatung/Verkauf Badenerstrasse Gebrauchsanweisung und... - Page 52 www.electrolux.com/shop...