Table of Contents
Advertisement
Before Use
• CHECKING ACCESSORIES.................................................................................... E-2
• INSTALLATION ........................................................................................................ E-3
Usage
• PART NAMES AND FUNCTIONS ............................................................................ E-4
Others
• OPTIONS.................................................................................................................. E-9
• MAIN SUPPORTED SIGNALS............................................................................... E-10
• SPECIFICATION .................................................................................................... E-12
Before using the display, read the User's manual (1/2) and the User's manual (2/2) carefully so that you know how to use the display
correctly.
Refer to this manual whenever questions or problems about operation arise. Be sure to read and observe the safety precautions (see
the separate "Safety Precautions" manual).
Keep this manual where the user can see it easily.
* Installation and removal require special expertise. Consult your product dealer for details.
* When "English" is selected at "Language" of the on-screen display, "colour" will be displayed in the case of the R model and "color"
will be displayed for all other models.
The notation used in this users' manual is "color".
* All operation items of A model are the same as W model.
Please read the description part of "W model" for "A model" in User's manual (2/2).
* The residential warranty for "A model" is enclosed in accessories.
* The last digit of MODEL NO. (10 digit alphanumeric characters) indicated on the product means the body color indication alphabet or
the management number.
* The illustration of external appearance is for 42" model.
Please acknowledge some differences in the actual product of other models.
P42VHA40W/P42HHA40W/P50XHA40W/P55XHA40W/
P42VHA40U/P42HHA40U/P50XHA40U/P55XHA40U/
P42VHA40A/P42HHA40A/P50XHA40A/P55XHA40A/
Contents
USER'S MANUAL
(Specification and Part Names)
WIDE PLASMA DISPLAY
P42VHA40R/P63XHA40R
Page
P63XHA40W
P63XHA40U
P63XHA40A
Advertisement
Table of Contents

Related Manuals for Fujitsu plasmavision


Summary of Contents for Fujitsu plasmavision
- Page 1 Before Use • CHECKING ACCESSORIES... E-2 • INSTALLATION ... E-3 Usage • PART NAMES AND FUNCTIONS ... E-4 Others • OPTIONS... E-9 • MAIN SUPPORTED SIGNALS... E-10 • SPECIFICATION ... E-12 Before using the display, read the User’s manual (1/2) and the User’s manual (2/2) carefully so that you know how to use the display correctly.
-
Page 2: Checking Accessories
CHECKING ACCESSORIES One power cable Two small ferrite cores No.:ZCAT1518-0730 Mfr.:TDK Two AA batteries CONNECTING THE DISPLAY TO EXTERNAL EQUIPMENT Carefully check the terminals for position and type before making any connections. Loose connectors can result in picture or color problems. Make sure that all connectors are securely inserted into their terminals. Ferrite cores These ferrite cores are used to attenuate undesired signals. -
Page 3: Installation
INSTALLATION To prevent the display's internal components from overheating, make sure that the display is installed in a well-ventilated location. Be sure to use the optional stand, wall-mounting unit or the other unit when installing the display. Also, be also sure that your dealer performs the installation. -
Page 4: Front Display
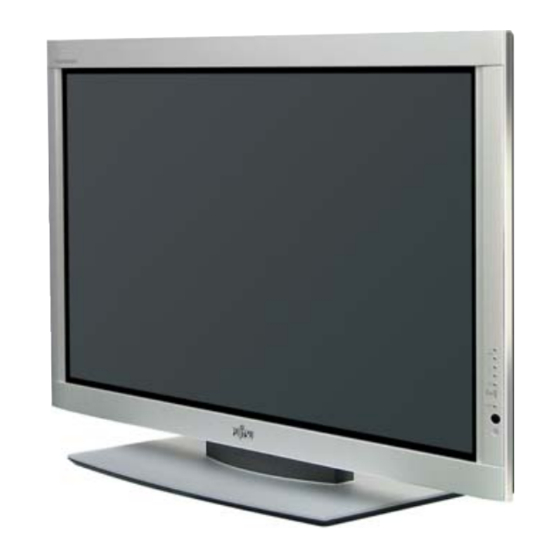
PART NAMES AND FUNCTIONS DISPLAY SECTION – FRONT Warning If the power indicator lamp flashes red or green, this signifies that the display has developed a problem. When this happens, be sure to remove the power plug from the receptacle and contact your dealer. Leaving the display power ON can result in fire or electric shock. ... -
Page 5: Back And Bottom Display Overview
DISPLAY SECTION – BACK AND BOTTOM PART / I power switch If this button is pressed when the power indicator lamp is off, the indicator lamp will light. The power can be turned on and the standby mode selected by using the remote control or the control panel of the display. If this button is pressed when the power indicator lamp is lit, the indicator lamp will go out. - Page 6 PART NAMES AND FUNCTIONS (Continued) RGB2 input terminal (RGB2 INPUT/mD-sub) for the W/U/A models / RGB1 input terminal (RGB1 INPUT/mD-sub) for the R model Connect this terminal to the PC’s display (analog RGB) output terminal or decoder (digital broadcast tuner, etc.) output terminal. ...
-
Page 7: Description Of Input Terminals
DESCRIPTION OF INPUT TERMINALS DVI-D terminal (RGB1 INPUT/DVI-D) for the W/U/A models mD-sub input terminal (RGB2 INPUT/mD-sub) for the W/U/A models (RGB1 INPUT/mD-sub) for the R model RS-232C terminal (RS-232C) Pin No. Signal Pin No. T.M.D.S. Data2– 9 T.M.D.S. Data1– 17 T.M.D.S. - Page 8 PART NAMES AND FUNCTIONS (Continued) HDMI input terminal (VIDEO5 INPUT/HDMI) for the U model HDMI (High-Definition Multimedia Interface) HDMI is a standard for home digital interfaces, which can transmit images as well as multichannel audio signals and control signals through one cable. Pin No.
-
Page 9: Others Options
To prevent injury, fire, and electric shock, arrange for options to be initially installed (or installed at a different location) by your dealer. CAUTION This display (P42VHA40/P42HHA40/P50XHA40) is for use only with Fujitsu General Limited's option (P-WB4201, P-CT4200, P-TT4202). This display (P55XHA40) is for use only with Fujitsu General Limited's option (P-WB6300, P-CT6300, P-TT4202). -
Page 10: Main Supported Signals
MAIN SUPPORTED SIGNALS This display can store the latest four types of signals for RGB adjustment value. The fifth input signal will replace the adjustment value of the first input signal. To do this, select a desired signal and follow the instructions in “Adjusting Screen Position and Size” on the User’s manual (2/2) to adjust the parameters. -
Page 11: Main Corresponding Signals
In the Comp.video and Video/S-video, the display has been factory-set as follows for different input signals: Main corresponding signals (Comp.video mode) Horizontal Vertical frequency (kHz) frequency (Hz) 15.73 59.94 15.63 50.00 31.47 59.94 31.25 50.00 45.00 60.00 37.50 50.00 33.75 60.00 28.13 50.00... -
Page 12: Specification
SPECIFICATION WIDE PLASMA DISPLAY Model P42VHA40W/A Screen size 42" wide screen: 92.1 cm (W) x 51.8 cm (H) (105.7 cm diagonal) 36.3 inch (W) x 20.4 inch (H) (41.6 inch diagonal) Aspect ratio 16:9 (wide) Number of pixels 852 (H) x 480 (V) Weight 31.5 kg / 69 lbs Outer dimensions... - Page 13 1.9 m or 6.2 feet for 50" / at least 2.1 m or 6.9 feet for 55" / at least 2.4 m or 7.9 feet for 63") from the screen and to look occasionally away while working. • is a worldwide trademark of Fujitsu General Limited and is a registered trademark in Japan, the U.S.A. and other countries or areas. P42HHA40U P50XHA40U 42"...
- Page 14 1.9 m or 6.2 feet for 50" / at least 2.1 m or 6.9 feet for 55" / at least 2.4 m or 7.9 feet for 63") from the screen and to look occasionally away while working. • is a worldwide trademark of Fujitsu General Limited and is a registered trademark in Japan, the U.S.A. and other countries or areas. E-14 P42VHA40R 63"...
-
Page 15: Table Of Contents
Before Use • INFORMATION ... E-2 Usage • USING THE REMOTE CONTROL... E-3 • CONNECTING THE DISPLAY TO EXTERNAL EQUIPMENT ... E-7 • BASIC OPERATIONS ... E-12 • SELECTING INPUT MODE ... E-14 • OTHER BASIC OPERATIONS ... E-16 • WATCHING PICTURES ON THE WIDE SCREEN... E-17 Adjustments •... -
Page 16: Information
INFORMATION • Receptacle Make sure that the power cable’s grounding wire is grounded. The display comes with a 3-prong power plug; one prong is connected to the grounding wire. If you have only a 2-hole receptacle, you will need to have it replaced. Contact your dealer for more information. •... - Page 17 USING THE REMOTE CONTROL REMOTE CONTROL (for the W/R models) For details, see page Note • Functions may not be available with some models and some device options. button E-12 Switches between Power On and Standby. (MUTE button) E-13 Temporarily mutes the audio. To return the audio to normal, press this button once again, or press the work also.
- Page 18 USING THE REMOTE CONTROL (Continued) REMOTE CONTROL (for the U model) For details, see page Note • Functions may not be available with some models and some device options. button E-12 Switches between Power On and Standby. (MUTE button) E-13 Temporarily mutes the audio.
- Page 19 PUTTING BATTERIES IN THE REMOTE CONTROL (1) To remove the cover, slide it outwards while pressing it down. PRECAUTIONS To prevent malfunction, be sure not to apply any form of severe shock to the remote control. To prevent malfunction or deformation, be sure not to allow the remote control to become wet; also, keep it away from hot locations or heating equipment.
-
Page 20: Using The Remote Control
USING THE REMOTE CONTROL (Continued) EFFECTIVE RANGE FOR THE REMOTE CONTROL Point the remote control at the display’s signal receiver when using it. Make sure that there are no obstacles between the remote control and the display’s signal receiver. Left Note The remote control may not function properly if you use a high-frequency fluorescent lamp. -
Page 21: Connecting The Display To External Equipment
CONNECTING THE DISPLAY TO EXTERNAL EQUIPMENT EXAMPLE OF CONNECTION TO EXTERNAL COMPONENTS Speaker Speaker (optional) Display Remote control To AC outlet VCR or other external components See P. Satellite tuner E-10 E-11 DVD recorder/player... - Page 22 CONNECTING THE DISPLAY TO EXTERNAL EQUIPMENT (Continued) • Connect the video signal cable to either the S-video input terminal or the video input terminal. • If the unit to be connected is equipped with S-video output terminal, it is recommended to connect to the S-video terminal. To video output To S-video output To S-video input...
- Page 23 DVD RECORDER/PLAYER • Connect the video signal cable to the HDMI input terminal, component video input terminal, S-video input terminal, or the video input terminal. • If the component to be connected is equipped with HDMI output terminal, component video output terminal, it is recommended to connect to the component video terminal.
- Page 24 CONNECTING THE DISPLAY TO EXTERNAL EQUIPMENT (Continued) SATELLITE TUNER • Connect the video signal cable to the HDMI input terminal, component video input terminal, S-video input terminal, or the video input terminal. • If the component to be connected is equipped with HDMI output terminal, component video output terminal, it is recommended to connect to the component video terminal.
- Page 25 • As the cable for connecting a PC differs with the PC model, please consult your dealer for information on the right cable to purchase. To RGB output (DVI-D) To DVI-D input To RGB output (mD-sub) To mD-sub input To audio output To audio inputs Display bottom Note...
-
Page 26: Basic Operations
BASIC OPERATIONS TURNING THE POWER ON AND STAND-BY Press the display to the ON The power lamp lights up. Press The color of the power lamp changes from “Red” to “Green”. Press Select the video mode to input. Press The color of the power lamp changes from “Green” to “Red”... -
Page 27: Adjusting The Volume
ADJUSTING THE VOLUME Adjusting the volume Press to increase the volume. Press to reduce the volume. * Note that the volume level remains stored even when you turn OFF the power. Muting the audio Press The audio is removed. Press again to restore the audio to the original level. The mute mode can also be released by pressing the volume buttons. -
Page 28: Selecting Input Mode
SELECTING INPUT MODE VIDEO INPUT MODE (for the W/R models) Press mode. You can select from VIDEO1 mode to VIDEO4 mode. The video modes corresponding to each input terminal are as follows. • VIDEO1: Video • VIDEO2: S-video • VIDEO3: Component video •... - Page 29 RGB INPUT MODE Press mode. You can select between the modes from RGB1 to RGB2. The input terminal of each RGB mode is as follows. [for the W/U models] • RGB1: DVI-D • RGB2: mD-sub [for the R model] • RGB1: mD-sub * For selection of the input terminal, see * You can also use the buttons on the display’s control...
-
Page 30: Other Basic Operations
OTHER BASIC OPERATIONS CONVENIENT FUNCTIONS On-screen information Press The mode is indicated on the screen for 5 seconds. Picture Mode Press This button can be used to switch the picture mode. In the picture mode, you can switch between the set status and the fine mode. * For the picture mode settings, see “Setting Picture Mode (P. -
Page 31: Watching Pictures On The Wide Screen
WATCHING PICTURES ON THE WIDE SCREEN SWITCHING BETWEEN SCREEN SIZES Press The currently selected mode will appear. Press Size. Each time you press appears. The sequences used are as follows: When you are in a Video input mode When you are in an RGB input mode * Depending on the type of signal, some aspects * You can also use the buttons on the display’s control... - Page 32 WATCHING PICTURES ON THE WIDE SCREEN (Continued) SCREEN SIZE Normal (Video/RGB) Displays pictures of normal size (i.e., a 4:3 aspect ratio). Wide1 (Video) Displays natural-looking pictures of standard size on the wide screen. Wide2 (Video)/Wide (RGB) Ideal for displaying vertically extended pictures such as squeezed pictures. Zoom1 (Video)/Zoom (RGB) Enlarges horizontally extended pictures equally in all directions to maintain the aspect ratio constant.
-
Page 33: Adjustment Menu
ADJUSTMENT MENU The numbers in parentheses ( ) indicate the reference page numbers. PICTURE (E-20) MENU POSITION/SIZE (E-27) AUDIO (E-28) FEATURES (E-29) FACTORY DEFAULT(E-35) Note • The shaded menu items are applied to the U model only. • Some type of signal can not be selected. Signal Contrast (E-21) Drive Contrast... -
Page 34: Basic Procedure Of Adjustment Menu Operations
BASIC PROCEDURE OF ADJUSTMENT MENU OPERATIONS • Below is shown the basic procedure to make changes to the options in the ADJUSTMENT MENU. (Ex.: adjusting tint setting (Tint)) (Ex. the W/R models) Note • On-screen information disappears if you do not take any action for about 60 seconds. •... -
Page 35: Adjusting The Picture
ADJUSTING THE PICTURE • Picture-related items can be set and adjusted in the Picture Adjustment Screen. See BASIC PROCEDURE OF ADJUSTMENT MENU OPERATIONS on page E-20 for the basic operation procedures. Adjusting the Signal Contrast Press to increase the input signal contrast. Press to reduce the input signal contrast. - Page 36 ADJUSTING THE PICTURE (Continued) Setting Picture Mode Each time you press , the available choices appear in the following sequence. [Natural]: Enables you to watch pictures with natural color tones and high picture clarity. This mode is suitable for watching a normal motion picture. [Fine]: Suitable for watching a dark picture such as a movie.
- Page 37 PRECISION SETTING (for the U model) • See BASIC PROCEDURE OF ADJUSTMENT MENU OPERATIONS on page E-20. Even more advanced Sharpness adjustments can be made as required. Adjusting the Black Level Press to strengthen the reproduction of black. (Provides a picture quality with deep blacks.) Press to weaken the reproduction of black.
- Page 38 ADJUSTING THE PICTURE (Continued) Setting Image Enhance This performs detailed image quality settings. • Chroma Transient This function corrects the color contours. Each time is pressed, the setting is switched. Press to store. • Image Identify This function discerns between the natural image display section and the text display section, and performs correction to enable an optimized display for each.
- Page 39 Setting the Color Focus This enables correction with respect to specific color hues within the image. Independent correction of the hue of skin colors, blue skies, and so on, enables a more brilliant display. • [Reddish color] With red at the center, performs the following corrections with respect to the range from magenta to yellow.
- Page 40 ADJUSTING THE PICTURE (Continued) Making the Progressive Scan Settings This sets the conversion processing of interlace signals to block receive signals. • 24 Frame Mode This function enables the optimized display of movies, etc. with 24 frames/second signals. Each time is pressed, the setting is switched.
-
Page 41: Adjusting Screen Position And Size
ADJUSTING SCREEN POSITION AND SIZE • You can make changes to all screen adjustment options in the POSITION/SIZE Menu. See Page E-20 for the basic operation procedures. • The changes you make will be stored for the selected input mode. Therefore, you need to select a desired input mode before making any changes. -
Page 42: Adjusting Audio
ADJUSTING AUDIO • You can make changes to all audio adjustment options in the AUDIO Menu. See Page E-20 for the basic operation procedures. • The changes you make will be stored for the selected input mode. Therefore, you need to select a desired input mode before making any changes. -
Page 43: Other Adjustments
OTHER ADJUSTMENTS • FEATURES setup screen has the following 4 options. See Page E-20 for the basic operation procedures. [Adjustment]: Can make a fine adjustment of pictures such as Dot Clock, Clamp Position. [On Screen Menu]: Can make a display setting such as OSD, Language. (See P. E-30.) [Input Terminal]: Can make an input terminal setting such as Video Input. - Page 44 OTHER ADJUSTMENTS (Continued) ON SCREEN MENU • Setting Display Information (OSD) You can use this option to select whether to display information other than menus. (Error messages are displayed regardless of what choice you make for this option.) Each time you press , one of the available choices appears in the following sequence: [On (OSD:bright)]: On-screen information shown in light color.
- Page 45 SETTING THE INPUT TERMINALS • Selecting the settings of Video/S-video Input terminal You can use this option to select the color format appropriate for the input signal. Each time you press , one of the available modes appears in the following sequence: [Auto1]: Automatically selects NTSC, PAL and SECAM.
- Page 46 OTHER ADJUSTMENTS (Continued) OTHER SETTINGS Auto Off-NO SIG. You can make to the standby state automatically when the no signal state continued during set up time. Press to select the "Time". Press to select the amount of time before the standby state starts. Press to store.
- Page 47 • Minimizing phosphor burn-in (Screen Orbiter) You can use this option to move the screen position to minimize phosphor-induced “burn-in”. Follow the steps below. (1) Select “Screen Orbiter” and press The “Screen Orbiter” setting screen will appear. (2) Press to select “Mode/Time”. (3) Select a desired pattern.
- Page 48 OTHER ADJUSTMENTS (Continued) • Setting Exhibition Mode (Exhibition Mode) You can use this option to display the enhanced contrast, which is most suitable for the use by unspecified persons. Each time you press , one of the available choices appears in the following sequence: Press to store.
-
Page 49: Initialization Of User Adjustment Value
INITIALIZATION OF USER ADJUSTMENT VALUE You can restore the values of the adjustment/setting made in the MENU to factory settings. Press The main menu screen will appear. Press DEFAULT”. Each time you press menus appears in the following sequence: PICTURE FACTORY DEFAULT The FACTORY DEFAULT Menu screen will appear. -
Page 50: Cleaning And Maintenance
CLEANING AND MAINTENANCE Precautions Be sure to remove the power plug from the receptacle before cleaning the display. Be sure not to clean the display using a cloth dampened with volatile solvents, such as benzene or thinner. Such solvents can harm the display’s cabinet, the filter at the screen front, and the remote control.