Advertisement
Quick Links
System
Setting Up the
Mise en place et réglage du Système
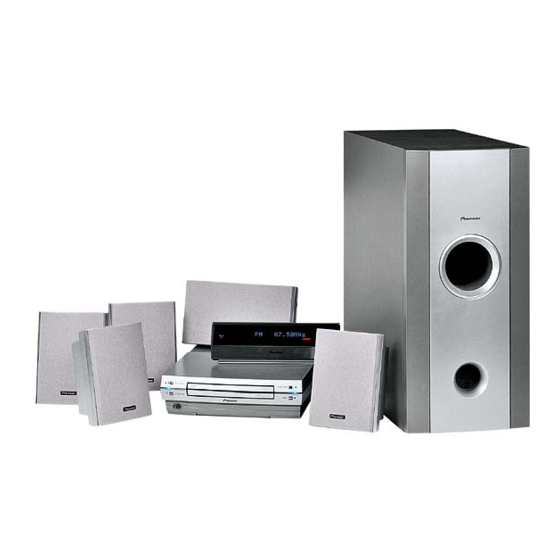
Although compact, this system delivers powerful Dolby Digital and DTS
sound to turn your room into a home theater. The appearance of the
system is designed to match modern interiors. If you are using the
system for the first time, these two pages show you how to connect the
system and set up the speakers.
For instructions on connecting the optional tape deck, MD or CD
recorder, see the Operating Instructions supplied with each component.
Check supplied accessories
Confirm that the following accessories are in the box when you open it.
Remote control unit
Dry cell batteries
Display unit (AXX7107)
Télécommande
(size AA/R6P) x 2
Unité d'affichage (AXX7107)
Piles (format AA/
R6P) x 2
Control cable A
Control cable B
Display cable
Cordon de commande A
Cordon de commande B
Cordon d'affichage
Blue plugs / Fiches bleues
Black plugs / Fiches noires
Speaker cords / Cordons de haut-parleurs
5 m x 3 (for center, front L-R speakers)
5 m x 3 (pour haut-parleurs Centre, Avant G-D)
10 m x 2 (for rear L-R speakers)
10 m x 2 (pour haut-parleurs Arrière G-D)
<TSWZW/01E00001>
Printed in
Connecting
Caution
When connecting this system or changing connections, be
sure to switch power OFF with the STANDBY/ON button, and
disconnect the power cord from the wall socket.
After completing all connections, connect the power cord to
the wall socket.
Powered subwoofer unit
Enceinte active d'extrême gave
1
B
A
US and Canadian models
Modèles canadiens et américains
1
Control cable A (blue plugs)
Cordon de commande A (fiche bleues)
Memo
• The display unit (AXX7107) features holes on the rear to enable
hanging on a wall, so you can install it wherever you like.
Non-slip pads
• Remove the supplied non-slip pads from the paper, and stick
three onto the base of each satellite speaker.
<S-DV88ST>
<FRONT, REAR> under side
<CENTER> under side
Fond du haut-parleur
Fond du haut-parleur
<AVANT, ARRIERE>
<CENTRE>
All manuals and user guides at all-guides.com
En dépit de sa compacité, cet ensemble fournit une superbe sonorité
Dolby Digital et DTS, capable de transformer votre salle de séjour en un
studio musical. L'aspect du système est étudié de manière à
s'harmoniser dans les intérieurs modernes. Si vous utilisez le système
pour la première fois, ces pages vous aideront à raccorder le système et
à installer les haut-parleurs. Pour les instructions sur le raccordement
de la platine cassette optionnelle, de l'enregistreur MD ou CD, voir le
mode d'emploi fourni avec chaque composant.
Vérifiez le contenu de l'emballage
Assurez-vous que tous les accessoires suivants se trouvent dans la boîte
d'emballage lorsque vous l'ouvrez.
AM loop antenna
FM antenna
Antenne cadre AM
Antenne FM
Video cord
Power cord
Cordon vidéo
Cordon d'alimentation
Yellow plugs
Fiches jaunes
Gray / Gris
Non-skid pads x 19 (satellite speakers)
Non-skid pads x 4
(subwoofer)
Tampons antidérapants (Enceintes
satellites) x 19
Tampons antidérapants
(subwoofer)x 4
Fix to the underside of the subwoofer
Fixez-les en dessous du subwoofer
Operating instructions / Warranty
Mode d'emploi / Garantie
/ Imprimé
Raccordement
Attention
Avant de raccorder ce système ou de changer ses connexions,
veillez à le mettre sous tension (OFF) par la touche STANDBY/
ON et de débrancher le cordon d'alimentation au niveau de la
prise du secteur.
Lorsque les raccordements sont effectués, branchez le cordon
d'alimentation dans une prise secteur.
AM loop antenna
Antenne cadre AM
FM antenna
3
Antenne FM
Display unit (AXX7107)
Unité d'affichage (AXX7107)
4
2
Display cable (gray)
4
Cordon d'affichage (gris)
A
DVD tuner system
B
Combiné radio / DVD
1
Control cable B (black plugs)
Cordon de commande B (fiches noires)
Note
• L'arrière de l'unité d'affichage (AXX7107) présente des orifices qui
permettent de suspendre celle-ci sur une paroi à l'endroit que vous
souhaitez, ce qui accroît la facilité de son installation.
Coussinets anti-dérapants
• Décollez du papier les coussinets anti-dérapants fournis et
collez-les sur le fond des haut-parleurs satellites. Collez-en 3 sur
le fond de chaque haut-parleur.
<S-DV77ST>
<FRONT, REAR> under side
<CENTER> under side
Fond du haut-parleur
Fond du haut-parleur <CENTRE>
<AVANT, ARRIERE>
1
Connect the subwoofer unit and DVD tuner system with 2 cables
Raccordement du subwoofer et du système de tuner DVD par 2 cordons
2
Connect the DVD tuner system and display unit
Raccordement du système de tuner DVD et de l'unité d'affichage
3
Setup the AM loop antenna
Installation de l'antenne cadre AM
<ARE7280-B>
4
Connect the AM and FM antennas
Branchement des antennes AM et FM
European model
US and Canadian model
Modèles canadiens et
américains
1. Plug the control cable A (blue
1. Branchez le cordon de commande
plugs) into the A jack (USE
A (fiches bleues) dans la prise A
ONLY WITH S-DV77SW/S-
(marquée "USE ONLY WITH S-
DV88SW) on the rear of the DVD
DV77SW/S-DV88SW") à l'arrière
tuner system.
du système de tuner DVD.
2. Plug the other end of the control
2. Branchez l'autre extrémité du
cable A into the A jack (TO
cordon de commande A dans la
prise A (marquée "TO MODEL
MODEL XV-DV77/DV88) on the
rear of the powered subwoofer
XV-DV77/DV88") à l'arrière du
unit.
subwoofer en phase.
3. In the same way, plug one end of
3. De la même façon, branchez une
the control cable B (black plugs)
extrémité du cordon de
into the B jack (USE ONLY WITH
commande B (fiches noires) dans
la prise B (marquée "USE ONLY
S-DV77/DV88) on the rear of the
DVD tuner system, and the other
WITH S-DV77/DV88") à l'arrière
end into the B jack (TO MODEL
du système de tuner DVD et
l'autre extrémité sur la prise B
XV-DV77/DV88) on the powered
subwoofer unit.
(marquée "TO MODEL XV-DV77/
DV88") sur le subwoofer en
phase.
1. Plug the L-shaped end of the
1. Branchez l'extrémité en L du
display cable into the connector
cordon d'affichage dans le
on the rear of the display unit
connecteur à l'arrière de l'unité
(AXX7107).
d'affichage (AXX7107).
2. Plug the other end of the display
2. Branchez l'autre extrémité du
cable into USE ONLY WITH
cordon d'affichage dans la prise
AXX7107 jack on the DVD tuner
marquée "USE ONLY WITH
system.
AXX7107" à l'arrière du système
de tuner DVD.
1. Bend the stand in the direction
1. Dépliez le support dans le sens
indicated by the arrow.
indiqué par la flèche.
2. Clip the loop onto the stand.
2. Fixez le cadre sur le support.
3. Pour une installation sur une
3. If you want to fix to a wall or
other surface, perform step 2
paroi ou toute autre surface,
after first securing the stand with
effectuez l'étape 2 après avoir
screws.
fixé le support au moyen de vis.
1. Twist off the plastic insulation on
1. Torsadez le fil conducteur de
l'antenne AM à isolant plastique.
the end of each strand of the AM
antenna.
2. Appuyez sur le levier de la borne
2. Press the AM antenna terminal
d'antenne AM pour l'ouvrir et
lever to open it, and insert a wire.
insérez le fil. Relâchez le levier
Release the lever to secure.
pour immobiliser le fil.
3. Connect the other strand of the
3. Branchez tous les fils d'antenne
AM antenna in the same way.
comme indiqué ci-dessous.
4. Modèle européen : Insérez la
fiche de l'antenne FM dans la
4. European model : Push the FM
broche centrale de la prise
antenna plug onto the center pin
d'antenne FM.
of the FM antenna socket.
Modèles canadiens et américains :
US and Canadian model : Press
Appuyez sur le levier de la borne
the FM antenna terminal lever to
d'antenne FM pour l'ouvrir et
open it, and insert a wire. Release
insérez le fil. Relâchez le levier
the lever to secure.
pour immobiliser le fil.
European model
US and Canadian model
Modèle européen
Modèles canadiens et américains
Notes
Note
• Maintenez les cordons d'antenne à l'écart des
• Keep antenna cables away from other cables
autres cordons, de l'unité de l'afficheur et du
and the display unit and main set.
jeu principal.
• To assure optimum reception, pull the FM
• Pour obtenir une réception optimale, déployez
antenna so that it is fully extended and not
au maximum l'antenne FM; ne la laissez pas
coiled or hanging at the rear of the unit.
pendre ou enroulée à l'arrière de l'appareil.
• If reception with the supplied antenna is poor,
• Si la réception avec l'antenne fournie laisse à
see page 89 of the main operating instructions
désirer, reportez-vous à la page 89 du Mode
for details on the Connecting Outdoor
d'emploi principal où vous trouverez des détails
Antennas.
sur le branchement d'antennes extérieures.
Advertisement

Related Manuals for Pioneer NS-DV77


Summary of Contents for Pioneer NS-DV77
- Page 1 System Setting Up the All manuals and user guides at all-guides.com Connect the subwoofer unit and DVD tuner system with 2 cables Mise en place et réglage du Système Raccordement du subwoofer et du système de tuner DVD par 2 cordons 1.
- Page 2 DEMO ON ou DEMO OFF selon le cas. Publication de Pioneer Corporation. Published by Pioneer Corporation. L’appareil se remet en attente. © 2001 Pioneer Corporation. Copyright © 2001 Pioneer Corporation. Tous droits de reproduction et de traduction réservés. All rights reserved.