Table of Contents
Advertisement
Quick Links
Advertisement
Table of Contents

Related Manuals for KitchenAid KSB1570SL0


Summary of Contents for KitchenAid KSB1570SL0
- Page 1 KSB1570 INSTRUCTIONS INSTRUCTIONS INSTRUCCIONES...
- Page 2 #1 goal. Remember to register your product online at www.kitchenaid.com or by mail using the attached Product Registration Card. Join us in the kitchen at www.kitchenaid.com. Scan with your mobile device for recipes, tips, and more. USA: 1.800.832.7173 KitchenAid.com Canada: 1.800.807.6777...
-
Page 3: Table Of Contents
Blender, please fill out and mail your product registration card packed with the unit, or register on-line at www.kitchenaid.com. This card will enable us to contact you in the unlikely event of a product safety notification and assist us in complying with the provisions of the Consumer Product Safety Act. -
Page 4: Blender Safety
BLENDER SAFETY IMPORTANT SAFEgUARDS When using electr_ical appliances, basic safety pr_ecautions should always be followed, including the following: 1. Read all instructions. 2. To protect against risk of electrical shock, do not put Blender in water or other liquid. 3. Close supervision is necessary when any appliance is used by or near children. 4. -
Page 5: Electrical Requirements
BLENDER SAFETY 12. The use of attachments, including canning jars, not recommended by KitchenAid may cause a risk of injury to persons. 13. When blending hot liquids, remove center piece of two-piece cover. 14. Flashing light indicates ready to operate - avoid any contact with blades or moveable parts. -
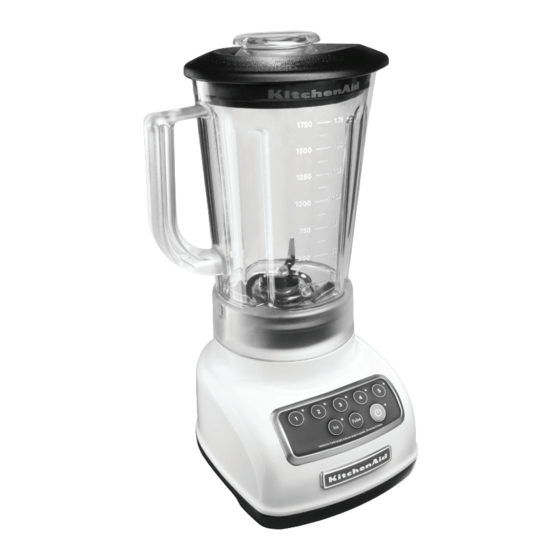
Page 6: Parts And Features
PARTS AND FEATURES Par_ts and accessor_ies Lid with ingr_edient cup BPA Fr_ee pitcher_ Stainless steel blade Speed selection buttons Clean touch contr_ol pad Die-cast metal base ASSEMBLINg ThE BLENDER Pr_epar_ing the Blender_ for_ use Befor_e Fir_st Use Before using your Blender for the first time, wipe Blender base with a warm damp cloth, then wipe clean with a damp cloth. - Page 7 ASSEMBLINg ThE BLENDER Adjust the length of the Blender power Rotate pitcher clockwise, approximately 1/8 turn until pitcher clicks into place. cord. Put lid on pitcher. NOTE: When properly positioned, pitcher will rest completely on Blender base. If not, repeat steps 1 and 2. IMPORTANT: When moving your blender, always support/lift from the blender base.
-
Page 8: Operating The Blender
OPERATINg ThE BLENDER Using the Blender_ Befor_e Use While the Blender Power indicator light is blinking: - Do not interfere with blade movement. - Do not remove pitcher lid. Before operating the Blender, make sure the pitcher is properly locked onto the Blender base. -
Page 9: Crushing Ice
OPERATINg ThE BLENDER Cr_ushing ice Your Blender offers an Ice feature. When selected, the Blender will automatically pulse for 30 seconds at staggered intervals at the optimal speed for crushing ice or other ingredients. Before operating the Blender, make sure Put ingredients into the pitcher and the pitcher is properly positioned on firmly place lid. -
Page 10: Using Pulse Mode
OPERATINg ThE BLENDER Using Pulse mode Your Blender offers a Pulse function. Before operating the Blender, make sure Put ingredients into the pitcher and the pitcher is properly positioned on firmly place lid. the base. Press POWER, then press and hold the When finished, press POWER to turn PULSE button for the desired amount of off. -
Page 11: Using The Blender Pitcher Ingredient Cup, And Soft Start Blending Feature
OPERATINg ThE BLENDER Using the Blender_ pitcher_ ingr_edient cup, and Soft Star_t blending featur_e • The Blender pitcher ingredient cup can • The Soft Start blending feature be used to measure and add ingredients. automatically starts the Blender at a lower Remove cup and add ingredients at speeds speed to draw ingredients into the blades, 1, 2, or 3. -
Page 12: Tips For Great Results
TIPS FOR gREAT RESULTS Quick tips • If you’re making beverages using ice, • Stop the Blender before using utensils start with ICE, then finish with Speed 5 in in the pitcher. Use a rubber spatula to mix order to produce a smoother texture. ingredients only when the Blender is off. -
Page 13: Care And Cleaning
TIPS FOR gREAT RESULTS Pr_epar_e pancake or_ waffle batter_ fr_om gr_ate cheese: Cut very cold cheese into mix: Place mix and other ingredients in 1.5 cm cubes. Place up to 1/2 cup (120 mL) pitcher. Cover and blend at speed 3 until cheese in the pitcher. -
Page 14: Troubleshooting
TROUBLEShOOTINg IMPORTANT: The Blender will not operate at any speed unless the Power button is pressed first. Blender_ does not oper_ate when a setting is selected Check to see if the Blender is plugged into a grounded 3-prong outlet. If it is, press POWER, then unplug the Blender. -
Page 15: Warranty
IF THIS PRODUCT FAILS TO WORK AS WARRANTED, CUSTOMER’S SOLE AND EXCLUSIVE REMEDY SHALL BE REPAIR OR REPLACEMENT ACCORDING TO THE TERMS OF THIS LIMITED WARRANTY. KITCHENAID AND KITCHENAID CANADA DO NOT ASSUME ANY RESPONSIBILITY FOR INCIDENTAL OR CONSEQUENTIAL DAMAGES. This warranty gives you specific legal rights and you may also have other rights... - Page 16 Mississauga, ON L5N 0B7 Outside the United States and Puer_to Rico: Consult your local KitchenAid dealer or the store where you purchased the Blender for information on how to obtain service. ®/™ © 2013 KitchenAid. All rights reserved. Used under license in Canada.
- Page 17 ®/™ © 2013 KitchenAid. All rights reserved. Used under license in Canada. ®/™ © 2013 KitchenAid. Tous droits réservés. Utilisé sous licence au Canada. ®/™ © 2013 KitchenAid. Todos los derechos reservados. Usada en Canadá bajo licencia. W10575361A 04/13...