Table of Contents
Advertisement
Available languages
Available languages
Quick Links
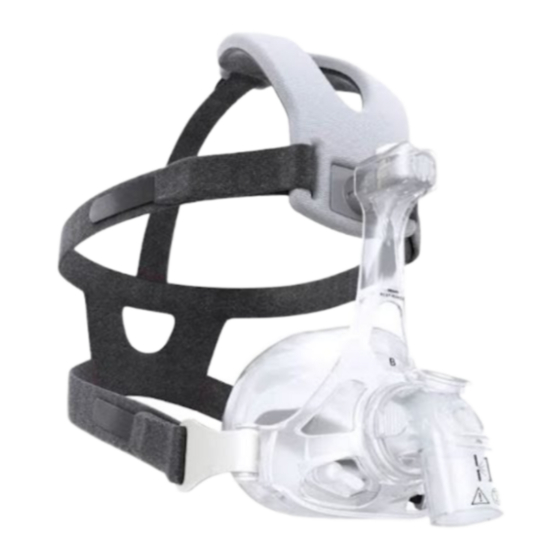
AF541 EE Leak 1 Oro-Nasal Mask
Instructions for Use -
Safety information
Intended Use
This mask is intended to provide an interface for application of CPAP or bi-level therapy to patients.
The mask is for single use in the hospital/institutional environment only. The mask is to be used on
patients (>40lbs/20kg) for whom CPAP or bi-level therapy has been prescribed.
Caution: U.S. Federal law restricts this device to sale by or on the order of a physician.
Note: This mask is not made with natural rubber latex , BPA or DEHP.
Contraindications
This mask is not for use on patients with the following conditions: recent eye surgery or dry eyes,
hiatal hernia, excessive reflux, impaired cough reflex, and impaired cardiac sphincter function.
This mask should also not be used on patients who need life support ventilation, who are taking a
prescription drug that may cause vomiting, or on patients that are uncooperative, unresponsive, or
unable to remove the mask by themselves.
Warnings
• This mask requires a separate exhalation device.
• Use of this mask while the system is not on and operating may cause rebreathing of exhaled air.
Rebreathing of exhaled air for longer than several minutes can in some circumstances lead to
suffocation.
• Monitor or intervene if the patient experiences skin redness, irritation, discomfort, blurred vision, or
drying of the eyes.
• Monitor or intervene if any of the following symptoms occur: Unusual chest discomfort, shortness of
breath, stomach distension, belching, severe headache, eye pain or eye infections.
• Monitor or intervene if any of the following symptoms occur: tooth, gum, or jaw soreness. Use of a
mask may aggravate a patient's existing dental conditions.
• This mask is for single use only and is not intended to be disinfected or cleaned after patient use.
Dispose of the mask after patient use.
• This mask is not designed for multi-patient use. Respironics cannot guarantee the performance
specifications once this mask has been disinfected.
• A minimum of 3cm H₂O (hPa) must be maintained when using this mask.
• Attaching an exhalation device requires therapy pressure level adjustment to compensate for
increased leak.
• Do not overtighten the headgear straps. Watch for signs of overtightening, such as excessive
redness, sores or bulging skin around the edges of the mask. Loosen the headgear straps to alleviate
symptoms.
• Do not block the anti-asphyxia valve.
e
1
Advertisement
Table of Contents

Related Manuals for Philips Respironics EE Leak 1 AF541


Summary of Contents for Philips Respironics EE Leak 1 AF541
- Page 1 AF541 EE Leak 1 Oro-Nasal Mask Instructions for Use - Safety information Intended Use This mask is intended to provide an interface for application of CPAP or bi-level therapy to patients. The mask is for single use in the hospital/institutional environment only. The mask is to be used on patients (>40lbs/20kg) for whom CPAP or bi-level therapy has been prescribed.
- Page 2 Mask Parts and Mask Options Mask Frame and Elbow A Forehead Adjuster Button B Forehead Adjuster Ball C Mask Frame D NIVO Nebulizer Port E Entrainment Elbow with Anti-Asphyxia Valve F Headgear Clip Post CapStrap Headgear Four Point Headgear G CapStrap Headgear Crown Strap M Four Point Headgear Crown Strap H CapStrap Forehead Pad N Four Point Headgear Forehead Pad...
-
Page 3: Before Use
Cushion Options S Over the Nose Mask Cushion with T Under the Nose Mask Cushion Nostril Pressure Pick-Off Ports Opening U Under the Nose Mask Cushion with Pressure Pick-Off Ports Before Use • Wash the patient’s face. Do not use moisturizer/lotion on your hands or the patient’s face. Safety Checks 1. - Page 4 Fitting the Under the Nose Mask Cushion The mask should rest comfortably against the face. The cushion nostril opening goes under the nostrils. The bottom of the mask cushion should rest just above the chin with the mouth slightly open de. Note: Do not place your nose in the cushion nostril opening.
- Page 5 Four Point Headgear Fitting Illustrations Oral Access Without Removing the Headgear 1. Disconnect the headgear clips. 2. Swing the mask upward rs. Removing the Mask and Headgear 1. Turn the headgear clips away from the headgear clip posts. 2. Pull the mask over the top of the head t. Using the Clean Clip Shell The mask may be placed in the Clean Clip Shell when not in use for therapy.
- Page 6 Comfort Tips • The headgear should fit loose and comfortable. If the patient’s skin bulges around the mask or if you see red marks on the patient’s face, loosen the headgear. • Adjust the headgear lower side straps to manage leaks. •...
-
Page 7: Symbols Glossary
Assembly Replacing the Mask Elbow 1. Push the elbow onto the mask frame until the tabs snap into place (audible click). Replacing the Mask Cushion 1. Grasp the sides of the mask cushion, and push it onto the mask frame z. Note: Do not pull the under the nose mask cushion by the cushion nostril opening. -
Page 8: Specifications
Symbol Title and Meaning Reference Reorder number ISO 7000-2493 Indicates the manufacturer’s catalogue number so Symbol 5.1.6, the medical device can be identified. ISO 15223-1 Mask leak symbol and value Indicates the intentional leak of the mask. ISO 7000:2014, Graphical symbols for use on equipment - Registered symbols ISO 15223-1:2012, Medical devices - Symbols to be used with medical devices labels - General requirements IEC/TR 60878:2015, Graphical symbols for electrical equipment in medical practice... -
Page 9: Informations De Sécurité
Deadspace Over-the-Nose Mask Cushion Under-the-Nose Mask Cushion 277 mL 218 mL 288 mL 215 mL 303 mL 213 mL 315 mL 230 mL Sound Levels at 10 cm H A-weighted Sound Power Level 18.5 dBA A-weighted Sound Pressure Level at 1m 11.4 dBA Disposal Dispose of in accordance with local regulations. - Page 10 • Ce masque est destiné à un usage unique et ne doit être ni désinfecté, ni nettoyé après son utilisation par un patient. Jetez le masque après son utilisation par un patient. • Ce masque n’est pas destiné à être réutilisé par d’autres patients. Respironics ne garantit pas les performances précisées dans les caractéristiques techniques de ce masque lorsque celui-ci a été...
- Page 11 Harnais CapStrap Harnais quatre points G Sangle de la couronne du harnais CapStrap M Sangle de la couronne du harnais quatre points H Cale frontale CapStrap N Cale frontale du harnais quatre points I Sangles supérieures du harnais O Sangles supérieures du harnais J Logement de la bille du harnais P Logement de la bille du harnais K Sangles inférieures du harnais...
-
Page 12: Avant L'utilisation
Avant l’utilisation • Lavez le visage du patient. N’utilisez pas de lotion ni de crème hydratante sur vos mains ou sur le visage du patient. Contrôles de sécurité 1. Inspectez visuellement la valve anti-asphyxie (battant). Le battant situé à l’intérieur du coude doit être à plat lorsque l’appareil est fermé... - Page 13 Utilisation du masque avec le harnais CapStrap ou le harnais quatre points Remarque : Reportez-vous aux illustrations ci-dessous pour connaître la procédure d’ajustement en fonction du harnais utilisé (harnais CapStrap ou harnais quatre points). 1. Saisissez et faites tourner les clips du harnais pour les dégager des barres de fixation du harnais. 2.
- Page 14 Illustrations d’ajustement du harnais quatre points Accès à la bouche sans retrait du harnais 1. Décrochez les clips du harnais. 2. Faites basculer le masque vers le haut rs. Retrait du masque et du harnais 1. Faites tourner les clips du harnais pour les dégager des barres de fixation. 2.
- Page 15 Conseils de confort • Le harnais doit être lâche et permettre un port confortable. Si la peau du patient forme un renflement autour du masque ou si vous apercevez des marques rouges sur le visage du patient, desserrez le harnais. •...
-
Page 16: Montage
Montage Remise en place du coude 1. Fixez le coude sur la coque du masque en appuyant jusqu’à ce que les languettes s’enclenchent (un clic se fait entendre). Remise en place du coussinet 1. En tenant le coussinet du masque par les côtés, fixez-le à la coque du masque en appuyant z. -
Page 17: Caractéristiques Techniques
Symbole Titre et signification Référence Référence ISO 7000-2493 Indique le numéro de référence du fabricant pour Symbole 5.1.6, ISO 15223-1 permettre l’identification du dispositif médical. Symbole et valeur de fuite du masque Indique la fuite intentionnelle du masque. ISO 7000:2014, Symboles graphiques à utiliser sur l’équipement - Symboles déposés ISO 15223-1:2012, Appareils médicaux - Symboles à... -
Page 18: Instrucciones De Uso
Espace mort Coussinet de masque supranasal Coussinet de masque infranasal 277 ml 218 ml 288 ml 215 ml 303 ml 213 ml 315 ml 230 ml Niveaux acoustiques à 10 cm H Niveau de puissance acoustique pondérée A 18,5 dBA Niveau de pression acoustique pondérée A à 1 m 11,4 dBA Mise au rebut Éliminez ce produit conformément aux réglementations locales. - Page 19 • Esta mascarilla es de un solo uso y, por tanto, no se debe desinfectar ni limpiar después de utilizarse. Deseche la mascarilla tras su uso. • Esta mascarilla no está diseñada para su uso en varios pacientes. Si la mascarilla se desinfecta, Respironics no garantiza las especificaciones de rendimiento.
- Page 20 Arnés CapStrap Arnés con cuatro posiciones G Correa de la coronilla del arnés CapStrap M Correa de la coronilla del arnés con cuatro posiciones H Almohadilla para la frente CapStrap N Almohadilla para la frente del arnés con I Correas superiores del arnés cuatro posiciones J Ranura para la bola del arnés O Correas superiores del arnés...
-
Page 21: Antes De Su Uso
Antes de su uso • Lave la cara del paciente. No utilice cremas ni lociones hidratantes en sus manos ni en la cara del paciente. Comprobaciones de seguridad 1. Inspeccione visualmente la válvula antiasfixia (aleta). La aleta situada en el interior del codo debe estar plana cuando se apague el dispositivo a. - Page 22 Uso de la mascarilla con el arnés CapStrap o el arnés con cuatro posiciones Nota: consulte las ilustraciones de ajuste siguientes adecuadas para el arnés usado (arnés CapStrap o arnés con cuatro posiciones). 1. Sujete y gire las presillas del arnés para separarlas de los enganches para las presillas del arnés. 2.
- Page 23 Ilustraciones de ajuste del arnés con cuatro posiciones Acceso oral sin quitar el arnés 1. Desconecte las presillas del arnés. 2. Gire la mascarilla hacia arriba rs. Retirada de la mascarilla y el arnés 1. Gire las presillas del arnés para separarlas de los enganches para las presillas del arnés. 2.
- Page 24 Sugerencias para mayor comodidad • El arnés debe ajustarse de forma holgada y cómoda. Si la piel del paciente se hincha alrededor de la mascarilla o si ve marcas rojas en la cara del paciente, afloje el arnés. • Ajuste las correas laterales inferiores del arnés para controlar las fugas. •...
-
Page 25: Montaje
Montaje Colocación del codo de la mascarilla 1. Presione el codo sobre el armazón de la mascarilla hasta que las lengüetas se ajusten en su sitio (se oirá un chasquido). Colocación del almohadillado de la mascarilla 1. Sujete los laterales del almohadillado de la mascarilla y presiónelo sobre el armazón de la mascarilla z. -
Page 26: Especificaciones
Símbolo Título y significado Referencia Número de pedido ISO 7000-2493 Indica el número de catálogo del fabricante para Símbolo 5.1.6, ISO 15223-1 que se pueda identificar el producto sanitario. Valor y símbolo de fuga de la mascarilla Indica la fuga intencionada de la mascarilla. ISO 7000:2014, Símbolos gráficos utilizados en el equipo. - Page 27 Espacio muerto Almohadillado de la mascarilla Almohadillado de la mascarilla bajo sobre la nariz la nariz 277 ml 218 ml 288 ml 215 ml 303 ml 213 ml 315 ml 230 ml Niveles de sonido a 10 cm H Nivel de potencia acústica ponderado A 18,5 dBA Nivel de presión acústica ponderado A a 1 m 11,4 dBA...
- Page 28 1120844 R09 LZ 1/31/2017 © 2017 Koninklijke Philips N.V. All rights reserved.