Table of Contents
Advertisement
Quick Links
Advertisement
Table of Contents

Related Manuals for Bosch HGB330E50Q


Summary of Contents for Bosch HGB330E50Q
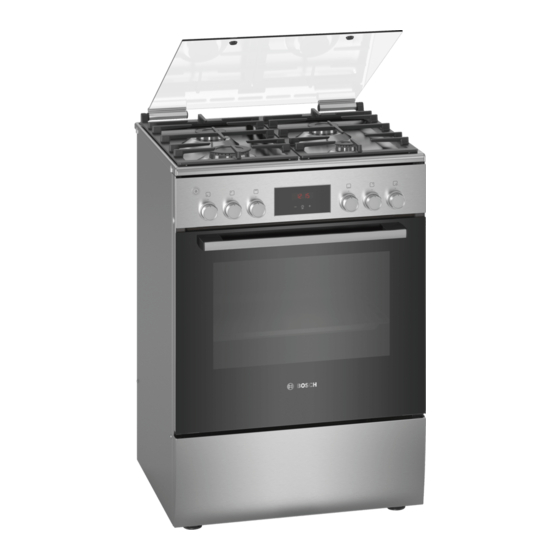
- Page 1 Free standing cooker HGB330E50Q User manual and installation instructions [en]...
-
Page 2: Table Of Contents
en Safety ATTENTION: Observe the applicable regula- Table of contents tions and only set up the appliance in well- ventilated rooms. Read through the instruc- tions before setting up and using the appli- USER MANUAL ance. Warning: The appliance is only used for cook- Safety .............. - Page 3 Safety en ▶ Connection, maintenance and setting of the been instructed on how to use the appliance gas governor must be carried out by an au- safely and have understood the resulting thorised installation specialist. dangers. Do not let children play with the appliance. WARNING ‒ Risk of suffocation! Children must not perform cleaning or user Using the gas cooking appliance leads to a...
-
Page 4: Safety
en Safety control and do not attempt to re-ignite the When the cooking compartment is hot, any al- burner for at least one minute. coholic vapours inside may catch fire. Opening the appliance door creates a ▶ Only use small quantities of drinks with a draught. - Page 5 Safety en ▶ Never let the power cord come into contact ▶ Keep children at a safe distance. with sharp points or edges. If there is water in the cooking compartment when it is hot, this may create hot steam. ▶ Never kink, crush or modify the power cord.
-
Page 6: Preventing Material Damage
en Preventing material damage ▶ Do not keep any flammable or combustible 1.5 Plinth drawer objects in the plinth drawer. WARNING ‒ Risk of fire! The surfaces of the plinth drawer may be- come very hot. ▶ Only store oven accessories in the drawer. 2 ... -
Page 7: Environmental Protection And Saving En- Ergy
Environmental protection and saving energy en No not use oven liners. Only use pots and pans with an even base. ▶ ▶ The burner may not ignite or the burner flame is not Do not heat up empty pots or pans. ▶... - Page 8 en Installation and connection Choose a burner roughly the same size as your pan. Use a glass lid. Centre the cookware on the hob. ¡ You can see into the pan through a glass lid without having to lift it. Tip: Cookware manufacturers often give the upper diameter of the saucepan.
-
Page 9: Installation And Connection
Installation and connection en ¡ Ensure that a multi-pin disconnecting system is ¡ Ensure that the appliance is not moved again after it available. is set up. ¡ For safety reasons, this appliance must only be con- ¡ In particular, the distance from the high-output nected to an earthed connection. - Page 10 en Familiarising yourself with your appliance Wall fixing To prevent the appliance from tipping over, you must fix it to the wall using the enclosed brackets. To secure the appliance to the wall, follow the installation instruc- tions. 5 Familiarising yourself with your appliance 5.1 Your appliance Explanation Appliance door...
-
Page 11: Familiarising Yourself With Your Appliance
Familiarising yourself with your appliance en Control Explanation Control Explanation The buttons are touch- You can use the four hot- Buttons and display Hotplate control sensitive surfaces. To se- plate switches to control lect a function, simply the output provided by press lightly on the relev- each individual hotplate. - Page 12 en Accessories Position Function Explanation Zero setting The hotplate is switched off. Ignition position All the igniters ignite at the same time. Settings range Large flame = highest setting Small flame = lowest setting There is a limit stop at the end of the settings range. Multi-function lamp button Do not turn the gas hotplate selector beyond the end You can use your appliance's multi-function lamp but-...
-
Page 13: Accessories
Slide the tray in with the sloping your appliance in our brochures and online: E.g. univer- edge facing the appliance door. www.bosch-home.com sal pan or Accessories vary from one appliance to another. When baking tray purchasing accessories, always quote the exact product number (E no.) of your appliance. - Page 14 en Cookware 7.2 Cleaning the appliance before using it Type of heat- Lower oven gas burner/electric grill for the first time Temperature Maximum Clean the cooking compartment and accessories be- Cooking time 30 minutes fore using the appliance to prepare food for the first time.
-
Page 15: 9.3 Operating The Hotplate
Operating the hotplate en 8.2 Suitable cookware Only use cookware with a suitable diameter. Burner/hotplate Maximum dia- Minimum dia- → "Suitable cookware", Page 15 meter of the meter of the Ensure that the cookware does not protrude over base of the base of the the edge of the hob. -
Page 16: Basic Operation
en Basic operation Push in the selector for your chosen burner and turn 9.4 Manually igniting the appliance it anti-clockwise to the power level you require. Note: In the event of a power cut, you can light the Press and hold the selector. burners manually. -
Page 17: Time-Setting Options
Time-setting options en Note: Preheat the empty oven for 15 minutes and The top cover must remain open while the appli- then start the preparation. ance is running. You can change the temperature at any time. Insert the appliance plug into the socket. Press ... -
Page 18: Childproof Lock
en Childproof lock When the cooking time has elapsed: 11.4 Setting the time Press any button to end the signal prematurely. ‒ Once the appliance has been connected to the mains To set another cooking time, press the button. ‒... -
Page 19: Cleaning And Servicing
Cleaning and servicing en Appliance Surface Suitable cleaning agents Information Stainless steel ¡ Hot soapy water To prevent corrosion, remove any limescale, grease, starch or albu- min (e.g. egg white) stains on stainless steel fronts immediately. ¡ Special stainless steel cleaning products Apply a thin layer of the stainless steel cleaning product with a soft cloth. - Page 20 en Cleaning and servicing 13.2 Cleaning the appliance 13.6 Using cleaning gel for burnt-on dirt In order to avoid damaging the appliance, clean your For hard-to-remove, burnt-on dirt, you can order a appliance only as specified, and using suitable clean- cleaning gel from our online shop, from your specialist ing products.
- Page 21 Rails en 14 Rails To clean the rails and cooking compartment thor- ATTENTION! oughly, you can remove the shelf supports. Incorrect assembly Never move the rail before the two hooks are se- ▶ cured fully in the upper holes. Otherwise the 14.1 Unhooking the rails enamelled coating may be damaged and break.
- Page 22 en Appliance door 15 Appliance door It is normally sufficient if you clean the outside of the Open the locking levers on the left- and right-hand appliance door. If the appliance door is very dirty on hinges. the inside and outside, you can remove the appliance door and clean it.
-
Page 23: Top Cover
Top cover en The notch on the hinge must engage on both sides. Close the appliance door. 15.4 Additional door safety Additional safety devices have been fitted to prevent contact with the oven doors. Always attach these safety devices when children could come near the oven. You can purchase this special accessory from after-sales service. -
Page 24: Troubleshooting
en Troubleshooting 17 Troubleshooting You can rectify minor faults on your appliance yourself. WARNING ‒ Risk of electric shock! Read the troubleshooting information before contacting Incorrect repairs are dangerous. after-sales service. This will avoid unnecessary costs. Repairs to the appliance should only be carried out ▶... - Page 25 Troubleshooting en Fault Cause and troubleshooting Burner does not ig- Gas cylinder is empty. nite. Replace the gas cylinder. ▶ There is air in the gas line following initial connection or a cylinder change. Turn the control knob to 0. Ignite the burner again. If necessary, repeat the ignition several times.
-
Page 26: Transportation And Disposal
en Transportation and disposal 18 Transportation and disposal You can find out here how to prepare your appliance 18.2 Transporting the appliance for transportation. You will also find out how to dispose Keep the original appliance packaging. Only transport of old appliances. the appliance in the original packaging. -
Page 27: How It Works
How it works en ¡ The setting values apply to food placed in the cook- WARNING ‒ Risk of scalding! ing compartment while the cooking compartment is Hot steam may escape when you open the appli- still cold. ance door. Steam may not be visible, depending on Do not place accessories into the cooking compart- the temperature. - Page 28 en How it works Meal Accessory/cookware Shelf posi- Temperature in Cooking time, tion °C/grill setting minutes Pies and tarts made from yufka dough Universal pan 50–70 Baking tray Pastries made from yeast dough Universal pan 60–80 Baking tray Pizza Universal pan 40–60 Baking tray ¡...
-
Page 29: Installation Instructions
Installation instructions en Recommended settings Yoghurt Meal Accessory/cookware Shelf position Type of Temperature Cooking heating/ in °C time, function minutes Yoghurt Cup/jar Cooking compartment 4–5 hours floor 20.7 Tips for keeping acrylamide levels to a minimum when cooking Acrylamide is dangerous to your health and is pro- duced in particular when you cook cereal and potato products at high temperatures. - Page 30 en Installation instructions ¡ After converting the appliance from one 21.3 Selecting the gas connection side gas type to another, the new gas type must On many appliances, you can carry out the gas con- be labelled on the rating plate. nection on the right- or left-hand side. If necessary, you can change the connection side.
- Page 31 Installation instructions en Secure the connecting piece using a 24 mm span- Connection in accordance with EN ISO 228-1 G½ (TS ner. Use a 24 mm spanner to place the threaded fit- EN ISO 228-1 G½) ting of the gas pipe or safety gas hose on the con- Insert the new seal in the connecting piece.
-
Page 32: Nozzle (Mm)
en Installation instructions Fit the safety gas hose and use a pipe union or Note: cable clamp to tighten it securely. The accessories supplied may differ depending on the appliance model. ¡ The gas connecting piece may vary depending on the gas type and the country-specific regulations. ¡... - Page 33 Installation instructions en After replacing the nozzles, check that there are no Replace all of the bypass nozzles in the appliance. leaks. You can find additional information about this You can find additional information about this in the in the section entitled "Leak and function test" section entitled "Removing the control panel"...
- Page 34 en Installation instructions Remove the two screws (T20) at the front right and Remove the two screws (M4) that are uncovered left of the hob panel. Do not remove the plastic when you remove the control knobs (T15). parts that are located below these. Grip the panel with both hands and slowly pull it up- Note: To ensure that no scratches are formed on wards.
- Page 35 Installation instructions en Select the appropriate replacement bypass nozzles Replacing the oven gas burner from the table. You can find additional information Preparation about this in the section entitled "Technical data – ¡ Switch off all of the knobs on the control panel. Gas"...
- Page 36 en Installation instructions Press the function control knob for the oven and 21.6 Leak test and function test turn the knob anti-clockwise. Gas therefore comes The leak test must be carried out by two people. to the nozzle. a If dispersions and bubbles occur on the foamy sur- WARNING ‒ Risk of explosion! face and these indicate that gas is escaping, follow Sparks, flames or open flames may cause explosions...
-
Page 37: Bypass Nozzle (Mm)
Installation instructions en Nozzle values for the auxiliary burner Note the following information for the gas types that are listed in the table for some burners. G20/ G25.3 G30/G31 Gas pressure (mbar) 20/25 28– 30/37 Nozzle (mm) 0.72 0.72 0.68 0.77 0.72 0.72 0.50... -
Page 38: Gas Flow At 15 °C And
en Installation instructions G20/G25 G25.3 G30 Bypass nozzle (mm) 0.76 0.76 0.67 0.80 0.70 0.70 0.48 0.45 Max. input power (kW) Min. input power (kW) Gas flow at 15 °C and 1013 mbar m 0.285/0.332 0.285 0.285 0.332 0.332 0.325 Gas flow at 15 °C and 1013 mbar g/h... - Page 40 Expert advice for your Bosch home appliances, help with problems or a repair from Bosch experts. Find out everything about the many ways Bosch can support you: www.bosch-home.com/service Contact data of all countries are listed in the attached service directory.