Table of Contents
Advertisement
Available languages
Available languages
INSTRUCTION MANUAL
GUIDE D'UTILISATION
MANUAL DE INSTRUCCIONES
DWFP71917
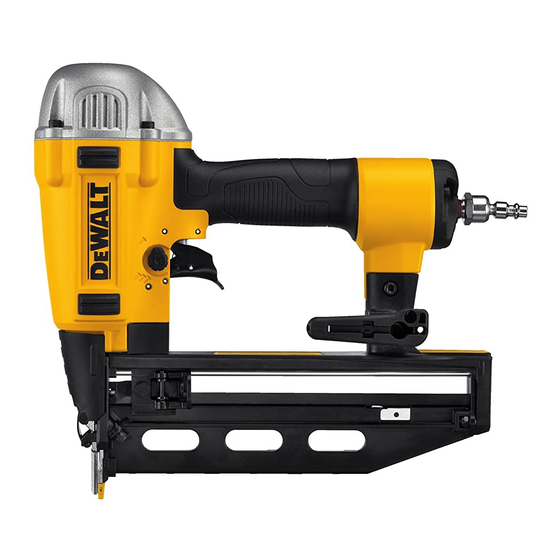
16 Gauge Finish Nailer
Cloueuse de finition de calibre 16
Clavadora de acabado de calibre 16
If you have questions or comments, contact us.
Pour toute question ou tout commentaire, nous contacter.
Si tiene dudas o comentarios, contáctenos.
1-800-4-D
WALT • www.dewalt.com
e
INSTRUCTIVO DE OPERACIÓN, CENTROS DE SERVICIO Y PÓLIZA DE GARANTÍA.
ADVERTENCIA: LÉASE ESTE INSTRUCTIVO ANTES DE USAR EL PRODUCTO.
Advertisement
Table of Contents

Related Manuals for DeWalt DWFP71917


Summary of Contents for DeWalt DWFP71917
- Page 1 If you have questions or comments, contact us. Pour toute question ou tout commentaire, nous contacter. Si tiene dudas o comentarios, contáctenos. 1-800-4-D WALT • www.dewalt.com INSTRUCTION MANUAL INSTRUCTIVO DE OPERACIÓN, CENTROS DE SERVICIO Y PÓLIZA DE GARANTÍA. ADVERTENCIA: LÉASE ESTE INSTRUCTIVO ANTES DE USAR EL PRODUCTO.
-
Page 3: Definitions: Safety Guidelines
BEFORE OPERATING THIS TOOL, CAREFULLY READ AND • Actuating tool may result in flying FIG. A UNDERSTAND ALL INSTRUCTIONS IN THE IMPORTANT debris, collation material, or dust SAFETY INSTRUCTIONS SECTION. which could harm operator’s eyes. The operator and all those persons in the general area Definitions: Safety Guidelines should wear safety glasses with permanently attached side shields. - Page 4 • Do not use bottled gases to power this • Do not remove, tamper with, or FIG. E FIG. H tool. Bottled compressed gases such as oxygen, otherwise cause the tool, trigger, or carbon dioxide, nitrogen, hydrogen, propane, contact trip to become inoperable. Do acetylene or air are not for use with pneumatic tools.
- Page 5 • Do not overreach. Maintain proper footing and balance at all times. Loss of • Do not drive nails onto the heads of FIG. N balance may cause cause personal injury. (Fig. K) other fasteners or with the tool at too steep an angle.
- Page 6 • Keep hands and body parts clear of BUMP/CONTACT ACTION TRIGGER FIG. T FIG. Q immediate work area. Hold workpiece with • When using the contact action clamps when necessary to keep hands and body trigger, be careful of unin tentional out of potential harm.
-
Page 7: Tool Specifications
WEIGHT 4.4 lbs (2.0 kg) * The DWFP71917 requires 2.0 cubic feet per minute or cfm (56.6 liters per minute or lt/min) of free air at 80 psi (5.6 kg/cm ) to operate at a rate of 60 fasteners per minute. -
Page 8: Components (Fig. 1)
OPERATION For example, if your fastener usage averages 30 fasteners per minute, you need 50% of the tools cfm required to operate the tool at the rate of 60 fasteners per minute. In Preparing the Tool this case, be sure that your air compressor can deliver a minimum of 1.0 cfm. (28.3 lt/ WARNING: Read the section titled Important Safety Instructions min) at 80 psi (5.6 kg/cm ) for optimum performance. - Page 9 2. Fully depress nosepiece against the work The DWFP71917 features a selectable trigger system that allows the user to choose surface. between the following modes of operation 3. Pull trigger.
- Page 10 2. Depress the trigger. THE TOOL MUST NOT CYCLE. To operate the tool using the BUMP ACTUATION method: C. With the tool off the work surface, pull the trigger. Press the contact trip against the work surface. 1. Depress the trigger. 2.
-
Page 11: Cold Weather Operation
Belt Hook (Fig. 1, 5) Cold Weather Operation The belt hook (J) can be changed to either side of the tool to accommodate left- or WARNING: Read the section titled Important Safety Instructions right-handed users. at the beginning of this manual. Always wear eye and ear protection when operating this tool. - Page 12 Clearing a Jammed Fastener (Fig. 1, 7) ACTION Clean magazine, pusher, and contact trip mechanism If a fastener becomes jammed in the nosepiece, keep the tool pointed away from you Permits smooth operation, reduces wear, and prevents jams and follow these instructions to clear: Blow clean with compressed air.
-
Page 13: Register Online
Laser, or Nailer for any reason, you can return it within 90 days from the date of any accessory, please contact DEWALT Industrial Tool Co., 701 East Joppa Road, purchase with a receipt for a full refund – no questions asked. -
Page 14: Troubleshooting Guide
FREE WARNING LABEL REPLACEMENT: If your warning labels become illegible or are missing, call 1-800-4-D WALT (1-800-433-9258) for a free replacement. TROUBLESHOOTING GUIDE MANY COMMON PROBLEMS CAN BE SOLVED EASILY BY UTILIZING THE CHART BELOW. FOR MORE SERIOUS OR PERSISTENT PROBLEMS, CONTACT A D WALT SERVICE CENTER OR CALL 1-(800)-4-D WALT. - Page 15 TROUBLESHOOTING GUIDE MANY COMMON PROBLEMS CAN BE SOLVED EASILY BY UTILIZING THE CHART BELOW. FOR MORE SERIOUS OR PERSISTENT PROBLEMS, CONTACT A D WALT SERVICE CENTER OR CALL 1-(800)-4-D WALT. WARNING: To reduce the risk of serious personal injury, remove fasteners from magazine before making any adjustments or servicing this tool.
- Page 16 TROUBLESHOOTING GUIDE MANY COMMON PROBLEMS CAN BE SOLVED EASILY BY UTILIZING THE CHART BELOW. FOR MORE SERIOUS OR PERSISTENT PROBLEMS, CONTACT A D WALT SERVICE CENTER OR CALL 1-(800)-4-D WALT. WARNING: To reduce the risk of serious personal injury, remove fasteners from magazine before making any adjustments or servicing this tool.
-
Page 17: Définitions : Lignes Directrices En Matière De Sécurité
FIG. D TOUT AUTRE OUTIL D WALT, COMPOSEZ LE NUMÉRO SANS FRAIS : 1 800 personnes dans la zone de travail le port 4-DEWALT (1 800 433-9258) d’équipement de protection des yeux. (fig. A) CONSERVER TOUS LES AVERTISSEMENTS • Toujours porter des protecteurs d’oreilles appropriés et autres... - Page 18 l’utilisation. Selon les conditions et la durée d’utilisation, le bruit émis par cet • Utiliser des raccords qui libèrent toute la pression de l’outil outil peut causer une perte auditive. (fig. A) lorsqu’il est débranché de la source d’alimentation. Utiliser des connecteurs de tuyau qui coupent l’alimentation d’air du compresseur quand l’outil •...
- Page 19 • Inspecter l’outil avant de l’utiliser. Ne FIG. K FIG. H • Ne pas tendre le bras trop loin. Il faut pas faire fonctionner un outil si une demeurer bien campé sur ses pieds et en équilibre en partie de l’outil, de la détente ou du tout temps.
- Page 20 • Toujours utiliser l’outil dans un endroit • Garder les mains et les parties du FIG. Q FIG. N propre et bien éclairé; s’assurer que la surface corps éloignées de la zone de travail de travail est exempte de débris et prendre soin de immédiate.
- Page 21 • Lors de l’utilisation de la gâchette • Ne pas enfoncer de clous à l’aveugle FIG. T FIG. U dans les murs, les planchers ou par contact, prendre garde aux autres zones de travail. Des attaches doubles déclenchements enfoncées dans des fils électriques sous tension, intempestifs provoqués par le recul de la plomberie ou d’autres types d’obstacles de l’outil.
-
Page 22: Fiche Technique De L'outil
• protection oculaire conforme à la norme ANSI Z87.1 (CAN/CSA Z94.3), modèle DWFP71917 besoin 56,6 litres minute (2,0 pi³/min) d’air libre à une pression de 5,6 kg/cm (80 psi) pour fonctionner à un taux • protection auditive conforme à la norme ANSI S12.6 (S3.19) et de 60 fixations par minute. -
Page 23: Préparation De L'outil
Le modèle DWFP71917 est équipé d’une gâchette avec mode de sélection permettant ATTENTION : NE JAMAIS pulvériser ni appliquer de quelque autre à... - Page 24 L’utilisateur doit maintenir le déclencheur par contact contre la surface de travail Utilisation de l’outil en mode d’action séquentielle : avant d’appuyer sur la gâchette. Le positionnement des fixations sera ainsi plus 1. Tourner le sélecteur de mode de la gâchette FIG.
- Page 25 2. Appuyer sur la gâchette. DÉCLENCHEMENT PAR CONTACT Utilisation de l’outil en mode D’ACTIONNEMENT PAR CHOC : A. Sans toucher la gâchette, appuyer le déclencheur par contact contre la surface de 1. Appuyer sur la gâchette. travail. 2. Pousser le déclencheur par contact contre la surface de travail. Tant que la L’OUTIL NE DOIT PAS SE DÉCLENCHER.
-
Page 26: Fonctionnement Par Temps Froid
Fonctionnement par temps froid Tourner la molette de réglage de profondeur (K) jusqu’à obtention de la profondeur souhaitée. AVERTISSEMENT: Lire la section intitulée Directives de sécurité Crochet pour ceinture (fig. 1, 5) importantes début ce manuel. Toujours porter une protection oculaire et auditive durant l’utilisation de cet outil. -
Page 27: Entretien
5. Augmenter la pression jusqu’au niveau de fonctionnement (sans excéder 120 psi) 4. Retirer la fixation coincée. Il peut être nécessaire d’utiliser une pince pour FIG. 6 décoincer la fixation. 5. Fermer le verrou de la porte de dégagement du nez. 6. - Page 28 1 800 433-9258 (1 800 4-D WALT) ou visiter notre site Web : www. un chiffon humecté uniquement d’eau et de savon doux. Ne jamais laisser de liquide dewalt.com. pénétrer dans l’outil et n’immerger aucune partie de l’outil dans un liquide. Registre en ligne Lubrification Merci pour votre achat.
- Page 29 Pour en savoir plus sur la protection et les réparations sous garantie, visiter D’AVERTISSEMENT : Si l’étiquette d’avertissement devient illisible ou est le site Web www.dewalt.com ou composer le 1 800 433-9258 (1 800 4-D WALT). manquante, composer le 1 800 433-9258 (1 800 4-D WALT) pour un remplacement Cette garantie ne s’applique pas aux accessoires ni aux dommages causés par des...
-
Page 30: Guide De Dépannage
GUIDE DE DÉPANNAGE IL EST POSSIBLE DE RÉSOUDRE FACILEMENT LES PROBLÈMES LES PLUS COMMUNS À L’AIDE DU TABLEAU CI-DESSOUS. POUR DES PROBLÈMES PLUS GRAVES OU DES PROBLÈMES QUI PERSISTENT, COMMUNIQUER AVEC UN CENTRE DE RÉPARATION D WALT OU COMPOSER LE 1 800 4-D WALT. - Page 31 GUIDE DE DÉPANNAGE IL EST POSSIBLE DE RÉSOUDRE FACILEMENT LES PROBLÈMES LES PLUS COMMUNS À L’AIDE DU TABLEAU CI-DESSOUS. POUR DES PROBLÈMES PLUS GRAVES OU DES PROBLÈMES QUI PERSISTENT, COMMUNIQUER AVEC UN CENTRE DE RÉPARATION D WALT OU COMPOSER LE 1 800 4-D WALT.
- Page 32 GUIDE DE DÉPANNAGE IL EST POSSIBLE DE RÉSOUDRE FACILEMENT LES PROBLÈMES LES PLUS COMMUNS À L’AIDE DU TABLEAU CI-DESSOUS. POUR DES PROBLÈMES PLUS GRAVES OU DES PROBLÈMES QUI PERSISTENT, COMMUNIQUER AVEC UN CENTRE DE RÉPARATION D WALT OU COMPOSER LE 1 800 4-D WALT.
-
Page 33: Definiciones: Normas De Seguridad
SI TIENE ALGUNA PREGUNTA O DESEA HACER ALGÚN COMENTARIO SOBRE ESTA O área de trabajo utilicen equipos de protección ocular. FIG. C CUALQUIER OTRA HERRAMIENTA DEWALT, LLAME SIN COSTO AL: 1-800-4-DEWALT (Fig. A) (1-800-433-9258) • Utilice siempre la apropiada protección,... - Page 34 • Regule la presión del aire. Utilice una • Desconecte la herramienta del suministro de aire cuando no se FIG. E presión compatible con los valores vaya a usar. Siempre desconecte la herramienta del suministro indicados placa de aire y retire los clavos del cargador antes de dejar la zona características.
- Page 35 • Revise la herramienta antes de usarla. • No ponga en peligro su estabilidad. FIG. H FIG. K No trabaje con la herramienta si alguna Manténgase siempre bien apoyado y equilibrado. La parte de ésta, el gatillo o el activador pérdida del equilibrio podría provocar una lesión por contacto no funcionan;...
- Page 36 • No intente insertar grapas cerca del • Mantenga las manos y otras partes FIG. N FIG. Q borde del material. La pieza de trabajo podría del cuerpo alejadas del área de quebrarse y hacer que la grapa rebotase, trabajo más inmediata. Sostenga la pieza lesionándolo a usted o a un compañero.
- Page 37 • La elección del método de disparo es importante. Verifique las • No clave indiscriminadamente en FIG. U opciones de disparo en el manual. paredes, suelos u otras superficies de trabajo. Los clavos introducidos en cables GATILLO DE ACCIÓN POR TOPE/CONTACTO eléctricos, cañerías u otro tipo de obstrucciones •...
-
Page 38: Especificaciones De La Herramienta
• Protección para los ojos ANSI Z87.1(CAN/CSA Z94.3), * El modelo DWFP71917 requiere 56,6 litros por minuto o l/min (2,0 pies cúbicos por minuto o cfm) de aire libre a 5,6 kg/cm (80 psi) para operar a una tasa de 60 remaches •... -
Page 39: Preparación De La Herramienta
1. Antes de usar la herramienta, asegúrese de que los tanques del compresor se La DWFP71917 posee un sistema de gatillo seleccionable que permite al usuario hayan vaciado adecuadamente. elegir entre los siguientes modos de funcionamiento. - Page 40 El interruptor secuencial requiere que el operador presione la punta de contacto contra 1. Gire el selector de modo de gatillo (B) en FIG. 2 la superficie de trabajo antes de presionar el gatillo. Esto facilita la colocación precisa sentido horario a la posición de del remache.
- Page 41 Para utilizar herramienta usando método ACCIÓN DE INTERRUPTOR DE CONTACTO ACCIONAMIENTO POR TOPE: A. Con el dedo fuera del gatillo, presione el interruptor de contacto contra la 1. Presione el gatillo. superficie de trabajo. 2. Presione el interruptor de contacto contra la superficie de trabajo. Mientras el LA HERRAMIENTA NO DEBE ACCIONARSE.
- Page 42 La función de ajuste de control de profundidad de los remaches proporciona control 2. Alinee el gancho del cinturón con la ranura en el soporte. de la profundidad de colocación del remache desde al ras o apenas por encima de la 3.
-
Page 43: Mantenimiento
Cuadro de mantenimiento diario 3. Baje la presión del aire a 80 psi o menos. 4. Accione la herramienta 5 o 6 veces en madera de deshecho para lubricar las ACCIÓN Drene los tanques del compresor y las mangueras diariamente juntas tóricas. -
Page 44: Registro En Línea
Utilice siempre piezas de repuesto idénticas. más información sobre la cobertura de la garantía y la información de reparación de la garantía, visite www.dewalt.com o llame al 1 800 433-9258 (1 800 4-D WALT). Esta garantía no se aplica a accesorios o daños causados en caso de que terceros... - Page 45 legales específicos y usted puede tener otros derechos que varían en ciertos estados o provincias. Además de esta garantía, las herramientas D WALT están cubiertas por nuestro: SERVICIO GRATUITO DE 1 AÑO WALT mantendrá la herramienta y reemplazará las piezas desgastadas por el uso normal sin costo y en cualquier momento durante el primer año después de la compra.
-
Page 46: Guía De Solución De Problemas
GUÍA DE SOLUCIÓN DE PROBLEMAS CON LA TABLA SIGUIENTE, PODRÁ SOLUCIONAR MUCHOS PROBLEMAS COMUNES CON FACILIDAD. PARA PROBLEMAS PERSISTENTES O MÁS GRAVES, PÓNGASE EN CONTACTO CON EL CENTRO DE MANTENIMIENTO D WALT O LLAME AL 1-(800)-4-D WALT. ADVERTENCIA: Para reducir el riesgo de lesiones personales graves, quite los remaches del cargador antes de realizar ajustes o reparar esta herramienta SYMPTOM CAUSE... - Page 47 GUÍA DE SOLUCIÓN DE PROBLEMAS CON LA TABLA SIGUIENTE, PODRÁ SOLUCIONAR MUCHOS PROBLEMAS COMUNES CON FACILIDAD. PARA PROBLEMAS PERSISTENTES O MÁS GRAVES, PÓNGASE EN CONTACTO CON EL CENTRO DE MANTENIMIENTO D WALT O LLAME AL 1-(800)-4-D WALT. ADVERTENCIA: Para reducir el riesgo de lesiones personales graves, quite los remaches del cargador antes de realizar ajustes o reparar esta herramienta SYMPTOM CAUSE...
- Page 48 GUÍA DE SOLUCIÓN DE PROBLEMAS CON LA TABLA SIGUIENTE, PODRÁ SOLUCIONAR MUCHOS PROBLEMAS COMUNES CON FACILIDAD. PARA PROBLEMAS PERSISTENTES O MÁS GRAVES, PÓNGASE EN CONTACTO CON EL CENTRO DE MANTENIMIENTO D WALT O LLAME AL 1-(800)-4-D WALT. ADVERTENCIA: Para reducir el riesgo de lesiones personales graves, quite los remaches del cargador antes de realizar ajustes o reparar esta herramienta SYMPTOM CAUSE...
- Page 51 Industrial 23+ CFM Industriel 23 pieds cubes par minute et + Industrial 23+ CFM 8 HP Gas 14 - 16 CFM 8 CH Essence 14 à 16 pieds cubes par minute 8 CV Gas 14 -16 CFM 5.5 HP Gas/2 HP Elec. 8 - 9 CFM 5.5 HP Essence/ 2 CH Élec.
- Page 52 WALT Industrial Tool Co., 701 East Joppa Road, Towson, MD 21286 (AUG 18) Part No. 9R209199 DWFP71917 Copyright © 2014, 2015, 2018 D WALT The following are trademarks for one or more D WALT power tools: the yellow and black color scheme; the “D” shaped air intake grill; the array of pyramids on the handgrip; the...