
Related Manuals for Panasonic BT-LH900


Summary of Contents for Panasonic BT-LH900
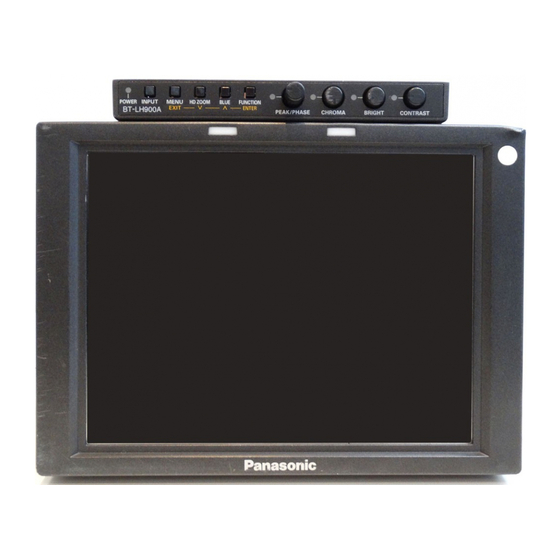
- Page 1 Liquid Crystal Video Monitor BT-LH900 POWER INPUT MENU HD ZOOM BLUE FUNCTION EXIT ENTER PEAK/PHASE CHROMA BRIGHT CONTRAST Before attempting to connect, operate or adjust this product, please read these instructions completely.
-
Page 2: For Your Safety
For your safety CAUTION RISK OF ELECTRIC SHOCK DO NOT OPEN CAUTION: TO REDUCE THE RISK OF ELECTRIC SHOCK, DO NOT REMOVE COVER (OR BACK). NO USER SERVICEABLE PARTS INSIDE. REFER TO SERVICING TO QUALIFIED SERVICE PERSONNEL. The lightning flash with arrowhead symbol, within an equilateral triangle, is intended to alert the user to the presence of uninsulated “dangerous voltage”... -
Page 3: Table Of Contents
Contents Precautions for use ....3 Introduction ..... . 4 Parts and their functions . -
Page 4: Introduction
∫ Slim design, light weight, compact size, low power consumption and driven by DC power Since this monitor uses an LCD panel, it has a slim design, light weight and compact size. Furthermore, while supporting HD specifications, it has a low power... -
Page 5: Parts And Their Functions
These tally lamps can be lighted by initiating the GPI ON/OFF operation. <Note> When the monitor is used outdoors, it may be hard to see that the tally lamps are in fact lighted. Controls 2, 3 and 4 can be separated from the monitor main unit as the main controls and relocated to the bottom surface or right panel of the main unit. -
Page 6: Image Controls
≥ PEAKING This function is selected when the monitor is to be used as a viewfinder. It is used to set the edge sharpness. Any value from 0 to 30 can be set: the higher the value, the sharper the edges. -
Page 7: Power Switch
? Tripod fastening screws Two screws (UNC3/8-16 compatible) for securing a tripod are provided each on the top of the monitor and at its bottom where the main controls are removed. A removable screw spacer is provided in one of the screw holes in the bottom of the monitor, and this supports a UNC1/4-20 screw. -
Page 8: Relocating The Main Controls
Relocating the main controls The main controls can be relocated to the bottom surface or right panel of the monitor depending on such factors as where and how the monitor will be used. <Note> Before relocating the main control, make absolutely sure that the power has been turned off. -
Page 9: Supplying The Power
Supplying the power An Anton Bauer, V-mount or other such type of battery pack or an AC power source can be used to power this monitor. Using the Anton Bauer battery pack Install the Anton Bauer type of battery pack. -
Page 10: Cosmetic Screws
A total of eight cosmetic screws are provided with the monitor for use at such times when the main controls have been relocated. (Refer to page 8) Since these screws also serve to protect the internal mechanisms, do not leave the screw holes empty but place the screws inside them and tighten them up. -
Page 11: How To Use The On-Screen Menus
This appears when REMOTE has been selected as the CONTROL item setting on the CONTROL screen of the main unit. monitor controls will no longer function at this time. 3 Battery voltage display This indicates the voltage level of the battery. If an Anton Bauer digital battery is being used, its remaining level is indicated as a number of "[//]"... - Page 12 How to use the on-screen menus Image control display [ C O N T R A S T ] Battery voltage display D C 1 5 0 V Concerning the signal formats Menu setting AUTO 1080/60I 1080/50I 1080/30P 1080/25P 1080/24P 1080/24PsF 1035/60I 720/60P...
-
Page 13: Menu Operations
Menu operations Menu operations When the MENU/EXIT button is pressed, the main menu appears on the screen. MENU/EXIT button Use the HD ZOOM/X button and BLUE/W button to move the cursor, and select the desired menu using the FUNCTION/ENTER button. [ M A I N ] M A R K E R V I D E O C O N F I G... -
Page 14: User Data
The following data can be saved and loaded as user data files: ≥ All menu settings (including the function settings of the buttons at the front of the monitor) with the exception of USER MODE LOAD/SAVE ≥... -
Page 15: Main Menu
MAIN MENU Menu configuration MAIN MARKER VIDEO CONFIG SYSTEM CONFIG OSD CONFIG INPUT SELECT CONTROL MARKER SELECT MARKER 16:9 MARKER 4:3 GAMMA SELECT MARKER BACK COLOR TEMP. CENTER MARKER SHARPNESS MODE GPI PRESET1 SHARPNESS H GPI PRESET2 SHARPNESS V I-P MODE MONO SD ASPECT BACKLIGHT... -
Page 16: Menu Items
MAIN MENU Menu items MARKER Item Setting Description MARKER SELECT MENU For setting whether the marker display settings are to be performed using the menu or from the GPI connector. MENU: The operations are performed using the menu. Operations from the GPI connector are canceled. -
Page 17: Types Of Markers
MAIN MENU Types of markers 16:9 markers (These appear when HD signals or when SD signals with a 16:9 aspect ratio are supplied.) 4:3 markers 14:9 markers Markers are displayed only in the form of vertical lines. The shaded areas indicate what is set by the MARKER BACK item. -
Page 18: Video Config
MAIN MENU VIDEO CONFIG Item Setting Description GAMMA SELECT For setting the gamma mode. NORMAL GPI: This is the GPI setting. FILM details, specifications” (page 22). NORMAL: The normal gamma mode is established. FILM: The film mode that supports the Varicam digital cine camera is established. -
Page 19: System Config
MAIN MENU SYSTEM CONFIG Item Setting Description BACKLIGHT For adjusting the backlight brightness to a level from 0 to 60. The higher the setting, the brighter the backlight. FUNCTION For setting the function to be allocated to ON/OFF the FUNCTION/ENTER button. HV DELAY WFM ON/OFF: The Y signal (luminance) UNDEF... -
Page 20: Input Select
MAIN MENU INPUT SELECT Item Setting Description SDI1 * For setting whether the SDI 1 signals can be selected when the channels are to be switched using the INPUT button. OFF: The SDI 1 signals cannot be selected. ON: The SDI 1 signals can be selected. FORMAT AUTO For selecting the signals whose input is to... - Page 21 MAIN MENU INPUT SELECT Item Setting FORMAT AUTO For selecting the signals whose input is to 1080/60I be accepted in the YPBPR mode and in the 1080/50I RGB mode. 1080/30P The signals can be set for each mode, and 1080/25P when the MODE item setting is switched 1080/24P from YPBPR to RGB or vice versa, the...
-
Page 22: Remote Specifications
REMOTE specifications This monitor can be operated by remote control using the GPI connector and RS-232C connector. GPI connector The items on the GPI screen correspond to the connector pins shown below. Functions can be allocated to these pins on the GPI screen of the main menu. -
Page 23: Error And Warning Displays
1-second intervals. Countermeasure ≥ Turn off the power and turn it back on. If the error display persists, contact a Panasonic service center. ± Low remaining battery charge warning/error When this warning/error appears ≥... -
Page 24: Maintenance
In order to ensure that the monitor's functions will perform to the best of their ability for a long time to come, be absolutely sure to conduct the maintenance and inspections described here. -
Page 25: Specifications
Dimensions (W a H a D): 218 a 176 a 65 mm (When the main controls have been installed at the bottom of the monitor) Weight: 2.0 kg (main unit only) Ambient operating temperature: 0 °C to 40 °C... - Page 26 MEMO...
- Page 27 MEMO...
- Page 28 PANASONIC BROADCAST & TELEVISION SYSTEMS COMPANY UNIT COMPANY OF MATSUSHITA ELECTRIC CORPORATION OF AMERICA Executive Office: One Panasonic Way 4E-7, Secaucus, NJ 07094 (201) 348-7000 EASTERN ZONE: One Panasonic Way 4E-7, Secaucus, NJ 07094 (201) 348-7621 Southeast Region: 1225 Northbrook Parkway, Ste 1-160, Suwanee, GA 30024 (770) 338-6835...