Table of Contents
Advertisement
Quick Links
HP ProLiant m800 Server Cartridge
User and Maintenance Guide
Abstract
This document is for the person who installs, administers, services, and troubleshoots cartridges. This guide describes identification and maintenance
procedures, and specifications and requirements for hardware components and software. HP assumes you are qualified in the servicing of computer
equipment, trained in recognizing hazards in products, and are familiar with weight and stability precautions.
Part Number: 793524-001
October 2014
Edition: 1
Advertisement
Table of Contents

Related Manuals for HP ProLiant M800


Summary of Contents for HP ProLiant M800
- Page 1 This document is for the person who installs, administers, services, and troubleshoots cartridges. This guide describes identification and maintenance procedures, and specifications and requirements for hardware components and software. HP assumes you are qualified in the servicing of computer equipment, trained in recognizing hazards in products, and are familiar with weight and stability precautions.
- Page 2 © Copyright 2014 Hewlett-Packard Development Company, L.P. The information contained herein is subject to change without notice. The only warranties for HP products and services are set forth in the express warranty statements accompanying such products and services. Nothing herein should be construed as constituting an additional warranty. HP shall not be liable for technical or editorial errors or omissions contained herein.
-
Page 3: Table Of Contents
Log in to the iLO CM firmware........................16 Setup ............................17 Overview ..............................17 Installing and configuring an HP Moonshot 1500 Chassis ................17 Installing and configuring the switch and uplink modules ................17 Installing the cartridge ..........................17 Powering up the chassis ..........................18 Powering up the node .......................... - Page 4 Specifications ..........................34 Chassis environmental specifications ......................34 Chassis specifications ..........................34 Support and other resources ......................35 Before you contact HP ..........................35 HP contact information ..........................35 Acronyms and abbreviations ......................36 Documentation feedback ......................37 Index ............................38...
-
Page 5: Component Identification
Component identification Cartridge LEDs and buttons Item Description Status Cartridge power Green = Normal operation LED/button Amber = Standby operation Off = No power Cartridge health LED Green = Normal operation Flashing amber = Degraded condition Flashing red = Critical condition Off = No power Cartridge UID LED/button Blue = Cartridge ID is selected. -
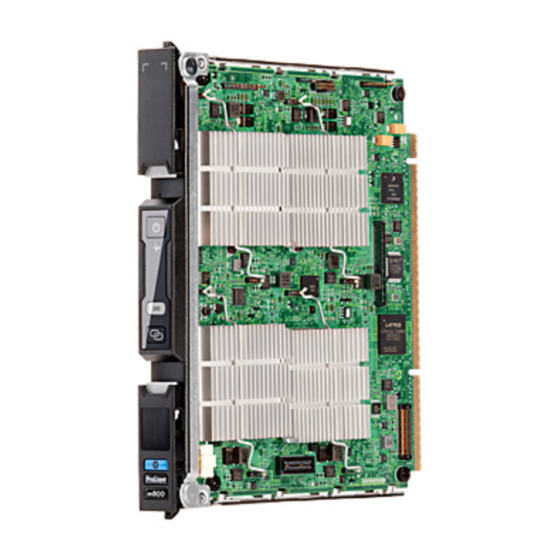
Page 6: Cartridge Components
Cartridge components Item Description Processor heatsink Solid state device connector DIMM slots Processor numbering Component identification 6... -
Page 7: Dimm Numbering
DIMM numbering Solid state device numbering Component identification 7... -
Page 8: Cartridge Slot And Switch Module Bay Identification
Cartridge slot and switch module bay identification The chassis provides 45 cartridge slots (1-45) and two switch module bays (A-B). Component identification 8... -
Page 9: Operations
Use commas to separate non-contiguous numbers (omit spaces), or a dash to denote a range (for example, C1,3-9N1-4). For more information about using commands, see the HP Moonshot iLO Chassis Management CLI User Guide on the HP Moonshot Information Library (http://www.hp.com/go/moonshot/docs). -
Page 10: Power Down A Cartridge Locally
Power down a cartridge locally To power down a cartridge locally: Power down the cartridge according to the current cartridge state: If the cartridge power LED is green, press and release the cartridge power button. This method initiates a controlled shutdown of applications and the OS on any active nodes before the cartridge enters standby mode. -
Page 11: Remove The Access Panel
After performing the installation or maintenance procedure, slide the chassis back into the rack, and then press the chassis firmly into the rack to secure it in place. Remove the access panel IMPORTANT: After performing a procedure inside the chassis, always install the access panel on the chassis when complete. -
Page 12: Remove The Cartridge Blank
Lift and remove the access panel. Turn the access panel over to locate the HP Moonshot 1500 Chassis label. This label provides information on LED status indicators, component identification, and cartridge and switch installation procedures. Remove the cartridge blank CAUTION: For proper cooling, be sure that a cartridge or a cartridge blank is always installed in each cartridge slot in the chassis. -
Page 13: Install The Cartridge
CAUTION: For proper cooling, be sure that a cartridge or a cartridge blank is always installed in each cartridge slot in the chassis. When replacing a cartridge, leave the cartridge slot empty for no more than 30 seconds. Failure to do so can disrupt airflow in the chassis. To remove the component: Power down the node or cartridge ("Power... -
Page 14: Install The Cartridge Blank
Prepare the cartridge. Align and install the cartridge into the chassis. Install the access panel (on page 15). Slide the chassis into the rack. Install the cartridge blank CAUTION: For proper cooling, be sure that a cartridge or a cartridge blank is always installed in each cartridge slot in the chassis. -
Page 15: Install The Access Panel
Use commas to separate non-contiguous numbers (omit spaces), or a dash to denote a range (for example, C1,3-9N1-4). For more information about using commands, see the HP Moonshot iLO Chassis Management CLI User Guide on the HP Moonshot Information Library (http://www.hp.com/go/moonshot/docs). -
Page 16: Power Up A Cartridge Locally
If no changes were made, enter the user name and password assigned for the chassis or the default user name and password: Default username: Administrator Default password: password For more information about the iLO CM firmware, see the HP Moonshot iLO Chassis Management CLI User Guide in the HP Moonshot Information Library (http://www.hp.com/go/moonshot/docs). Operations 16... -
Page 17: Setup
HP Moonshot Information Library (http://www.hp.com/go/moonshot/docs). Installing and configuring the switch and uplink modules For specific steps to install the switch modules and uplink modules, see the switch documentation in the HP Moonshot Information Library (http://www.hp.com/go/moonshot/docs). Installing the cartridge Do one of the following: Remove the cartridge blank (on page 12). -
Page 18: Powering Up The Chassis
Wait while the chassis powers on. Verify the status of the chassis power LED located on the front panel display on the chassis. For more information on the chassis power LED status, see the HP Moonshot 1500 Chassis Setup and Installation Guide in the HP Moonshot Information Library (http://www.hp.com/go/moonshot/docs). -
Page 19: Registering The Product
Download the latest firmware version from the HP Moonshot Component Pack download site (http://www.hp.com/go/moonshot/download). For more information on updating the firmware, see the HP Moonshot iLO Chassis Management CLI User Guide in the HP Moonshot Information Library (http://www.hp.com/go/moonshot/docs). Registering the product To experience quicker service and more efficient support, register the product at the HP Product Registration website (http://register.hp.com). -
Page 20: Software And Configuration Utilities
HP Moonshot iLO Chassis Management Firmware is the gateway for aggregated chassis management on the HP Moonshot System. As a single point of access to the chassis, iLO CM firmware enables you to configure, update, and operate the HP Moonshot System through CLI, IPMI, and remote serial console access. -
Page 21: Hp Moonshot Component Pack
Moonshot System. Users deploy the firmware updates contained in the Moonshot Component Pack from a command line by using the iLO Chassis Manager CLI or HP Moonshot-45G/180G Switch Module CLI, or by using the included HP Smart Update Manager. Download the latest pack from the HP website (http://www.hp.com/go/moonshot/download). -
Page 22: Troubleshooting
The HP Moonshot System Troubleshooting Guide provides procedures for resolving common problems and comprehensive courses of action for fault isolation and identification, issue resolution, and software maintenance on the HP Moonshot System. The document is available in the HP Moonshot Information Library (http://www.hp.com/go/moonshot/docs). -
Page 23: Illustrated Parts Catalog
HP specifies in the materials shipped with a replacement CSR part whether a defective part must be returned to HP. In cases where it is required to return the defective part to HP, you must ship the defective part back to HP within a defined period of time, normally five (5) business days. The defective part must be returned with the associated documentation in the provided shipping material. - Page 24 Optional—Parts for which customer self repair is optional. These parts are also designed for customer self repair. If, however, you require that HP replace them for you, there may or may not be additional charges, depending on the type of warranty service designated for your product.
-
Page 25: Removal And Replacement Procedures
Removal and replacement procedures Preparation procedures To access some components and perform certain service procedures, you must perform one or more of the following procedures: • Remove the access panel (on page 11). • Install the access panel (on page 15). •... -
Page 26: Warnings And Cautions
This symbol indicates the presence of electric shock hazards. The area contains no user or field serviceable parts. Do not open for any reason. WARNING: To reduce the risk of injury from electric shock hazards, do not open this enclosure. This symbol on an RJ-45 receptacle indicates a network interface connection. - Page 27 To remove the component: Log in to the iLO CM firmware (on page 16). For more information about the iLO CM firmware, see the HP Moonshot iLO Chassis Management CLI User Guide on the HP website (http://www.hp.com/go/moonshot/docs). Capture the cartridge serial number using the following command: SHOW CARTRIDGE SN C<x>...
-
Page 28: Cartridge Blank
To replace the component: Prepare the replacement cartridge for installation. Install the replacement cartridge. Install the access panel (on page 15). Allow the chassis manager to discover the replacement cartridge. The link LED flashes when this process is complete. Assign the original serial number to the replacement cartridge using the following command: SET CARTRIDGE SN <original SN>... -
Page 29: Solid State Device
Remove the access panel (on page 11). Remove the cartridge blank from the chassis. To replace the component, reverse the removal procedure. Solid state device To remove the component: Power down the node ("Power down" on page 9). Remove the access panel (on page 11). Remove the cartridge (on page 12). -
Page 30: Solid State Device Mezzanine
To remove the component: Power down the node ("Power down" on page 9). The HP ProLiant m800 Server Cartridge requires you to power down all nodes for this operation. Remove the access panel (on page 11). Remove the cartridge (on page 12). - Page 31 Remove the two screws, and remove the solid state device mezzanine from the cartridge. To replace the component: Align and install the solid state device mezzanine onto the cartridge. Press down on the connector to seat the solid state device mezzanine, and secure with two screws. Install the four solid state devices.
-
Page 32: Regulatory Information
Regulatory information Safety and regulatory compliance For safety, environmental, and regulatory information, see Safety and Compliance Information for Server, Storage, Power, Networking, and Rack Products, available at the HP website (http://www.hp.com/support/Safety-Compliance-EnterpriseProducts). Turkey RoHS material content declaration Ukraine RoHS material content declaration Warranty information HP ProLiant and X86 Servers and Options (http://www.hp.com/support/ProLiantServers-Warranties) -
Page 33: Electrostatic Discharge
Electrostatic discharge Preventing electrostatic discharge To prevent damaging the system, be aware of the precautions you need to follow when setting up the system or handling parts. A discharge of static electricity from a finger or other conductor may damage system boards or other static-sensitive devices. -
Page 34: Specifications
Specifications Chassis environmental specifications Specification Value — Temperature range* 10°C to 35°C (50°F to 95°F) Operating -30°C to 60°C (-22°F to Non-operating 140°F) — Maximum Wet bulb temperature 28ºC (82.4ºF) Operating 38.7ºC (101.7ºF) Non-operating Relative humidity (non-condensing)** — 10% to 90% Operating 5% to 95% Non-operating... -
Page 35: Support And Other Resources
Operating system type and revision level To obtain product information, log in to iLO CM firmware and use the Show Chassis Info command. For more information, see the HP Moonshot iLO Chassis Management CLI User Guide in the HP Moonshot Information Library (http://www.hp.com/go/moonshot/docs). -
Page 36: Acronyms And Abbreviations
Acronyms and abbreviations chassis management HP Insight Cluster Management Utility Customer Self Repair electrostatic discharge IPMI Intelligent Platform Management Interface iSSD integrated solid state drive power distribution unit preboot execution environment unit identification uninterruptible power system Acronyms and abbreviations 36... -
Page 37: Documentation Feedback
Documentation feedback HP is committed to providing documentation that meets your needs. To help us improve the documentation, send any errors, suggestions, or comments to Documentation Feedback (mailto:docsfeedback@hp.com). Include the document title and part number, version number, or the URL when submitting your feedback. -
Page 38: Index
HP Insight Cluster Management Utility 20 cartridge UID LED/button 5 HP Moonshot Component Pack 21 cartridge, powering down 9, 10 HP Moonshot iLO Chassis Management Firmware 20 cartridge, powering up 15, 16, 18 HP technical support 35 cartridges 17 HP website 35... - Page 39 9, 10 preparation procedures 9, 25 warnings 26 processor numbering 6 warranty information 32 website, HP 35 registering the server 19 regulatory compliance information 32 regulatory compliance notices 32 removal and replacement procedures 25 removing a cartridge 12...