Table of Contents
Advertisement
Quick Links
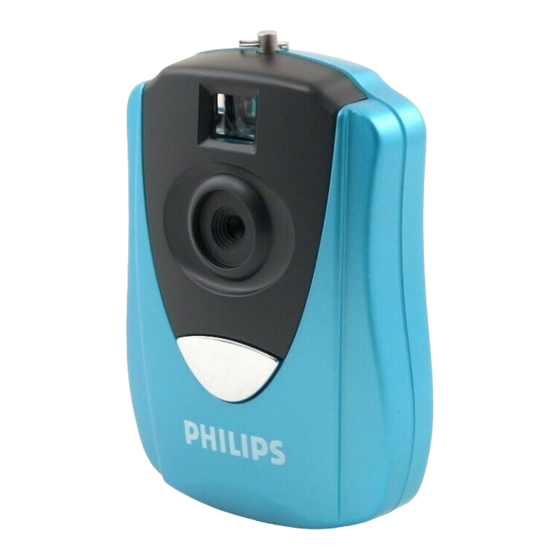
Keychain Digital Camera
The camera is capable of taking and storing up to 20 CIF (352 x 288) Images; or 60
Compressed CIF Images; or 81 QCIF (176 x 144) Images; or 243 Compressed QCIF Images, or
recording up to 10 seconds of AVI video. These may be uploaded to a PC via a USB port. The
camera is powered by one (1) AAA alkaline battery or through the USB port when attached to a
PC. Familiarize yourself with the different parts of your camera before attempting to operate the
camera.
LOCATION OF CONTROLS
1. Hook for Neck Cord
4. Viewfinder (front)
7. USB port
1.0
GETTING STARTED
1. Slide open the Battery Door and insert 1 AAA alkaline battery into the battery
Compartment, make sure that the battery terminals (+ and -) are properly positioned.
2.
Close the Battery Door.
2.0
TURNING THE CAMERA ON
1. Insert 1 AAA battery into the battery compartment, the camera will turn on automatically.
The camera will beep twice and the LCD will display the number of pictures remaining in the
camera memory.
2. If the LCD is blank, press the Mode button (#9 from Location of Controls) once to turn the
camera on.
3. If inactive for 30 seconds, the camera will automatically go into stand-by mode for power
conservation. Press the mode button once to restore the camera to active mode.
3.0 TAKING A PICTURE
1.
Verify the LCD (#5 from Location of Controls) displays the number of pictures remaining.
If the display is other than a number, press the mode button until a number is displayed. If
2. Shutter
5. LCD display
8. Battery door
1
3. Lens
6. Viewfinder (back)
9. Mode button
Advertisement
Table of Contents

Related Manuals for Philips US2-P44418A


Summary of Contents for Philips US2-P44418A
- Page 1 Keychain Digital Camera The camera is capable of taking and storing up to 20 CIF (352 x 288) Images; or 60 Compressed CIF Images; or 81 QCIF (176 x 144) Images; or 243 Compressed QCIF Images, or recording up to 10 seconds of AVI video. These may be uploaded to a PC via a USB port. The camera is powered by one (1) AAA alkaline battery or through the USB port when attached to a PC.
-
Page 2: Auto Stand-By Mode
this is the first time the camera has been activated, the LCD should read “20”. This number represents the number of images the camera is capable of recording before transfer of the images is required. Next, look through the viewfinder (#6 from Location of Controls). Hold the camera steady and press the Shutter button (#2 from Location of Controls) until you hear 1 beep. - Page 3 2. Pressing the Shutter button once and you will hear a short beeping sound, which indicates that a photo has been taken. 3. The number on the LCD display will automatically decrement by one. 4. If the memory is full, the number “00” will be shown in the LCD display. If you keep pressing the Shutter button you will hear a series of beeps indicating the memory is full.
- Page 4 5.52 Non-compressed mode 1. Press the Mode button until “ on the LCD, then press the Shutter Button to confirm the mode change. 2. Using Non-Compressed mode while in High Resolution format allows you take a maximum of 20 photos (see table #1 below). 3.
-
Page 5: To Install The Software
5.82 Low Resolution format 1. Press the Mode button until “ button. 2. Using Non-Compressed mode while in Low Resolution format allows you take a maximum of 81 photos (see table #1 above). 3. Using Compressed mode while in Low Resolution format allows you take a maximum of 243 photos (see table #1 above). - Page 6 4. Choose “I accept” on the License agreement wizard and click next. 5. The program will be saved to a default path at C:\Program Files\AvailaSoft\Photo2Album. If you would like to save at a different location, click browse to change the path. Click next and start the software installation.
- Page 7 7. When it comes to the following License agreement wizard, choose “I accept” and click and next. 8. Follow the instructions on the computer screen. Click “Finish” in the last Wizard to complete the driver installation. 6.20 Installation of Camera driver 1.
- Page 8 On the next screen, navigate to your CD-Rom Drive directory to specify the location, then select and double click the “Camera_Driver” folder, then click “OK”. Remark : For Windows 2000 and XP user, you just need to direct the path to the CD- Rom Drive and the system will detect the files automatically.
-
Page 9: Uploading Pictures
7.0 UPLOADING PICTURES Images may be uploaded to a PC at any time whether or not the camera memory is full. Follow steps to install software in section 6.0 before attempting any uploads. After the appropriate application/driver software is installed, attach the USB connector to the camera and PC and follow these steps 7.10 Uploading digital still pictures/AVI Video Clip 1. - Page 10 7.40 Using AvailaSoft Software to Create you own Photo Album 1. Double click the “Photo2Album” icon on your desktop, (or from Windows Taskbar Start->Programs->Photo2Album), the Cover Page of the Photo Album will appear: 2. Click anywhere on the cover page to enter into the main page of Photo2Album. You can then add, copy, delete, rename, cut &...
- Page 11 "File Management" Section (on the right hand side): -Different Photo Organizing Tools appear by just using Select and Right-Click. [Refresh], [Edit], [Rename], [Copy], [Delete], [Cut], [Paste], [Select All], [Copy to Desktop] and so on are available in the right-click menu. - Organize and manage your .JPG photo files.
-
Page 12: Video Conferencing
2. Connect your digital camera and start the net meeting programs. You can see your friends and families if they are on the same net meeting program and have the web camera set up. 9.0 HINTS ON SOFTWARE INSTALLATION The camera driver might share same resource files with other imaging device. - Page 13 Helpful Hints and Camera Maintenance Troubleshooting: 1. The camera does not work: Make sure the battery has inserted with the correct polarity. Check if the battery power is low / run out of battery, replace a new one. 2. “No New Hardware Found” message appears: Make sure the camera and PC are connected properly.
- Page 14 8.0 ACCESSORIES Your kit contains the following: * Installation CD * USB Cable * Instruction manual * Neck cord * 1 x AAA Alkaline Battery Note: Your computer needs a USB port to use your digital camera. To uninstall Photo2Album...
-
Page 15: System Requirements
9.0 SYSTEM REQUIREMENTS • PC with Processor Speed at 200MHz or higher • Microsoft Windows 98SE/ME/2000/XP • 64MB of RAM • 200MB available hard drive space • Available USB port • 24-bit display adaptor • True Color (24-bit) display settings at 1024 X 768 pixels (recommended) •... - Page 16 For customer support or to obtain warranty service, please call 919-573-7863. THERE ARE NO OTHER EXPRESS OR IMPLIED WARRANTIES. Philips’ liability is limited to repair or, at its sole option, replacement of the product. Incidental, special and consequential damages are disclaimed where permitted by law. This warranty gives you specific legal rights.