Table of Contents
Advertisement
Quick Links
Owner's Manual
32" SPIKER SPREADER
Model No. 486.24331
CAUTION:
Before using this product, read
this manual and follow all Safety
Rules and Operating Instructions.
Sears, Roebuck and Co., Hoffman Estates, IL 60179 U.S.A.
www.sears.com/craftsman
PRINTED IN U.S.A.
®
STOP
DO NOT RETURN TO STORE
For Missing Parts or Assembly
Questions Call 1-866-576-8388
• Safety
• Assembly
• Operation
• Maintenance
• Parts
FORM NO. 48070 (REV. 5/20/08)
Advertisement
Table of Contents

Related Manuals for Craftsman SPIKER 486.24331


Summary of Contents for Craftsman SPIKER 486.24331
- Page 1 CAUTION: Before using this product, read this manual and follow all Safety Rules and Operating Instructions. Sears, Roebuck and Co., Hoffman Estates, IL 60179 U.S.A. www.sears.com/craftsman PRINTED IN U.S.A. ® DO NOT RETURN TO STORE For Missing Parts or Assembly...
-
Page 2: Table Of Contents
ONE YEAR FULL WARRANTY When operated and maintained according to the instructions supplied with it, if this Spiker Spreader fails due to a defect in material or workmanship within one year from the date of purchase, call 1-800-4-MY-HOME® to arrange for free repair (or replacement if repair proves impossible). -
Page 3: Safety Rules
Do not drive too close to a creek or ditch and be alert for holes and other hazards which could cause you to loose control of the tractor and spiker/spreader. • Before operating the vehicle on any grade (hill) refer to the safety rules in the vehicle owner's manual concerning safe operation on slopes. -
Page 4: Full Size Hardware Chart
REF. QTY. DESCRIPTION Hex Bolt, 1/2" x 4" Hex Bolt, 5/16" x 2-1/4" Hex Bolt, 5/16" x 2" Hex Bolt, 5/16" x 1-3/4" Hex Bolt, 5/16" x 1-1/2" Hex Bolt, 5/16" x 1" Hex Bolt, 1/4" x 1 1/4" Hex Bolt, 1/4" x 3/4" Carriage Bolt. -
Page 5: Carton Contents
CARTON CONTENTS 1. Chain Cover 2. Flow Control Lever 3. Center Brace 4. Hopper Assembly ASSEMBLY 5. Hitch Tube (2) 6. Lift Handle 7. Spike Disk (7) 8. Drive Disk Assembly (2) 9. Wheel (2) 10. Transport Tube Assembly 11. Hitch Bracket (2) 12. - Page 6 TOOLS REQUIRED FOR ASSEMBLY (2) 7/16" Wrenches (2) 1/2" Wrenches (2) 3/4" or Adjustable Wrenches (1) Screwdriver (1) Pliers • Remove all parts and hardware packages from the carton. Lay out all parts and hardware and identify using the illustrations on pages 3 and 4. •...
- Page 7 • Fasten the hitch tubes together using three 5/16" x 2-1/4" hex bolts and 5/16" nylock hex nuts. Do not tighten yet. See figure 4. 5/16" x 2-1/4" HEX BOLT (3) FIGURE 4 • Assemble the hitch brackets to the hitch tubes using two 5/16"...
- Page 8 See figure 9. • Move the lift handle into the locked position as shown in figure 9 and then tip the spreader back to rest on the wheels and the rear of the hopper. PLASTIC WING NUT CARRIAGE BOLT...
- Page 9 • Push two flange bearings into each of the drive disk assemblies. See figure 11. DRIVE DISK ASSEMBLY FLANGED BEARING FIGURE 11 • Push a flange bearing into each of the seven drive disks, from the side shown in figure 12. SPIKE DISK FIGURE 12 •...
- Page 10 • Place a 5/8" flat washer, the compression spring and another 5/8" flat washer onto the shaft. See figure 16. 5/8" FLAT WASHER FIGURE 16 • Place two spike disks, separated by a long spacer tube, onto the shaft. Fit the long spacer tube onto the ends of the flanged bearings in the disks.
- Page 11 • Place two 5/8" flat washers separated by a long spacer tube onto the shaft. See figure 20. LONG SPACER TUBE 5/8" FLAT WASHER FIGURE 20 • Place a spike disk and a short spacer tube onto the shaft. Fit the short spacer tube onto the ends of the flanged bearings in the spike disk and in the end plate.
-
Page 12: Operation
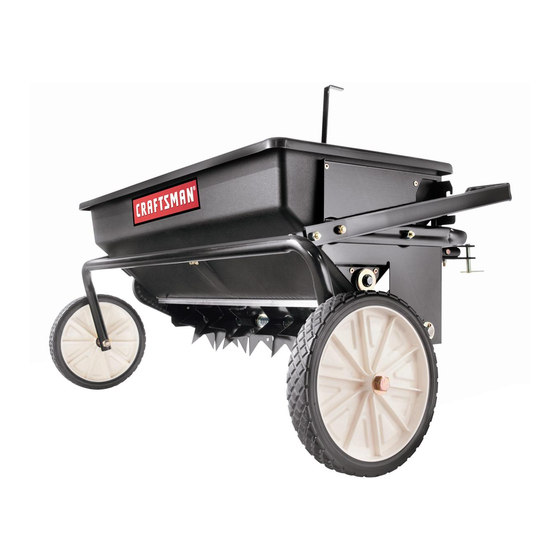
KNOW YOUR SPIKER SPREADER Read this owner's manual and safety rules before operating your Spiker Spreader. Compare the illustration below with your Spiker Spreader to familiarize yourself with the various controls and their locations. FLOW CONTROL LEVER Opens and closes the flow plate at the bottom of the hopper. -
Page 13: Maintenance
CHECK FOR LOOSE FASTENERS • Before each use make a thorough visual check of the spiker spreader for any bolts and nuts which may have loosened. Retighten any loose bolts and nuts. • Empty the spiker spreader, storing leftover material in it's original bag. -
Page 14: Repair Parts Illustration
PARTS REPAIR PARTS FOR MODEL 486.24331... -
Page 15: Repair Parts List
REPAIR PARTS FOR MODEL 486.24331... - Page 16 Get it fixed, at your home or ours! For repair – in your home – of all major brand appliances, lawn and garden equipment, or heating and cooling systems, no matter who made it, no matter who sold it! For the replacement parts, accessories and owner’s manuals that you need to do-it-yourself.