Table of Contents
Advertisement
Quick Links
Advertisement
Table of Contents

Related Manuals for Toro Haven 20459


Summary of Contents for Toro Haven 20459
- Page 1 Operator’s Manual Haven™ Robotic 3000 m (0.75 Acre) or 5000 m (1.25 Acre) Lawnmower Model—Serial Range 20459, 20460, 20491, 20492, 20496, 20497, 30960, 30962, 30970, 30972, 30980, 30982, 31060, 31062, 31070, 31072, 31080, 31082—324000000 and Up *3448-238* B 3448-238B Original Instructions (EN)
-
Page 2: Table Of Contents
Removing the Mower Handle and Storing it in the Charging Station......... 4–16 Chapter 5: Operation ........................... 5–1 Operation Safety..........................5–1 Repositioning the Mower ........................ 5–4 © 2023—The Toro ® Company Contact us at www.Toro.com 8111 Lyndale Ave So Printed in the USA Bloomington, MN 55044 All rights reserved... -
Page 3: Disclaimers And Regulatory Information
Manually Stopping and Starting the Mower ................5–5 Docking and Charging the Mower ....................5–5 Installing an Optional Location Tracker..................5–6 Chapter 6: Maintenance ........................6–1 Recommended Maintenance Schedule..................6–1 Maintenance Safety ......................... 6–1 Battery and Charging Station Safety ................... 6–2 Servicing the Battery........................ -
Page 4: Chapter 1: Introduction
For more information on safe operating practices, including safety tips and training materials, go to www.Toro.com. This robotic lawnmower is intended to be used by residential homeowners for autonomous, programmable lawn care. -
Page 5: Getting Help
Whenever you need service, genuine Toro parts, or additional information, contact an Authorized Service Dealer or Toro Customer Service and have the model and serial numbers of your product ready. These numbers are located on the serial plate on your product . -
Page 6: Manual Conventions
Manual Conventions This manual identifies potential hazards and has safety messages identified by the safety- alert symbol, which signals a hazard that may cause serious injury or death if you do not follow the recommended precautions. G405934 This manual uses 2 words to highlight information. Important calls attention to special mechanical information and Note emphasizes general information worthy of special attention. -
Page 7: Chapter 2: Safety
Chapter 2 Safety General Safety • The operator/supervisor of the machine is responsible for any accidents or hazards occurring to others or their property. • Read, understand, and follow all these instructions and warnings before using the machine. • Improperly using or maintaining the machine could result in serious injury or death. To reduce this potential, follow all safety instructions. -
Page 8: Safety And Instructional Decals
Safety and Instructional Decals Safety decals and instructions are easily visible to the operator and are located near any area of potential danger. Replace any decal that is damaged or missing. Decal Part: 133-8061 s_decal133-8061 Decal Part: 137-9705 Warning—read the Operator’s Manual. -
Page 9: Chapter 3: Product Overview
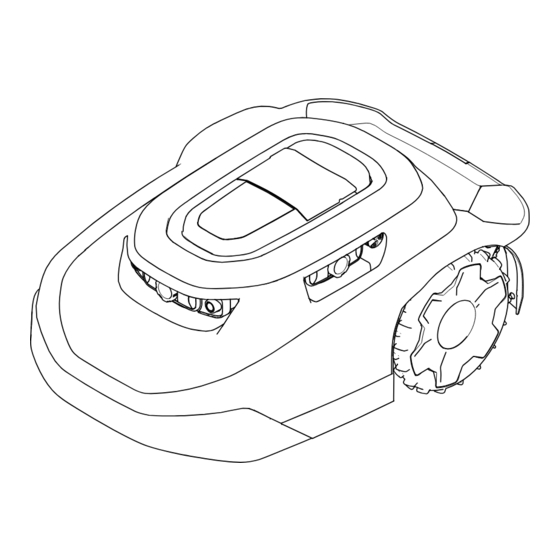
Chapter 3 Product Overview Mower: G468383 Power switch Stop button Sunshade/cover Mower body Phone opening Mower charging port Mower handle Lens/Imaging system Blade screw Wheel Blade Cutting system 3448-238 B Page 3–1 Product Overview... - Page 10 Charging Station: G468384 Charging station Low-voltage cable Allen-head screws Power supply Allen wrench Hub: G468385 Ethernet cord Power cord Product Overview: Safety and Instructional Decals Page 3–2 3448-238 B...
-
Page 11: Robotic Mower Overview
Property Example: G469078 Lens/imaging system Wi-Fi router Working area perimeter Transit path Mobile device Charging station Mower Robotic Mower Overview The robotic mower is a maintenance lawnmower that maintains the height of the grass consistently. When the mower is not mowing your lawn, it returns to the charging station to charge before continuing with the next scheduled mowing task. -
Page 12: Charging Station Overview
Charging Station Overview When the mower battery charge is too low for mowing or when it reaches the end of a mowing task, it goes to the charging station to charge. While charging, the indicator light on the charging station blinks green. After fully charging, the indicator light on the charging station turns solid green. -
Page 13: Hub Overview
Hub Overview The hub allows you to communicate with the mower from anywhere within your property. It uses your router to securely connect to the internet. Communicating through encrypted radio signal, the hub provides a secure communication path and nearly three times the communication distance of a typical Wi-Fi router. G430561 Plug the hub into the router and it will automatically connect to the internet. -
Page 14: Creating The Working Areas
Creating the Working Areas IMPORTANT Follow the instructions in the app using your mobile device. Refer to the following example of a property. You can map the following objects as shown in the figure below. G430562 Transit path Mowing zone Charging station Exclusion zone Product Overview: Creating the Working Areas... - Page 15 You cannot operate the mower on slopes greater than that shown in the figure below. G430563 100 cm (40 inches) 25° slope (maximum slope) 10 cm (4 inches) 3448-238B Page 3–7 Product Overview: Creating the Working Areas...
-
Page 16: Control Panel
Control Panel Become familiar with all the controls before you start and operate the mower. G430559 Lock/unlock indicator Home button Stop button Battery indicator Hub-connection indicator Numeric keypad/Code buttons Status indicator Play (resume operation) button Product Overview: Control Panel Page 3–8 3448-238 B... - Page 17 Stop Button The stop button manually stops the mower. G430095 Home Button The H button sends the mower to the charging station until the next scheduled mowing task. Play (Resume Operation) Button The P (resume operation) button resumes mower activity according to the previously active function (i.e., scheduled mowing, unscheduled mowing, returning to the charging station) on the mobile application.
- Page 18 Status Indicator If the status indicator illuminates green, the mower is functioning properly; if the indicator is red, there is an active fault. If a fault occurs, open the app to view the fault. Visit the Haven Robotic Mower Help Center for assistance.
-
Page 19: Specifications
Height 49.5 cm (19-1/2 inches) Attachments/Accessories A selection of Toro approved attachments and accessories is available for use with the machine to enhance and expand its capabilities. Contact your Authorized Service Dealer or authorized Toro distributor or go to www.Toro.com for a list of all approved attachments and accessories. -
Page 20: Chapter 4: Setup
Chapter 4 Setup Downloading the App and Adding the Mower 1. From the phone app store, download the MyToro app. Figure 1 Apple download: G430242 G362110 Setup Page 4–1 3448-238 B... - Page 21 Figure 2 Android Google Play Store download: G430241 G387030 3448-238B Page 4–2 Setup: Downloading the App and Adding the Mower...
- Page 22 2. If you have an existing account, tap Log In. If you do not have an account, tap Create Account. G445461 Setup: Downloading the App and Adding the Mower Page 4–3 3448-238 B...
- Page 23 3. From the home screen, tap Add Equipment. G445462 3448-238B Page 4–4 Setup: Downloading the App and Adding the Mower...
- Page 24 4. Enable the camera on your phone. Note: Alternatively, you can manually enter your new equipment information. G445465 Setup: Downloading the App and Adding the Mower Page 4–5 3448-238 B...
- Page 25 G445467 3448-238B Page 4–6 Setup: Downloading the App and Adding the Mower...
- Page 26 5. Scan the QR located on your mower. G445463 Setup: Downloading the App and Adding the Mower Page 4–7 3448-238 B...
- Page 27 6. Confirm the model number and serial number and enter the purchase date. G445464 3448-238B Page 4–8 Setup: Downloading the App and Adding the Mower...
- Page 28 7. Enter your personal information and tap Register. G445466 Setup: Downloading the App and Adding the Mower Page 4–9 3448-238 B...
-
Page 29: Determining A Position For The Charging Station
Determining a Position for the Charging Station Refer to the following guidelines when choosing a position for the charging station: • Place it near an outdoor electrical outlet. • Do not use an extension cord. • Ensure that the charging station is near a mowing zone. •... - Page 30 • Install the charging station on a level surface; do not install it on a slope, as it can bend the charging station. Maximum of 51 mm (2 inches) slope G430556 G430410 Setup: Determining a Position for the Charging Station Page 4–11 3448-238 B...
-
Page 31: Installing The Charging Station
Installing the Charging Station Parts Required Charging station Allen-head screw Low-voltage cable Power supply WARNING A power supply plugged into a non-GFCI or non-RCD receptacle could result in electric shock. Plug the power supply into only a ground-fault circuit interrupter (GFCI) or residual- current device (RCD) receptacle with a tripping current not more than 30 mA. - Page 32 2. Plug the male connector on the power supply into the female connector on the low-voltage cable. G430557 3. Use the 4 Allen-head screws to secure the charging station. G430077 4. Plug the power supply into an electrical outlet. The indicator light on the charging station should turn green.
-
Page 33: Preparing The Lawn Before Using The Robotic Mower
Preparing the Lawn Before Using the Robotic Mower To prepare the lawn before using the robotic mower, do the following: • Clear any obstructions and/or debris from your lawn. • For best results when training the mower, first use a walk-power mower to mow the lawn to a height of 51 mm (2 inches). -
Page 34: Installing The Mower Handle
Installing the Mower Handle G430121 Openings for the handle Handle assembly Lift the cover. Setup: Installing the Mower Handle Page 4–15 3448-238 B... -
Page 35: Removing The Mower Handle And Storing It In The Charging Station
Removing the Mower Handle and Storing it in the Charging Station G430160 Cam lever Upright/vertical notch position Squeeze the release levers inward. Notch in the handle assembly Sunshade/horizontal notch Handle assembly position 3448-238B Page 4–16 Setup: Removing the Mower Handle and Storing it in the Charging Station... -
Page 36: Chapter 5: Operation
Chapter 5 Operation Operation Safety • Keep bystanders and children away from the mower, charging station, and power supply during operation. • Wear appropriate clothing, including long pants and substantial, slip-resistant footwear, whenever you manually operate the mower. • Do not operate the mower without all safety protective devices in place and working properly or if a power cord is damaged or worn. - Page 37 • We recommend not using the mower while watering or irrigating the operating area. • Use only accessories approved by Toro to avoid the risk of fire, electric shock, or injury. • Press the stop button on the mower and wait for the blades to come to a complete stop before handling the mower.
- Page 38 • Do not plug the charging station or the power supply into a power strip or an extension cord. • Do not operate a charging station or power supply that has received a sharp or heavy blow. • Do not use a charging station other than that designed for the mower; refer to the Operator’s Manual for proper charging instructions.
-
Page 39: Repositioning The Mower
Repositioning the Mower Note: If possible, remove the obstacle (fill the hole, remove the toy, branch, etc.). If you cannot remove the obstacle, create an exclusion zone around the obstacle to prevent this from recurring. If the mower gets stuck on an obstacle, do the following: 1. -
Page 40: Manually Stopping And Starting The Mower
Manually Stopping and Starting the Mower When you manually stop the mower, autonomous features are disabled. Enter the 4-digit code to enable the mower. 1. Press the stop button on the mower. 2. Enter the 4-digit code. 3. Press the play button to resume mowing or press the home button to send the mower to the charging station. -
Page 41: Installing An Optional Location Tracker
Installing an Optional Location Tracker Note: A location tracker is not included with the robotic mower; you can purchase one separately. 1. Remove the screws from the cover. 2. Place the location tracker on the foam pad 3. Secure the cover using the previously-removed 2 screws. G464079 3448-238B Page 5–6... -
Page 42: Chapter 6: Maintenance
• Take the charging station to an Authorized Service Dealer for service or repair. Do not disassemble the charging station. • For best performance, use only genuine Toro replacement parts and accessories. Other replacement parts and accessories could be dangerous, and could void the product warranty. -
Page 43: Battery And Charging Station Safety
Battery and Charging Station Safety • Clean the charging port on the mower and/or charging station using a nonconductive tool (cloth or soft brush); otherwise, damage may occur. • Wipe the charging terminals on the charging station and mower using a clean, dry cloth if they are dirty. -
Page 44: Servicing The Battery
Servicing the Battery Disconnecting the Battery 1. Turn the power switch to the O position. 2. Use a 7 mm socket to remove the 8 screws and the battery cover. G433890 3. Remove the screws securing the battery. G433889 4. Disconnect the 2 wire-harness connectors from the battery. -
Page 45: Connecting The Battery
Connecting the Battery 1. Connect the 2 wire-harness connectors to the battery. 2. Secure the battery using the previously removed screws. 3. Install the battery cover. 4. Turn the power switch to the O position. 5. Place the mower in the charging station to charge. -
Page 46: Replacing The Wheels
Replacing the Wheels Removing the Wheels 1. Press the stop button and wait for all moving parts to stop. 2. Using a flat-head screwdriver , remove the from the wheel 3. Remove the 3 bolts 4. Remove the wheel G430568.svg Maintenance: Replacing the Wheels Page 6–5 3448-238 B... -
Page 47: Installing The Wheels
Installing the Wheels G430569 3448-238B Page 6–6 Maintenance: Replacing the Wheels... -
Page 48: Cleaning The Lens Protectors
Cleaning the Lens Protectors Clean the lens protectors using a dry soft-bristle brush and/or a clean microfiber cloth. Refer to the figure below for the lens locations. Maintenance: Cleaning the Lens Protectors Page 6–7 3448-238 B... -
Page 49: Replacing The Blades
Replacing the Blades Always mow with sharp blades. Sharp blades cut cleanly without tearing or shredding the grass. WARNING The blades are sharp; contacting the blades can result in serious personal injury. Use care when replacing or cleaning the blades. 1. -
Page 50: Cleaning The Mower And Charging Station
Cleaning the Mower and Charging Station IMPORTANT Do not pressure-wash the mower; the water can damage the electronics. Use compressed air when cleaning the mower. IMPORTANT Clean the charging port on the mower and/or charging station using a non- conductive tool (cloth or soft brush); otherwise, damage may occur. CAUTION If metal objects contact the positive and negative posts at the same time, this could short out the battery pack. - Page 51 4. Clean any debris or grass build-up on the caster wheels and drive wheels 5. Use a wet cloth or a soft brush to remove grass clippings and debris from the mower housing Ensure that there are not any obstructions in the top side of the mower (e.g., a stick that got stuck or debris buildup).
-
Page 52: Disposing Of Waste
Disposing of Waste Batteries are pollutants to the environment. Dispose of these according to your state and local regulations. Maintenance: Disposing of Waste Page 6–11 3448-238 B... -
Page 53: Chapter 7: Storage
Chapter 7 Storage Storage Safety When you are not using the mower, store it indoors in a dry, secure place out of the reach of children or other unauthorized users. Preparing for Off-Season Storage WARNING Improperly storing the mower and its battery may result in an increased risk of fire and/or electric shock;... - Page 54 1. Fully charge the mower. 2. Press the stop button on the mower. 3. Remove the mower from the charging station. 4. Turn the power switch to the O position. 5. Disconnect and remove the battery from the mower. 6. Clean the mower housing using a cloth or soft brush and remove grass clippings, dirt, and grime from external parts of the shroud and from the top of the mower housing.
-
Page 55: Chapter 8: Troubleshooting
Chapter 8 Troubleshooting The mower does not start a mowing cycle. Possible Cause Corrective Action The on/off switch underneath the mower is Push the on/off switch to the O position. in the O position. The handle is still installed in the mower. Remove the handle from the mower and stow the handle in the charging station. - Page 56 The charging station has no power. Possible Cause Corrective Action There is no power at the house outlet. Reset the house breaker. The LED light on the charging station will illuminate when power is restored. The power supply is not plugged into the Plug the power supply into the house outlet.
- Page 57 There is no wireless connection between mower and hub. Possible Cause Corrective Action There is no wireless signal from the Wi-Fi Restart your Wi-Fi router by disconnecting router. the power cord from the router and reconnecting the power cord. Wait 30 to 60 seconds before reconnecting the power cord.
- Page 58 When manually pushing the mower, the handle feels loose. Possible Cause Corrective Action The cam lever on the handle is loose. Tighten the cam lever. Troubleshooting: Preparing for Off-Season Storage Page 8–4 3448-238 B...
-
Page 59: Chapter 9: Glossary
Chapter 9 Glossary Advisory A message that informs the user of an operator error or anything that may cause a job to pause or halt and may require the user to intervene. An abbreviation for software application. A computer program on a mobile device that performs one or more tasks. - Page 60 The work being performed by a robot at one time inside an operating area. Localization The process of determining where a mobile robot is with respect to its environment. Localization is a most fundamental competency required by a robot as the knowledge of its location is necessary for making decisions about future actions.
- Page 61 Sensing The feedback from the environment of the robot, which enables the robot to react to its environment. Sensory inputs may come from a variety of sensor types. Sensor A device that responds to physical stimuli (including, but not limited to, heat, light, sound, pressure, magnetism, and motion) and transmits the resulting signal or data providing a measurement, operating a control, or both.
-
Page 62: California Proposition 65 Warning Information
Toro has chosen to provide consumers with as much information as possible so that they can make informed decisions about the products they buy and use. Toro provides warnings in certain cases based on its knowledge of the presence of one or more listed chemicals without evaluating the level of exposure, as not all the listed chemicals provide exposure limit requirements. - Page 63 Notes:...