Table of Contents
Advertisement
Quick Links
Advertisement
Table of Contents
Troubleshooting

Related Manuals for Asus GIGAX2024


Summary of Contents for Asus GIGAX2024
- Page 1 GigaX2024/2048 Layer 2 Managed Switch User Manual...
- Page 2 ASUS; or (2) the serial number of the product is defaced or missing. ASUS provides this manual “as is” without warranty of any kind, either express or implied, including but not limited to the implied warranties or conditions of merchantability or fitness for a particular purpose.
- Page 3 GigaX2024/2048 L2 Managed Switch User Manual Federal Communications Commission Statement This device complies with Part 15 of the FCC Rules. Operation is subject to the following two conditions: • This device may not cause harmful interference, and • This device must accept any interference received including interference that may cause undesired operation.
-
Page 4: Asus Contact Information
GigaX2024/2048 L2 Managed Switch User Manual ASUS contact information ASUSTeK COMPUTER INC. (Asia-Pacific) Address: 150 Li-Te Road, Peitou, Taipei, Taiwan General Tel: +886-2-2894-3447 General Fax: +886-2-2894-7798 Web Site: www.asus.com.tw Technical Support MB/Others (Tel): +886-2-2890-7121 (English) Notebook (Tel): +886-2-2890-7122 (English) Desktop/Server (Tel): +886-2-2890-7123 (English) -
Page 5: Table Of Contents
GigaX2024/2048 L2 Managed Switch User Manual Table of Contents 1 Introduction ................1 1.1 GigaX2024/2048 features ............1 1.2 Conventions used in this document ........... 2 1.2.1 Notations ..................2 1.2.2 Typography ..................2 1.2.3 Symbols ..................2 2 Getting to know the GigaX ............3 2.1 Package contents ............... - Page 6 GigaX2024/2048 L2 Managed Switch User Manual 4.2.2 Commonly used buttons and icons ..........16 4.3 System Pages ................16 4.3.1 Management ................. 16 4.3.2 IP Setup ..................17 4.3.3 Administration ................18 4.3.4 Reboot ..................18 4.3.5 Firmware Upgrade ................ 18 4.4 Physical Interface ..............
- Page 7 GigaX2024/2048 L2 Managed Switch User Manual 4.7.2 Filter Attach ................... 37 4.8 Security ..................38 4.8.1 Port Access Control ..............38 4.8.2 Dial-In User ................... 40 4.8.3 RADIUS ..................40 4.8.4 Port Security ................. 41 4.8.4.1 Port Configuration ..............41 4.8.4.2 Port Status ................
- Page 8 GigaX2024/2048 L2 Managed Switch User Manual 5.3.3 Bridge Commands ................ 60 5.3.4 SNMP ................... 68 5.3.5 Filters Commands ................ 74 5.3.6 Security Commands ..............77 5.3.7 QoS Commands ................82 5.4 Miscellaneous Commands ............85 6 IP Addresses, Network Masks, and Subnets ...... 86 6.1 IP Addresses ................
- Page 9 GigaX2024/2048 L2 Managed Switch User Manual List of Figures Figure 1. GigaX L2 managed switch package contents ........3 Figure 2. Front panel (GigaX 2048) ..............4 Figure 3. Front panel (GigaX 2024) ..............4 Figure 4. Rear panel ................... 5 Figure 5.
- Page 10 GigaX2024/2048 L2 Managed Switch User Manual Figure 29. IGMP Snooping ................25 Figure 30. Traffic Control .................. 26 Figure 31. Dynamic Address ................26 Figure 32.Static Address ................... 27 Figure 33. Tagged VLAN (GigaX 2048) ............29 Figure 34. Tagged VLAN (GigaX 2024) ............29 Figure 35.
- Page 11 GigaX2024/2048 L2 Managed Switch User Manual Figure 58. Policy Set ..................48 Figure 59. Policy Edit ..................49 Figure 60. Policy Attach ..................49 Figure 61. CoS ....................50 Figure 62. Traffic comparison (GigaX 2048) ............. 51 Figure 63. Traffic comparison (GigaX 2024) ............. 51 Figure 64.
- Page 12 GigaX2024/2048 L2 Managed Switch User Manual List of Tables Table 1. Front panel labels and LEDs ..............4 Table 2. Rear panel labels .................. 5 Table 3. Technical specifications ................ 5 Table 4. LED Indicators ..................8 Table 5. Port color description ................14 Table 6.
-
Page 13: Introduction
You may now manage your LAN (local area network) through a friendly and powerful user interface. This user manual tells how to set up the GigaX2024/2048 switch, and how to customize its configuration to get the most out of this product. -
Page 14: Conventions Used In This Document
• Acronyms are defined the first time they appear in text and in the glossary. • For brevity, the GigaX2024/2048 switch is referred to as “the switch.” • The terms LAN and network are used interchangeably to refer to a group of Ethernet-connected computers at one site. -
Page 15: Getting To Know The Gigax
GigaX2024/2048 L2 Managed Switch User Manual 2 Getting to know the GigaX Package contents The GigaX2024/2048 switch package comes with the following items: • GigaX 2048 (48-port) or GigaX 2024 (24-port) L2 managed switch • AC power cord • Null modem cable for console interface (DB9) •... -
Page 16: Front Panel
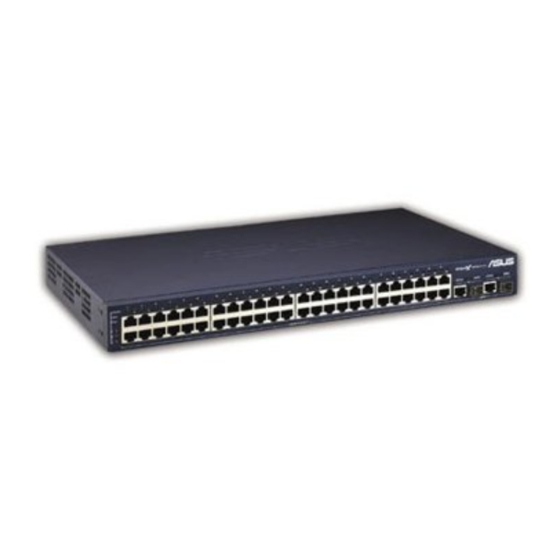
GigaX2024/2048 L2 Managed Switch User Manual 2.2 Front Panel The front panel includes 24/48 RJ-45 10/100Base-T ports, two 10/100/1000Base-T ports, two SPF GBIC port and LED indicators that show the status of the system, RPS, fan, and ports. Figure 2. Front panel (GigaX 2048) Figure 3. -
Page 17: Rear Panel
GigaX2024/2048 L2 Managed Switch User Manual 2.3 Rear Panel The switch rear panel contains the fan modules, two console ports (USB and DB9) and one RPS port.. Figure 4. Rear panel Table 2. Rear panel labels Label Description Power Connector... -
Page 18: Quick Start Guide
This section provides the basic instructions to set up the switch environment. Refer also to the GigaX2024/2048 Installation Guide. Part 1 shows how to install the GigaX2024/2048 on a flat surface or on a rack. Part 2 provides instructions to set up the hardware. -
Page 19: Connect To The Computers Or A Lan
GigaX2024/2048 L2 Managed Switch User Manual 3.2.2 Connect to the computers or a LAN You can use Ethernet cable to connect computers, hubs and other switches to the switch ports. Either crossover or straight-through Ethernet cable can apply for connecting these devices. -
Page 20: Part 3 - Basic Switch Setting For Management
Set the data format to no parity, 8 data bits and 1 stop bit d) No flow control e) Set VT1000 for emulation mode 4. After setting up the terminal, you can see the prompt “(ASUS)%” on the terminal. -
Page 21: Setting Up Through The Web Interface
GigaX2024/2048 L2 Managed Switch User Manual 5. Type “login” to access the command line interface. The default user name is “admin”. Skip the password by pressing <Enter>. You can change the password at any time through CLI (see section 5.3.1). To protect your switch from unauthorized access, you must change the default password as soon as possible. -
Page 22: Figure 7. Login Screen
GigaX2024/2048 L2 Managed Switch User Manual This is the factory default IP address of the switch. A login screen appears, as shown in Figure 7. Figure 7. Login Screen Enter your user name and password, and then click OK to enter the Configuration Manager. -
Page 23: Figure 8.Ip Setup (Gigax 2048)
GigaX2024/2048 L2 Managed Switch User Manual Figure 8.IP Setup (GigaX 2048) Figure 9.IP Setup (GigaX 2024) -
Page 24: Management With The Web Interface
GigaX2024/2048 L2 Managed Switch User Manual 4 Management with the Web Interface The switch provides Web pages that allow switch management through the ® Internet. The program is designed to work best with Microsoft Internet Explorer ® 5.5, or later versions with Java enabled. -
Page 25: Figure 11. Home Page (Gigax 2048)
GigaX2024/2048 L2 Managed Switch User Manual Figure 11. Home page (GigaX 2048) Figure 12. Home page (GigaX 2024) -
Page 26: Functional Layout
GigaX2024/2048 L2 Managed Switch User Manual 4.2 Functional layout The web-based configuration page consists of three separate frames. The top frame has a switch logo and front panel as shown in Figures 13 and 14. This frame remains on the top of the browser window all the times and updates the LED status periodically. -
Page 27: Menu Navigation Tips
GigaX2024/2048 L2 Managed Switch User Manual Figure 15. Expanded Menu List The above frame displays configuration pages or graphics for the statistics. See section 4.3 for details. 4.2.1 Menu navigation tips • To expand a group of related menus, click on the corresponding group name. -
Page 28: Commonly Used Buttons And Icons
GigaX2024/2048 L2 Managed Switch User Manual 4.2.2 Commonly used buttons and icons The following table describes the function for each button and icon used in the application. Table 6. Commonly used buttons and icons Button/Icon Description Stores any changes you have made on the current page. -
Page 29: Ip Setup
GigaX2024/2048 L2 Managed Switch User Manual Figure 16. Management 4.3.2 IP Setup The switch supports dynamic IP and static IP assignment. Dynamic IP can be got from a DHCP server within the same VLAN. The IP Setup page contains the following editable information: VLAN ID: Specifies a VLAN ID to system management interface. -
Page 30: Administration
GigaX2024/2048 L2 Managed Switch User Manual 4.3.3 Administration The Administration page allows to enable or disable the password protection for web user authentication. The default setting does not require any authentication. To save any changes and make it effective immediately, click OK. Use Reload to update the setting, as shown in Figure 18. -
Page 31: Physical Interface
GigaX2024/2048 L2 Managed Switch User Manual Enter the firmware (or auto-config file) location into the firmware space directly, or click Browse... to choose the file name of the firmware (or auto-config file) from prompt window. Click Upload to update the switch firmware (or auto-config file). -
Page 32: Bridge
GigaX2024/2048 L2 Managed Switch User Manual Select the corresponding port and configure the port setting, then click on the Modify button. The field you change will update the content of the display window. Click OK to send the settings to the switch (HTTP server). Click Reload to refresh the setting to current value. -
Page 33: Link Aggregation
GigaX2024/2048 L2 Managed Switch User Manual Priority: the port priority in the switch. Low numeric value indicates a high priority. The port with lower priority is more likely to be blocked by STP if a network loop is detected. The valid value is from 0 to -240. - Page 34 GigaX2024/2048 L2 Managed Switch User Manual of the link aggregation group according to source MAC address, destination MAC address, source and destination MAC address, source IP address, destination IP address, or source and destination IP address. Name: the group name. The string of group name cannot include character ʻ/ʼ...
-
Page 35: Mirroring
GigaX2024/2048 L2 Managed Switch User Manual Figure 23. Link aggregation (GigaX 2048) Figure 24. Link aggregation (GigaX 2024) 4.5.3 Mirroring Mirroring, together with a network traffic analyzer, helps you monitor network traffics. You can monitor the selected ports for egress or ingress packets. -
Page 36: Static Multicast
GigaX2024/2048 L2 Managed Switch User Manual Figure 25. Mirroring page (GigaX 2048) Figure 26. Mirroring page (GigaX 2024) 4.5.4 Static Multicast This page can add multicast addresses into the multicast table. The switch can hold up to 255 multicast entries. All the ports in the group will forward the specified multicast packets to other ports in the group. -
Page 37: Igmp Snooping
GigaX2024/2048 L2 Managed Switch User Manual Figure 27. Static Multicast (GigaX 2048) Figure 28. Static Multicast (GigaX 2024) 4.5.5 IGMP Snooping IGMP snooping helps reduce the multicast traffics on the network by allowing the IGMP snooping function to be turned on or off. When turned on, the switch snoops the IGMP packets and puts the new group into the multicast table. -
Page 38: Dynamic Addresses
GigaX2024/2048 L2 Managed Switch User Manual the limit value. Traffic control does not work for isolated port of Private VLAN. Click OK to make the setting send to the switch (HTTP server). Click Reload to refresh the settings to current value. To make the configuration effective, please go to Save Configuration page, then click Save. -
Page 39: Static Addresses
GigaX2024/2048 L2 Managed Switch User Manual 4.5.8 Static Addresses You can add a MAC address into the switch address table. The MAC address added by this way will not age out from the address table. We call it static address. The switch only allows 1024 static addresses. - Page 40 GigaX2024/2048 L2 Managed Switch User Manual “T” type: All packets transmitted from this port will be tagged. “blank” type: This port is not a member of the VLAN group. If one untagged port belongs to two or more VLAN groups at the same time, it will confuse the switch and cause flooding traffics.
-
Page 41: Default Port Vlan And Cos
GigaX2024/2048 L2 Managed Switch User Manual Figure 33. Tagged VLAN (GigaX 2048) Figure 34. Tagged VLAN (GigaX 2024) 4.5.10 Default Port VLAN and CoS Some VLAN tag related field settings for each port are included in this page. It includes: Port: select the port to configure... -
Page 42: Dhcp Snooping
GigaX2024/2048 L2 Managed Switch User Manual Figure 35. Default Port VLAN and CoS 4.5.11 DHCP Snooping DHCP snooping is a DHCP security feature that provides security by filtering untrusted DHCP messages and by building and maintaining a DHCP binding table.You can assign some ports to be trusted ports. The selected (trusted) port forwards the DHCP packets as a normal port, but the DHCP ACK packets will be dropped when the unselected (untrusted) port receives the packets. -
Page 43: Snmp
GigaX2024/2048 L2 Managed Switch User Manual 4.6 SNMP This group offers the SNMP configuration including Community Table, Host Table, and Trap Setting. To provide more secure management and access control, SNMPv3 is supported. 4.6.1 Community Table You can type different community names and specify whether the community has the privilege to do set action (write access) by checking the box. -
Page 44: Trap Setting
GigaX2024/2048 L2 Managed Switch User Manual 4.6.3 Trap Setting By setting trap destination IP addresses and community names, you can enable SNMP trap function to send trap packets in different versions(v1 or v2c). Click OK to make the setting effective immediately. Click Reload to refresh the settings to current value. -
Page 45: Vacm View
GigaX2024/2048 L2 Managed Switch User Manual You can remove the existed group by selecting the entry with the mouse, then clicking on Remove. The Modify button updates the existed VACM Group entries. Click OK to make the setting effective immediately. Click Reload to refresh the settings to current value. -
Page 46: Usm User
GigaX2024/2048 L2 Managed Switch User Manual go to Save Configuration page, then click on Save. Figure 42. VACM View 4.6.6 USM User USM(User-based Security Model) User is used to configure the information of SNMPV3 USM User. Engine Id: enter the Engine Id that should match the ID in the Manager.. -
Page 47: Filters
GigaX2024/2048 L2 Managed Switch User Manual Figure 43. USM User 4.7 Filters The switch can filter certain traffic types according to packet header information from Layer 2 to Layer 4. Each filter set includes a couple of rules. You have to attach the filter set to certain ports to make the filter work. -
Page 48: Figure 44. Filter Set
GigaX2024/2048 L2 Managed Switch User Manual Figure 44. Filter Set The Filter Rule page provides options for rule modes, one is MAC rule (Figure 40) and the other is IP rule (Figure 41). If you did not enter the MAC address in the blank box, it means the rule donʼt care the MAC value. -
Page 49: Filter Attach
GigaX2024/2048 L2 Managed Switch User Manual 4.7.2 Filter Attach A filter set is idle if you did not attach it to any ingress or egress port. Use the Filter Attach page to attach a filter set to ingress and egress ports. -
Page 50: Security
GigaX2024/2048 L2 Managed Switch User Manual Figure 48. Filter Attach (GigaX 2024) 4.8 Security The switch has the 802.1x port-based security feature. Only authorized hosts are allowed to access the switch port. Traffic is blocked for hosts failed to authenticate themselves. The authentication service is provided by a RADIUS server or the local database in the switch. -
Page 51: Figure 49. Port Access Control
GigaX2024/2048 L2 Managed Switch User Manual Quiet Period: If authentication failed either from RADIUS or local database, the switch waits upon this time period before sending another authentication request to the port user. Retransmission Time: If the port user failed to respond to authentication request from the switch, the switch waits upon this time period before sending another authentication request to the port user. -
Page 52: Dial-In User
GigaX2024/2048 L2 Managed Switch User Manual 4.8.2 Dial-In User Dial-in User is used to define users in the local database of the switch. User Name: New user name. Password: Password for the new user. Confirm Password: Enter the password again. -
Page 53: Port Security
GigaX2024/2048 L2 Managed Switch User Manual Click OK to make the setting send to the switch (HTTP server). Click Reload to refresh the settings to current value. To make the configuration effective, please go to Save Configuration page, then click Save. -
Page 54: Port Status
GigaX2024/2048 L2 Managed Switch User Manual aging mechanism is only effective for dynamic secure MAC addresses. If the time is equal to 0, the aging mechanism is disabled for this port. Aging Type: set the aging type. To determines the action when the dynamic secure MAC addresses are aged out. -
Page 55: Figure 53. Port Status
GigaX2024/2048 L2 Managed Switch User Manual the violation mode is ʻrestrictʼ. e) Shutdown: this indicates that the port is shutdown due to port security violation occurs when the violation mode is ʻshutdownʼ. Restart: whether to restart the port in shutdown status (Yes/No). -
Page 56: Secure Mac Addresses
GigaX2024/2048 L2 Managed Switch User Manual 4.8.4.3 Secure MAC Addresses Users can add a MAC address into the secure MAC address table of one port. The MAC address added by this way will not age out from the secure MAC address table. -
Page 57: Trust State
GigaX2024/2048 L2 Managed Switch User Manual 4.9.1 Trust State This page is used to configure packets classification using port trust states. Users can configure the port in following field: Port: select the port to make configuration. State: set the trust state Three types of state are supported for each port. -
Page 58: Mapping
GigaX2024/2048 L2 Managed Switch User Manual Figure 55. Trust State 4.9.2 Mapping This page is used to configure CoS (Classification of Service) and DSCP (Differentiated Services Code Point) mapping. Map CoS to DSCP: each CoS value can map into one of the DSCP value. -
Page 59: Policy Set
GigaX2024/2048 L2 Managed Switch User Manual traffic. The class set defines the criteria (match mode) used to match a specific traffic flow to further classify it. The criteria can include matching ACL rule in Filter Set ID or DSCP list. Only one match mode and only one CL rule for each class set are supported. -
Page 60: Figure 58. Policy Set
GigaX2024/2048 L2 Managed Switch User Manual just click on to select the policy that you want to edit or remove. And then click on Edit to enter the Policy Edit page or click on Remove to remove the policy. A policy only can have 6 policy actions. -
Page 61: Policy Attach
GigaX2024/2048 L2 Managed Switch User Manual Figure 59. Policy Edit 4.9.5 Policy Attach A policy does nothing if you donʼt attach it to any ingress port. You can use this page to attach a policy to ingress ports. A port only can be one policy attached. -
Page 62: Statistics Chart
GigaX2024/2048 L2 Managed Switch User Manual Weighted round-robin (WRR) scheduling: WRR scheduling requires you to specify a number the indicates the importance (weight) of the queue relative to other CoS queues. WRR scheduling prevents the low-priority queues from being completely neglected during periods of high-priority traffic. -
Page 63: Error Group
GigaX2024/2048 L2 Managed Switch User Manual Figure 62. Traffic comparison (GigaX 2048) Figure 63. Traffic comparison (GigaX 2024) 4.10.2 Error Group Selecting the Port and display Color, then clicking the Draw, the statistics window shows you all the discards or error counts for the specified port. The... -
Page 64: Historical Status
GigaX2024/2048 L2 Managed Switch User Manual Figure 64. Error group 4.10.3 Historical Status You can display information for different ports and statistics items in this chart. Since this shows the history of the statistics information, the line chart keeps the old data even it is refreshed. -
Page 65: Save Configuration
GigaX2024/2048 L2 Managed Switch User Manual 4.11 Save Configuration To save configuration permanently, you have to click Save. The setting also takes effective after a successful save. Sometimes you may want to reset the switch configuration, you can click on Restore to reset the configuration file to factory default. -
Page 66: Console Interface
GigaX2024/2048 L2 Managed Switch User Manual 5 Console Interface This chapter describes how to use console interface to configure the switch. The switch provides RS232 and USB connectors to connect your PC. Use a terminal emulator on your PC such as HyperTerminal and command line interpreter to configure the switch. -
Page 67: Boot Rom Command Mode
GigaX2024/2048 L2 Managed Switch User Manual 5.1.1 Boot ROM Command Mode During the POST process, you can enter a Boot ROM Command mode by pressing <ENTER> key as shown in Figure 50. Figure 50 shows dual images in the switch. One firmware is in Slot 0 and the other firmware is in Slot 1. -
Page 68: Table 7. Boot Rom Commands
GigaX2024/2048 L2 Managed Switch User Manual Table 7. Boot ROM commands Command Parameters Usage Notes Address Dump memory [,length] contents by giving address and length. NONE Replaceable system fans NONE Both fans are working properly NONE Both or either one of... -
Page 69: Login And Logout
For security reason, please change the user name and password after login. Once you forget the use name and password, you may contact ASUS support team or erase the whole configuration file in the Boot ROM Command mode. If you take the second choice, the whole system configuration is lost at the same time. -
Page 70: Figure 69. Sys Commands
GigaX2024/2048 L2 Managed Switch User Manual If you put the contact description in the contact description field, the switch contact will change to the new one. [System Location] Displays the physical location of the switch. This is an RFC-1213 defined MIB object in System Group, and provides the location information on the managed node. - Page 71 GigaX2024/2048 L2 Managed Switch User Manual IP address. CLI command: net interface ip sw0 < IP address> <netmask> [Network Mask] Displays the subnet mask for the switch. CLI command: net interface ip sw0 < IP address> <netmask> [Default Gateway] Displays the IP address of the default gateway. This field is necessary if the switch network contains one or more routers.
-
Page 72: Physical Interface Commands
GigaX2024/2048 L2 Managed Switch User Manual 5.3.2 Physical Interface Commands [Admin] [Enable/Disable] Displays the port admin status, allow user to turn the port on or off. CLI command: l2 port admin <port number> <enable/disable> [Mode] [Auto/10M-Half/10M-Full/100M-Half/100M-Full/1G-Full] Displays the current speed and duplex mode of the port. The speed and duplex mode can be automatically detected when auto-negotiation is enabled on a port. - Page 73 GigaX2024/2048 L2 Managed Switch User Manual CLI command: l2 stp bridge set Hello Time (1..10 seconds): [old Hello Time] <new Hello Time> Forward Delay (4..30 seconds): [old Forward Delay] <new Forward Delay> Max Age (6..40 seconds): [old Max Age] <new Max Age>...
- Page 74 GigaX2024/2048 L2 Managed Switch User Manual [Create Trunk] Creates a new trunk group by giving trunk ID, rtag, name , LACP mode and port numbers. The “rtag” is the packet distribution algorithm for the trunk group. Rtag values and corresponding meanings:...
- Page 75 GigaX2024/2048 L2 Managed Switch User Manual **For GigaX 2048 [Mirror] [Mirror 1/Mirror 2] [Mirror Mode] [Enable/Disable] [Monitor Port] [port number] Displays the mirroring settings of the switch. User can create a maximum of two mirroring ports on the switch. One is associated to a SoC., which means mirror ID 1 is dedicated to SoC 0, and mirror ID 2 is dedicated to SoC 1.
- Page 76 GigaX2024/2048 L2 Managed Switch User Manual [MAC Address] [VLAN] [CoS] [0-7] Allows user to add or modify a static multicast group by specifying the MAC address, VLAN ID, Class of Service, VLAN port members, and its untagged port members. Note that MAC address and VLAN ID combination is formed as an unique entry in multicast group table.
- Page 77 GigaX2024/2048 L2 Managed Switch User Manual [Multicast] [Enabled/Disabled] [Destination Lookup Failure] [Enabled/Disabled] User can limit the broadcast, multicast, and flooding (due to destination lookup failed) traffic rate by turning the traffic control on. CLI command: l2 rate set <1: bcast/2: mcast/3: dlf> <enable/disable>...
- Page 78 GigaX2024/2048 L2 Managed Switch User Manual [Discard] [none/source/destination/source & destination] User can add or modify a static ARL entry by specifying a MAC address, VLAN ID, port number, trunk ID, and discard criteria. CLI command: l2 arl static <mac> <vlan id> <port no> <trunk id> <discard: 0-3>...
- Page 79 GigaX2024/2048 L2 Managed Switch User Manual CLI command: l2 dhcpsnoop enable <vlan id list> CLI command: l2 dhcpsnoop disable <vlan id list> [Remove VLAN] Allows user to completely destroy an existing VLAN. CLI command: l2 vlan delete <vlan id> [Promiscuous Port] Set the promiscuous port for a Private VLAN.
-
Page 80: Snmp
GigaX2024/2048 L2 Managed Switch User Manual [DHCP Snooping is] Enable or disable DHCP snooping on specific VLAN. CLI command: l2 dhcpsnoop enable <vlan id list> CLI command: l2 dhcpsnoop disable <vlan id list> [Add/Remove Trusted Port] Allows user to add or remove specific ports for DHCP snooping. - Page 81 GigaX2024/2048 L2 Managed Switch User Manual CLI command: snmp community delete Allows user to delete a community entry from community table. Community entry (table index): <entry id to delete> This action will delete all hosts in community string with ʻdelete communityʼ.
- Page 82 GigaX2024/2048 L2 Managed Switch User Manual [Destination] [Community for Trap] A trap entry contains SNMP version (currently support version 1 and version 2c), a destination IP address and the remote community string. CLI command: snmp trap add SNMP version? (1/2c): [1, by default] <snmp version>...
- Page 83 GigaX2024/2048 L2 Managed Switch User Manual security level and context match. CLI command: snmp snmpv3 access add Gruop Name: <group name string> Security Model [0/1/2/3](any/v1/v2c/usm): <security model> Security Level [1/2/3](noauth/authnopriv/authpriv): <security level> Context Match [0/1](inexact/exact): <context match> Read View Name: <read view name string>...
- Page 84 GigaX2024/2048 L2 Managed Switch User Manual [View Subtree] [View Mask] VACM(View-based Access Control Model) View is used to view the information of SNMPV3 VACM Group. A VACM View entry contains a view name, view type, view subtree and view mask.
- Page 85 GigaX2024/2048 L2 Managed Switch User Manual USM(User-based Security Model) User is used to configure the information of SNMPV3 USM User. A USM User entry contains a engine Id, name, auth protocol, auth password, priv protocol and priv password. CLI command: snmp snmpv3 usmuser add EngineId: <engine id string >...
-
Page 86: Filters Commands
GigaX2024/2048 L2 Managed Switch User Manual 5.3.5 Filters Commands [New] Creates a new filter set with specifying a unique ACL ID and its description name. CLI command: filter set new <acl id> <acl name> [Remove] User can delete a filter set by indicating the ACL ID. - Page 87 GigaX2024/2048 L2 Managed Switch User Manual [Destination Port] [Type/Port] [Protocol] [ICMP/TCP/UDP/ANY] [Add] User can add a new IP rule associated to a filter set. These filter rule works with ICMP, TCP or UDP protocols with permit or deny options. User can also specify the IP address (source or destination) and port number of the filter rule using the...
- Page 88 GigaX2024/2048 L2 Managed Switch User Manual [Destination Port] [Type/Port] [Protocol] [ICMP/TCP/UDP/ANY] [Modify] Allows user to modify the IP filter rule. CLI command: filter rule modify <set id> <rule id> <protocol: ICMP/TCP/ UDP/any> <action: permit/deny> CLI command: filter rule dstip <set id> <rule id> <type: (any/[ip] [subnet])>...
-
Page 89: Security Commands
GigaX2024/2048 L2 Managed Switch User Manual [Rule List] Displays the filter set and filter rule configurations. CLI command: filter rule show <set id> <rule id> Attach Attach a filter set to ingress/egress ports to enable the filter function. [Filter ID] Displays the filter configurations. - Page 90 GigaX2024/2048 L2 Managed Switch User Manual [Quiet Period] Allows user to set up the quiet period. CLI command: security dot1x bridge quietperiod <quiet period (1-65535 sec)> [Retransmission Time] Allows user to set up the retransmission time. CLI command: security dot1x bridge retxtime <retransmission time (1-65535 sec)>...
- Page 91 GigaX2024/2048 L2 Managed Switch User Manual [Dynamic VLAN] Create users in the local database of the switch for 802.1x authentication. A user entry contains a user name, password and dynamic VLAN. CLI command: security dialinuser create User Name: <user name string>...
- Page 92 GigaX2024/2048 L2 Managed Switch User Manual confirm authentication key <key/none>: <confirm server key> [Reload] Restores the previous saved settings from configuration file. CLI command: security radius retrieve [Generate SSH key] Allows user to generate SSH keys. SSH (Secure SHell) is a protocol for remotely logging into a machine via a shell.
- Page 93 GigaX2024/2048 L2 Managed Switch User Manual Allows user to set up the aging time of some particular ports. CLI command: security portsecu age <age time> <port list/*> [Aging Type] [Absolute/Inactivity] Allows user to set up aging type of some particular ports.
-
Page 94: Qos Commands
GigaX2024/2048 L2 Managed Switch User Manual 5.3.7 QoS Commands [State] [No/CoS/DSCP] Allows users to set up trust state of some particular ports. CLI command: qos trust state <no/cos/dscp> <port list/*> [CoSOverride] [Disable/Enable] Allows users to enable or disable CoS override of some particular ports. CoS override only can be enabled when trust state is ʻNoʼ... - Page 95 GigaX2024/2048 L2 Managed Switch User Manual Allows users to modify a match criterion of a class. If users input <new dscp list>, <new acl id> will not display, and <new acl id> force to 0. CLI command: qos class modify <class id(1-56)>...
- Page 96 GigaX2024/2048 L2 Managed Switch User Manual CLI command: qos policy add <policy id(1-56)> <class id(1-56)> dscp (0/8/10/16/18/24/26/32/34/40/46/48/56):<dscp value> traffic rate(1-125): <traffic rate> traffic burst size: <traffic rate size> exceed act(none/drop/dscp): <exceed action> exceed dscp(0/8/10/16/18/24/26/32/34/40/46/48/56): <dscp value> [Modify] Allows users to modify a policy action by specifying a policy ID and class ID.
-
Page 97: Miscellaneous Commands
GigaX2024/2048 L2 Managed Switch User Manual [CoS Queue ][Weight] Set the scheduler mode. The weight delay of queues only effective for weighted round robin and bounded delay. The range of weight delay is 1-255. CLI command: l2 cos sched <mode (1:strict 2:weighted round robin 3: bounded delay)>... -
Page 98: Ip Addresses, Network Masks, And Subnets
GigaX2024/2048 L2 Managed Switch User Manual 6 IP Addresses, Network Masks, and Subnets 6.1 IP Addresses This section pertains only to IP addresses for IPv4 (version 4 of the Internet Protocol). IPv6 addresses are not covered. Note This section assumes basic knowledge of binary numbers, bits, and bytes. For details on this subject, see Chapter 8. -
Page 99: Network Classes
GigaX2024/2048 L2 Managed Switch User Manual Following are examples of valid IP addresses: Class A: 10.30.6.125 (network = 10, host = 30.6.125) Class B: 129.88.16.49 (network = 129.88, host = 16.49) Class C: 192.60.201.11 (network = 192.60.201, host = 11) 6.1.2 Network classes... - Page 100 GigaX2024/2048 L2 Managed Switch User Manual Subnet masks are used to define subnets (what you get after dividing a network into smaller pieces). A subnetʼs network ID is created by “borrowing” one or more bits from the host ID portion of the address. The subnet mask identifies these host ID bits.
-
Page 101: Troubleshooting
GigaX2024/2048 L2 Managed Switch User Manual 7 Troubleshooting This section gives instructions for using several IP utilities to diagnose problems. A list of possible problems with suggestion actions is also provided. All the known bugs are listed in the release note. Read the release note before you set up the switch. -
Page 102: Nslookup
GigaX2024/2048 L2 Managed Switch User Manual (using the pre-configured default LAN IP address 192.168.1.1) or another address you assigned. You can also test whether access to the Internet is working by typing an external address, such as that for www.yahoo.com (216.115.108.243). If you do not know the IP address of a particular Internet location, you can use the nslookup command, as explained in the following section. -
Page 103: Replacing Defective Fans
GigaX2024/2048 L2 Managed Switch User Manual 7.2 Replacing defective fans Turn off the power of the switch when you remove the fan module on the rear side of the switch. Warning When any one of the switch fans (located on the rear panel) becomes defective, you can easily replace it following these steps. -
Page 104: Figure 74. Detaching The Fan From The Module
GigaX2024/2048 L2 Managed Switch User Manual Figure 74. Detaching the fan from the module 5. Fasten the new fan with the screws that you removed earlier. Make sure that the fan cable is near the bottom of the module. Follow the same steps to replace the other fan. -
Page 105: Simple Fixes
GigaX2024/2048 L2 Managed Switch User Manual 7.3 Simple fixes The following table lists some common problems that you may encounter when installing or using the switch, and the suggested actions to solve the problems. Table 9. Troubleshooting Problem Suggested Action... - Page 106 GigaX2024/2048 L2 Managed Switch User Manual Problem Suggested Action PCs cannot display web 1.The switch is powered up and the configuration pages. connecting port is enabled. The factory default IP for the switch is 192.168.1.1. 2.Verify your network setup in your PC for this information.
-
Page 107: Glossary
GigaX2024/2048 L2 Managed Switch User Manual 8 Glossary 10BASE-T A designation for the type of wiring used by Ethernet networks with a data rate of 10 Mbps. Also known as Category 3 (CAT 3) wiring. See also data rate, Ethernet. - Page 108 GigaX2024/2048 L2 Managed Switch User Manual filtering rule A rule that specifies what kinds of data the a routing device will accept and/or reject. Filtering rules are defined to operate on an interface (or multiple interfaces) and in a particular direction (upstream, downstream, or both).
- Page 109 GigaX2024/2048 L2 Managed Switch User Manual e.g., 209.191.4.240. An IP address consists of a network ID that identifies the particular network the host belongs to, and a host ID uniquely identifying the host itself on that network. A network mask is used to define the network ID and the host ID.
- Page 110 GigaX2024/2048 L2 Managed Switch User Manual binary, IP address, subnet, “IP Addresses Explained” section. Network Interface Card An adapter card that plugs into your computer and provides the physical interface to your network cabling, which for Ethernet NICs is typically an RJ-45 connector. See Ethernet, RJ-45.
- Page 111 GigaX2024/2048 L2 Managed Switch User Manual performs routing is called a router. SNMP Simple Network Management Protocol The TCP/IP protocol used for network management. Spanning Tree Protocol The bridge protocol to avoid packet looping in a complicate network. subnet A subnet is a portion of a network. The subnet is...
- Page 112 GigaX2024/2048 L2 Managed Switch User Manual that receives a packet decrements this field by one. When the TTL reaches zero, the packet is discarded. twisted pair The ordinary copper telephone wiring long used by telephone companies. It contains one or more wire pairs twisted together to reduce inductance and noise.
-
Page 113: Index
GigaX2024/2048 L2 Managed Switch User Manual 9 Index 100BASE-T, 95 FTP, 96 10BASE-T, 95 Hardware connections, 6,7 Administration page, 19 Historical Status page, 52 Binary numbers, 95 Host, 96 Bits, 95 Host ID, 86 Boot Rom Command Mode, 55 Host Table Commands, 69... - Page 114 GigaX2024/2048 L2 Managed Switch User Manual Mirror Commands, 62 SNMP Commands, 68 Mirroring page, 23 SNMP pages, 31 Multicast Commands, 63 Spanning Tree Commands, 60 Network. See LAN Spanning Tree page, 20 Network classes, 87 Static Address Commands, 58 Network ID, 86...
- Page 115 GigaX2024/2048 L2 Managed Switch User Manual WAN, 100 Web browser, 100 Web function layout, 12 Web Interface, 12 Web page, 100 Web site, 100 Web top frame, 14 World Wide Web, 101...