NEC POWERMATE ES Series Service And Reference Manual
The space-saving office pc
Hide thumbs
Also See for POWERMATE ES Series:
- User manual (167 pages) ,
- Configuration manual (1 page) ,
- Release note (8 pages)

Related Manuals for NEC POWERMATE ES Series


Summary of Contents for NEC POWERMATE ES Series
- Page 1 The Space-Saving Office PC ES S ® O W E R A T E L I M I N E E R I E S S E R V I C E A N D R E F E R E N C E M A N U A L...
- Page 2 NEC is a registered trademark of NEC Corporation. PowerMate and MultiSync are registered trademarks and VistaScan is a trademark of NEC Corporation or one of its subsidiaries. All are used under license by NEC Corporation and/or one of its subsidiaries.
-
Page 3: Table Of Contents
Front Features ......................1-3 Rear Features ......................1-5 Inside Features ......................1-7 Software Features......................1-8 Preloaded Software ....................1-8 NEC Product Recovery Program CD..............1-8 NEC PowerMate Driver CD ................1-9 Security Features......................1-9 Password Security....................1-9 Windows Network Security Features ..............1-9 Keyboard/mouse Anti-theft Bracket .............. - Page 4 Product Recovery Program....................2-20 Starting the Recovery Program .................2-20 Using the Recovery Program ..................2-20 Standard System Restore..................2-20 Advanced Options....................2-21 Tools ........................2-21 Using the Smart Restore Program ................2-22 How to Load Smart Restore ................2-22 Software Restore or Removal ................2-22 Hardware Settings ....................2-22 Restoration Process ....................2-22 PowerMate Driver CD......................2-23 Intel Processor Serial Number Control Utility ..............2-23...
- Page 5 System Board Resources................... 4-12 Memory Map ..................... 4-12 I/O Addresses..................... 4-12 DMA Settings ....................4-14 Riser Board ........................4-15 5 Illustrated Parts Breakdown Order Spare Parts ....................... 5-2 Field Replaceable Unit List....................5-2 Illustrated Parts Breakdown ....................5-4 6 Preventive Maintenance System Cleaning.........................
- Page 6 List of Figures PowerMate ES SlimLine Series Slimtower Front Features ............1-4 PowerMate ES SlimLine Series Desktop Front Features............1-4 PowerMate ES SlimLine Series Slimtower Rear Features............1-6 PowerMate ES SlimLine Series Desktop Rear Features.............1-6 Inside the System ........................1-7 System Board Jumper Locations....................2-5 System Board Jumper Settings....................2-6 Removing the Slimtower Stabilizers...................3-3 Removing the Cover Screw ......................3-4...
- Page 7 List of Tables PowerMate ES SlimLine Series System Configuration.............. 1-2 System Components ......................... 1-10 Sample DIMM Memory Upgrade Paths ................... 1-11 Interrupt Level Assignments....................... 2-2 Parallel Port Interrupts........................ 2-3 Serial Port Interrupts........................2-4 Maxtor EIDE Hard Drive Jumper Settings ................. 2-7 Quantum EIDE Hard Drive Jumper Settings................
-
Page 8: Preface
® This manual contains technical information for servicing and repairing the NEC PowerMate SlimLine Series systems manufactured by NEC Computers Inc. Use this manual for NEC PowerMate ES SlimLine Series computers assembled in Europe. Check the regulatory sticker at the rear of the system to find the assembly location for the computer. -
Page 9: Abbreviations
Abbreviations ampere Desktop Management Interface alternating current disk operating system acknowledge dots per inch accelerated graphics port DRAM dynamic RAM ASIC application-specific integrated circuit digital versatile disc advanced technology (IBM PC) error checking and correction AT attachment extended capabilities port ATAPI AT attachment packet interface extended data output... - Page 10 Industry Standard Architecture programmable peripheral interface internet service provider PROM programmable ROM interrupt request PS/2 personal system/2 kilo (1024) quad flat pack kilo (1000) read kilobyte random-access memory kilogram RAMDAC RAM digital-to-analog converter kilohertz row address strobe pound red green blue local area network RGBI red green blue intensity...
- Page 11 volts, alternating current video cassette recorder volts, direct current video display terminal VESA video electronics standards association VESA-compliant feature connector Video Graphics Array very high frequency VLSI very large scale integration VRAM video RAM watt wide area network WRAM Windows RAM write world wide web Abbreviations xiii...
-
Page 12: System Overview
System Overview Configurations Features Components... -
Page 13: Configuration
This section provides an overview of the NEC PowerMate ES SlimLine Series system. Included are descriptions of the system’s hardware configuration front, back, and inside features software features security features major components. The system can be configured as a slimtower or as a desktop to suit the user’s requirements. -
Page 14: Features
PowerMate ES SlimLine Series System Configuration Component Description Hard Drive* 10-GB or higher, 5400 rpm or higher: EIDE, Ultra DMA/66, with SMART technology Direct AGP integrated on system board Graphics Memory Shared with system memory (DVMT) Audio Audio-Codec (AC) 97 controller integrated on 810E chipset Diskette Drive Notebook type, 3.5-inch 1.44-MB Power Supply... -
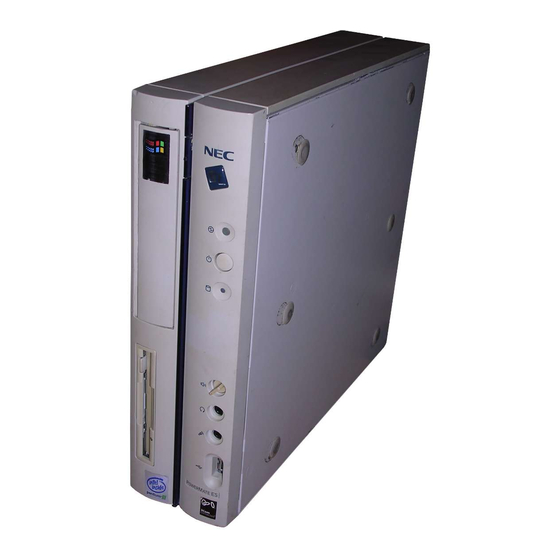
Page 15: Powermate Es Slimline Series Slimtower Front Features
PowerMate ES SlimLine Series Slimtower Front Features A – CD-ROM Tray Open/Close Button H – Power/Sleep Button B – CD-ROM Drive I – Hard Drive Activity Lamp C – CD-ROM Drive Activity Lamp J – Volume Control D – Diskette Drive Disk Eject Button K –... -
Page 16: Rear Features
The system has the following devices, controls, and lamps at the front of the system (see the previous figures for device, control, and lamp locations). Power/sleep button — press this button to turn on system power. To turn off power, close ®... -
Page 17: Powermate Es Slimline Series Slimtower Rear Features
PowerMate ES SlimLine Series Slimtower Rear Features A – Serial Port I – VGA Port B – Line Out Jack J – Voltage Switch C – Line In Jack K – AC Power Connector D – Keyboard Port L – Power Supply E –... -
Page 18: Inside Features
LAN. VGA monitor connector — attach a video graphics array (VGA)-compatible monitor ® (NEC MultiSync monitor or other VGA-compatible monitor) with a 15-pin connector to this connector. Line in jack — use this jack to connect a stereo audio device such as a stereo amplifier, cassette, or minidisc player for playback or recording. -
Page 19: Software Features
Wake-On LAN and remote boot. NEC Product Recovery Program CD The system comes with an NEC Product Recovery Program CD and bootable diskette. Should a problem occur that causes data loss or corruption, you can use the NEC Product Recovery Program CD to restore the system to its original factory state or you can restore just the operating system and drivers. -
Page 20: Nec Powermate Driver Cd
NEC PowerMate Driver CD Use the NEC PowerMate Driver CD to install drivers for NEC system options that are not part of the factory configuration. Also use the NEC PowerMate Driver CD to reinstall NECC-supplied software. See “PowerMate Driver CD” in Section 2 for information about installing drivers from the CD. -
Page 21: Components
Components The major system components are listed in the following table, along with the page number where each component is briefly described. System Components Component Go to Page System Board 1-10 System Memory 1-10 Riser Board 1-11 Diskette Drive 1-11 Hard Drive* 1-11 Power Supply... -
Page 22: Riser Board
Sample DIMM Memory Upgrade Paths Total Memory DIMM 1 DIMM 2 64 MB (8 Mbit x 72) 64 MB — 128 MB (16 Mbit x 72) 64 MB 64 MB 128 MB (16 Mbit x 72) 128 MB — 256 MB (32 Mbit x 72) 128 MB 128 MB 256 MB (32 Mbit x 72) -
Page 23: Mouse
Mouse The system ships with a PS/2-compatible mouse as standard equipment. The mouse has a self-cleaning mechanism that prevents a buildup of dust or lint around the mouse ball and tracking mechanism. The six-pin mouse cable connector plugs into the back of the system. Mouse specifications are given in Section 9, “Specifications.”... -
Page 24: System Configuration
System Configuration Interrupt Requests Jumper Settings BIOS Setup Utility FLASH Utility Online Documentation Product Recovery Program PowerMate Driver CD Intel Processor Serial Number Control Utility... -
Page 25: System Interrupts
This section provides information for configuring the system. The section includes: system interrupt request (IRQ) assignments system jumper settings procedures for using the American Megatrends Inc. (AMI) BIOS Setup Utility to configure the system descriptions and procedures for using the following utilities and applications —... -
Page 26: Parallel Port Interrupts
Interrupt Level Assignments* Interrupt Priority Interrupt Device IRQ10 Shared Resource: ACPI IRQ Holder for PCI IRQ Steering/Intel 82801AA USB Universal Host Controller/3COM 3C920 Controller IRQ11 Shared Resource: ACPI IRQ Holder for PCI IRQ Steering/SCI IRQ used by ACPI Bus/Intel 82801AA AC’97 Audio Controller- Sigma Tel Codec/82801AA SMBus Controller IRQ12... -
Page 27: Jumper Settings
Serial Port Interrupts Port Interrupt COM1 IRQ04 COM2 IRQ03 COM3 IRQ04 COM4 IRQ03 COM1 IRQ03 COM2 IRQ04 COM3 IRQ03 COM4 IRQ04 Jumper Settings Jumpers on the boards and devices in the system are used to set the system configuration. Boards and devices using jumpers include: system board hard drive CD-ROM drive. -
Page 28: System Board Jumper Locations
System Board Jumper Locations A – Keyboard Wakeup (JKBV1) D – CPU Type (J23) B – Onboard Audio (JP3) E – Save-to-RAM (STR) (JP4) C – BIOS Recovery (J4) F – Clear CMOS (JBAT1) To prevent damage to the system board, do not set jumpers while power is on. -
Page 29: System Board Jumper Settings
System Board Jumper Settings 2-6 System Configuration... -
Page 30: Maxtor Eide Hard Drive Jumper Settings
Maxtor EIDE Hard Drive Jumper Settings The factory settings for the jumpers on the Maxtor EIDE hard drive are shown in the following table. The settings are for a single hard drive installed in the system as the master device on the primary channel. -
Page 31: Bios Setup Utility
Start the BIOS Setup Utility as follows. Turn on or reboot the system. Press as soon as you see the following message at the bottom of the NEC startup screen. <F2> for Setup You have about five seconds to press before the system boot continues. -
Page 32: Main Menu
Navigation Keys Function Exits the menu. Enter Executes Command or brings up a submenu. Loads the Default Configuration values for this menu. Selects the Original Values for the field. Saves changes and Exits the BIOS Setup Utility. Up or down arrow keys Moves cursor up and down in the menu. -
Page 33: Main Menu Items
Main Menu Items Menu Item Settings (default is bold) Set system date in this field. Press Tab or Enter to move System Date between month, date, and year fields. Example: 04/28/2000 Set system time in this field. Press Tab or Enter to move System Time between hour, minute, and second fields. -
Page 34: Advanced Menu
Main Menu Items Menu Item Settings (default is bold) On, Off LBA Mode When On is selected, it causes logical block addressing to be used in place of cylinders, heads, and sectors. On, Off Block Mode When On is selected, it allows block mode data transfers. Fast Programmed I/O Auto, 0 -5 Modes... -
Page 35: Advanced Menu - Advanced Cmos Setup
Advanced Menu - Advanced CMOS Setup Menu Item Settings (default is bold) Status only. Press Enter to view. View DMI Event Log Clear all DMI Events No, Yes Logs Selecting No prevents clearing out the DMI events logs. Enabled, Disabled Event Logging Selecting Enabled permits event logging. -
Page 36: Advanced Menu - Advanced Chipset Setup
Advanced Menu - Advanced CMOS Setup Menu Item Settings (default is bold) Setup, Always Password Check Allows the user to determine at what moment a password check is needed. No, Yes Boot to OS/2>64 MB Select Yes to enable a boot to OS/2 if RAM is greater than 64 MB. CPU Serial Number Disabled, Enabled Controls detection of the processor serial number. - Page 37 Advanced Menu - Power Management Setup Menu Item Settings (default is bold) Dual Color, Single Color, Blinking Green PC LED Status Select Dual-Color to show a green LED for normal use and an orange LED for standby use. Standby, Disabled, Suspend Video Power Down Mode Select Standby or Suspend to power down the video display as a...
-
Page 38: Advanced Menu - Plug And Play Setup
Advanced Menu - Power Management Setup Menu Item Settings (default is bold) 15, Every Date RTC Alarm Date Sets the day that the system boots up (when Resume on RTC Alarm is Enabled). 12, 1-00 RTC Alarm Hour Sets real time clock alarm hour (when Resume on RTC Alarm is Enabled). -
Page 39: Advanced Menu - Peripheral Setup
Advanced Menu - Peripheral Setup Menu Item Settings (default is bold) Enabled, Disabled Onboard AC’97 Audio The Enabled setting allows use of onboard sound. Enabled, Disabled Onboard AC’97 Modem Onboard modem not available. Enabled, Disabled Onboard LAN Select Enabled to allow use of onboard local area network Onboard Serial 3F8/COM1, Auto, Disabled, 2F8/COM2, 3E8/COM3, 2E8/COM4 Port A... -
Page 40: Security Menu
Advanced Menu - Hardware Monitor Setup Menu Item Settings (default is bold) ACPI Shut Down ° ° C/176 Temperature ACPI gives the operating system direct control over the power management and Plug and Play functions of a computer. The system shuts down at the temperature indicated. -
Page 41: Exit Menu
Exit Menu Choose the Exit Menu by selecting Exit in the legend bar on the Main Menu. Other Exit Menu options are available by selecting submenus. Use the arrow keys to select one of the Exit Menu options and press Enter to display the submenu. -
Page 42: Online Documentation
Online Documentation NECC provides Online Documentation that can be accessed directly from an icon on the windows desktop. The Online Documentation provides quick access to information about the computer. The Online Documentation includes the following modules. Preface Provides navigating pointers, text conventions, legal information, safety notices, and information on setting up a healthy work environment. -
Page 43: Product Recovery Program
Product Recovery Program The PowerMate Product Recovery program offers the possibility to go back to the original software shipped on your system. You can reinstall valuable software with the original hardware settings shipped from the factory. The recovery kit includes: PowerMate Recovery Boot diskette Product Recovery CD-ROM. -
Page 44: Advanced Options
Start the Recovery program (see “Starting the Recovery Program” earlier in this document). At the Recovery Program main menu, choose Standard System Restore. The first part of the restoration process takes about a half hour. Do not remove the Recovery Boot diskette from the diskette drive. -
Page 45: Using The Smart Restore Program
FDisk Runs the hard disk partition manager utility. Inappropriate use of FDisk can result in an irreversible loss of all data on the hard drive. Format Hard Drive Performs a quick format of the computer's hard disk. Inappropriate use of the Format command can result in an irreversible loss of all the data on the hard drive. -
Page 46: Powermate Driver Cd
PowerMate Driver CD The PowerMate Driver CD provides drivers for peripheral equipment that is available for purchase to use with your PowerMate system. The equipment and the drivers are fully tested by NECC to ensure their compatibility with the PowerMate system. If you need drivers for peripheral devices you are adding to your system, use this CD. -
Page 47: Faqs
For additional information about the Pentium III processor and the processor serial number, visit www.intel.com/pentiumiii FAQs What are the benefits of the processor serial number? You can use the processor serial number in applications which benefit from stronger forms of system and user identification. -
Page 48: Technical Support
Technical Support For world wide 7 days a week, 24 hours a day technical support, please visit the Intel support website at http://support.intel.com Email: support@intel.com In the United States, call 800-628-8686 from 5:00 a.m. to 5:00 p.m. Pacific Standard Time. For world wide phone contacts, please see http://support.intel.com/support/feedback.htm System Configuration 2-25... -
Page 49: Disassembly And Reassembly
Disassembly and Reassembly Slimtower Stabilizer System Cover DIMM Module Processor Expansion Board 5 1/4-Inch Device Diskette Drive Hard Drive CMOS Battery LED Board Assembly Power Supply System Board... -
Page 50: Powermate Es Slimline Series Disassembly Sequence
This section contains step-by-step disassembly procedures for the PowerMate ES SlimLine Series system. A disassembly figure is provided with most procedures. For an illustrated parts breakdown and parts list, see Section 5, “Illustrated Parts Breakdown.” For complete disassembly of the system, follow the disassembly order listed in the following table. -
Page 51: Slimtower Stabilizer Removal
Slimtower Stabilizer Removal If the system is configured as a slimtower, the stabilizer(s) must be removed before the system cover can be removed for access to the interior of the system. Remove the stabilizer(s) from the slimtower as follows. Turn off the system and all peripherals. Unplug the system AC power cord and all peripheral power cords. -
Page 52: System Cover Removal
System Cover Removal Remove the system cover as follows. Before removing the cover, turn off system power and unplug the system AC power cable. Before opening the system and before handling system components, reduce static discharge by touching the metal chassis. Turn off the system and all peripherals. -
Page 53: Removing The Cover
Slide the cover about one inch towards the front of the chassis, lift it up, and remove from the chassis. It might help to press in on the sides while sliding the cover towards the front of the chassis. Removing the Cover A –... -
Page 54: Dimm Module Removal
DIMM Module Removal Remove a DIMM module from the system board as follows. Before removing a DIMM module, reduce static discharge by touching a metal part on the chassis. Remove the system cover (see “Cover Removal” earlier in this section). Locate the DIMM module sockets on the system board. -
Page 55: Installing A Dimm Module
Install a DIMM module as follows. Remove the cover, if not already removed. As necessary, remove any installed DIMM module(s). Select a DIMM module (see “System Memory” in Section 1). Before installing a DIMM module, reduce static discharge by touching a metal part on the chassis. -
Page 56: Processor Removal
Processor Removal Remove the processor from its socket on the system board as follows. Before handling the processor, reduce static discharge by touching a metal part on the chassis. Remove the cover (see “Removing the Cover” earlier in this section). Remove the diskette drive and bracket (see “Diskette Drive Removal”... - Page 57 Remove the processor as follows. Carefully pull out on the processor socket lock lever just enough to release the lever from the socket, then pivot the lever up to release the processor (see the preceding figure). Carefully lift up on the processor and remove it from the socket. Store the processor in a static-free bag.
-
Page 58: Expansion Board Removal
Expansion Board Removal Remove an expansion board as follows. Before handling boards or chips, ground yourself to release static. Remove the cover (see “Removing the Cover” earlier in this section). Remove the riser board and bracket as follows. Label and unplug any cable(s) connected to the expansion board. Remove the upper side screw securing the bracket to the side of the chassis (see the following figure). - Page 59 Install an expansion board as follows. Remove the system cover and riser board bracket, if not already removed. Locate an empty expansion slot on the riser board bracket. Remove and save the screw securing the slot cover to the bracket (see the preceding figure “Removing the Riser Board Bracket”).
-
Page 60: 1/4-Inch Device Removal
5 1/4-Inch Device Removal Remove a 5 1/4-inch device from the system as follows. Remove the cover (see “Removing the Cover” earlier in this section). While pressing on the device bracket lock, raise the bracket up enough to access the device cables. -
Page 61: Diskette Drive Removal
Slide the device out of the bracket. Install a replacement device in the bracket. Install a 5 1/4-inch device in the system as follows. Slide the replacement device through the front bezel and into the device bracket until the device is flush to the bracket. Fasten the device to the bracket with the previously removed top screw ( Press the bracket lock on the side of the device bracket and raise the bracket up until it is perpendicular to the chassis. -
Page 62: Removing The Diskette Drive
Removing the Diskette Drive A – Bracket Screw D – Diskette Drive Cable B – Bracket E – Brown Cable Retainer C – Diskette Drive Remove the two screws fastening the drive to the bracket and set the drive aside. Install a replacement diskette drive as follows. -
Page 63: Hard Drive Removal
Lift the back of the drive slightly and slide it forward to engage the two tabs on the bracket with their slots in the front panel. Align the screw hole at the end of the bracket with its corresponding hole in the chassis. Install the previously removed screw through the bracket and into the chassis to fasten the bracket in place. - Page 64 Remove the hard drive from the chassis. Remove the three shoulder screws from the hard drive and install them in the same positions on the new hard drive. There is one shoulder screw on one side and two shoulder screws on the opposite side of the drive. Install a replacement hard drive as follows.
-
Page 65: Cmos Battery Removal
CMOS Battery Removal Remove the 3-volt lithium battery from the system board as follows. Turn off and unplug the system unit and any external options connected to the system. Removing the battery from the system board causes the system to lose system configuration information. -
Page 66: Removing The Battery
Press down on the battery clip to release the battery from its socket. Removing the Battery A – Battery B – Clip Remove the battery and discard in accordance with the manufacturer’s instructions. The battery can explode if it is incorrectly replaced or improperly discarded. -
Page 67: Led Board Assembly Removal
LED Board Assembly Removal Remove the LED board and cable assembly as follows. Before removing the system cover, turn off the power and unplug the system power cable. Power is removed only when the power cable is unplugged. Turn off and unplug the system unit and any external options connected to the system. Remove the system cover (see “System Cover Removal”... -
Page 68: Power Supply Removal
Power Supply Removal Remove the power supply as follows. Before removing the system cover, turn off the power and unplug the system power cable. Power is removed only when the power cable is unplugged. Turn off the system and any connected peripherals. Unplug the system AC power cord and any peripheral power cords. -
Page 69: System Board Removal
System Board Removal Remove the system board as follows. Before removing the system cover, turn off the power and unplug the system power cable. Power is removed only when the power cable is unplugged. Turn off the system and unplug the AC power cord. Unplug and disconnect any attached peripherals. - Page 70 Remove the system board from the chassis as follows. Locate the two standoffs on the system board, towards the front of the chassis. Lift the system board up enough to clear the standoffs, then slide the board towards the back of the chassis. Remove the board from the chassis.
-
Page 71: System Boards
System Boards System Board Riser Board... -
Page 72: External Cable Connectors
This section describes the locations of connectors, jumpers, and sockets on the system board and riser board, including any external cable connectors, internal board connectors and slots, jumper locations, and upgrade sockets. Included in this section are procedures for setting jumpers on the system board and a DIMM memory upgrade path for the DIMM sockets. -
Page 73: Internal Connectors, Sockets, And Jumpers
Desktop External Connector Locations A – Serial Port F – Parallel Port B – Line Out Jack G – USB Port C – Line In Jack H – LAN Port D – Keyboard Port I – VGA Port E – Mouse Port Internal Connectors, Sockets, and Jumpers Locations of the jumpers, connectors, and sockets on the system board are shown in the following figures. -
Page 74: System Board Jumpers
System Board Connector and Socket Locations A – Power Supply Fan Connector J – CPU Fan Connector B – Power Connector (JWR1) K – LED Panel Connector C – CD IN Connector L – DIMM Socket 1 D – Modem IN Connector M –... -
Page 75: Setting System Board Jumpers
The system power must be off before removing the cover and changing a jumper setting. Remove the system cover (see “System Cover Removal” in Section 3). Remove the diskette drive to access the jumpers (see “Diskette Drive Removal” in Section 3 for procedures). -
Page 76: Upgrade Sockets
Check all settings to ensure that they are correct for the application (see the preceding figure to check settings). Reinstall the diskette drive (see Section 3, “Diskette Drive Removal”). Reinstall the system cover (see Section 3, “System Cover Removal”). Connect any peripherals, plug in all power cords, and power up the system. Press to run the BIOS Setup Utility and recustomize the BIOS settings as necessary (see “BIOS Setup”... -
Page 77: System Board Components
System Board Components The system board has the following components: Intel 810E chip set used for AGP, PCI, memory, and peripheral control. The chip set incorporates — 82810E Graphics and Memory Controller Hub (GMCH) — 82801 I/O Controller Hub (ICH) —... -
Page 78: System Board Components
System Board Components Component Function Processor Celeron 500-MHz or higher processor, 66-MHz or higher FSB Pentium III 533-MHz or higher processor , 100-MHz or higher FSB Intel 810E Chipset: 82810E Graphics and Uses Intel graphics technology, software drivers, and Direct Memory Controller Hub AGP (integrated AGP) to create vivid 2D and 3D effects and (GMCH) -
Page 79: Processor And Secondary Cache
Processor and Secondary Cache The system uses an Intel Celeron or Pentium III processor with an internal clock speed of 500 MHz or higher (depending on type of processor). The processors are advanced pipelined 32-bit addressing, 64-bit data processors designed to optimize multitasking operating systems. -
Page 80: Pci/Ide Ports
PCI/IDE Ports The system board has two high-performance PCI/IDE ports: a primary port and a secondary port. The primary PCI/IDE port has an enhanced IDE interface that supports PIO Mode 4 devices with 66 MB per second maximum burst rate data transfers on the high-performance Ultra DMA bus. -
Page 81: Usb Interface
Serial Port I/O Addresses Starting I/O Address Port COM1 COM2 COM3 COM4 COM1 COM2 COM3 COM4 See Section 2, “System Configuration,” for information on resetting the port through the BIOS Setup Utility. See Section 9, “Specifications,” for the serial interface specifications. Serial interface signals are output through the system board’s 9-pin, D-subconnector. -
Page 82: Integrated Audio
MPEG is a compression/decompression standard developed by a professional video group called the Motion Picture Experts Group. MPEG produces full-screen, 30-frames-per-second (fps), broadcast-quality digital video. Integrated Audio To support multimedia applications, an AC97 Codec audio chip is integrated on the system board. -
Page 83: I/O Address Map
I/O Address Map Address (Hex) I/O Device Name 0000-000F DMA controller 1 (channel 0-3) 0020-0021 Programmable interrupt controller 1 0040-0043 Counter/timer 1 0060 PC/AT Keyboard controller 0061 System speaker 0064 PC/AT Keyboard controller 0070-0071 System CMOS/real time clock 0081-0083 DMA controller 00A0-00A1 Programmable interrupt controller 2 00C0-00DF... -
Page 84: Dma Settings
I/O Address Map Address (Hex) I/O Device Name FF00-FFOF Intel 82801AA Bus Master IDE controller FFO8-FFOF Secondary IDE controller DMA Settings The system’s DMA settings are given in the following table. DMA Settings DMA Setting Device Available Available Diskette drive Parallel port (for ECP or EPP)/audio DMA controller Available... -
Page 85: Riser Board
Riser Board The riser board is attached to a removable riser board bracket that plugs into the riser board connector on the system board. Riser Board Bracket A – Riser Board C – Riser Board Connector (on system board) B – Expansion Board Connectors D –... -
Page 86: Illustrated Parts Breakdown
Illustrated Parts Breakdown Order Spare Parts Field Replaceable Unit List Illustrated Parts Breakdown... -
Page 87: Powermate Es Slimline Series System Fru List
This section contains the illustrated parts breakdown (IPB) and NECC part descriptions for the PowerMate ES SlimLine Series systems. The following lists the telephone number for ordering spare parts field-replaceable parts for the system. The PowerMate ES SlimLine Series system illustrated parts breakdown figure is at the end of this section. - Page 88 10-GB or higher EIDE Smart Hard Drive, 5400 rpm or higher, DMA/66 LED Board Assembly AC Power Cable Windows Enhanced Keyboard The following FRU items are not shown on the IPB — Logo, NEC PowerMate — Volume Knob — Security Ring Illustrated Parts Breakdown 5-3...
-
Page 89: Powermate Es Slimline Series System Illustrated Parts Breakdown
Illustrated Parts Breakdown The following figure shows the illustrated parts breakdown (IPB) for the PowerMate ES SlimLine Series system. Each FRU on the IPB is identified with a number that cross-references to the FRU list. PowerMate ES SlimLine Series System Illustrated Parts Breakdown 5-4 Illustrated Parts Breakdown... -
Page 90: Preventive Maintenance
Preventive Maintenance System Cleaning Keyboard Cleaning Mouse Cleaning... -
Page 91: Keyboard Cleaning
This section contains general information for cleaning and checking the system, keyboard, and monitor. The system unit, keyboard, and monitor require cleaning and checking at least once a year, and more often if operating in a dusty environment. No other scheduled maintenance is required. Unplug all power cords before performing any maintenance. -
Page 92: Locating A Typical Mouse Ball Cover
Mouse Cleaning The mouse has a self-cleaning mechanism that prevents a buildup of dust or lint around the mouse ball and tracking mechanism under normal conditions. Periodically, however, the mouse ball must be cleaned. Use the following procedure to clean the mouse. Note The following procedure describes cleaning of a typical mouse and should be used as a guideline. -
Page 93: Troubleshooting
Troubleshooting Checklist Diagnostics... -
Page 94: System Problems
This section provides information to help isolate and repair system malfunctions at the field level. The system has a built-in program that automatically checks its components when the system is powered on. If there is a problem, the system displays an error message. If this happens, follow any instructions on the screen. -
Page 95: Diskette Drive Problems
System performance appears sluggish. Check that the system is set for optimal operation. See the operating system documentation. Check the memory requirements of the software applications. If required, install additional DIMM memory (see Section 3, “Disassembly and Reassembly”). If optional DIMM memory was added, check that it is correctly installed. System password forgotten. -
Page 96: Keyboard/Mouse Problems
Distorted image appears on the monitor screen. Adjust the monitor’s video controls. If this does not help, turn the monitor off for several seconds, then back on. There is constant movement on the screen. A magnetic field is affecting the monitor. Move any devices (fan, motor, another monitor) that generate magnetic fields away from the monitor. -
Page 97: Speaker Problems
The CD does not eject due to a power failure or software error. Use the emergency eject feature to open the CD tray. Remove the system cover to access the front of the CD-ROM drive (see Section 3, “Disassembly and Reassembly” for cover removal procedures). -
Page 98: Diagnostics
Diagnostics One beep indicates that the system has completed its POST test. If intermittent beeping occurs, power off the system and try again. If the beeping persists, see the following table. The table summarizes problems that may develop during system operation and lists (in sequential order) suggested corrective actions. - Page 99 Problems and Solutions Problem Symptom Solution 1. Press F2 to run Setup and correct the Operating system “Invalid Configuration” message does not boot displayed. parameters. (cont’d) 2. Replace the CMOS battery (see Section 3) if the date and time must be set each time the system is powered on.
- Page 100 Problems and Solutions Problem Symptom Solution 1. Check keyboard/mouse plugged in. Keyboard or mouse Monitor has prompt, but cannot malfunction input data using keyboard or 2. Check password (see Section 2). mouse. 3. Disable password (see Section 2). 4. Replace keyboard (or mouse). 5.
- Page 101 Problems and Solutions Problem Symptom Solution 1. Check that speaker power is on and CD-ROM drive No sound from CDs. malfunction (cont'd) volume is adjusted. 2. Check audio software settings. 3. Check the CD. 4. Check the CD-ROM drive audio cable connections.
-
Page 102: Necc Information Services
NECC Information Services Service Telephone Numbers Technical Support... -
Page 103: Necc Website
In the U.S. and Canada, call Support Center (TSC): 1 (800) 632-4525 To order spare parts: Call 1 (800) 632-4525 To send technical questions by tech-support@nec-computers.com email: To fax technical questions to In the U.S., fax customer support: 1 (801) 981-3133 To access the NECC website: www.nec-computers.com/... -
Page 104: Necc Ftp Site
The NECC Technical Support Center offers technical support by Internet email if you have access. The Internet email address is: tech-support@nec-computers.com You can also fax technical questions to the NECC Technical Support Center if you have access to a fax machine or fax/modem. The fax number is:... -
Page 105: Specifications
Specifications System Board Keyboard Mouse Optional Speaker Set System Unit Diskette Drive Hard Drive Power Supply CD-ROM Drive Environmental Compliance... -
Page 106: System Board Specifications
This section contains the specifications for the various components comprising the PowerMate ES SlimLine Series systems. The following table lists the specifications and the pages where the specifications can be found. System Specifications Specification Go to Page System board Keyboard Mouse Speaker set Diskette drive... -
Page 107: Keyboard Specifications
System Board Specifications Feature Specification Graphics Memory Shared with system memory (DVMT) Audio Audio-Codec (AC) 97 controller integrated on 810E chipset Battery Replaceable coin-type battery Keyboard Specifications The specifications for the keyboard are included in the following table. Keyboard Specifications Feature Specification Keyboard... -
Page 108: Optional Speaker Set Specifications
Optional Speaker Set Specifications The specifications for the optional speaker set (if ordered) are included in the following table. Speaker Specification Feature Specification Speakers Features Magnetically shielded 10-watt stereo speakers Power on/off/volume switch 15-volt AC power adapter Performance Frequency response, 90-20 kHz, 2 dB Sensitivity, 300 mV Output power, 4.5 watts System Unit Specifications... -
Page 109: Diskette Drive Specifications
Diskette Drive Specifications The specifications for the diskette drive are included in the following table. Diskette Drive Specifications Feature Specification Diskette Drive Notebook type diskette drive Recording Capacity High density mode: Unformatted: 2.00/1.00 MB Formatted: 1440 KB (512B 18 Sec) 720 KB (256B 18 Sec) Normal density mode: Unformatted: 1.00/0.50 MB... -
Page 110: Power Supply Specifications
Power Supply Specifications The specifications for the 106-watt power supply are included in the following table. Power Supply Specifications Feature Specification Power Supply 106-watt AC Power Input 100 — 240 volt, 50-60 Hz Switch Selectable 115 or 230 volts Power Connectors One diskette drive, one system board, two storage devices (hard drive and CD-ROM drive or DVD-ROM drive) Power Management... -
Page 111: Specifications
FCC CFR 47 Part 15, Subpart B UL 1950 3 edition Canadian C-UL C22.2 No. 950-95 ICES-003 Issue 2, Revision 1 Year 2000 YMARK 2000 NEC Y2KTEST.EXE WHQL DMI 2.0 Self Certification Test Suite Energy Star All systems are Energy Star Compliant Specifications 9-7... - Page 112 Glossary access time The time period between the supply of an access signal and the output or acceptance of the data by the addressed system. Examples are the access times for DRAMs, SRAMs, hard drives, and CD-ROM drives. Hard drive access time is the time it takes for a computer to get data from the drive.
- Page 113 application programs Software designed to perform specific functions or a group of functions, like solving business or mathematical problems. Examples of applications include word processing, communications, or database management. architecture A general term for the design and construction of computer systems, particularly hardware, but also operating systems and networks.
- Page 114 bandwidth A measure of how much information something can carry. Specifically, data path times frequency. For example, the ISA bus has a data path of 16 bits (it can send 16 bits at a time) and typically operates at 8.33 MHz, so it has a bandwidth of 133.28 megabits per second (Mbps).
- Page 115 block A contiguous section of bits considered as a whole, especially in memory. On a disk, the data in one sector; in modem data transfer, the bits between checksums. board Printed circuit board. Board onto which computer components are soldered and thin wires are printed to connect the components.
- Page 116 bus master The ability of an expansion card to control the bus without needing intervention from the CPU. byte Group of eight contiguous bits. Frequently written as an eight-digit binary number or a two- digit hexadecimal number. One letter of the alphabet in ASCII code takes one byte. cache A special block of fast memory used for temporary storage of frequently used data for quick retrieval.
- Page 117 cold boot Process of starting up the computer by turning on the power. If power is already on, the process means to turn off the computer and turn it on again. A cold boot reinitializes all devices. compression Any scheme for recording data with fewer bits. For example, stating how many times something occurs can be shorter than stating each occurrence.
- Page 118 ECC memory Error Checking and Correcting memory. Advanced type of memory that can find and correct certain types of single-bit memory errors, providing greater data integrity. Advanced ECC can correct some double-bit errors. Extended Capabilities Port. A parallel-port standard for PCs that supports bidirectional communication between the PC and attached devices (such as a printer).
- Page 119 graphics accelerator A term referring to a higher end video controller that handles high-speed graphics and usually contains several megabytes of onboard video memory. Graphical User Interface. Method of presenting information on a computer screen utilizing icons, pull-down menus, and a mouse. hertz (Hz) A unit of frequency equal to one cycle per second.
- Page 120 I/O address Input-Output address. How the CPU sees an I/O port. It puts data into this address or reads the data in it. The device at the other end of the I/O port gets the data from that address or puts the data there, respectively.
- Page 121 memory Electronic storage area in a computer that retains information and programs. A computer has two types of memory: read-only memory (ROM) and random access memory (RAM). microprocessor A semiconductor central processing unit that is the principal component of a microcomputer.
- Page 122 page A type of message transmission in which a message is sent or received via modem to a paging device from a computer (with paging communications software) or telephone. parallel interface Interface that communicates eight bits at a time. parallel printer A printer with a parallel interface.
- Page 123 Random Access Memory. A storage device into which data is entered and from which data is retrieved in a nonsequential manner. On the system board, RAM is semiconductor-based memory that can be read and written to by the microprocessor or other hardware devices. In RAM, data can be directly and randomly read or written (with any choice for the address).
- Page 124 SMART Self-Monitoring Analysis and Reporting Technology. A hard drive feature that works in conjunction with system software (for example, LANDesk Client Manager, NEC Auto Backup) for identifying a potential problem on the hard drive and automatically backing up system files to a user-specified device, such as a tape or Zip drive.
- Page 125 Ultra DMA A protocol developed by Quantum Corporation and Intel that supports burst mode data transfer rates of 33.3 MBps and 66 MBps. Ultra DMA/33 is twice as fast and Ultra DMA/66 is four times as fast as the previous disk drive standard for PCs. Increasing the transfer rates is necessary to take advantage of the faster Ultra ATA disk drives.
- Page 126 WRAM Windows RAM. A type of RAM that supports two ports. This enables a video adapter to fetch the contents of memory for display at the same time that new bytes are being pumped into memory. This results in much faster display than is possible with conventional single- port RAM.
- Page 127 Index riser board, 3-19 riser board bracket, 3-10 stabilizers, 3-3 Addresses, parallel port, 2-3 system board, 3-21 Adobe Acrobat Reader, 1-8 system cover, 3-12 Advanced Menu, 2-11 Diskette drive AGP, 1-12, 4-11 installation, 3-14 AMI BIOS Setup Utility, 2-2 removal, 3-13 AntiVirus, Norton, 1-8 specifications, 9-5 Audio features, 4-12...
- Page 128 6-3 system board, 3-22 problems, 7-4 Recovery boot diskette, 2-20 specifications, 9-3 Removal procedures 5 1/4-inch device, 3-12 CMOS battery, 3-17 NEC PowerMate Driver CD diskette drive, 3-13 features, 1-9 hard drive, 3-15 NEC Product Recovery Program CD Index-2...
- Page 129 9-2 Upgrading BIOS, 2-18 system unit, 9-4 USB features, 4-11 Stabilizers Utilities installation, 3-3 NEC Product Recovery Program, 1-8 removal, 3-3 Norton AntiVirus, 1-8 Standard system restore, 2-20 Standards, compliance, 9-7 System Virus protection, Norton, 1-8 cleaning, 6-2...
-
Page 130: Regulatory Statements
Regulatory Statements The following regulatory statements include the Federal Communications Commission (FCC) Radio Frequency Interference Statement, compliance statements for Canada and Europe, battery disposal and replacement information, and the Declaration of Conformity. FCC Statement for United States Only Changes or modifications to this unit not expressly approved by the party responsible for compliance could void the user’s authority to operate the equipment. -
Page 131: Battery Replacement
Canadian Department of Communications Compliance Statement This Class B digital apparatus meets all requirements of the Canadian Interference-Causing Equipment Regulations (pursuant to ICES-003 Issue 2, Revision 1). Avis de conformité aux normes du ministere des communications du Canada Cet equipment numérique de la Classe B respecte toutes les exigences du Reglement sur le matérial brouillage du Canada (en conformité... - Page 132 456-00131-000SRV NEC Computer Systems Division 15 Business Park Way 7/2000 Sacramento, CA 95828 www.nec-computers.com...