Table of Contents
Advertisement
Hi-Fi-Stereo-
Video recorder
Model No. GC987P1/GC981P1/GC967P1/GC961P1/GC947P1/GC941P1
Part No. MFL46896863
Owner's manual
LV 4 7 8 7
LV 4 9 8 1
LV 4 7 6 7
LV 4 7 6 5
LV 4 7 4 7
LV 4 7 4 5
●
HQ (High Quality) picture
enhancement system
●
Full function infra-red remote
control handset
●
Programmable 88 channel memory
with Frequency synthesised tuner
●
ACMS (Automatic Channel Memory
System) plus - the channels will be
preset, sorted and memorized
automatically.
●
7 event/1 month programmable
timer
●
Built-in ShowView programming
●
Recording and playback for 16:9
Wide-screen format
●
Energy Saving function
●
ICON O.S.D (On Screen Display) -
Enables menu to display on the
blue picture and actual picture.
●
NTSC playback on PAL TV
●
PREMIERE Compatible
●
LP - Long Play - recording and
playback
●
Logic & Picture Search
●
Lock
●
Auto Power on and Play
●
Fine still, Frame advance & Slow
functions
●
Real Time Counter
●
Quick Start function
●
Auto Tracking System
●
Reception of Stereo, Bilingual &
Mono sound
●
Hi-Fi Audio System
●
Simulcast Recording
Advertisement
Table of Contents

Related Manuals for LG ShowView LV4787


Summary of Contents for LG ShowView LV4787
- Page 1 Owner’s manual Hi-Fi-Stereo- LV 4 7 8 7 LV 4 9 8 1 Video recorder LV 4 7 6 7 LV 4 7 6 5 LV 4 7 4 7 LV 4 7 4 5 ● HQ (High Quality) picture enhancement system ●...
- Page 2 Welcome to LG Thank you for buying this LG video cassette recorder Model LV4787/LV4981/LV4767/LV4765/LV4747/LV4745. Before using your video recorder you need to be familiar with the names of some of the buttons on the remote control handset (see OPERATING THE VIDEO RECORDER, pages 4 to 6), and you need to set up the video recorder so that it can receive the TV stations in your area and so that your TV set can receive pictures from it (see p 12 to 14).
-
Page 3: Table Of Contents
Contents Operating the video recorder The remote control handset The front & back of the video recorder Installing your video recorder Setting the VCR output channel On screen displays Storing TV stations 12-16 Automatic tuning Manual tuning 13-14 Moving the programme order of the “TV station table” menu Clearing stations from the “TV station table”... -
Page 4: Operating The Video Recorder
Operating the video recorder The Remote Control Handset This video recorder is designed so that almost all of its functions can be controlled from the REMOTE CONTROL HANDSET. This must have a “line of sight” to the sensor on the front of the video recorder. It must be within an angle of 30 degrees either side of the centre. - Page 5 VCR: To monitor, view playback or view the video recorder’s tuner. ● To watch TV or view another programme while recording one programme (see p 24). SHOWVIEW (LV4787/LV4767/LV4747) To display the programme menu for ShowView programming on the handset (see p 25 to 26). ez POWER OFF (see p 36).
-
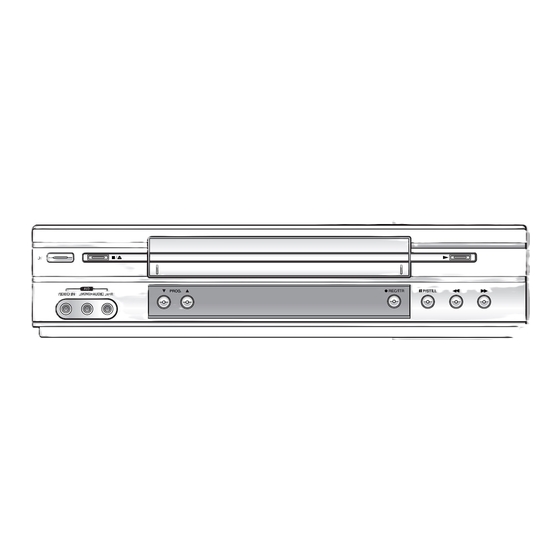
Page 6: The Front & Back Of The Video Recorder
Operating the video recorder The front of the Video Recorder LV4787/LV4981 7 8 9 LV4767/LV4765 LV4747/LV4745 7 8 9 P/STILL To switch the video recorder on and off. Switches to still picture (see p 19), during recording to (see p. 18). -
Page 7: Installing Your Video Recorder
Installing your video recorder IMPORTANT! The guidance given on the next three pages in the most common forms of connection. However please check with your manufacturers instruction books for specific information. Make sure all connections are made with both your VCR and additional appliance unplugged from the mains to avoid damaging your equipment. - Page 8 Installing your video recorder Connecting to your Hi-Fi (Audio Out) An audio system can be connected to the AUDIO OUT sockets on the back of your VCR. Please remember to turn the volume to minimum on your Hi-Fi, then gradually increase the volume;...
- Page 9 Installing your video recorder Camcorder Connection Make sure all connections are made with both your VCR and Camcorder unplugged from the mains to avoid damaging your equipment. To make connecting your Camcorder easier we have designed the Audio IN (Left and Right) and Video IN sockets on the front panel of your VCR.
-
Page 10: Setting The Vcr Output Channel
Setting the VCR output channel Your TV set receives the video recorder signal like another TV station. So you have to select a programme number for the video recorder. Take care to select this programme number, whenever you control the video recorder, or watch a recording. -
Page 11: On Screen Displays
On Screen Displays A number of the features of this video recorder can be set and altered using the handset with On Screen Displays (menus) on the TV screen. The Main menu Switch on your TV set and video recorder by pressing the “POWER” button. Press the “i”... -
Page 12: Storing Tv Stations
“P”: Portugal, “S”: Sweden, “SF”: Finland, Others. Press the “OK” button to start the automatic storing of the channels of the TV stations in your area. The VCR’s clock will be set automatically when automatic tuning has finished (LV4787/LV4767/ LV4747). Pr-12 ACMS If the clock is wrong please see “Setting the video... -
Page 13: Manual Tuning
Storing TV stations Manual tuning TV station Channel numbers and Station names can be stored manually. Press the “i” button on the video recorder handset. The menu will appear on the TV screen. Pr-12 P SET TIME SYS- ACMS DATE 16:9 DECO- OK i... - Page 14 Storing TV stations Press the “OK” and select the cursor “ ” and “ ” buttons to select the station name from list. WDR 3 NOTE: STATION Press the use “ ” button to input the station name NDR3 SWF3 P SET OK i manually.
-
Page 15: Moving The Programme Order Of The "Tv Station Table" Menu
Storing TV stations Moving the programme order of the “TV station table” menu If you want to move the order of the TV stations you can easily do so as follows: Press the “i” button on the remote control handset. The menu will appear on the TV screen. -
Page 16: Clearing Stations From The "Tv Station Table" Menu
Storing TV stations Clearing stations from the “TV station table” menu If you want to clear a TV station from the video recorder’s store you can easily do so as follows: Press the “i” button on the remote control handset. The menu will appear on the TV screen. -
Page 17: Time And Date Setting
LV4747). It is also continually checked against the date and time if this information is being broadcast as it is by all channels broadcasting a Teletext signal (LV4787/LV4767/ LV4747). It is, therefore, unlikely that you will need to alter the clock settings. -
Page 18: Using The Vcr To Play Back A Tape
Using the VCR to play back a tape NOTE - Loading and unloading of a video cassette is only possible when the video recorder is plugged into a power source. Loading & Unloading a video cassette Insert the cassette into the video recorder with the window side up and the arrow pointing away from you. -
Page 19: Normal Playback
Using the VCR to play back a tape Normal playback Press the “PLAY” button to start playing a tape (called Normal playback). “PLAY” will appear for a few seconds on the TV screen. Automatic tracking - The video recorder will automatically adjust the tracking to give the best quality picture. -
Page 20: Other Playback Features
Other playback features This video recorder will allow you to rapidly wind a tape forwards or backwards, search a cassette tape, view individual frames on a tape, and play back a tape in slow motion. Fast forward (FF) Pressing the fast forward (“ FF ”) button with the tape on stop, will rapidly wind the tape forward. -
Page 21: Slow Motion Playback, Shuttle
Other playback features Slow motion playback, Shuttle This video recorder is equipped with a slow motion and shuttle features. During playing back or still picture press the cursor “ ” or “ ” button. You can reach the following playback speeds: (-7xplay, -3xplay, -play, still, 1/19 slow, play, 2xplay, 7xplay) If distortions can be seen in the picture, remove them with the cursor “... -
Page 22: Selection Of The Colour System
Other playback features Selection of the colour system Because your video recorder is equipped with dual colour standard, you can playback recordings in PAL B/G and SECAM B/G. During playback your video recorder detects the recorded colour system automatically. Only if there are colour problems with very weak recordings, you should select the colour system manually: Press the “i”... -
Page 23: Using The Video Recorder To Record
1 You can use the ShowView feature, which is built into this video recorder (see p 25 to 26) (LV4787/LV4767/LV4747). 2 You may set the times manually, using either the on screen display (OSD) (see p 27 to 28). -
Page 24: Immediate Timer (Itr)
Using the video recorder to record Recording one TV programme while watching another You can record one programme while watching another by selecting the channel you watch on your TV set. Start a recording by following above steps 1 to 5 (see p. 23). Select to TV mode by pressing the “TV/VCR”... -
Page 25: Programming The Video Recorder Timer
Development Corporation. The S System is manufactured under licence from Gemstar Development Corporation. ShowView programming on the TV screen (LV4787/LV4767/LV4747) These new timer programming feature is very easy to use: Press the “SHOWVIEW” button. The “SHOWVIEW” menu appears. SHOWVIEW NO. - Page 26 Programming the video recorder timer Press the “OK” button. You will see the data of the selected DATE TIME 00~14 broadcasts. 30~20 00~20 • - - ~ - - If “PLEASE CHECK” appears, you have to check - - ~ - - - - ~ - - - - ~ - - the entering and repeat the procedure.
-
Page 27: Recorder Timer Programming Using The On Screen Displays
Programming the video recorder timer Recorder timer programming using the On Screen Displays Without the ShowView code you need to enter the programme number, date, and the start and stop times of the programme you wish to record. Press the “i” button and select “REC” with the cursor “... - Page 28 Programming the video recorder timer Enter the start and end times using the number buttons. DATE TIME - - ~ - - • - - ~ - - For setting programme times you must use the - - ~ - - - - ~ - - - - ~ - - - - ~ - -...
-
Page 29: Checking & Clearing Stored Timer Programmes
Programming the video recorder timer Checking and clearing stored timer programmes The stored timer programmes can easily be viewed on the TV screen, and can also be cleared if not wanted. Press the “i” button and select “REC” with the cursor “... -
Page 30: Other Features
Other features Introduction This video recorder has a number of other features which make it easier and more convenient to use. Some of these are described in this section of the manual. Later sections describe the connection of the video recorder to other equipment, and features relating on the video recorder. -
Page 31: Digital Tape Counter, Remaining Tape Volume, Memory Stop
Other features ON SCREEN DISPLAY OF THE TIME OR TAPE COUNTER, REMAINING TAPE VCR RECORDER CHANNEL VOLUME, DATE, PROGRAMME CHANNEL AND OPERATION MODE OF THE FUNCTION PROGRAMME VIDEO RECORDER. When the “OK” button is pressed, a display occurs on the TV screen of the current STOP time or the tape counter and the remaining tape volume, the date, year and day of the week, the programme channel and the operation mode of the video recorder. -
Page 32: Tracking Controls
Other features Tracking Controls Tracking distortions show up as streaks or an unstable picture. This video recorder can set the tracking automatically. You can also set the tracking manually if you need to do so. Automatic tracking - The automatic tracking adjusts the tracking to playback a tape with the optimum picture quality. -
Page 33: The Child Lock, 16:9 Compatibility, Self-Diagnosis
Other features The Child Lock The control buttons on the front of the video recorder are inoperative. The video recorder can be controlled only from the handset. Press the “LOCK” button. SAFE will appear on the TV screen. SAFE will flicker in your video recorder’s display for a few seconds. The control buttons on the front of the video recorder are inoperative (except for “STOP/EJECT”). -
Page 34: The Hi-Fi Stereo Sound System
The Hi-Fi stereo sound system Introduction This video recorder will record and playback Hi-Fi stereo sound. There are, therefore, several possible ways of recording and playing back the sound. These are described below. The audio tracks Video cassette tapes recorded on this video recorder will have a normal mono audio AUDIO TRACKS TYPE OF track and two video tape Hi-Fi stereo audio tracks. -
Page 35: Recording From Another Equipment
Recording from another equipment VIDEO IN L(MONO)-AUDIO IN-R VIDEO IN L- AUDIO IN -R 300•ÿ 75•ÿ To AUDIO IN (L/R) To AUDIO OUT (L/R) Simulcast stereo recording and playback Recording Some TV programmes is also broadcast in stereo sound on FM radio. For these simulcast broadcasts you can record the picture from the TV programme, and the sound from your audio system as follows: Connect your audio system to the “AUDIO IN (L/R)”... -
Page 36: Ez (Easy) Operations
ez (easy) operations ez (easy) power off The sequence of “Stop Rewind Eject Power Off ” is operated automatically by pressing ez POWER OFF. During play back press ez POWER OFF. Your VCR will be operated as the following; POWER STOP REWIND EJECT... -
Page 37: Controlling The Tv
Controlling the TV You can control the sound level, input source, and power switch of your LG TV with the supplied remote control. You can control your TV using the buttons below By pressing You can TV POWER Turns the TV on or off.. -
Page 38: Specifications
Specifications General Power : 200-240V~, 50Hz. Power consumption : Approx. 12 watts (Energy saving mode: 3 watts) Video Head system : Double azimuth 4 heads, helical scanning system Tape speed : 23.39 mm/sec (SP mode)/11.69 mm/sec (LP mode) Tape format : Tape width 1/2"... -
Page 39: Before Calling For Service
Before calling for service... Please check to see if any problem which you may have with your video recorder is described here before taking it for service or calling a service engineer. Problem Possible solution? • Is the video recorder plugged into the No mains power to the recorder mains? •... - Page 40 LG Electronics Deutschland GmbH Jakob-Kaiser-Straße 12 Postfach 244, 47877 Willich Telefon: 02154 / 492-0, Telefax: 02154 / 428799 Internet: www.lge.de P/N: MFL46896863...