
Related Manuals for Frigidaire PL30WC51EC


Summary of Contents for Frigidaire PL30WC51EC
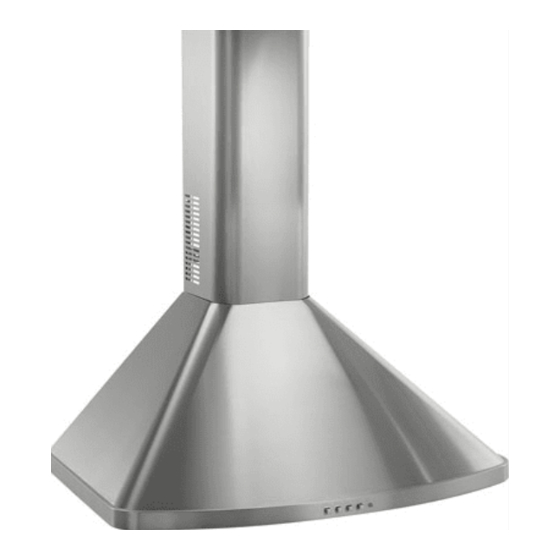
- Page 1 PL30WC51EC Models PL36WC51EC PL42WC51EC ENGLISH........2 FRANÇAIS........10...
-
Page 2: To Reduce The Risk Of Fire, Electric Shock, Or Injury To Persons, Observe The Following
READ AND SAVE THESE INSTRUCTIONS INTENDED FOR DOMESTIC COOKING ONLY WARNING TO REDUCE THE RISK OF FIRE, ELECTRIC SHOCK, OR INJURY TO PERSONS, OBSERVE THE FOLLOWING: 1. Use this unit only in the manner intended by the manufacturer. If you have questions, contact the manufacturer at the address or telephone number listed in the warranty. -
Page 3: Operation
OPERATION BLOWER Controls LIGHT PILOT MEDIUM SWITCH LAMP SPEED The hood is operated using the (4) push-buttons located at eye-level, on the front edge of the hood. BLOWER BLOWER ON-LOW / The light switch turns the halogen lamps on and off. HIGH SPEED The blower on-low / off switch turns the blower on to its lowest running speed. -
Page 4: Prepare The Hood
PREPARE THE HOOD Unpack hood and check contents. You should receive: 1 - Hood 1 - Decorative Flue Assembly 1 - Parts Bag containing: 1 - Mounting Bracket DISCHARGE MOUNTING 1 - Discharge Collar COLLAR BRACKET 1 - Flue Mounting Bracket 8 - Mounting Screws (4,8 x 38mm Pan Head) 4 - Mounting Screws (3,9 x 9,5mm Pan Head) 2 - Mounting Screws (3.9 x 6mm Flat Head) -
Page 5: Install The Ductwork
INSTALL THE DUCTWORK (DUCTED HOODS ONLY) ROOF CAP 6” CAUTION: To reduce the risk of fire, use only metal ductwork. ROUND DUCT 1. Decide where the ductwork will run between the hood and the outside. DECORATIVE WALL 2. A straight, short duct run will allow the hood to perform most efficiently. FLUE HOOD 3. -
Page 6: Install Flue Mounting Bracket
INSTALL FLUE MOUNTING BRACKET (DUCTED AND NON-DUCTED HOODS) 1. Assemble the flue mounting bracket, adjusting outside width as shown. See Figure 7. 2. Carefully center the mounting bracket directly over the range hood location. 3. Secure the bracket assembly to the ceiling using (2) 4.8x38mm mounting screws and drywall anchors (Fig. 8). Make sure the bracket is pushed into the corner, tight against the wall and centered over the hood. -
Page 7: Install The Hood
PREPARE THE HOOD (NON - DUCTED HOODS ONLY) Note: The following materials must be purchased separately for non-ducted recirculation installations. Non - Ducted Recirculation Kit, Model DFKTWC51EC. 5” diameter metal duct. 1. Discard discharge collar and damper supplied with the hood. Install the 5” to 6” adapter supplied with the Non-Ducted Recirculation Kit. -
Page 8: Install Filters
INSTALL THE HOOD, cont’d 8. Carefully place the decorative flue on the hood. Fig. 13. - On ducted installation in rooms with 8-foot ceilings, the air vents are concealed. Install the flue with the air vents down. - On non-ducted installations in rooms with 8-foot ceilings, the air vents are exposed. Install the flue with the air vents - On ducted and non-ducted installations in rooms with 9-foot ceilings, the vents are exposed. - Page 9 Major Appliance Warranty Information Your appliance is covered by a one year limited warranty. For one year from your original date of purchase, Electrolux will pay all costs for repairing or replacing any parts of this appliance that prove to be defective in materials or workmanship when such appliance is installed, used and maintained in accordance with the provided instructions.
- Page 10 LISEZ ET CONSERVEZ CES INSTRUCTIONS SEULEMENT POUR UTILISATION DOMESTIQUE AVERTISSEMENTS POUR REDUIRE LES RISQUES D’INCENDIE, DE DECHARGES ELECTRIQUES OU DE DOMMAGES AUX PERSONNES, OBSERVEZ LES INSTRUCTIONS SUIVANTES: 1. N’utilisez cet appareil que comme cela est indiqué par le constructeur. Si vous avez des problèmes, contactez le fabriquant à l’adresse ou au numéro de téléphone indiqués dans la garantie.
-
Page 11: Entretien
FONCTIONNEMENT VOYANT LUMINEUX VENTILATEUR Commandes BOUTON VITESSE Votre hotte fonctionne grâce à (4) boutons sur lesquels vous devez appuyer et qui LUMIÈRE MOYENNE se trouvent à la hauteur de vos yeux, sur le bord antérieur de votre hotte. Le bouton de la lumière allume et éteint les ampoules halogènes. VENTILATEUR Le bouton du ventilateur ON-bas/OFF fait fonctionner le ventilateur à... - Page 12 PREPAREZ LA HOTTE Enlever la hotte dans l’emballage et controller le contenu. Vous devez recevoir : 1 - Hotte 1 - Conduit décoratif COLLIER SUPPORT 1 - Sachet avec: D’EVACUATION DE FIXATION 1 - Support de fixation 1 - Collier d’évacuation 1 - Étrier de support 8 - Vis d’assemblage (4,8 x 38mm Tête ronde) 4 - Vis d’assemblage (3,9 x 9,5mm Tête ronde)
-
Page 13: Installation Du Systeme D'evacuation
INSTALLATION DU SYSTEME D’EVACUATION COUVERCLE DU (UNIQUEMENT POUR LES HOTTES CARÉNÉES) TOIT TUYAU ROND ATTENTION: Pour réduire les risques d’incendie, n’utilisez que des tuyaux DE 6” (15cm) en métal. 1. Décidez où le tuyau rond doit être installé, entre votre hotte et l’extérieur. 2. -
Page 14: Préparation De La Hotte
INSTALLATION ETRIER DE SUPPORT (HOTTES CARÉNÉES OU NON CARÉNÉES) 1. Assemblez l’étrier de support du conduit décoratif en réglant la largeur extérieure comme indiqué. Fig. 7. 2. Centrez soigneusement l’étrier de support directement sur l’emplacement destine à la hotte. 3. Fixez l’etrier de support au plafond au moyen de deux (2) vis de montage de 4,8 x 38 mm et chevilles (Fig. 8). Vérifiez que le support est enfoncé... -
Page 15: Installation De La Hotte
PRÉPARATION DE LA HOTTE (CONFIGURATION NON CARÉNÉE) Remarque : Le matériel doit être acheté séparément pour des installations non carénées. Kit de recirculation non caréné, modèle DFKTWC51EC. Conduit en metal de 5" de diamètre. 1. Ne comptez pas le collier d’évacuation ni le clapêt fournis avec la hotte. Installez l’adaptateur de 5" à 6" fourni avec le kit de recirculation non caréné. -
Page 16: Installation Des Filtres
INSTALLATION DE LA HOTTE, suite 8. Placez précautionneusement le conduit décoratif sur la hotte (Fig. 13). - Pour les hottes carénées, lorsque le plafond est de 8’, les prises d’air du conduit supérieur sont dissimulées. Installez le conduit avec les prises d’air vers le bas. - Pour les hottes non carénées, lorsque le plafond est de 8’, les prises d’air du conduit supérieur seront visibles une fois installées. - Page 17 Informations sur la garantie des gros électroménagers Votre appareil est couvert par une garantie limitée d’un an. Pendant un an à partir de la date d’achat originale, Electrolux assumera les coûts des réparations ou du remplacement des pièces de cet appareil qui présente un défaut de fabrication ou de matériau, si cet appareil est installé, utilisé...
-
Page 18: Service Parts
SERVICE PARTS - LISTE PIECES DE RECHANGE MODELS PL30WC51EC - PL36WC51EC - PL42WC51EC KEY No. DESCRIPTION (ENGLISH ) DESCRIPTION (FRANCAIS) Grease Filter Filtre à graisse Motor Capacitor Condensateur Connection Box Support Support boîte cable alimentation Electrical Box Support Support boîte installation electrique... - Page 19 SERVICE PARTS - LISTE PIECES DE RECHANGE MODELS PL30WC51EC - PL36WC51EC - PL42WC51EC - 19 -...
- Page 20 99043832A 04307534...