Table of Contents
Advertisement
Quick Links
Advertisement
Table of Contents

Related Manuals for Sharp ER-A450


Summary of Contents for Sharp ER-A450
- Page 1 ELECTRONIC CASH REGISTER MODEL ER-A450 INSTRUCTION MANUAL...
- Page 2 CAUTION: The cash register and the remote drawer should be securely fitted to the supporting platforms to avoid instability when the drawers are open. CAUTION: The socket-outlet shall be installed near the equipment and shall be easily accessible. VORSICHT: Die Netzsteckdose muß nahe dem Gerät angebracht und leicht zugänglich sein. ATTENTION: La prise de courant murale devra être installée a proximité...
-
Page 3: Introduction
INTRODUCTION Thank you very much for your purchase of the SHARP Electronic Cash Register, Model ER-A450. Please read this Manual carefully before operating your machine in order to gain full understanding of functions and features. Please keep this manual for future reference, it will help you, if you encounter any operational problems. -
Page 4: Table Of Contents
CONTENTS INTRODUCTION ····················································································································································1 IMPORTANT ··························································································································································1 PRECAUTION························································································································································1 CONTENTS····························································································································································2 EXTERNAL VIEW ··················································································································································6 Front view ···············································································································································6 Rear view················································································································································6 PRINTER································································································································································7 KEYBOARD ···························································································································································8 1 Standard keyboard layout··························································································································8 2 Standard key number layout······················································································································9 KEYS AND SWITCHES ·······································································································································10 1 Mode switch and mode keys ···················································································································10 2 Drawer lock key ·······································································································································10 DISPLAYS ···························································································································································11 Machine state symbols ·························································································································11 FOR THE MANAGER... - Page 5 Job-Code-Based Programming ························································································································27 1 Setting the date and time·························································································································27 Setting the date (#2610) ·······················································································································27 Setting the time (#2611) ·······················································································································27 2 Setting the register and consecutive numbers ························································································28 Setting the register number (#2612)·····································································································28 Setting the consecutive number (#2613)······························································································28 3 Programming the tax rate ························································································································29 The tax rate (#2711) ·····························································································································29 4 Programming for departments ·················································································································30 Functional programming (#2110) ·········································································································30...
- Page 6 Secret codes to control access to the PGM1 mode, X1/Z1 mode and X2/Z2 mode (#2630, 2631, 2632) ·····························································································································63 Currency description text programming (#2334) ·················································································63 Functional programming for the printer (#2990) ···················································································64 Assigning the drawer number to the drawer for foreign currency (#2680) ··········································64 Setting the AUTO key - Automatic sequencing key - (#2900) ······························································65 11 Reading stored programs ························································································································66 Program details and procedures for their reading ················································································66...
- Page 7 Difference subtotal (Differ ST) ············································································································100 3 Finalization of transaction ······················································································································101 Cash or cheque tendering ··················································································································101 Mixed tendering (cheque + cash) ·······································································································101 Cash or cheque sale that does not need any tender entry·································································101 Credit sale ··········································································································································102 Mixed-tender sale (cash or cheque tendering + credit tendering) ······················································102 4 Computation of VAT (Value Added Tax)/tax ·························································································102 VAT/tax system ··································································································································102 VAT shift entries ·································································································································104...
-
Page 8: External View
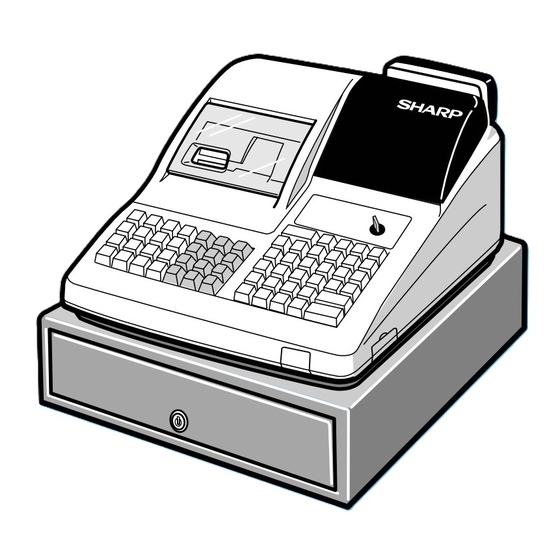
EXTERNAL VIEW Front view Customer display (Pop-up type) Printer cover Operator display Receipt paper Journal window Mode switch Keyboard RS-232C connector cover Drawer Drawer lock Rear view... -
Page 9: Printer
PRINTER The printer is a receipt/journal dual station type thermal printer, and therefore it does not require any type of ink ribbon or cartridge. The average life of the printer is approximately 5 million lines. When removing the printer cover, lift up its rear. When installing the printer cover, hook it on the pawls on the cabinet and shut it. -
Page 10: Keyboard
KEYBOARD Standard keyboard layout CASH PLU/SUB RECEIPT JOURNAL RCPT AUTO AUTO • All the keys but the receipt paper feed and journal paper feed keys can be re-positioned. If you Note want to change the layout, consult your dealer. Receipt paper feed key Value added tax key RECEIPT Journal paper feed key... -
Page 11: Standard Key Number Layout
AUTO Foreign currency exchange 1 and 2 keys Automatic sequencing 3 through 10 keys AUTO Credit 1 through 3 keys Received-on-account 2 key Paid-out 2 key Credit 4 key Cheque 1 and 2 keys Cash total 2 key Subtotal key Foreign currency exchange 3 and 4 keys Total (cash total) key... -
Page 12: Keys And Switches
KEYS AND SWITCHES Mode switch and mode keys The mode switch can be operated by inserting one of the three supplied mode keys - manager (MA), submanager (SM), and operator (OP) keys. These keys can be inserted or removed only when the switch is in the “REG”... -
Page 13: Displays
DISPLAYS Operator display Customer display (Pop-up type) PLU/SUB DEPT REPEAT RCPT Cashier/clerk code CID sentinel indicator Amount: Appears in the far-right eight (max.) positions. Cashier code: Appears in the second and third positions (two digits). Clerk code: Appears in the second and third positions (two digits) with “C” in the fifth position. Number of repeats for repetitive registrations: The number of repeats is displayed, starting at “2”... -
Page 14: For The Manager
FOR THE MANAGER PRIOR TO PROGRAMMING General instructions This chapter illustrates how to program your cash register. Job-Code-Based Programming All the programming items can be programmed by the described later. Direct Programming However, your machine allows you to program some items using the , which does not require you to enter the job code. -
Page 15: Entering Character Codes
Example To program the word “SHARP” in double size, do the following key-in. Î S Î H Î A Î R Î P • Letters of alphabets “A” through “Z”, “Ø” and “Æ”are possible to be entered in lower case or in upper case. By Ó... - Page 16 Alphanumeric character code table Code Character Code Character Code Character Code Character Code Character á Ä â Ö ê Ü î ì í ’ ô ó û ç ú œ ¿ Ù ´´ ú à Æ ´´ ó < ø Å...
-
Page 17: Programming
PROGRAMMING Your machine allows you to program in two modes: PGM1 and PGM2. The PGM1 mode is for programming those items that need to be changed often: unit prices of departments/PLUs, and percentages. The PGM2 mode is used for programming all PGM1-mode programs and those items that require less frequent changes: date, time, tax rate, and the functions of each key. -
Page 18: Time
Time PGM 2 Set the time using the 24-hour format. For example, when the time is set to 2:30 AM, enter 230; and when it is set to 2:30 PM, enter 1430. Once you set the time, the internal clock unit will continue to run as long as the built-in battery is alive and update the date (day, month, year) properly. -
Page 19: Functional Selection
Print Dept. code Unit price Functional selection PGM 2 Procedure To keep the current setting Department Department ≈ *A B C D E F G H I J To program for the following dept. Department To program for another dept. * Item: Selection: Entry:... - Page 20 Normal department/SICS (Single Item Cash Sale) / SIF (Single Item Finalization) • If an entry of a department programmed for SICS is made first, the sale will be finalized as soon as the department key is pressed. If the entry is made after entering a department not programmed for SICS, the sale will not be finalized until the key is pressed.
-
Page 21: Price Lookup (Plu) Programming
Price lookup (PLU) programming A PLU code can be up to six digits (free code). Unit price PGM 1 PGM 2 Procedure Direct PLU To keep the current setting ß Unit price X X X X X X PLU code *Unit price: max. - Page 22 * Item: Selection: Entry: Sign (plus/minus) Plus Minus VAT6 or TAX6 VAT5 or TAX5 VAT4 or TAX4 VAT3 or TAX3 VAT2 or TAX2 VAT1 or TAX1 Mode Prohibit mode Subdepartment mode PLU mode PLU/subdepartment mode Delete mode Sign (plus/minus) Note The function of every PLU/subdepartment varies according to the combination of its sign and the sign of its associated department as follows: Sign...
-
Page 23: Plu Assignment To Departments
Example Programming for PLU code 1 as follows: A=0, B=0, C=0, D=0, E=0, F=0, G=1, and H=2 A B C D E F G H Enter the PLU code “1” ß ß ß 0 0 0 0 0 0 0 2 and press the key twice. -
Page 24: Programming For Discount Keys
Press the department 2 key to assign 0 0 0 0 0 3 PLU code 2 to department 2. Press the key to finalize the programming 0 . 0 0 and generate a programming report. Print Associated dept. Programming for discount keys Deduction amount ( PGM 1 PGM 2... -
Page 25: High Amount Lockout (Halo) And +/- Sign
High amount lockout (HALO) and +/- sign ( PGM 2 Procedure To keep the current setting ≈ * A B C ≠ ≠ * Item: Selection: Entry: Sign (plus/minus) Plus Minus Significant digit for HALO 1 through 9 Number of zeros to follow the significant digit for HALO 0 through 7 HALO (High Amount Lockout) Note... -
Page 26: Programming For Percent Keys
Programming for percent keys Percent rate ( PGM 1 PGM 2 Procedure To keep the current setting ∞ * Percent rate • * Percent rate: 0.00 - 100.00 Note You must use a decimal point when setting percentage rates that are fractional. Example ∞... -
Page 27: Programming For Exchange Keys
Programming for exchange keys Currency exchange rate ( PGM 1 PGM 2 Procedure To keep the current setting “ * Exchange rate through * Currency exchange rate: 0.000000 - 999.999999 Note You must use a decimal point when setting conversion rates that are fractional. Example Assigning 0.6068 to the Key operation... -
Page 28: Programming The Tax Rate
Programming the tax rate Tax rate PGM 2 Procedure When the lowest taxable amount is zero ◊ ≈ ≈ **Sign and tax rate Lowest taxable amount max. five digits: 0.00 to 999.99 To delete * A: Enter a corresponding tax rate number. For example, when you program a tax rate as tax rate 1, enter “1”, and when you program it as tax rate 6, enter “6”. -
Page 29: Job-Code-Based Programming
Job-Code-Based Programming This section illustrates how to program items using job codes. Using job codes allows you to program a wide variety of items in comparison with direct programming. Start this programming by entering a corresponding job code as shown below. ≈... -
Page 30: Setting The Register And Consecutive Numbers
Example Key operation Print . ≈ 2611 1430 Time Setting the register and consecutive numbers Setting the register number 2612 PGM 2 When your store has two or more registers, it is practical to set separate register numbers for their identification. You may set them in a maximum of six digits. -
Page 31: Programming The Tax Rate
Example Key operation Print . ≈ 2613 1000 Consecutive number Programming the tax rate The tax rate 2711 Direct PGM 2 Procedure When the lowest taxable amount is zero ≈ ≈ ≈ **Sign and Lowest taxable 2711 tax rate amount 1 to 6 max. -
Page 32: Programming For Departments
Programming for departments Your machine is equipped with 20 standard departments and up to 50 optional departments. Your machine allows you to perform the following programming for each department: Functional programming 2110 PGM 2 You can set each department for: SICS (Single Item Cash Sale) / SIF (Single Item Finalization) •... -
Page 33: Tax Status (#2111)
Example Key operation Print . ≈ 2110 ≈ 0000003 A through G Tax status PGM 2 2111 Direct Assign a tax status to each department. When entries are made into taxable departments in a transaction, tax is automatically computed according to the associated tax rate as soon as the transaction is completed. Procedure To program for the dept. -
Page 34: A Limit Amount (Halo) Of Entry (#2112)
Example Key operation Print . ≈ 2111 ≈ 0000110 ≈ 0000101 Tax status A limit amount (HALO) of entry 2112 Direct PGM 2 You can set upper limit amounts (HALO: High Amount Lockout) for each department. The limit is effective for the REG-mode operations and can be overridden in the MGR mode. -
Page 35: Alphanumeric Characters (#2114)
Alphanumeric characters PGM 2 2114 You can program a maximum of 16 characters (item label) for each department. (However, the default setting is for a 12-character label.) Select the characters you want to program, referring to section “2 How to program alphanumeric characters” in chapter “PRIOR TO PROGRAMMING”. -
Page 36: Commission Group Assignment (#2115)
Commission group assignment 2115 PGM 2 Your machine allows you to assign a commission group (1-9) to each department. Procedure The current setting is displayed. To keep the current setting ≈ ≈ 2115 Dept. code To program for the follwing dept. * A: Commission group 0-9 (0 = no commission) Example Key operation... -
Page 37: Department Key Positioning (#2119)
Cancellation ≈ ≈ 2119 Key no. (1 through 68) To program for the following key number The key number placement is determined by your local Authorized SHARP Dealer. AB is a department code. Example Key operation Print . ≈ 2119 ≈... -
Page 38: Price Lookup (Plu) Programming
Price lookup (PLU) programming Your machine has two kinds of PLU registration methods. Direct PLU registration: Accomplished by depressing item key (direct PLU key) directly. ß Indirect PLU registration: Accomplished by making an entry of PLU code and pressing the key. -
Page 39: Department Assignment (#1200, 2230)
For some items, you can program in two ways: programming an individual PLU code and for a Note range of sequential PLU codes. The procedure marked “For each PLU” shows individual PLU programming. “For a range of PLUs” shows sequential range PLU programming. Department assignment 1200 2230... -
Page 40: Unit Prices (#1210)
Unit prices 1210 Direct PGM 1 PGM 2 Procedure The current setting is displayed. To keep the current setting Unit price ≈ ≈ 1210 PLU code (max. six digits) Example Key operation Print . ≈ 1210 ≈ Unit price Base quantity PGM 1 PGM 2 1211... -
Page 41: Plu/Subdepartment Mode (#2210, 2231)
PLU/subdepartment mode PGM 2 2210 2231 Direct Procedure For each PLU The current setting is displayed. To keep the current setting ≈ ≈ 2210 PLU code AB C For a range of PLUs The current setting ≈ 2231 of start PLU code To apply the current setting of is displayed. -
Page 42: Sign (+/-) And Tax Status (#2211, 2232)
Sign (+/-) and tax status 2211 2232 Direct PGM 2 Procedure For each PLU The current setting is displayed. To keep the current setting ≈ ≈ 2211 PLU code A B C D E FG For a range of PLUs The current setting ≈... -
Page 43: Alphanumeric Characters (#2214)
Example For each PLU Key operation Print . ≈ 2211 ≈ 0000001 0000000 Taxable 1 For a range Key operation Print of PLUs . ≈ 2232 ≈ ≈ PLU range 0000001 Taxable 1 Alphanumeric characters 2214 PGM 2 You can program a maximum of 16 characters (item label) for each PLU or subdepartment. (However, the default setting is for a 12-character label.) Select the characters you want to program, referring to section “2 How to program alphanumeric characters”... -
Page 44: Assigning Of Plus To Commission Groups (#2215, 2235)
Assigning of PLUs to commission groups 2215 2235 PGM 2 You can assign PLUs (or subdepartments) to commission groups. Procedure For each PLU The current setting is displayed. To keep the current setting ≈ ≈ 2215 PLU code To program for the following PLU For a range of PLUs The current ≈... -
Page 45: Link Plu (#2220)
PLU code (1 through 68) To program for the following key number To program for the key number other than the following key number * The key number placement is determined by your local Authorized SHARP Dealer. Example Key operation Print . -
Page 46: Programming For Miscellaneous Keys
Programming for miscellaneous keys Only function keys which you have programmed on the keyboard will allow the programming. Programming the rate ( , commission ) and the deduction ( PGM 1 PGM 2 1310 Direct You can program percent rates, currency exchange rates, deduction amounts and commission rates. Procedure The current setting is... -
Page 47: A Limit Amount (Halo) Of Entry ( ) (#2312)
A limit amount (HALO) of entry ( 2312 Direct PGM 2 The HALO limit is in effect for the REG-mode operations but can be overridden in the MGR mode. The HALO limit is represented by two figures as follows: Procedure The current setting is displayed. -
Page 48: Sign ( % , - ) (#2311)
+/- sign ( 2311 Direct PGM 2 Programming of the +/- sign assigns the premium or discount function for each key. Procedure The current setting is displayed. To keep the current setting ≈ ≈ 2311 Function no. A B C DE FG *1: Function no. -
Page 49: Item % Or Subtotal % Selection ( % ) (#2315)
Item % or subtotal % selection ( 2315 PGM 2 Item % Select this when a percent calculation is desired for the individual department and PLU. Subtotal % Select this when a percent calculation is desired for subtotals. Procedure The current setting is displayed. - Page 50 Example Key operation Print . ≈ 2313 ≈ Percentage limit Item â or subtotal â selection ( 2316 PGM 2 â Item Select this when a deduction calculation is desired for the individual department and PLU. â Subtotal Select this when a deduction calculation is desired for subtotals. Procedure The current setting is...
-
Page 51: Programming For The ; , Å
Å ’ Programming for the through , and through keys Functional programming PGM 2 2320 You can set each media for: EFT Transaction ’ through keys, and through keys Footer printing This programming decides whether or not your machine should print a message at the foot of a receipt when a specified media key is used. -
Page 52: High Amount Lockout (Halo) For Cheque Change, Cheque Cashing, And Cash In Drawer (#2321)
Example Key operation Print . ≈ 2320 ≈ 0000001 A through G High amount lockout (HALO) for cheque change, cheque cashing, and cash in drawer 2321 PGM 2 You can program the upper limit amounts for cheque change, cheque cashing, and cash in drawer. Procedure The current setting is... -
Page 53: Programming Of Function Text
Example Key operation Print . ≈ 2322 ≈ HALO limit Programming of function text Programming 2314 PGM 2 You can program a maximum of 8 characters for each function key and other functions using the table on the following pages. Select the characters you want to program referring to section “2 How to program alphanumeric characters”... -
Page 54: List Of Function Texts
List of function texts Function Default Function Default Key or function Key or function setting setting (–)1 Credit 2 CREDIT2 (–)2 Credit 3 CREDIT3 (–)3 Credit 4 CREDIT4 (–)4 Exchange 1 EXCH1 Exchange 2 EXCH2 Exchange 3 EXCH3 Exchange 4 EXCH4 Exchange 1 is EXCH1 IS... -
Page 55: Cashier And Clerk Programming
Function Default Function Default Key or function Key or function setting setting Total TOTAL Commission amount 1 COM.AMT1 Change CHANGE Commission amount 2 COM.AMT2 Sales q'ty ITEMS Commission amount 3 COM.AMT3 PLU subtotal PLU ST Commission amount 4 COM.AMT4 COPY Copy receipt title Commission amount 5 COM.AMT5... -
Page 56: Cashier Name (#1514)
Cashier name 1514 PGM 1 PGM 2 You can program a maximum of 8 characters (cashier name) for each cashier. Select the characters you want to program referring to section “2 How to program alphanumeric characters” in chapter “PRIOR TO PROGRAMMING.”... -
Page 57: Clerk Code (#1400)
Clerk code PGM 1 PGM 2 1400 You can assign a clerk code to each of 99 clerks. The standard machine has no clerk function. If you need this function, consult your dealer. Procedure To keep the current setting Clerk no. *Clerk code ≈... -
Page 58: Programming Various Functions
Programming various functions Programming for optional feature selection PGM 2 2616 OP X/Z mode availability When a cashier needs to take the cashier/clerk X or Z report, he or she will use the OP X/Z mode. This programming determines whether he or she will be allowed to use this mode. You can take cashier/clerk X and Z reports in the X1/Z1 mode regardless of the above Note programming. - Page 59 **P: 1 Item: Selection: Entry: OP X/Z mode Enable Disable Paid-out in REG-mode Enable Disable Always enter 0. Refund key entry in the REG-mode Enable Disable Direct void in the REG-mode Enable Disable Indirect void in the REG-mode Enable Disable Subtotal void in the REG-mode Enable Disable...
- Page 60 P: 4 Item: Selection: Entry: A and B Always enter 0. VAT/tax amount printing on the receipt/journal Taxable amount printing on the receipt/journal Net amount printing on the receipt/journal F to H Always enter 0. P: 5 Item: Selection: Entry: A to C Always enter 0.
-
Page 61: Programming Feed Line After Printing Of A Difference Subtotal (#2615)
Example Key operation Print . ≈ 2616 ≈ 00000010 P: 1 through 13 A through H Programming feed line after printing of a difference subtotal 2615 PGM 2 Procedure When A and B are zeroes ≈ 2615 * A: Always enter 0. B: Feed lines after printing of difference subtotal (0 through 9) Example Key operation... -
Page 62: Programming Of Logo Messages (#2614)
Programming of logo messages 2614 PGM 2 Your register can print programmed messages for customers on every receipt. On the standard model, only graphic logo is printed on the receipt. If you want to print logo message, please consult your dealer. You have five options described below. -
Page 63: Selection Of X1/Z1 And X2/Z2 Reports To Be Printed In The Stacked Report Sequence (#2620)
Selection of X1/Z1 and X2/Z2 reports to be printed in the stacked report sequence PGM 2 2620 Your register is equipped with the stacked report printing function that enables multiple X/Z reports to be printed in sequence with only a single request, up to maximum of 13 reports*. This function continuously prints a maximum of 13 kinds of reports with a single operation. -
Page 64: Setting The Time Range For Hourly Reports (#2619)
Setting the time range for hourly reports 2619 PGM 2 You can set the time range for an hourly report . Procedure When A through C are all zeros ≈ 2619 AB C *A: Time range To set the time range to 30 minutes (in the 24-hour system), enter 0. To set the time range to 60 minutes (in the 24-hour system), enter 1. -
Page 65: Currency Description Text Programming (#2334)
Secret codes to control access to PGM1 mode, X1/Z1 mode and X2/Z2 mode PGM 2 2630 2631 2632 You must enter a secret code according to the following procedure before performing any PGM1-mode, X1/Z1- mode or X2/Z2-mode operation when a secret code has been set for that specific mode operation. Operating Procedure Secret code... -
Page 66: Functional Programming For The Printer (#2990)
Functional programming for the printer PGM 2 2990 You can program functions for the printer. When A through D are all zeroes Procedure ≈ *ABCD 2990 Item: Selection: Entry: Always enter 1. Always enter 0. C and D Printing density 80% for standard=00 00-99 90% for standard=50... -
Page 67: Setting The Auto Key - Automatic Sequencing Key - (#2900)
Setting the AUTO key — Automatic sequencing key — X2/Z2 2900 If you program frequently performed transactions or report sequences for the AUTO keys, you can call those transactions and/or reports simply by pressing the corresponding AUTO keys in key operations. This programming can be done when your machine is in the X2/Z2 mode. -
Page 68: Reading Stored Programs
Reading stored programs Your machine allows you to read every program stored in the PGM1 and PGM2 modes. Program details and procedures for their reading Mode Related PGM1/ switch Program for: Procedure PGM2 job code no. position code nos. ≈ 1100 1110, 2110, For reading all codes... -
Page 69: Sample Printouts
Sample printouts 1 Reading of programmed items for departments 2 Reading of programmed items for (Reading in the PGM1 and PGM2 modes) PLUs/subdepartments (Reading in the PGM1 and PGM2 modes) Job code no. Mode switch Mode switch position* position* Range Range Dept. - Page 70 3 Reading of programmed key nos. for 4 Reading of programmed items for link PLUs departments and PLUs (Reading in the PGM2 mode) (Reading in the PGM2 mode) Key no. Dept. code Range Leading Linked PLU code PLU code 5 Reading of programmed items for cashiers (Reading in the PGM1 and PGM2 modes) PLU code Mode switch...
- Page 71 7 Reading of programmed items for functions - 1 (Reading in the PGM1 and PGM2 modes) Mode switch position* To be continued on the next page To be continued on the next page * When you take this report in the PGM1 mode, the PGM2 indication is replaced by a “PGM1”.
- Page 72 8 Reading of programmed items for functions - 2 (Reading in the PGM2 mode) Logo message Line feed for differ ST Optional feature selection Drawer open alarm time Hourly report format/start hour Stacked report Secret code Drawer no. for the drawer for foreign currency RS-232C channel data...
- Page 73 11 Reading of programmed items for the thermal 9 Reading of programmed tax rates printer (Reading in the PGM2 mode) (Reading in the PGM2 mode) Printing density Tax rate Lowest taxable Entered Value amount Printing density example 10 Reading of programmed items for auto keys (Reading in the PGM2 mode)
-
Page 74: Training Mode
Training mode The training mode is used when the operator or the manager practices register operations. When a cashier set in training is selected, the machine automatically enters the training mode. When a cashier not set in training is selected, the machine automatically enters the ordinary REG mode. (For programming, consult your dealer.) The training operations is valid only in REG, MGR and VOID mode. -
Page 75: Reading (X) And Resetting (Z) Of Sales Totals
READING (X) AND RESETTING (Z) OF SALES TOTALS • Use the reading function (X) when you need to take a reading of sales information entered since the last resetting. You can take this reading any number of times. It does not affect the register’s memory. •... - Page 76 Mode switch position Item Key operation code X1/Z1 X2/Z2 Commission sales ≈ report Reading ≈ Reading and X1, Z1 X1, Z1 resetting of sales Resetting information for a All PLUs range of PLUs/ subdepartments X2, Z2 ≈ Start PLU code PLU code Reading of sales information of PLUs/...
-
Page 77: Automatic Modification Of Register System For Introduction Of Euro
Automatic modification of register system for introduction of EURO To make your register correspond to the introduction of EURO, your register system can be automatically modified when the procedure shown below is executed in the Z2 mode. Procedure ≈ *A (1 or 2) *A=1: Applicable for the period of co-existence of EURO and national currency. -
Page 78: Daily Sales Totals
Daily sales totals Full reading and resetting of sales totals You can take X and Z reports in the X1/Z1 mode. The use of the decimal key ( ) determines when the report will actually reset the sales totals. • Sample X report •... - Page 79 “-” dept. counter and total “+” hash dept. counter and total “-” hash dept. counter and total “+” bottle return dept. counter and total “-” bottle return dept. counter and total Subtotal 2 counter and total Subtotal percent 1 counter and total Net sales total Taxable 1 total VAT 1 total...
- Page 80 No-sale (exchange) counter Gest check copy counter Customer counter Order total Paid total Paid total average per costomer Received on account counter and total Paid out counter and total Cheque cashing counter and total Cash counter and total Cheque 1 sales counter and total Credit 1 sale and tendering counter and total Exchange 1 counter and total Cash in drawer...
-
Page 81: Cashier Reading And Resetting
Cashier reading and resetting Using this function, you can take X and Z reports for individual cashiers or all cashiers. Individual cashier reading and resetting The OP X/Z-mode reading and resetting is allowed only when your machine has been programmed Note for “OP X/Z mode available”... -
Page 82: Clerk Reading And Resetting
Clerk reading and resetting Using this function, you can take X and Z reports for individual clerks or all clerks. Individual clerk reading and resetting The OP X/Z-mode reading and resetting is allowed only when your machine has been programmed Note for “OP X/Z mode available”... -
Page 83: Reading And Resetting Of Hourly Sales Information
Reading and resetting of hourly sales information You can take X and Z reports for sales totals and transaction (customer) counters for 48 half hours, or 24 hours. If both quantity and amount are zero, their print is skipped. • Sample X report •... -
Page 84: Full Department Reading
Full department reading Sales q'ty and total Ratio of dept. 1 sales amount to “+” dept. total... -
Page 85: Individual Group Reading
Individual group reading Full group reading Group 1 sales q'ty and total Group 1 sales q'ty and total... -
Page 86: Reading And Resetting Of Sales Information For A Range Of Plus/Subdepartments
Reading and resetting of sales information for a range of PLUs/subdepartments This function provides you with X and Z reports for sales information of a certain range of PLUs/subdepartments. You must enter the start and end PLU/subdepartment code of the range. Of course, the range may represent all of the PLUs/subdepartments in your register. -
Page 87: Reading Of Sales Information On Plus/Subdepartments Associated With An Individual Department
Reading of sales information on Reading of sales information for PLUs/subdepartments the price amount range of associated with an individual PLUs/subdepartments department Price amount Associated dept.code range PLU code Sales q'ty Sales q'ty and total and total Reading of commission sales Reading of sales information on information PLUs/subdepartments whose... -
Page 88: Transaction Reading
Transaction reading Total in drawer reading Exchange 1 counter Currency exchange 1 total Domestic currency for In this report the same transaction data as those currency printed when full reading is taken are printed exchange 1 except department sales totals. total Cash in drawer Cheque in drawer... -
Page 89: Periodic Consolidation
Periodic consolidation Your register allows you to take consolidation X and Z reports of a chosen period (normally one week or a month). Generality The periodic reading or resetting reports are the same in format as those in the X1/Z1 report for daily total except job code no. -
Page 90: Reading And Resetting Of Daily Net Totals
Reading and resetting of the daily net totals • Sample X report • Sample Z report The subsequent printout occurs in the same format as in the sample X report. Reading and resetting of a stacked report You can print multiple X1/Z1 reports in sequence at a time. In this case, you need to program in advance what X1/Z1 reports should be printed in the stacked report sequence. -
Page 91: Compulsory Cash/Cheque Declaration
COMPULSORY CASH/CHEQUE DECLARATION If you want to make mandatory the declaration of the cash and cheque amount in the drawer before outputting cashier Z reports, consult your dealer and have your register programmed for compulsory cash/cheque declaration. If your register is programmed for compulsory cash/cheque declaration (CCD), a cashier must first count and declare the cash and cheque amounts (of domestic and foreign currency) in the drawer, before he or she can output a cashier report. - Page 92 CCD entry amount Currency exchange 1 in drawer to be obtained Total of entered (declared) exchange 1 in drawer Difference Cash in drawer to be obtained Check in drawer Cash/cheque in drawer to be obtained Total of entered (declared) cash/cheque in drawer Difference Total of difference...
-
Page 93: Override Entries
OVERRIDE ENTRIES Programmed limit for functions (such as for maximum amounts) can be overridden by making an entry in the MGR mode. Procedure Turn the mode switch to the MGR position. Make an override entry. Example On this example, the register has been programmed not to allow deduction entries over 2.00. -
Page 94: Correction After Finalizing Atransaction (After Generating A Receipt)
CORRECTION AFTER FINALIZING A TRANSACTION (AFTER GENERATING A RECEIPT) When you need to void incorrect entries that cashiers cannot correct (incorrect entries that are found after finalizing a transaction or cannot be corrected by direct or indirect void), follow this procedure in the MGR mode. Turn the mode switch to the MGR position. -
Page 95: For The Operator
FOR THE OPERATOR PRIOR TO ENTRIES Preparations for entries Before registrations, insert the operator key into the mode switch and turn it to the REG position and check the following items: Receipt and journal paper rolls If the receipt and journal paper rolls are not set in the machine or there are low rolls, install new ones according to section “4. -
Page 96: Error Warning
Procedure Cashier assignment Sign-on Sign-off Variant 1 / Variant 2 : To display the signed-on cashier code ‹ ‹ Variant 1 : ‹ Cashier code (Code is displayed) Variant 2 : ‹ ‹ Cashier code (Code is not displayed) The real cashier key system is also available. In this system put one of the 1 through 15 keys in the Note cashier switch to sign on. -
Page 97: Entries
ENTRIES Item entries Single item entries Procedure Department entries Enter a unit price and press a department key. If you use a programmed unit price, press a department key only. When using a programmed unit price *Less than the programmed upper limit amounts Unit price * Department key (max. -
Page 98: Repeat Entries
Repeat entries You can use this function for entering a sale of two or more same items. Example Key operation Print Repeated department entry ß Repeated PLU ß entry (indirect) ß ó Repeated PLU entry ó (direct) å Repeated ß subdepartment ß... -
Page 99: Successive Multiplication Entries
Successive multiplication entries This function is practical for example when you enter a sale of items sold by area (square meter). Procedure When you use a programmed unit price ≈ ≈ Length Width Unit price Dept. Dept. entry ß PLU code PLU entry (indirect) Unit price Direct PLU... -
Page 100: Split-Pricing Entries
Split-pricing entries You will use this function when your customer wants to purchase items normally sold in bulk. Procedure When you use a programmed unit price ≈ ≈ Unit price Selling q'ty Base q'ty Dept. per base q'ty ß PLU code Unit price Direct PLU per base q'ty... -
Page 101: Single Item Cash Sale (Sics)/Single Item Finalize (Sif) Entries
Single item cash sale (SICS)/single item finalize (SIF) entries SICS entries • This function is useful when a sale is for only one item and is for cash; such as a pack of cigarettes. This function is applicable only to those departments that have been set for SICS or to their associated PLUs or subdepartments. -
Page 102: Displaying Subtotals
Printing leading link PLUs and total sales amount When a link PLU is entered, only the leading link PLU’s text and the total sales amount (the sum of prices for PLU’s which are included in the link PLU) are printed. Example Key operation Print... -
Page 103: Finalization Of Transaction
Finalization of transaction Cash or cheque tendering Å Press the key to get a subtotal, enter the amount tendered by your customer, then press the key if it is a cash tender or press one of the through key if it is a cheque tender. When the amount tendered is greater than the amount of the sale, your register will show the change due amount and the symbol “... -
Page 104: Credit Sale
Credit sale ’ Enter items and press the corresponding credit keys ( through Key operation Print Example 2500 3250 ’ Amount tendering operations (i.e., change calculations) can be achieved by the through key when a PGM2 programming allows them. Mixed-tender sale (cash or cheque tendering + credit tendering) Example Key operation Print... - Page 105 VAT3/tax3 VAT4/tax4 VAT5/tax5 VAT6/tax6 When the multiple VAT/tax is assigned to a department or a PLU, a smaller number of the VAT/tax will be printed. For details, contact your authorized SHARP dealer. Example Key operation Print (When the manual VAT 1-6 system is selected) ◊...
-
Page 106: Vat Shift Entries
VAT shift entries This feature is intended to shift the tax status of a particular department (or PLU) programmed for taxable 1 or taxable 1 and taxable 3. 1. When the VAT shift entry is made for a particular department or PLU programmed for taxable 1, their tax status shifts to taxable 2. -
Page 107: Deduction Entries
Percent calculation for item entries Example Key operation Print (When a premium of 15% is § programmed for ß § key) § Deduction entries Your register allows you to deduct a certain amount less than a programmed upper limit after the entry of an item or the computation of subtotal depending on the programming. -
Page 108: Refund Entries
Refund entries © If a refund item is the one entered into a department, enter the amount of the refund, then press the key and the corresponding department key in this order; and if an item entered into a PLU is returned, enter the ©... -
Page 109: Received On Account Entries
Example Preset exchange rate (0.6068) - EX1 Key operation Print 2300 4650 Currency exchange Domestic 10000 Amount currency tendered in Exchange rate foreign currency Foreign currency Domestic currency ” Manual exchange rate - EX4 (The key can be used only for the manual entry of an exchange rate.) Key operation Print... -
Page 110: No Sale (Exchange)
Example Key operation Print 6789 3000 No sale (exchange) Simply press the key without any entry. The drawer will open and the printer will print “NO SALE” on both the journal and the receipt. If you let your machine print a non-add code number before pressing the key, a no sale entry is achieved with a non-add code number printed. -
Page 111: Correction
CORRECTION Correction of the last entry (direct void) ∞ • If you make an incorrect entry relating to a department, PLU/subdepartment, percentage ( through ≠ deduction ( through ) or refund, you can void this entry by pressing the key immediately after the incorrect entry. -
Page 112: Subtotal Void
Subtotal void You can void an entire transaction. Once subtotal void is executed, the transaction is aborted and the register issues a receipt. Example Key operation Print 1310 1755 ß ß Subtotal void Correction of incorrect entries not handled by the direct or indirect void function Any errors found after the entry of a transaction has been completed or during an amount tendered entry cannot be voided. -
Page 113: Special Printing Functions
SPECIAL PRINTING FUNCTIONS Copy receipt printing If your customer wants a receipt after you have finalized a transaction with the receipt function being in the “OFF” status (no receipting), press the key. This will produce a receipt. Your register can also print a copy receipt when the receipt function is in the “ON”... -
Page 114: Guest Check Copy
Guest check copy You can use this function when you want to take a copy of guest check. Press the key and make a desired entry. Procedure Item entries Finalization When the receipt ON/OFF function is in the “OFF” status The guest check copy has nothing to do with the memory. -
Page 115: Overlapped Cashier Entry
OVERLAPPED CASHIER ENTRY This function allows you to switch from one cashier to another and to interrupt the first cashier’s entry. So the second cashier can do his or her entry in this mode. For actual use of this function, consult your dealer. Example Cashier 1: Entry started Cashier 2: Cashier change (1 to 2), interrupt initiated... -
Page 116: Operator Maintenance
OPERATOR MAINTENANCE In case of power failure When power is lost, the machine retains its memory contents and all information on sales entries. • When power failure is encountered in register idle state or during an entry, the machine returned to the normal state of operation after power recovery. -
Page 117: Cautions In Handling The Recording Paper (Thermal Paper)
Paper roll Therefore, it is advisable to use paper rolls - whose paper tube is 18 mm in O.D. and 12 mm in I.D. - specified by SHARP. • If the sensing occurs too early or late, contact your dealer. -
Page 118: Installing And Removing The Paper Roll
Installing and removing the paper roll Recording paper specifications Be sure to use paper rolls specified by SHARP. The use of any other paper rolls than specified could cause paper jamming, resulting in register malfunction. Paper specification Paper width: 44.5 ± 0.5 mm Max. - Page 119 Installing the journal paper roll Turn the mode switch to the “REG” position with the AC cord connected. Remove the printer cover. Check that the print head release lever is in its printing position. Set the paper correctly as illustrated on the previous page in Printing position the journal side of the printer.
-
Page 120: Removing The Paper Roll
Removing the paper roll When a red dye appears on the paper roll, it is time to replace the existing paper roll. Replace the paper roll with a new one. If you plan not to use your register for an extended period of time, remove the paper roll, and store it in the appropriate place. -
Page 121: Removing A Paper Jam
Remove the outer side of the take-up spool as shown on the left. Remove the printed journal roll from the take-up spool. Removing a paper jam Precaution: Be very careful with the manual cutter, so as not to cut yourself. Never touch the print head immediately after printing, because the head may still be hot. -
Page 122: Cleaning The Print Head
Cleaning the print head When the printed text is getting dark or faint, paper dust may be stuck to the print head. Clean the print head as follows: Turn the mode switch to the “ ” position. Remove the printer cover. Pull the print head release lever all the way forward (after it stops at one position, continue pulling forward until it stops Pull all the... -
Page 123: Removing The Till And The Drawer
Removing the till and the drawer The till in the register is detachable. After closing your business for the day, remove the till from the drawer and keep the drawer open. The coin case is also detachable from the till. To detach the drawer, pull it forward fully with the till removed, and remove it by lifting it up. -
Page 124: Installing The Fixing Angle Bracket
Installing the fixing angle bracket To prevent the register from moving when the drawer opens, the fixing angle bracket is supplied with the register. By attaching the bracket to the table where the register is installed, you can hook the register on this bracket and secure the register to its position. -
Page 125: Before Calling For Service
Before calling for service The malfunctions shown in the left-hand column below, labelled “Fault,” do not necessarily indicate functional faults of the machine. It is therefore advisable to refer to the “Checking” shown in the right-hand column before calling for service. Fault Checking The display won't be illuminated even when... -
Page 126: List Of Options
LIST OF OPTIONS For your register, the following options are available. For details, contact your dealer. •RAM memory chip model ER-03RA •Remote drawer model ER-05DW •Till model ER-58CC and till cover model ER-03CV •Coin case model ER-58CV •EFT interface board model ER-01EF •Key kit models By using the following key kits, you can change the keyboard layout of your register including the expansion of the number of departments. -
Page 127: Specifications
SPECIFICATIONS Model: ER-A450 Dimensions: 355 (W) x 424 (D) x 308 (H) mm Weight: 13 kg Power source: Official (nominal) voltage and frequency Power consumption: Stand-by 14W Operating 41W (max.) Working temperature: 0 °C to 40 °C Electronics: LSI (CPU) etc. - Page 128 FOR CUSTOMERS IN U.K. IMPORTANT The wires in this mains lead are coloured in accordance with the following code: BLUE: Neutral BROWN: Live As the colours of the wires in the mains lead of this apparatus may not correspond with the coloured markings identifying the terminals in your plug proceed as follows.
- Page 129 SHARP CORPORATION Printed in Korea / Imprimé en Corée / Gedruckt in Korea / Impreso en Corea 7423 BHZZ) T(TINSE...