
Related Manuals for Motorola StarMax


Summary of Contents for Motorola StarMax
- Page 1 Motorola StarMax Desktop System Motorola StarMax Minitower System User’s Guide...
- Page 2 Motorola, Inc. assumes no liability resulting from any omissions in this document, or from the use of the information obtained therein. Motorola reserves the right to revise this document and to make changes from time to time in the content hereof without obligation of Motorola to notify any person of such revision or changes.
- Page 3 Preface The Motorola StarMax Desktop System and Motorola StarMax Minitower System User’s Guide describes how to install, upgrade, and use these computer systems. StarMax is a trademark of Motorola, Inc. ® Motorola and the Motorola symbol are registered trademarks of Motorola, Inc.
- Page 4 In accordance with European Community directives, a “Declaration of Conformity” has been made and is on file at Motorola, Inc. - Computer Group, 27 Market Street, Maidenhead, United Kingdom, SL6 8AE. In addition to the above standards, this system has also met the requirements of the following European standards: EN 60555-2 “Disturbances in supply systems caused by household appliances and...
- Page 5 Regulatory Notices Changes or modifications not expressly approved by Motorola WARNING Computer Group could void the user’s authority to operate the equipment. Use only shielded cables when connecting peripherals to assure that appropriate radio frequency emissions compliance is maintained. FCC Class B NOTE: This equipment has been tested and found to comply with the limits for a Class B digital device, pursuant to part 15 of the FCC Rules.
- Page 6 If a 10BASE-T Ethernet connector is used, the system complies only with the FCC PART 15 Class A limits and the CISPR 22 Class A limits and may not be used in a residential area. FCC Class A NOTE: This equipment has been tested and found to comply with the limits for a Class A digital device, pursuant to Part 15 of the FCC Rules.
- Page 7 CD-ROM drive Making adjustments or performing procedures other than those specified in your equipment’s manual may result in hazardous exposure. WARNING Do not attempt to disassemble the cabinet containing the laser. The laser beam used in this product is harmful to the eyes.
- Page 8 Software notice Application software programs have been installed on the computer and compact discs have been included with your StarMax. See the label on the box for a complete list of all your programs. LIMITATION OF LIABILITY: MOTOROLA, INC. MAKES NO WARRANTIES...
-
Page 9: Declaration Of Conformity
Declaration of Conformity Tested Equipment Name StarMax Manufacturer’s Name Motorola, Inc. - Computer Group Manufacturer’s Address 2900 S. Diablo Way Tempe, Arizona 85282 USA Manufacturer’s Phone (602) 438-3000 Type of Equipment Personal Computer Model Numbers 3000/160DT, 3000/180DT, 3000/200 DT, 4000/160 DT,... - Page 10 ADVARSEL! Lithiumbatteri - Eksplosionsfare ved fejlagtig håndertyering. Udskiftning må kun ske med batteri af samme fabrikat og type. Levér det brugte batteri tilbage til leverandøren. ADVARSEL! Eksplosjonsfare ved fellaktig skifte av batteri. Benytt samme batteritype eller en tilsvarende type anbefalt av apparatfabrikanten. Brukte batterier kasseres i henhold til fabrikantens instruksjoner.
- Page 11 Motorola, Inc. assumes no liability for the customer's failure to comply with these requirements. The safety precautions listed below represent warnings of certain dangers of which Motorola is aware. You, as the user of the product, should follow these warnings and all other safety precautions necessary for the safe operation of the equipment in your operating environment.
-
Page 13: Table Of Contents
Contents Chapter 1 Getting Started Before you begin....................1-2 Front panel features .....................1-3 Rear panel ports....................1-4 Assembling your StarMax system ..............1-7 Voltages for different locations ..............1-15 Connecting audio equipment................1-16 Sound ports....................1-16 Connecting most audio equipment............1-17 Connecting and positioning a microphone..........1-18 Connecting external stereo speakers............1-19 Connecting external SCSI devices ..............1-20... - Page 14 Chapter 3 Getting Help Getting answers to your questions..............3-2 Getting answers with the Topics button ............ 3-5 Getting answers with the Index button............3-7 Getting answers with the Look For button..........3-9 Tips for using Mac OS Guide..............3-11 Identifying objects on the screen ..............
- Page 15 Chapter 6 Troubleshooting When you have questions...................6-1 If you run into trouble ..................6-2 Take your time....................6-3 Start over ......................6-4 Rebuild your desktop regularly ..............6-5 Solutions to common problems................6-7 Solutions to CD-ROM problems ..............6-23 Problems using the CD-ROM drive ............6-23 Problems using CD-ROM discs ..............6-25 Problems using ISO 9660 or High Sierra discs ........6-27 Problems playing audio CDs ..............6-27 Problems using Photo CDs.................6-28...
- Page 16 Doing a clean installation of system software......... 6-54 Replacing your special software ............... 6-58 Doing a custom installation ............... 6-59 Appendix A Safety and Maintenance Tips Safety instructions....................A-1 Handling your computer equipment............... A-2 Handling a monitor..................A-4 Handling the keyboard................A-4 Handling floppy disks .................
- Page 17 Figures The Fully Assembled Systems ................1-2 Desktop System Rear Panel ................1-5 Minitower System Rear Panel ................1-6 SCSI Cable ......................1-21 SCSI Peripheral Interface Cable ..............1-21 SCSI Terminator ....................1-22 xvii...
-
Page 19: Getting Started
1Getting Started Follow the instructions in this chapter to set up your computer. Congratulations on the purchase of your new Motorola StarMax computer. Your computer is designed to give you the highest performance combined with real ease of use—it is easy to set up, easy to use, and easy to expand. -
Page 20: Before You Begin
Getting Started Before you begin Before you plug your computer into a wall socket, carefully read all the setup instructions in this chapter. Then, before you connect anything to your computer, follow the instructions in this section to plug it in. The plug grounds the computer and protects it from electrical damage while you are setting up. -
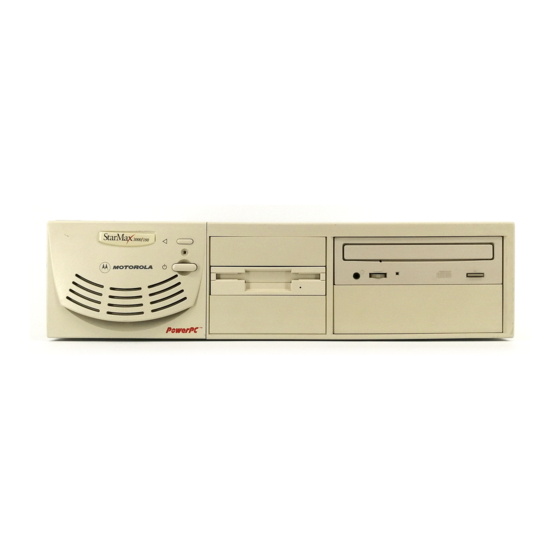
Page 21: Front Panel Features
Front panel features Front panel features Floppy disk drive Power-on light CD-ROM drive Power switch CD-ROM drive Open/Close button CD-ROM drive CD-ROM drive Open/Close button Power-on light Power switch Floppy disk drive... -
Page 22: Rear Panel Ports
Getting Started Rear panel ports Printer port Connects your computer to a printer, LocalTalk network, and the QuickTake 150 digital camera. Modem port Connects an external modem and the QuickTake 150 digital camera to your computer. SCSI port Connects your computer to SCSI equipment, such as external hard disk drives and scanners. -
Page 23: Desktop System Rear Panel
Rear panel ports PCI card access covers SCSI port PS/2 Mouse port PS/2 Keyboard port Apple Desktop Bus (ADB) port Printer port Modem port Sound input port Sound output port Monitor port Figure 1-2. Desktop System Rear Panel... -
Page 24: Minitower System Rear Panel
Getting Started SCSI port PS/2 Mouse port PS/2 Keyboard port Apple Desktop Bus (ADB) port Printer port Modem port Sound input port Sound output port Monitor port PCI card access covers Figure 1-3. Minitower System Rear Panel User’s Guide... -
Page 25: Assembling Your Starmax System
2. Place the monitor where you want it. • Monitors up to 17-inches, weighing less than 40lb. (18kg) can be placed on top of the StarMax Desktop System. Monitors larger than this must be used beside the computer. • Provide space for air circulation around the computer and monitor. - Page 26 If you are using an Apple-compatible (DB15) monitor, the monitor connector attaches to the monitor port via an adapter. If you do not find this adapter in your accessory kit, contact your Motorola- authorized dealer for details on obtaining this adapter.
- Page 27 Assembling your StarMax system 4. Plug the keyboard and mouse connectors into their respective ports on the rear of the computer. The StarMax computer is shipped with an Apple Desktop Bus (ADB) keyboard and mouse. ADB Connector and Icon ADB keyboards and mice have the connector type shown above,...
- Page 28 Getting Started Apple Desktop Bus Keyboard and Mouse Connection ADB devices are connected together in a string or “daisy chain.” The mouse plugs into a port on the keyboard, the keyboard then plugs into the port, on the rear of the computer. The ports are marked with the b icon.
- Page 29 Assembling your StarMax system PS/2 Keyboard and Mouse Connection Ensure that you connect the mouse and keyboard to the correct ports. The keyboard port is marked with the K icon and the mouse port is marked with the h icon. Both of these devices have the same type of connector and it is possible to swap connectors.
- Page 30 Getting Started 5. Make sure the voltage switch on the back of the computer is set to the correct voltage for your location. The voltage switch must be set correctly to avoid damaging your computer. If you do not know the voltage used your country, refer to Voltages for different locations on page 1-15.
- Page 31 Assembling your StarMax system 6. Plug the socket ends of two power cords into the recessed power plugs on the back of the computer and monitor. Make sure at least one end of the computer power cord is within easy reach in order to make it easy to unplug the computer.
- Page 32 Getting Started 7. Plug the other ends of the power cords into three-hole grounded outlets or power strip. This equipment is intended to be electrically grounded. Your computer is equipped with a three-wire grounding plug—a plug that has a third (grounding) Warning pin.
-
Page 33: Voltages For Different Locations
Assembling your StarMax system Voltages for different locations Country Single voltage Japan S. Korea 100/220 Jamaica, Taiwan Peru 110/220 Brazil, Lebanon 110-220 Philippines Bermuda, Canada, Puerto Rico, United States, Venezuela Mexico Saudi Arabia 127/220 Hong Kong India, South Africa 220-250... -
Page 34: Connecting Audio Equipment
Getting Started Connecting audio equipment Your StarMax can play and record stereo sound from a variety of sources. You can listen to or reproduce stereo sound by connecting audio equipment to the sound input and output ports on the computer. You can also use your internal CD-ROM drive to play and record sound from audio compact discs (CDs). -
Page 35: Connecting Most Audio Equipment
Connecting audio equipment The computer’s sound ports accept these 3.5mm connectors: Stereo miniplug Extended miniplug The smaller connector (stereo miniplug) is found most often on stereo equipment. The slightly longer connector is found on the Apple PlainTalk Microphone and other voice quality microphones. If your equipment has a different type of connector, you can purchase an adapter at an electronics supply store. -
Page 36: Connecting And Positioning A Microphone
Getting Started 4. Attach the cable to the audio equipment and to the appropriate sound port on the computer. To hear or record incoming sound on the computer, connect the audio equipment to the sound input port (j). To record the sound produced by the computer or play that sound through external speakers, connect the audio equipment to the sound output port (k). -
Page 37: Connecting External Stereo Speakers
Connecting audio equipment Connecting external stereo speakers You can take advantage of your computer’s stereo sound output by attaching externally powered (amplified) speakers. 1. Assemble the speakers and attach the cable you need. You need a cable with stereo miniplugs at each end to connect one or both speakers to the computer. -
Page 38: Connecting External Scsi Devices
Getting Started Connecting external SCSI devices Your computer has an external port for connecting devices that use the Small Computer System Interface (SCSI, pronounced “skuh- zee”). SCSI devices include hard disk drives, CD-ROM drives, scanners, some printers, and tape or cartridge backup drives. The SCSI port permits high-speed communication between the computer and the device. -
Page 39: Before You Connect A Device
Connecting external SCSI devices Before you connect a device Before you connect a SCSI device to your computer, be sure to complete these tasks: • Make sure each SCSI device connected to your computer has its own, unique ID number from 0 to 6. See the instructions that came with each SCSI device for information on checking and setting its SCSI ID number. -
Page 40: Scsi Terminator
Getting Started IMPORTANT The total length of the cables in a SCSI chain should not exceed 6 meters (20 feet). SCSI cables must have a 110-ohm impedance. • Make sure that the last (or only) device in the SCSI chain has a terminator. -
Page 41: Connecting A Scsi Device
Connecting external SCSI devices Connecting a SCSI device Use these general instructions in conjunction with the instructions that came with your SCSI device: 1. Shut down your computer. 2. Make sure the SCSI device is switched off. Do not connect or disconnect any device while the device or your computer is powered on. -
Page 42: Connecting Other Equipment
Getting Started Connecting other equipment For instructions on how to connect other equipment such as a modem or a printer, refer to the manual shipped with the unit. See Rear panel ports on page 1-4 to locate the correct port on the rear of the computer. - Page 43 2Turning the Computer on for the First Time Follow the instructions in this chapter to power up your computer and learn the basics. To turn the computer on for the first time, follow these steps: 1. Power on your monitor. See the information that came with your monitor for the location of the power switch.
-
Page 44: Chapter 2 Turning The Computer On For The First Time
Turning the Computer on for the First Time The Power key on the keyboard is marked with a triangle (e). The location of the Power key depends on which type of ADB keyboard you have. You hear a tone from your computer as it starts up. User’s Guide... - Page 45 3. Check to see what is on your screen. You see a sequence of messages describing what is happening, followed by the Desktop screen. • If you see a blinking question mark, see Solutions to common problems on page 6-7. •...
-
Page 46: Problems Starting Up
Turning the Computer on for the First Time Problems starting up? If the screen is dark, check these items to see if you can identify the problem: • Is the computer turned on? The power-on light on the front of the computer should be on. If it is not on, press the power switch. -
Page 47: What's Next
What’s next? What’s next? Continue with one of the following steps: • If you are new to the Mac OS, go to the next section, Using the mouse. When you have learned the basic Mac OS skills, see Chapter 3, Getting Help to learn about Mac OS Guide, your main source of information when working with the Mac OS. -
Page 48: Using The Mouse
Turning the Computer on for the First Time Using the mouse 1. Slide your mouse along your mouse pad or desk. Hold the mouse as shown, with the cable pointing away from you. Rest the heel of your palm on the desk and grasp the sides of the mouse between your thumb and fingers. - Page 49 Using the mouse 3. With the tip of the arrow on the question mark (T), press and hold down the mouse button. A list of choices (called a menu) appears. This is the Guide menu, which is the place to go when you have a question about how to use your computer.
-
Page 50: Reviewing The Basics
Turning the Computer on for the First Time Reviewing the basics Look at the following illustrations to review the elements you use on your screen to work with your computer. Icons Menu Window Menus The strip across the top of the screen is called the menu bar. The symbols and words in it represent menus of commands. -
Page 51: Icons
Reviewing the basics Icons Icons are small pictures that represent disks, programs, documents, and folders. You can double-click any icon to open it and see what it contains. This icon represents the internal hard disk. Icons like this one represent application programs, which you use to create documents and do other work. -
Page 52: Inserting A Cd-Rom Disc Or Other Cd
Turning the Computer on for the First Time Inserting a CD-ROM disc or other CD Your internal CD-ROM drive works with CD-ROM discs, standard audio compact discs (CDs), and single-session or multisession Photo CDs. Follow these instructions to insert a CD-ROM disc (or other CD) into your CD-ROM drive. - Page 53 Inserting a CD-ROM disc or other CD 4. Gently push the tray in, or press the Open/Close button, to close the tray. In a few moments, an icon for the disc appears on your screen. For instructions on ejecting a CD-ROM disc or other CD, see the “CD-ROM Discs”...
-
Page 54: Turning The Computer Off
Turning the Computer on for the First Time Turning the computer off Using the Shut Down command You can power your computer off by using the Finder’s Shut Down command in the Special menu. Follow these steps: 1. Move the tip of the arrow to the word “Special” at the top center of the screen. -
Page 55: Using The Shut Down Desk Accessory
Turning the computer off 2. With the tip of the arrow on the word Special, press and hold down the mouse button. 3. While holding down the mouse button, move the arrow until the words “Shut Down” are highlighted, then release the button. Using the Shut Down desk accessory You do not need to return to the Finder to power off your computer. -
Page 56: Using The Keyboard
Turning the Computer on for the First Time Using the keyboard You may also power off your computer from the keyboard. Follow these steps: 1. Press the Power Key. The following confirmation dialog appears: 2. Move the tip of the arrow into the “Shut Down” button and click the mouse button. -
Page 57: Where To Find Answers
Welcome to StarMax File The Welcome to StarMax file on your hard disk contains important information about some of the application programs included with your computer. Read Me files can also be found inside application folders. - Page 59 3Getting Help Use the instructions in this chapter to learn about the help available to you in the Guide menu. The Guide menu is your main source of information when you are working with your computer. The menu is identified by a question mark (T) in the upper-right corner of the screen.
-
Page 60: Chapter 3 Getting Help
Getting Help Getting answers to your questions When you have a question while working with your computer, you can get the answer by choosing Mac OS Guide from the Guide (T) menu. 1. Pull down the Application menu (in the upper-right corner of the screen) and choose Finder to make it the active application program. - Page 61 Getting answers to your questions 2. Pull down the Guide (T) menu and choose Mac OS Guide. The Mac OS Guide window appears. Whenever you use Mac OS Guide, its window remains in front of other windows. If the window obstructs your viewing area, move it by dragging its title bar (the gray bar across the top of the window).
- Page 62 Getting Help 3. Notice the three buttons at the top of the window: Topics, Index, and Look For. Mac OS Guide gives you three ways of finding information: • Topics lets you choose from a list of general subjects. It is similar to the table of contents in a book.
-
Page 63: Getting Answers With The Topics Button
Getting answers to your questions Getting answers with the Topics button 1. In the Mac OS Guide window, click the Topics button. A list of general topics appears on the left side of the Mac OS Guide window. (Depending on the hardware and software you have, the list of topics may be different.) 2. - Page 64 Getting Help 3. Click the question “How do I set the time and date?” and then click OK. Or double-click the question. A small window appears with instructions. If you want to return to the main Mac OS Guide window, click this Topics Click here to see the next step button.
-
Page 65: Getting Answers With The Index Button
Getting answers to your questions Getting answers with the Index button 1. In the Mac OS Guide window, click the Index button. An alphabetical list of subjects appears on the left side of the window. Slider Scroll bar 2. Scroll through the alphabetical list until the phrase “background pattern”... - Page 66 Getting Help 4. Click the question “How do I change the background pattern?” and then click OK. Or double-click the question. A small window appears with instructions for you to follow. If you want to return to the main Mac OS Guide window, click this Topics Click here to see the next step button.
-
Page 67: Getting Answers With The Look For Button
Getting answers to your questions Getting answers with the Look For button 1. In the Mac OS Guide window, click the Look For button. A small box appears on the left side of the window, where you can type text. To activate the text box, click here. - Page 68 Getting Help 4. Click the question “How do I turn off the Empty Trash warning?” and then click OK. Or double-click the question. A small window appears with instructions for you to follow. If you want to close Mac OS Guide, click here. Click here to see the next step (if there is one).
-
Page 69: Tips For Using Mac Os Guide
Getting answers to your questions Tips for using Mac OS Guide Here are a few tips for using Mac OS Guide effectively: • Mac OS Guide is available only when you are in the Finder— the desktop area where you can see the icons of disks, folders, and files. -
Page 70: Identifying Objects On The Screen
Getting Help Identifying objects on the screen Sometimes you will see an unfamiliar item on the screen and ask yourself, “What is that?” You can get an answer by using a Mac OS feature known as Balloon Help. Balloon Help explains icons, menus, commands, and other items on the Mac OS screen in balloons like those you see in comic strips. -
Page 71: Learning Useful Shortcuts
Learning useful shortcuts Learning useful shortcuts You can perform many tasks in the Finder more quickly if you use keyboard or mouse shortcuts. For example, instead of clicking an icon and choosing Open from the File menu, you can simply double-click the icon to open it. - Page 72 Getting Help 3. Read about the shortcuts available for the category you selected. Click the right arrow in the lower-right corner of the window to display the next window (if there is one). 4. When you finish reading about the shortcuts for your category, click the Topics button in the lower-left corner to return to the main Mac OS Shortcuts window.
-
Page 73: Installing Application Programs
4Installing and Using Application Programs Read this chapter for information on installing and using application programs with your computer. Installing application programs You will probably want to buy and install additional application programs. See the manuals you receive with your applications for instructions on installing and using them. - Page 74 Installing and Using Application Programs For instructions on how to eject CD-ROM discs, see Ejecting a CD- ROM disc on page 5-3. Some application programs come on floppy disks. See the “Disks” topic of Mac OS Guide, available in the Guide (T) menu, for information on inserting and ejecting floppy disks.
-
Page 75: Working With Several Applications At A Time
Working with several applications at a time Working with several applications at a time You can open as many application programs and desk accessories as your computer’s memory allows. All open applications are listed in the Application menu at the right end of the menu bar. -
Page 76: Increasing Memory Available To Run Applications
Installing and Using Application Programs Increasing memory available to run applications You can increase the memory available to run your application programs by changing memory settings and removing software that you may not need. Each of these options is discussed below. Turning virtual memory on Virtual memory uses space on your computer’s hard disk to create extra random-access memory (RAM) to run your applications. - Page 77 Working with several applications at a time 4. Choose Custom Remove from the pop-up menu. The Custom Remove dialog box appears, listing the software components that can be removed. 5. Scroll through the list of components, clicking the checkbox next to each component you want to remove.
-
Page 78: Hiding And Showing Windows On The Desktop
Installing and Using Application Programs Hiding and showing windows on the desktop You can hide all windows except those of the active application by choosing Hide Others from the Application menu. The other applications remain open even though their windows are hidden. -
Page 79: Using Powerpc Mac Os Application Programs
Using PowerPC Mac OS application programs Using PowerPC Mac OS application programs Your StarMax computer is compatible with application programs intended for use with Mac OS compatible computers. Certain applications are designed especially for PowerPC Mac OS compatible computers like the StarMax. (These are sometimes called “native”... - Page 80 Installing and Using Application Programs If a shared library is missing, you will see a message that the application could not be opened because the shared library could not be found. If this happens, follow the directions that came with your application to reinstall the application.
- Page 81 5Using the CD-ROM Drive Read this chapter for information on using the internal CD-ROM drive. Read this chapter for information on using the internal CD-ROM (Compact Disk Read-Only Memory) drive. (CD-ROM drives are also sometimes called CD-ROM players.) Refer to Appendix A, “Safety and Maintenance Tips,”...
-
Page 82: Chapter 5 Using The Cd-Rom Drive
Using the CD-ROM Drive Inserting a CD-ROM disc Follow these instructions to insert a CD-ROM disc into your CD- ROM drive. Then follow the instructions provided with your disc, as well as the instructions in this manual. 1. Power on your computer, if it is not already on. 2. -
Page 83: Ejecting A Cd-Rom Disc
Ejecting a CD-ROM disc Ejecting a CD-ROM disc Follow these instructions to open the tray and eject a CD-ROM disc. IMPORTANT You may not be able to eject a disc if it is being shared. To turn off file sharing, use the Control Strip or the Sharing Setup control panel. -
Page 84: Playing Audio Cds
Using the CD-ROM Drive Playing audio CDs With the CD-ROM drive and your computer’s built-in speaker, you can play audio compact discs (CDs) or audio tracks on CD-ROM discs. You can also attach headphones or speakers to the computer to listen to audio CDs and audio tracks. See Connecting audio equipment on page 1-16, for information on connecting sound equipment to your computer. -
Page 85: When You Have Questions
6Troubleshooting Consult this chapter if you experience problems using your computer. When you have questions If you want to know how to do a particular task with your computer, refer to Mac OS Guide in the Guide (A) menu. For instructions on using Mac OS Guide, see Chapter 3, Getting Help. -
Page 86: If You Run Into Trouble
Warning for instructions on how to contact a Motorola- authorized service provider or Motorola for assistance. If you attempt to repair the computer yourself, any damage you may cause to the computer will not be covered by the limited warranty on your computer. -
Page 87: Take Your Time
If you need repair service, contact your Value Added Reseller or Distributor. If further assistance is required, the local Motorola Computer Group Sales office or the Motorola Computer Group’s Customer Support Centers may be contacted. -
Page 88: Start Over
Troubleshooting Start over Often you can eliminate a problem simply by starting over. If you can, save any open documents before restarting the computer. If your computer is frozen and does not respond to anything you do, or if you have a “bomb” message on the screen, saving your work may not be possible. -
Page 89: Rebuild Your Desktop Regularly
If you run into trouble • If the power button does not power off the computer, unplug your computer. • If you suspect the problem is with other equipment, such as a printer or an external hard disk that is attached to your computer, power that equipment off for 10 seconds or longer, then power it on again and restart the computer. - Page 90 Troubleshooting 3. From the File menu, choose New Set. 4. In the New Set window, type a name for your new set of extensions (for example, “My Extensions”) and click OK. The name of your set is added to the Sets pop-up menu. 5.
-
Page 91: Solutions To Common Problems
Solutions to common problems Solutions to common problems This section contains descriptions of problems you could experience with your computer. Some problems may be caused by your CD-ROM drive, so if you do not find your problem here, be sure to check the section Solutions to CD-ROM problems on page 6-23. - Page 92 Troubleshooting • If none of these steps solves the problem, you may need to reset your computer’s parameter RAM (PRAM). Reset PRAM by powering off the computer and disconnecting all external SCSI devices. Next, restart the computer while holding down the key combination Z-Option-p-r. Wait for the second startup chime, then release the keys.
- Page 93 Your computer has a clock that runs continuously. When the computer is powered off, a battery keeps the clock running. If your clock begins to keep time inaccurately, have a Motorola- authorized service provider replace the battery. Consult the service...
- Page 94 Start up your computer using the CD-ROM disc that contains system software. This CD-ROM disc is in the accessory kit shipped with your StarMax. For instructions on how to start up your computer from the CD-ROM disc, see Starting up from a CD-ROM disc on page 6-45.
- Page 95 CD-ROM disc, see Starting up from a CD-ROM disc on page 6-45.) If the “sad Mac OS” icon appears again, consult the service and support information that came with your computer for information on contacting a Motorola-authorized service provider or Motorola for assistance. 6-11...
- Page 96 CD-ROM disc that contains system software. This CD-ROM disc is in the accessory kit shipped with your StarMax. For instructions on how to start up your computer from the CD-ROM disc, see Starting up from a CD-ROM disc on page 6-45.
- Page 97 Solutions to common problems Your computer cannot read a floppy disk. If you see a message that a floppy disk is unreadable, try one of the following: • If the disk has never been used, you may simply need to initialize it.
- Page 98 Push gently until the disk is ejected. Do not use excessive force. If none of these solutions works, take the computer to your Motorola-authorized service provider to have the disk removed. 6-14 User’s Guide...
- Page 99 Solutions to common problems A dialog box with a bomb appears. Your computer has a software problem. • Write down what you were doing when the message appeared, and write down the message’s text and its number, if there is one. •...
- Page 100 Troubleshooting You can also use the Extensions Manager control panel to turn off individual extensions. For information on using this control panel to manage system extensions, see the “Customizing Your Computer” topic area of Mac OS Guide, available in the Guide (T) menu. •...
- Page 101 If none of these procedures solves the problem, consult the service and support information that came with your computer for instructions on how to contact a Motorola-authorized service provider or Motorola for assistance. Typing on the keyboard produces nothing on the screen.
- Page 102 If none of these procedures solves the problem, consult the service and support information that came with your computer for instructions on how to contact a Motorola-authorized service provider or Motorola for assistance. Your computer will not restart, and a CD-ROM disc is in the CD-ROM drive.
- Page 103 Solutions to common problems You cannot start an application program or it quits unexpectedly. One of the following is probably the cause: • The computer ran out of memory. Quit the programs that you have open and then open the program you want to use, or restart your computer.
- Page 104 Troubleshooting You see a message that your computer does not have enough memory to start an application or open a document. You can make more memory available to run your application following the instructions in Increasing memory available to run applications on page 4-4.
- Page 105 Solutions to common problems You experience problems using a document created in a PC environment. If you cannot open a DOS document using a Mac OS program, try the following: • Open the document from within the program by choosing Open in the program’s File menu.
- Page 106 Troubleshooting You see a message that your application program cannot be opened because a file cannot be found. PowerPC Mac OS compatible programs use special files called shared libraries. Any necessary shared libraries should be installed automatically when you install PowerPC Mac OS compatible programs.
-
Page 107: Solutions To Cd-Rom Problems
Solutions to CD-ROM problems Solutions to CD-ROM problems Problems using the CD-ROM drive The CD-ROM drive icon does not appear on screen. • If you have SCSI devices attached to your computer, make sure that each device has a unique SCSI ID number. Refer to the documentation that came with your SCSI devices if you need to reset SCSI ID numbers. - Page 108 CD-ROM drive. Warning If neither of these suggestions works, your CD-ROM drive may be damaged. Contact a Motorola-authorized service provider or Motorola for further assistance. Your computer will not restart, and a CD-ROM disc is in the CD-ROM drive.
-
Page 109: Problems Using Cd-Rom Discs
Solutions to CD-ROM problems Problems using CD-ROM discs You insert a CD-ROM disc, but its icon does not appear on the Mac OS desktop. • Make sure the disc label is facing up and the disc is centered in the tray. If you are using a small (8cm) disc, make sure it is within the tray’s inner ring. - Page 110 Troubleshooting Your computer ejects a CD-ROM disc without giving you any error message. • Make sure the disc is flat in the tray and the disc label is facing up. If you’re using a small (8cm) disc, make sure it is centered within the tray’s inner ring.
-
Page 111: Problems Using Iso 9660 Or High Sierra Discs
Solutions to CD-ROM problems Problems using ISO 9660 or High Sierra discs You cannot access files on a CD-ROM disc that uses the ISO 9660 or High Sierra format. • Discs in the ISO 9660 and High Sierra disc formats have version numbers attached to filenames. -
Page 112: Problems Using Photo Cds
Troubleshooting • Make sure the volume is turned up in the AppleCD Audio Player. With the Audio Player open, drag the volume control slider up or press the Up Arrow key on your keyboard. • The CD may have been paused. Click the Play/Pause button in the AppleCD Audio Player once or twice. -
Page 113: If Your Computer's Performance Decreases
If your computer’s performance decreases After you open an image on a Photo CD, the image is scrambled, colors are displayed incorrectly, or no image appears in the window. • The program you are using may not be designed to work with large (high-resolution) image files. - Page 114 Troubleshooting If you notice a decrease in your computer’s performance after you add special software (a control panel, system extension, or custom utility), it may be because your special software does not work well with the PowerPC microprocessor. • To find out if your special software is the problem, hold down the Shift key while you restart the computer.
-
Page 115: Solving Printer Problems
Solving printer problems Solving printer problems The following suggestions should work for all printers. • Check your printer settings in the Chooser, making sure you have selected the correct printer. • Next, power off the computer and printer and check the printer cable connections. -
Page 116: Obtaining Online Support And Updated Mac Os Software
Troubleshooting Obtaining online support and updated Mac OS software Mac OS technical support information and software updates are available from many online services. Using these services, you can get troubleshooting and other important information. You can also get all of the latest versions of Mac OS software, including most printer drivers, system enablers, and updates to utilities, networking, and communication software. -
Page 117: America Online
Obtaining online support and updated Mac OS software America Online Apple software updates are posted to the USA Apple SW Updates area, which is located in the Apple Computer, Inc. folder. You can use the keyword applecomputer to go directly to the Apple Computer, Inc. -
Page 118: Compuserve
Troubleshooting CompuServe The MacPlanet (GO MACPLANET) area provides access to Apple- related information on CompuServe. From MacPlanet, go to the Apple Online (GO APLNEW) section for Apple product information, a database of technical support articles, a collection of popular software files, and software updates for U.S. and international customers. -
Page 119: Internet: Ftp Servers
Obtaining online support and updated Mac OS software Internet: FTP servers Support information and software updates are posted to two File Transfer Protocol (FTP) servers: ftp.info.apple.com, and ftp.support.apple.com. ftp.info.apple.com • Host name: ftp.info.apple.com • IP number: 204.96.16.4 • Path: ftp/Apple.Support.Area/Apple.SW.Updates ftp.support.apple.com •... -
Page 120: Internet: Gopher Server
Troubleshooting Internet: gopher server Apple recommends using TurboGopher client software to access the Apple Computer Higher Education Gopher server. The “Apple Support Area” folder is located in the following path: Home Gopher Server Computer Information Apple Computer Higher Education gopher server Apple Support Area Apple SW Updates TurboGopher Client software is available via anonymous file... -
Page 121: Testing And Repairing A Damaged Disk
Testing and repairing a damaged disk Testing and repairing a damaged disk Hard disks and floppy disks can become damaged by repeated use and handling. When do you need to repair a disk? If you see a message reporting that a disk is damaged or unreadable, you may need to repair the disk. -
Page 122: How To Verify And Test A Disk
Troubleshooting • If the hard disk is your startup disk, start up with a different startup disk, such as the CD-ROM. If the hard disk’s icon appears on your desktop, reinstall system software on the hard disk (see Installing or reinstalling system software on page 6-48). - Page 123 Disk First Aid again or another disk repair program (see the instructions that follow), or you may need to reinitialize the disk (see Initializing a hard disk on page 6-42). Consult a Motorola- authorized service provider for assistance if necessary.
-
Page 124: How To Repair A Hard Disk Or Floppy Disk
You can repair some types of disk damage by using the Disk First Aid application which is included on the CD-ROM disc containing system software. This CD-ROM disc is in the accessory kit shipped with your StarMax. 1. Start up your computer from the CD-ROM disc that contains system software. -
Page 125: If Disk First Aid Cannot Correct The Problem
• Once you have recovered all the information you can, erase (reinitialize) the disk. If initialization does not work, discard the damaged disk (if it is a floppy disk), or take it to your Motorola-authorized service provider for repair (if it is a hard disk). 6-41... -
Page 126: Initializing A Hard Disk
Troubleshooting Initializing a hard disk You may never need to initialize a hard disk. This section helps you determine whether you need to initialize your hard disk and tells you how to do the initialization, if it is necessary. When do you need to initialize a hard disk? The hard disk inside your computer was initialized at the factory, so you should not need to initialize it. -
Page 127: How To Initialize A Hard Disk
Initializing a hard disk How to initialize a hard disk You initialize a hard disk by using a program called Drive Setup, which is on the CD-ROM disc that contains system software. (To initialize a hard disk from another manufacturer, use the utility software that came with the hard disk.) Initializing a disk erases all information on it. - Page 128 5. Click Quit when you see a message reporting that initialization was successful. If a message reports that initialization failed, try again. If initialization fails a second time, take the disk to your Motorola- authorized service provider for repair. 6-44...
-
Page 129: Starting Up From Another Disk
You can start up your computer using the CD-ROM disc containing system software. This CD-ROM disc is in the accessory kit shipped with your StarMax. To start up the computer using the CD-ROM disc, either use the “Startup Disk” control panel to set the CD-ROM drive as your startup drive, or follow these steps: 1. -
Page 130: Starting Up From Floppy Disk
Troubleshooting 3. Immediately press the C key on the keyboard. Continue to hold down the key until you see the “Welcome to Mac OS” message. Starting up from floppy disk To initialize, test, or repair a hard disk, or to install system software on hard disk, you need to start up your computer from another device. -
Page 131: Starting Up From Another Hard Disk
Starting up from another disk Starting up from another hard disk To initialize, test, or repair a hard disk, or to install system software on a hard disk, you need to start up your computer from another disk. If you have another hard disk that will start up your computer, you may restart from it. -
Page 132: Installing Or Reinstalling System Software
Troubleshooting Installing or reinstalling system software System software is the set of programs and other files that your computer uses to start itself up, keep track of your files, and run the application programs you use. System software is kept in the folder called the System Folder. -
Page 133: When Should You Reinstall System Software
Installing or reinstalling system software When should you reinstall system software? If you have a problem with your system software, you may see this icon in the middle of the screen. If this icon appears, follow the instructions in How to repair a hard disk or floppy disk on page 6-40 to test your startup hard disk and repair any damage. -
Page 134: Installing System Software
Troubleshooting Installing system software Follow the steps in this section to do a normal installation of system software (also known as an “Easy Install”). If you are installing system software on a hard disk for the first time, make sure that your hard disk has been initialized. This is a process that prepares the disk to store information. - Page 135 Installing or reinstalling system software 4. Find and open the Install Mac™ OS icon. 5. Follow these four steps in the Install Mac™ OS program. 6-51...
- Page 136 Troubleshooting During step 4, you can select which software parts to install. The recommended parts are already checked, so just click the Start button. During the software installation, you may be shown software license agreements. Click the Agree button to continue the installation.
- Page 137 Installing or reinstalling system software If, after reinstalling system software by doing a normal installation, you still experience problems with your computer, follow the steps in the next section for doing a “clean” installation of system software. IMPORTANT Certain system extensions or application programs that were originally on your hard disk may not be installed with the Installer program.
-
Page 138: Doing A Clean Installation Of System Software
Troubleshooting Doing a clean installation of system software This section outlines what is commonly called a “clean” installation of system software. A clean installation allows you to discover which item in your System Folder is causing a problem. A clean installation creates a new System Folder and saves everything in your original System Folder as “Previous System Folder.”... - Page 139 Installing or reinstalling system software 4. Find and open the Install Mac™ OS icon. 5. Follow these four steps in the Install Mac™ OS program. 6-55...
- Page 140 Troubleshooting During step 4, you can select which software parts to install. Click the Customize button. The button changes to Don’t Customize. The list of software also changes slightly, showing the previously hidden Easy Install items. Click the “Options...” button. When the options dialog appears, check the “Create new System Folder”...
- Page 141 Installing or reinstalling system software After checking the items to be installed, click the Start button. During the installations, each software component will show its software license agreement. Click the Agree button to continue the installations. Each software component will also display its own welcome screen and installation dialog.
-
Page 142: Replacing Your Special Software
Troubleshooting Replacing your special software Special software consists of items such as control panels, system extensions, custom utilities, fonts, or Apple menu items that you may have added to your previous System Folder. To make sure that special software does not create any conflicts with other programs on your computer, follow this procedure to add these items in your new System Folder: 1. -
Page 143: Doing A Custom Installation
Installing or reinstalling system software Doing a custom installation For most Mac OS users, the Easy Install procedure described in the previous sections is appropriate, because it automatically installs all the items you need. However, if you would like to select a combination of system software files for your specific needs, you can customize your system software installation. - Page 144 Troubleshooting 3. Open the Installer program. The Installer welcome screen appears. 4. Click Continue. You will be shown a software license agreement. If you agree with the license, the installation continues. 6-60 User’s Guide...
- Page 145 Installing or reinstalling system software The Easy Install dialog box appears. 5. Choose Custom Install from the pop-up menu. 6-61...
- Page 146 Troubleshooting The Custom Install dialog box appears, listing all available system software components. 6. Scroll through the list of components, clicking the box next to each component you want to install. You can see and select individual items within each component by clicking the arrow to the left of the component, then clicking the item you want to install.
-
Page 147: Safety Instructions
ASafety and Maintenance Tips Read this appendix for important safety instructions, as well as tips on keeping your computer in good working order. For your own safety and that of your equipment, follow all the instructions in this chapter. Keep these instructions available for reference by you and others. -
Page 148: Handling Your Computer Equipment
Safety and Maintenance Tips • Protect your computer from dampness or wet weather, such as rain, snow, and so on. • Read all the installation instructions carefully before you plug your computer into a wall socket. • Keep these instructions handy for reference by you and others. - Page 149 Depending on what you spilled and how much of it got into your equipment, you may have to bring your equipment to a Motorola-authorized service provider. • Protect the computer and its components from direct sunlight and rain or other moisture.
-
Page 150: Handling A Monitor
24 hours at room temperature. If, after you take these steps, the keyboard does not work, take it to your Motorola- authorized service provider for repair. -
Page 151: Handling Floppy Disks
Handling your computer equipment Handling floppy disks Store disks at Do not use a temperatures pencil or an between 50 F eraser on a disk and 125 F or disk label. Keep disks dry. 125 F (52 C) 50 F (10 C) Do not touch the Keep disks away Avoid exposing... -
Page 152: If You Cannot Eject A Floppy Disk
Push gently until the disk is ejected. Do not use excessive force. If nothing works, take the computer to your Motorola-authorized service provider to have the disk removed. User’s Guide... -
Page 153: Handling Compact Discs
Handling your computer equipment Handling compact discs Keep these important safety instructions in mind as you use compact discs (such as CD-ROM discs, audio CDs, and Photo CDs): • Hold a disc by the edges or by one edge and the center hole. Do not touch the disc surface. -
Page 154: Power Supply
• Do not force the tray open by hand. • Do not wipe the lens with a paper towel or other abrasive surface. If you need to clean the lens, see a Motorola- authorized service provide for a lens cleaner. -
Page 155: Cleaning Your Equipment
Cleaning your equipment Cleaning your equipment Follow these general rules when cleaning the outside of your computer and its components: • Use a damp, soft, lint-free cloth to clean the computer’s exterior. Avoid getting moisture in any openings. • Do not use aerosol sprays, solvents, or abrasives. Cleaning the computer case To clean the case, do the following: 1. -
Page 156: Cleaning The Mouse
Safety and Maintenance Tips Cleaning the mouse The mouse contains a small ball that must roll smoothly for the mouse to work properly. You can keep this ball free of dirt and grease by using the mouse on a clean, lint-free surface and by cleaning it occasionally. - Page 157 Cleaning your equipment 3. Turn the mouse right-side up with one hand and catch the ring and the ball with your other hand. 4. Clean the three small rollers inside the mouse with a cotton swab moistened with water. Rotate the rollers to clean all around them. 5.
-
Page 158: Unlocking And Locking The Mouse
Safety and Maintenance Tips Unlocking and locking the mouse Some mouse devices can be locked so that the ball cannot be removed. A locking mouse has a small hole on the plastic ring. To unlock the mouse, follow these steps: 1. - Page 159 Unlocking and locking the mouse To lock the mouse, follow these steps: 1. Insert a straightened paper clip into the hole on the plastic ring. Insert a straightened paper clip into this hole. (The hole may be located here on your mouse.) 2.
- Page 161 Motorola-authorized service provider or Motorola for assistance. If you attempt to install the card yourself, any damage you may cause to the computer or card will not be covered by the limited warranty on your computer.
-
Page 162: Appendix B Installing An Expansion Card
Installing an Expansion Card Before you begin Motorola strongly recommends that you use an antistatic wrist strap and a conductive foam pad when installing or upgrading the computer. Electronic components, such as disk drives, computer boards, and memory modules, can be extremely sensitive to Electrostatic Discharge (ESD). -
Page 163: Expansion Card Power Requirements
1. Power off the computer. Leave the computer plugged in to ground it and protect its components from static electricity damage. 2. Remove the cover retaining screws. The StarMax Desktop Computer has three retaining screws located on the rear panel. - Page 164 Installing an Expansion Card The StarMax Minitower Computer has four retaining screws located on the rear panel. User’s Guide...
- Page 165 Card installation 3. Remove the cover from the computer. Slide the cover backward about one inch, lift it straight up and then off the computer.
- Page 166 Installing an Expansion Card 4. Use an antistatic wrist strap as described on page B-2. If you do not have an antistatic wrist strap, touch the metal part of the power supply case inside the computer to discharge static electricity. Always do this before you touch any parts, or install any components, inside the computer.
- Page 167 Card installation 5. Remove the PCI expansion slot cover. Desktop Computer: Being careful not to touch the sharp edges, remove the screw and port access cover from the expansion slot you want to use, and set the screw and access port cover aside.
- Page 168 Installing an Expansion Card Minitower Computer: Lay the computer down on its right side and slide the internal chassis outward by one inch (3cm) before removing the screw and port access cover from the Minitower Computer. 6. Remove the expansion card from its static-proof bag. Hold the card by its edges to avoid touching the connector.
- Page 169 Card installation 7. Align the connector end of the card with the expansion slot, then press the card gently but firmly until the connector is fully inserted. • Do not force the card. If you meet a lot of resistance, pull the card out and try again.
- Page 170 Installing an Expansion Card Minitower Computer: 8. Fix the card in place with the screw removed earlier. If you have other cards to install, put them in now by repeating steps 5 through 8. B-10 User’s Guide...
- Page 171 Card installation If you disconnected any of the power supply cables while pulling out the motherboard tray (minitower computer), use the next illustration as a reference. The connectors are keyed so they can only be inserted one way. 9. Replace the cover on the computer. Lower the cover all the way down onto the case, leaving a one-inch (3cm) gap.
-
Page 173: General Information
Warning information that came with your computer for instructions on how to contact a Motorola-approved service provider or Motorola for service. If you install additional DIMMs yourself, you risk damaging your equipment and this damage would not be covered by the limited warranty on your computer. - Page 175 DSpecial Keys on Your Keyboard Read this appendix to learn how to use the special keys on your keyboard. Your computer keyboard contains special keys that typewriter keyboards do not have. Many of these keys allow you to give commands to the computer without using the mouse. For example, in many application programs, you can press the Z (Command) key at the same time as the Q key to quit a program.
-
Page 176: Appendix D Special Keys On Your Keyboard
Special Keys on Your Keyboard Enter key In a dialog box, pressing Enter is the same as clicking the outlined button. In enter some programs, pressing this key confirms information you have provided. Escape key The function of this key depends on the program you are using. -
Page 177: Typing Special Characters And Symbols
Typing special characters and symbols Typing special characters and symbols You can type a variety of international and other special symbols and characters (including characters with diacritical marks, such as accents) by pressing combinations of keys. The Key Caps program, which is installed with your system software, shows you the characters produced when you type certain keys and key combinations in the fonts available on your computer. - Page 178 Special Keys on Your Keyboard If you see rectangles: If you see rectangles instead of diacritical marks on some of the pictures of keys in Key Caps, try pressing Option-Z to see the diacritical marks. However, you only need to use the Option key (not Option-Z) in combination with the other keys to type letters with diacritical marks.
-
Page 179: Special Key Combinations
Special key combinations Special key combinations If difficulties with your mouse or computer do not allow you to use standard methods of quitting a program or restarting your computer, you can try using these special key combinations. To do this... …press this key combination Force a program to quit -Option-Esc... - Page 181 Index AC outlet cable plugging in computer 1-13 for external SCSI 1-21 ADB devices cards connecting together 1-10 installing expansion cards B-1 ADB icons 1-9 CD disc ADB keyboards 1-9 inserting into drive 2-10, 4-1 ADB mouse 1-9 CD discs adding memory C-1 ejecting from drive 5-3 answers...
- Page 182 Index covers removing B-3 features replacing B-11 system 1-3 custom installation 6-59 files making backup copies 4-6 floppy disks daisy chain inserting into drive 4-1 for external SCSI devices 1-20 starting up 6-46 damaged disk storage and care A-5 repairing 6-37 front panel indicators 1-3 desktop rebuilding 6-5...
- Page 183 Index installation instructions expansion card B-3 Mac OS applications installation of system software 6-54 shared libraries 4-7 installing application programs 4-1 Mac OS basics 2-8 installing external SCSI devices 1-21 Mac OS compatible keyboard D-1 installing PCI cards Mac OS guide ESD precautions B-2 getting help 3-2 installing the system 1-7...
- Page 184 Index rear panel ports 1-4 shutting the computer down 2-12 recording sound 1-17 on-line support 6-32 removing software 4-4 open/close button repairing a disk 6-37 CD-ROM drive 1-3 restarting the system 6-4 performance degradation 6-29 safety instructions A-1 Peripheral Component Interconnect (PCI) cards screen installation B-1 identifying objects 3-12...
- Page 185 Index system software clean installation 6-54 tape recorder attaching to system 1-17 terminating external SCSI devices 1-22 terminator external SCSI 1-22 topics button getting answers 3-5 troubleshooting 6-1 starting up 2-4 turning off computer 2-12 virtual memory 4-4 virus detection programs 6-29 voltage switch 1-12 windows definition 2-9...