Table of Contents
Advertisement
Quick Links
Download this manual
See also:
Service Manual
Advertisement
Table of Contents

Related Manuals for Motorola Pro3100


Summary of Contents for Motorola Pro3100
- Page 1 PRO3100™ Radio Móvil Rádio Móvel Mobile Radio contacto PRO3100 control Guía del usuario Manual do usuário User Guide...
-
Page 2: Table Of Contents
LED Indicators ..... 3 Programmable Buttons ....3 Safe and Efficient Operation of Motorola Push-to-Talk (PTT) Button ... . 5 Two-Way Radios . -
Page 3: Computer Software Copyrights
Motorola. Furthermore, the purchase of Motorola products shall not be deemed to grant either directly or by implication, estoppel, or otherwise, any license under the copyrights, patents or patent... -
Page 4: Radio Overview
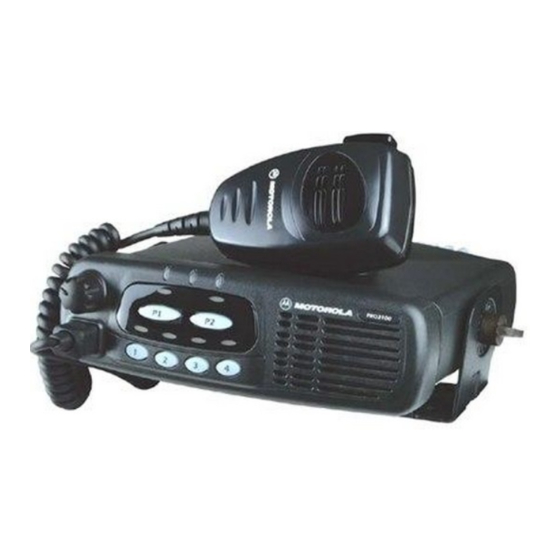
RADIO OVERVIEW PARTS OF THE RADIO Red/Yellow/Green LED Indicators On/Off/Volume Knob Channel Indicators (4) Microphone Jack Channel Selector Buttons (1, 2, 3 & 4) Programmable Programmable Button 1 (P1) Button 2 (P2) (Interchangeable) (Interchangeable) MAEPF 26781 O English... -
Page 5: Optional Enhanced Keypad Microphone (Rmn4026)
Optional Enhanced Keypad Microphone This keypad microphone has three buttons (A, B, C) below the keypad that can be (RMN4026) programmed to conveniently activate select Your radio may be ordered with an optional radio features. DTMF (Dual-Tone Multi-Frequency) microphone that has a direct entry keypad. Keypad Programmable Buttons... -
Page 6: On/Off/Volume Knob
On/Off/Volume Knob Some buttons can access up to two features, depending on the type of button press: Turns the radio on or off, and adjusts the radio’s volume. • short press—quickly pressing and releasing the programmable buttons Channel Indicators • long press—pressing and holding the Four LEDs (one per channel) that indicate the programmable buttons for a period of time... - Page 7 Function Short Press Long Press Hold Down Page Button Sound a tone for adjusting Volume Set — — your radio’s volume level. PRTT (Priority Sends a priority access request — Request-to-Talk) to the dispatcher. Repeater/ Toggle between using a repeater or transmitting directly —...
-
Page 8: Push-To-Talk (Ptt) Button
Push-to-Talk (PTT) Button Use with Enhanced Keypad Microphone (RMN4026) Press and hold down this button to talk; release it to listen. Microphone Hold the microphone 1 to 2 inches (2.5 to 5 cm) from your mouth, and speak clearly into it. These keys are used to: •... -
Page 9: Audio Indicators For Programmable Buttons
AUDIO INDICATORS FOR PROGRAMMABLE BUTTONS Low-High Tone High-Low Tone Some programmable buttons use tones to indicate one of two modes: Button Low-High Tone High-Low Tone Scan Start scan Stop scan High power Low power Power Level selected selected Option Board Enabled Disabled Repeater/... -
Page 10: Getting Started
ADJUSTING THE VOLUME GETTING STARTED Turn the On/Off/Volume Control knob TURNING THE RADIO ON OR OFF clockwise to increase the volume, or counterclockwise to decrease the volume. –or– button Hold down the Volume Set (see page 4). You will hear a continuous tone. Turn the On/Off/Volume Control knob to the desired volume level. -
Page 11: Sending A Call
SENDING A CALL RECEIVING A CALL Turn your radio on. Turn your radio on. Select the desired channel. Adjust the radio’s volume, if necessary (see page 7). Hold the microphone vertically 1 to 2 inches (2.5 to 5 cm) from your mouth. Press the PTT Select the desired channel. -
Page 12: Radio Calls
REPEATER OR TALKAROUND RADIO CALLS MODE SELECTIVE RADIO INHIBIT Talkaround Mode enables you to communicate with another radio when either: Your radio is equipped with a security feature • The repeater is not operating that can temporarily render the unit inoperative when an inhibit signal is sent from the base –or–... -
Page 13: Setting The Power Level
SETTING THE POWER LEVEL Each channel in your radio has a predefined transmit power level that can be changed. • High power • Low power To set the power level, press the preprogrammed Power Level button (see page 4) to toggle between low and high . English... -
Page 14: Scan
TALKBACK SCAN The Talkback feature allows you to respond to a transmission while scanning. If transmission is Your radio can monitor multiple channels in a detected on a channel while scanning, the radio scan list. Your dealer can program up to four will stop on that channel for a preprogrammed different channels into each scan list. -
Page 15: Restoring A Channel To The Scan List
Restoring a Channel to the Scan List To restore a previously deleted channel to the scan list, restart the scan operation or turn your radio off and on again. English... -
Page 16: Phone
3 When you hear a dial tone, enter the phone PHONE number using the keypad. –or– If your radio has access to a telephone system, Press and release the preprogrammed Speed you can make a phone call. To do this, your Dial button (see page 4) to use the Speed Dial radio must send an access code to a station feature. - Page 17 Notes English...
-
Page 18: Safety And Warranty
National and International Standards 2 1995 E Electromagnetic Fields High and Guidelines Frequency (10kHz to 300GHz) Your Motorola Two-Way Radio, which generates and radiates radio frequency (RF) Proceedings Safety Considerations for electromagnetic energy (EME), is designed to of SC211/8 Human Exposure to E.M.F.s... -
Page 19: Electromagnetic Interference/Compatibility
ELECTROMAGNETIC OPERATIONAL WARNINGS INTERFERENCE/COMPATIBILITY W A R N I N G Note: Nearly every electronic device is Vehicles with an Air Bag susceptible to electromagnetic Do not place a radio in the area over an air bag interference (EMI) if inadequately or in the air bag deployment area. -
Page 20: Blasting Caps And Blasting Areas
Blasting Caps and Blasting Areas Mobile Radio Operation and EME Exposure To avoid possible interference with blasting To assure optimal radio performance and that operations, turn off your radio when you are human exposure to radio frequency near electrical blasting caps, in a blasting area, electromagnetic energy is within the guidelines or in areas posted: “Turn off two-way radio.”... -
Page 21: Mobile Antenna Installation
Product Accessories One (1) Year Motorola, at its option, will at no charge either Note: Refer to Table 1 on page 17 for rated repair the Product (with new or reconditioned power and minimum distant values for parts), replace it (with a new or reconditioned transmitting antennas. - Page 22 MOTOROLA BE LIABLE FOR DAMAGES IN for any ancillary equipment not furnished by EXCESS OF THE PURCHASE PRICE OF THE MOTOROLA which is attached to or used in PRODUCT, FOR ANY LOSS OF USE, LOSS OF connection with the Product, or for operation of...
- Page 23 Product to verify any warranty service location. Warranty service will be claim. provided by Motorola through one of its Product which has had the serial number authorized warranty service locations. If you first removed or made illegible.
- Page 24 PATENT AND SOFTWARE PROVISIONS: over the lifetime of the Product or parts as established by MOTOROLA. MOTOROLA will defend, at its own expense, any MOTOROLA will have no liability with respect to suit brought against the end user purchaser to the...
- Page 25 MOTOROLA patent rights or copyrights. VI. GOVERNING LAW: This Warranty is governed by the laws of the State of Illinois, USA. English...
- Page 26 HLN8097‘ Removable Slide Mount Many of the available accessories are listed RLN4779 Key Lock Mount below. For a complete list, see your Motorola RLN4782 DIN Mounting Kit (in dash) dealer. RKN4077 Remote Mount Cable - 3 m...
- Page 27 ANTENNAS CONTROL STATION HAD4006A VHF 136-144 MHz, 1/4 Wave Roof Mount GPN6145 Desktop Power Supply 1-25W (EMC) HAD4007A VHF 146-150.8 MHz, 1/4 Wave Roof HPN4002 Desktop Power Supply 1-25W Mount GPN6149 Desktop Power Supply 25-45W (EMC) HAD4008A VHF 150.8-162 MHz, 1/4 Wave Roof HPN4001 Desktop Power Supply 25-45W Mount...
- Page 28 1. Turn radio on and select appropriate channel. ™ 2. Press PTT, hold the microphone 1 to 2 inches (2.5 to 5 cm) from your mouth, PRO3100 Quick Reference Card and speak clearly into it. 3. Release PTT to listen.
- Page 29 A, Motorola, Radios Profesionales, Serie PRO, PRO3100, y Call Alert son marcas de Motorola, Inc. © 1999 Motorola, Inc. Todos los derechos reservados. Impreso en los EE.UU. A, Motorola, R‡dios Profissionais, SŽrie PRO, PRO3100, e Call Alert s‹o marcas da Motorola, Inc.