LG LWS3081ST User's Manual & Cooking Manual
Electric convection built-in oven
Hide thumbs
Also See for LWS3081ST:
- User's manual & cooking manual (42 pages) ,
- Guía del usuario (42 pages) ,
- Installation manual (29 pages)
Table of Contents
Advertisement
Quick Links
L CTRIC CONV CTION
BUILT-IN OV N
Please read this guide thoroughly before operating
and keep it handy for reference at all times.
HORNO LƒTRICO D
CONV CCIîN MPOTRADO
GUêA D USUARIO Y
Lea esta guía con detenimiento antes de utilizar el
aparato y manténgala a mano para referencia en
FOUR ƒL CTRIQU A
CONV CTION NCASTRABL
MANU L D'UTILISATION T
MANU L D CUISSON
Veuillez lire ce manuel avec attention avant
d'utiliser cet appareil et gardez-le à portée de main
pour toute référence en cas de besoin.
Model/Modelo/Modèle
P/No. MFL51224502
Printed In Korea
Impreso en Korea
Imprimé en Corée
US RÕS GUID &
COOKING GUID
D COCCIîN
todo momento.
LWS3081ST
To contact LG Electronics
24 hours a day, 7 days a week:
1-800-243-0000 (U.S.A.)
1-888-542-2623 (Canada)
Or visit us on the Web at:
us.lge.com (U.S.A) or ca.lge.com (Canada)
Para comunicarse con LG Electronics
24 horas al día, 7 días a la semana:
1-800-243-0000 (EE.UU.)
1-888-542-2623 (Canadá)
O visítenos en la Web en:
us.lge.com (EE.UU.) o ca.lge.com (Canadá)
Pour contacter LG Electronics
24h/24 et 7jours/7 :
1-800-243-0000 (U.S.A.)
1-888-542-2623 (Canada)
Ou consultez notre site Internet au :
us.lge.com (U.S.A) ou ca.lge.com (Canada)
Advertisement
Table of Contents

Related Manuals for LG LWS3081ST


Summary of Contents for LG LWS3081ST
- Page 1 1-800-243-0000 (U.S.A.) 1-888-542-2623 (Canada) Or visit us on the Web at: us.lge.com (U.S.A) or ca.lge.com (Canada) Para comunicarse con LG Electronics 24 horas al día, 7 días a la semana: 1-800-243-0000 (EE.UU.) 1-888-542-2623 (Canadá) O visítenos en la Web en: us.lge.com (EE.UU.) o ca.lge.com (Canadá)
-
Page 2: Table Of Contents
Warranty for customers in the U.S.A..39 Warranty for customers in Canada ...40 THANK YOU! Congratulations on your purchase and welcome to the LG family. Your new LG Built-In Oven combines precision cooking features with simple operation and stylish design. Follow the operating and care... -
Page 3: Safety Precautions
READ ALL INSTRUCTIONS BEFORE USE This is the safety alert symbol. This symbol alerts you to potential hazards that can kill or hurt you and others. All safety messages will follow the safety alert symbol and either the word WARNING or CAUTION. These words mean: WARNING This symbol will alert you to hazards or unsafe practices which could cause serious bodily harm or death. -
Page 4: Electrical Safety
READ ALL INSTRUCTIONS BEFORE USE SAFETY PRECAUTIONS • Be certain all packing materials are removed from the appliance before operating. Keep plastics, clothes, and paper away from parts of the appliance that may become hot. • DO NOT force the door open. This can damage the automatic door locking system. -
Page 5: Safety During Use
READ ALL INSTRUCTIONS BEFORE USE SAFETY DURING USE • Oven Racks. Always place oven racks in desired position while oven is cool. • Always use pot holders or oven mitt when removing food from the oven. You can be burned because cookware and plates will be hot. -
Page 6: Safety When Cleaning
READ ALL INSTRUCTIONS BEFORE USE SAFETY WHEN CLEANING • Do Not Clean Door Gasket. The door gasket is essential for a good seal. Care should be taken not to rub, damage, or move the gasket. • Do Not Use Oven Cleaners. No commercial oven cleaner or oven liner protective coating of any kind should be used in or around any part of the oven. -
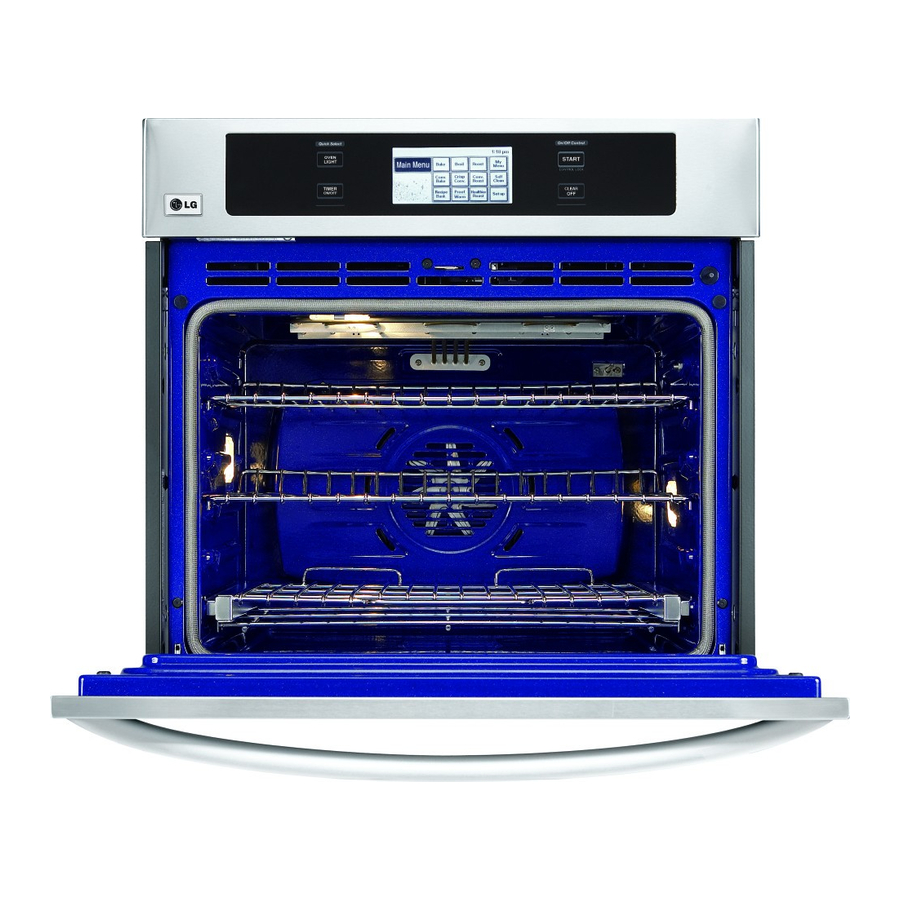
Page 7: Parts And Features
PARTS AND FEATURES Control panel Model & serial number plate Spacer (2 ea) - One on each side Metal bottom trim Grid Standard racks (2 ea) Broiler pan Telescopic rack (1 ea) Door switch Door latch Meat probe Broiler pan & Grid Standard racks (2 ea) Gasket Telescopic rack... -
Page 8: Control Panel Features
CONTROL PANEL FEATURES READ THE INSTRUCTIONS CAREFULLY BEFORE USING THE OVEN. For satisfactory use of your oven, become familiar with the various features and functions of the oven as described below. OVEN LIGHT: Use to turn the oven lights on and off. START: Use to start all oven features. -
Page 9: Initial Set Up
INITIAL SET UP When the oven is first powered ON, the oven needs to be programmed for the language and time of day. To set the language (example below for English display) Touch English. Then Set up 11:35 am Language Back English Español Français... -
Page 10: Language Selection
The following options can be found by touching SET UP on the main menu. LANGUAGE SELECTION English, French or Spanish can be set as the display language. To set language selection Set up TEMPERATURE UNIT The oven control can be set up to display temperatures in Fahrenheit or Celsius. To set temperature unit. -
Page 11: Sound Volume
SOUND VOLUME (MUTE, NORMAL OR LOUD) The sound volume feature allows you to adjust the volumes to a more acceptable volume. There are three possible volume levels. To set sound volume Touch Set Up. Set up Touch 4 for changing sound volume. -
Page 12: Temperature Adjustment
TEMPERATURE ADJUSTMENT The oven cavity temperature can be adjusted if it is running too hot or too cool. If needed, the temperature can be adjusted +/- 35 degrees. NOTE: The temperature adjustments made with this feature will change Bake, Convection Bake, Convection Roast, and Crisp Convection temperature. -
Page 13: Timer On/Off
TIMER ON/OFF The TIMER ON/OFF serves as an extra timer in the kitchen that will beep when the set time has run out. It does not start or stop cooking. The TIMER ON/OFF feature can be used during any of the other oven control functions. -
Page 14: Telescopic Rack
TELESCOPIC RACK The sliding shelf telescopic rack can be used in any rack position. Open Position A. Telescopic rack B. Frame Closed and Engaged Position A. Telescopic rack B. Frame CAUTION • DO NOT cover racks with aluminum foil. - This will result in poor baking caused by interrupted heat distribution. -
Page 15: Bake
BAKE The oven can be programmed to bake at any temperature from 170˚F (77˚C) to 550˚F (288˚C). Default temperature is 350˚F (177˚C). To set the Bake Temperature to 375˚F Touch CLEAR/OFF. The display will show the main menu. Touch Bake. 350˚F will Bake appear in the display. -
Page 16: Timed Bake
TIMED BAKE The oven will turn on immediately and bake for a selected length of time. At the end of the cooking time, the oven will turn off automatically. To set the oven to begin cooking immediately and shut off automatically: (example below to bake at 375˚F for 30 minutes): Touch CLEAR/OFF. -
Page 17: Delayed Timed Bake
DELAYED TIMED BAKE The automatic timer of the Delayed Timed Bake will turn the oven ON and OFF at the time you select in advance. To set the oven for a Delayed Start . (example for baking at 375˚F for 30 minutes and starting at 4:30 pm): Be sure that the clock is set with the correct time of day. -
Page 18: Broil
BROIL Broiling uses an intense, radiant heat to cook food. Both the inner and outer broil elements heat during full broiling. Only the inner broil element heats during center broiling. The element(s) cycle on and off in intervals to maintain the oven temperature. The meat probe cannot be used with this mode. -
Page 19: Recommended Broiling Guide
RECOMMENDED BROILING GUIDE Quantity and/ or Food Thickness Ground Beef 1 lb. (4 patties) Well Done 1/2 to 3/4” thick Beef Steaks Rare 1” thick Medium 1 to 1-1/2 lbs. Well Done Rare 1-1/2” thick Medium 2 to 2-1/2 lbs. Well Done Chicken 1 whole cut up... -
Page 20: Roast
ROAST The oven can be programmed to roast. The meat probe may be used in this feature. To set the Roast feature (example for Meats to cook at 375˚F): Touch CLEAR/OFF. Touch Roast. Roast Touch 3, 7, and 5. Touch START. NOTE: After any cooking cycle has been completed cooling fans will operate to protect the control panel. -
Page 21: Convection Bake
CONVECTION BAKE Benefits of Convection Bake: Some foods cook up to 25 to 30% faster, saving time and energy. Multiple rack baking. No special pans or bakeware needed. Convection baking uses a fan to circulate the oven’s heat evenly and continuously within the oven. This improved heat distribution allows for even cooking and excellent results using multiple racks at the same time. -
Page 22: Crisp Convection
CRISP CONVECTION Benefits of Crisp Convection: This crisp convection feature is best for light colored and delicate baked goods like cakes, tarts, cookies, puff pastries, scones, muffins, biscuits, free from yeast breads etc. The fan circulated hot air continually distributes heat more evenly than the natural movement of air in a standard thermal oven. -
Page 23: Convection Roast
CONVECTION ROAST This Convection Roast feature is designed to give optimum cooking performance for roasting meats and poultry. Preheating is not necessary for meats and poultry. Heated air circulates around the food from all sides, sealing in juices and flavors. Foods are crispy brown on the outside while staying moist on the inside. -
Page 24: Recipe Bank
RECIPE BANK The Recipe bank features 100 recipes, with 10 categories, for the at home chef. Preset cooking cycles are available on many of these recipes. To set the Recipe Bank feature for an automatic cooking (example Black Bean and Avocado Crostini): 11:35 am Main Menu... -
Page 25: Proof
PROOF The proof feature maintains a warm environment useful for rising yeast-leavened products. The proof feature automatically provides the optimum temperature for the proof process, and therefore does not have a temperature adjustment. Touch START without touching the numeric keys if you don’t want to set a specific proofing time. -
Page 26: Healthier Roast
HEALTHIER ROAST This Healthier Roast feature is designed to give cooking results of low fat, low calorie for roasting meats and poultry. Healthier Roasting can reduce the fat up to 20% compared to regular roasting. Fat reduction rate may vary according to the kinds or cuts of meat. -
Page 27: My Menu
MY MENU My Menu feature is used to record and recall your favorite recipe settings. This feature may store and recall up to 10 different settings. The My Menu setting may be used with Timed Bake feature. This feature will not work with any other function including Delay Timed Cook feature. -
Page 28: Cook & Warm
COOK & WARM The Cook & Warm feature can only be used with Timed Cook or Delayed Timed Cook feature. This feature is not designed to reheat cold foods. This feature will maintain an oven temperature of 170˚F. This feature will keep cooked foods warm for serving up to 3 hours. -
Page 29: Control Lock Feature
MEAT PROBE (cont.) To change the Meat Probe temperature during cooking: Touch Options. Options Probe Touch Probe Temp. Temp. Clear Set the probe temperature Touch START. IMPORTANT NOTE: Touch CLEAR/OFF to cancel Meat Probe at any time. To avoid breaking the probe, make sure food is completely defrosted before inserting. -
Page 30: Self-Clean
SELF-CLEAN The self-clean cycle uses above normal cooking temperatures to clean the oven’s interior automatically. It is normal for smoking to occur during cleaning if the oven is heavily soiled. It is better to clean the oven regularly rather than to wait until there is a heavy build-up of soil in the oven. - Page 31 SELF-CLEAN (cont.) This SELF-CLEAN key is used to start a self-clean cycle. When used with Start Time key, a delayed self- clean cycle may also be programmed. The self-clean function has cycle times of 2 (Light), 3 (Normal) or 4 (Heavy) hours.
- Page 32 SELF-CLEAN To change the setting during the operation of this self-clean feature: 11:35 am Touch Options. Self Clean Clean Level Clean Time Normal Options Touch Light for light soil or Light Normal Heavy Normal for average soil or 2Hours 3Hours 4Hours Heavy for heavy soil.
-
Page 33: Care & Cleaning
CARE & CLEANING Changing the Oven Light The oven light is a standard 10-watt halogen bulb for ovens. To replace lamps located on the side wall: • Make sure oven and bulb are cool. 1. Unplug oven or disconnect power. 2. -
Page 34: Care & Cleaning
CARE & CLEANING Broiler Pan and Grid Do not clean the broiler pan or grid in a self- cleaning mode. After broiling, remove the broiler pan from the oven. Remove the grid from the pan. Carefully pour out the grease from the pan into a proper container. Wash and rinse the broiler pan and grid in hot water with a soap-filled or plastic scouring pad. -
Page 35: Removing & Replacing The Lift-Off Oven Door
REMOVING & REPLACING THE LIFT-OFF OVEN DOOR CAUTION • Be careful when removing and lifting the door. • DO NOT lift the door by the handle. - The door is very heavy. To remove the door: Step. 1 Open the door fully. Slot Step. -
Page 36: Before Calling For Service
BEFORE CALLING FOR SERVICE Before you call for service, review this list. It may save you time and expense. The list includes common occurrences that are not the result of defective workmanship or materials in this appliance. Problem Oven control beeps and displays any F code error. - Page 37 BEFORE CALLING FOR SERVICE Problem Food does not • Oven controls improperly set. bake or roast - See the using the oven section. properly • Rack position is incorrect or the rack is not level. - See the using the oven section. •...
- Page 38 BEFORE CALLING FOR SERVICE Problem Oven not clean after a self clean cycle DOOR LOCKED icon are on when you want to cook Burning or oily odor emitting from the vent Cooling fan continues to run after oven is turned Warm air venting into kitchen after oven has been...
-
Page 39: Warranty For Customers In The U.s.a
LG ELECTRIC OVEN LIMITED WARRANTY – USA LG Electronics Inc. will repair or replace your product, at LG’s option, if it proves to be defective in material or workmanship under normal use, during the warranty period set forth below, effective from the date of original consumer purchase of the product. -
Page 40: Warranty For Customers In Canada
LG ELECTRIC OVEN LIMITED WARRANTY – CANADA LG Electronics Inc. will repair or replace your product, at LG’s option, if it proves to be defective in material or workmanship under normal use, during the warranty period set forth below, effective from the date of original consumer purchase of the product. - Page 41 MEMO...