Table of Contents
Advertisement
Advertisement
Table of Contents

Related Manuals for Lenovo ThinkPad USB 3.0 Dock


Summary of Contents for Lenovo ThinkPad USB 3.0 Dock
- Page 1 User Guide ThinkPad USB 3.0 Dock...
- Page 2 Note: Before installing the product, be sure to read the warranty information in Appendix B “Lenovo Limited Warranty” on page 23. First Edition (May 2012) © Copyright Lenovo 2012. LIMITED AND RESTRICTED RIGHTS NOTICE: If data or software is delivered pursuant a General Services Administration...
-
Page 3: Table Of Contents
Installing the device driver on Windows operating systems ....Appendix B. Lenovo Limited Uninstalling the device driver from Windows Warranty....23 operating systems . - Page 4 User Guide...
-
Page 5: Chapter 1. About The Thinkpad Usb 3.0 Dock
Chapter 1. About the ThinkPad USB 3.0 Dock This chapter contains the product description, locations of controls, and system requirements for the ® ThinkPad USB 3.0 Dock (hereafter called the dock). Product description The dock is a portable expansion module that enables you to easily connect your notebook computer to the Ethernet and multiple devices, such as a headset, a microphone, and Universal Serial Bus (USB) devices. -
Page 6: Locating The Controls
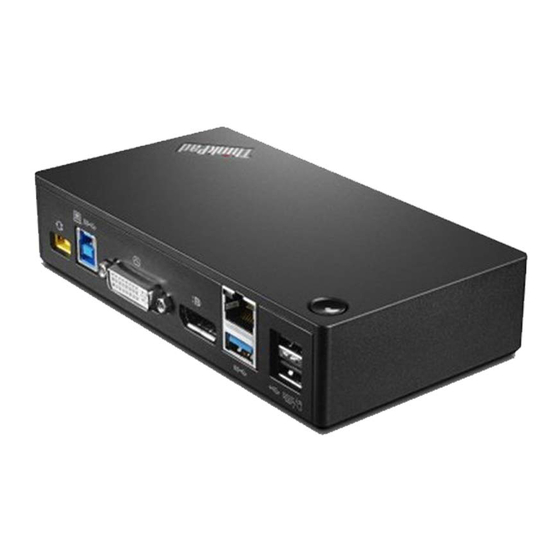
Locating the controls The following figure shows the locations of controls on the dock. Figure 1. Overview of the dock Power and connection indicator Used to indicate whether the dock is powered on normally. Headset and microphone combo Used to connect a microphone, a headset, or a speaker. jack Front panel super speed USB 3.0 Used to connect USB devices (USB 1.0, USB 1.1, USB 2.0, and USB 3.0... -
Page 7: System Requirements
• 1 GB of memory • 1.6 GHz of dual-core Central Processing Unit (CPU) • 30 MB of free space on the hard disk drive on which you want to install the device driver Chapter 1 About the ThinkPad USB 3.0 Dock... - Page 8 User Guide...
-
Page 9: Chapter 2. Installing The Dock
USB 3.0 cable. To connect the dock to your notebook computer, do the following: 1. Connect the power adapter to the power cord. Figure 2. Connecting the power adapter to the power cord © Copyright Lenovo 2012... -
Page 10: Installing The Device Driver On Windows Operating Systems
2. Connect the dc-in connector of the power adapter to the dock. 3. Connect the power plug of the power cord to an electrical outlet. Press the power button to turn on the dock. Note: Be sure to correctly connect the dock to the power supply. If the dock is not powered on, you will not be able to use the dock. -
Page 11: Uninstalling The Device Driver From Windows Operating Systems
To uninstall the device driver, do the following: 1. Exit all applications that use the dock. 2. Click Start ➙ All Programs ➙ ThinkPad USB 3.0 Dock ➙ Uninstall ThinkPad USB 3.0 Dock. 3. Follow the instructions on the screen to uninstall the device driver. - Page 12 User Guide...
-
Page 13: Chapter 3. Using The Dock
1. Most of the mobile devices can be charged by the USB 3.0 connector with battery charging function, but some devices with special configuration might not be charged. 2. The charging time varies depending on the device configuration and the environment. © Copyright Lenovo 2012... -
Page 14: Using The Video Output Connectors
Using the video output connectors The video output connectors on the dock consist of one DVI-D video output connector and one DVI-I video output connector. You can simultaneously connect two external monitors to the dock using the two video output connectors. You do not have to disconnect the dock from your notebook computer each time when you connect the external monitors to the video output connectors. -
Page 15: Chapter 4. Working With The Dock
If you are simultaneously connecting two external monitors to your notebook computer using the dock, click the ThinkPad USB 3.0 Dock icon in the Windows notification area, and you might see menus named as 2. ThinkPad USB 3.0 Dock or 4. ThinkPad USB 3.0 Dock. The serial numbers at the beginning of the menus are automatically and randomly assigned by the Windows operating system, which can help you match the menus with the corresponding monitors. -
Page 16: Mirror Mode
• Keeping the desktop on one display and watching videos on the other(s) To enter extend mode, do the following: 1. Click the ThinkPad USB 3.0 Dock icon in the Windows notification area. A pop-up menu opens. 2. Select ThinkPad USB 3.0 Dock, and then select one from the following: •... -
Page 17: Working With The Dock Utility
To enter single-display mode, do the following: 1. Click the ThinkPad USB 3.0 Dock icon in the Windows notification area. A pop-up menu opens. 2. Select ThinkPad USB 3.0 Dock ➙ Notebook Monitor Off or Off. To exit single-display mode, do the following: 1. -
Page 18: Optimizing The Video Playback Quality
To optimize the video playback quality, do the following: 1. Click the ThinkPad USB 3.0 Dock icon in the Windows notification area. A pop-up menu opens. 2. Select ThinkPad USB 3.0 Dock ➙ Optimize for Video. Note: This setting is not supported in the Windows XP operating system. -
Page 19: Setting The Resolution Of The External Monitor
In extend mode and single-display mode, you can set the resolution of the external monitor by doing the following: 1. Click the ThinkPad USB 3.0 Dock icon in the Windows notification area. A pop-up menu opens. 2. Select ThinkPad USB 3.0 Dock ➙ Screen Resolution, and then select the desired screen resolution option for the external monitor. - Page 20 Table 1. Supported resolutions and refresh rates (continued) Resolution Refresh rate (Unit: Hz) 1024 x 768 60, 70, 75, 85 1152 x 864 1152 x 870 1280 x 720 50, 60 1280 x 768 60, 75, 85 1280 x 800 1280 x 960 60, 85 1280 x 1024...
-
Page 21: Chapter 5. Troubleshooting
Note: For the connection of the VGA connector, ensure that the DVI-I to VGA adapter also is secured by the screws on both sides of it. • If the problem persists, disconnect all connections of the dock, and uninstall the dock device driver. Then, reinstall the dock and the device driver. © Copyright Lenovo 2012... - Page 22 You cannot hear anything through your notebook computer speakers or you cannot use the audio connectors on the notebook computer. ® By default, ThinkPad and other Lenovo notebook computers use the headset and microphone combo jack on the dock and disable built-in audio connectors when the dock is connected.
- Page 23 To enable the built-in audio connectors on your notebook computer, depending on the operating system you are using, do one of the following: For the Windows XP operating system: 1. Right-click the volume icon in the Windows notification area. 2. Select Adjust Audio Properties, and the Sound and Audio Devices Properties window is displayed. 3.
- Page 24 User Guide...
-
Page 25: Appendix A. Service And Support
Product replacement assistance or exchange of defective components also is available during the warranty period. In addition, if your option is installed in a Lenovo computer, you might be entitled to service at your location. A Lenovo technical support representative can help you determine the best alternative. - Page 26 User Guide...
-
Page 27: Appendix B. Lenovo Limited Warranty
Lenovo. The warranty period and type of warranty service that apply to your product are as specified in “Part 3 - Warranty Service Information” below. This warranty only applies to products in the country or region of purchase. - Page 28 If the Service Provider determines that it is unable to either repair or replace your product, your sole remedy under this Limited Warranty is to return the product to your place of purchase or to Lenovo for a refund of your purchase price.
-
Page 29: Part 2 - Country-Specific Terms
Limitation of Liability Lenovo is responsible for loss or damage to your product only while it is in the Service Provider’s possession or in transit, if the Service Provider is responsible for the transportation. Neither Lenovo nor the Service Provider is responsible for loss or disclosure of any data, including confidential information, proprietary information, or personal information, contained in a product. - Page 30 Use of Personal Contact Information: Lenovo will not be able to perform our service under this warranty if you refuse to provide your information or do not wish us to transfer your information to our agent or contractor. You have the right to access your personal contact information and request correction of any errors in it pursuant to the Privacy Act 1988 by contacting Lenovo.
- Page 31 Use of Personal Information: Lenovo will not be able to perform our service under this warranty if you refuse to provide your information or do not wish us to transfer your information to our agent or contractor. You have the right to access your personal information and request correction of any errors in it pursuant to the Privacy Act 1993 by contacting Lenovo (Australia &...
-
Page 32: Part 3 - Warranty Service Information
(International) B.V., Floor 2, Einsteinova 21, 851 01, Bratislava, Slovakia. Service under this warranty for Lenovo hardware products purchased in EEA countries may be obtained in any EEA country in which the product has been announced and made available by Lenovo. -
Page 33: Suplemento De Garantía Para México
Lenovo. Transportation charges, both ways, shall be at Lenovo’s expense. If you fail to use the carton in which the replacement product was received, you may be responsible for any damage to the failed product occurring during shipment. - Page 34 Para obtener una lista de los Centros de servicio autorizados, por favor, visite: http://www.lenovo.com/mx/es/servicios Importado por: Lenovo México S. de R.L. de C.V. Av. Santa Fe 505, Piso 15 Col. Cruz Manca Cuajimalpa, D.F., México C.P.
-
Page 35: Appendix C. Electronic Emission Notices
• Consult an authorized dealer or service representative for help. Lenovo is not responsible for any radio or television interference caused by using other than specified or recommended cables and connectors or by unauthorized changes or modifications to this equipment. - Page 36 Geräte der Klasse B. Dieses Gerät ist berechtigt, in Übereinstimmung mit dem Deutschen EMVG das EG-Konformitätszeichen - CE - zu führen. Verantwortlich für die Konformitätserklärung nach Paragraf 5 des EMVG ist die Lenovo (Deutschland) GmbH, Gropiusplatz 10, D-70563 Stuttgart. Informationen in Hinsicht EMVG Paragraf 4 Abs. (1) 4: Das Gerät erfüllt die Schutzanforderungen nach EN 55024 und EN 55022 Klasse B.
- Page 37 Japan compliance statement for products which connect to the power mains with rated current less than or equal to 20 A per phase Lenovo product service information for Taiwan Appendix C. Electronic emission notices...
- Page 38 User Guide...
-
Page 39: Appendix D. Notices
Lenovo representative for information on the products and services currently available in your area. Any reference to a Lenovo product, program, or service is not intended to state or imply that only that Lenovo product, program, or service may be used. Any functionally equivalent product, program, or service that does not infringe any Lenovo intellectual property right may be used instead. -
Page 40: Recycling Information For Brazil
A Lenovo possui um canal específico para auxiliá-lo no descarte desses produtos. Caso você possua um produto Lenovo em situação de descarte, ligue para o nosso SAC ou encaminhe um e-mail para: reciclar@lenovo.com, informando o modelo, número de série e cidade, a fim de enviarmos as instruções para o correto descarte do seu produto Lenovo. -
Page 41: Appendix E. Restriction Of Hazardous Substances Directive (Rohs)
People’s Republic of China. Turkish statement of compliance The Lenovo product meets the requirements of the Republic of Turkey Directive on the Restriction of the Use of Certain Hazardous Substances in Electrical and Electronic Equipment (EEE). Ukraine RoHS... - Page 42 User Guide...