
Related Manuals for Toro 07363


Summary of Contents for Toro 07363
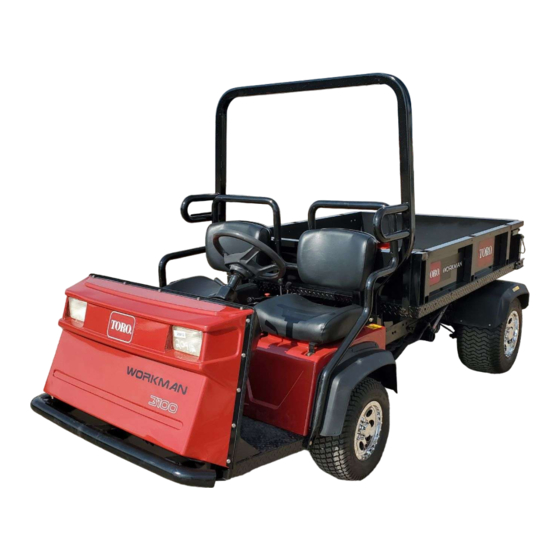
- Page 1 Form No. 3352–442 Rev C Workman 3100 Air Cooled Gas Utility Vehicle Model No. 07363—Serial No. 250000001 and Up Operator’s Manual English (EN)
-
Page 2: Table Of Contents
Check Interlock System ....The Toro General Commercial Products Warranty Operating Characteristics .... -
Page 3: Introduction
Whenever you need service, genuine Toro parts, or ANSI/NFPA 30 additional information, contact an Authorized Toro Distributor or Toro Customer Service and have the model • National Fire Protection Association: and serial numbers of your product ready. These numbers ANSI/NFPA #505; Powered Industrial Trucks... - Page 4 Keep replacement manual is available by sending complete nozzle in contact with container while filling. Remove model and serial number to: The Toro Company, 8111 equipment from vehicle bed before filling Lyndale Avenue South, Minneapolis, Minnesota 55420.
-
Page 5: While Operating
• Check the safety interlock system daily for proper – Use extra caution when operating vehicle on wet operation. If a switch should malfunction, replace the surfaces, at higher speeds or with a full load. switch before operating machine. After every two years, Stopping time will increase with a full load. - Page 6 Such use could void the product warranty of The TORO Company. Maintenance • This vehicle should not be modified without the TORO Company’s authorization. Direct any inquiries to The • Before servicing or making adjustments to the machine,...
-
Page 7: Safety And Instruction Decals
Safety and Instruction Decals Safety decals and instructions are easily visible to the operator and are located near any area of potential danger. Replace any decal that is damaged or lost. 93-9852 1. Warning—read the 2. Crushing hazard—install the Operator’s Manual. cylinder lock. - Page 8 93-9879 1. Stored energy hazard—read the Operator’s Manual. 106-2353 1. Electrical power 66-6840 106-2355 80-8040 1. Slow to fast 2. Transmission—third high; no fast speed 106-7897 1. The maximum load is 1019 kg, the vehicle weight is 795 kg, and the maximum gross vehicle weight is 1814 kg. 93-9449 1.
- Page 9 106-2352 1. Warning—do not operate the 3. Headlights 7. Battery –low charge 9. Hour meter vehicle on public streets, (Liquid cooled only) 4. Engine—low oil pressure 10. Off roads, or highways. 8. Temperature level 5. Engine—preheat indicator 11. On 2. Preheat–glow plug (Liquid cooled only) (Diesel only) (Diesel only)
- Page 10 106-2384 106-2377 1. Locked 6. Power take-off (PTO) 9. Entanglement hazard, 11. Extend hydraulics shaft—keep bystanders a 2. Differential lock 7. Disengage 12. Transmission—high speed safe distance from the 3. Unlocked 8. Warning—read the 13. Transmission—low speed vehicle. Operator’s Manual. 4.
- Page 11 106-7894 1. Engine—start 3. Headlights 2. Ignition 4. Power point 106-7767 1. Warning—read the 3. Wear the seat belt. Operator’s Manual. 4. Lean away from the 2. Avoid tipping the direction the machine is machine. tipping. 93-9448 1. Warning—when adding fuel to the tank, leave 25 mm between the fuel and the top of the tank;...
-
Page 12: Specifications
Specifications Note: Specifications and design subject to change without notice. General Specifications 4 wheel step through, out front operator style, two person vehicle. Certified to meet Type SAE J2258. Kohler, 4 cycle, air cooled, 23 hp @ 3600 rpm, 41.1 cu. in. (674 cc) displacement. Engine Mechanical fuel pump, 2 qt. - Page 13 Base Weight 1470 lbs. (Dry w/o flatbed) Rated Capacity 2,530 lbs. (includes 200 lb. operator, 200 lb. passenger and loaded attachment). Maximum. Gross Vehicle 4,000 lbs. Weight Tongue weight 200 lbs. Tow Capacity Maximum trailer weight 1,500 lbs. Ground Clearance 7”...
-
Page 14: Setup
Setup Note: Determine the left and right side of the machine from the normal operating position. Description Qty. ROPS frame Capscrew 1/2–13 x 3” lg. Mount ROPS (Rollover Protection System) Locknuts 1/2–13 Operator’s Manual (vehicle) Read before operating the machine. Parts Catalog Install ROPS Activate and Charge Battery... - Page 15 1. Loosen knobs securing battery cover to battery base and slide cover off. Figure 3 1. Positive (+) cable 2. Hold down Figure 2 6. Remove filler caps. Slowly add electrolyte to each cell 1. Battery cover 3. Battery base until level is up to fill ring.
-
Page 16: Full Bed Removal
Full Bed Removal 1. Start engine. Engage hydraulic lift lever and lower bed until cylinders are loose in slots. Release lift lever and turn off engine. 2. Remove lynch pins from outer ends of cylinder rod clevis pins (Fig. 4). Figure 5 1. - Page 17 2. Carefully set bed onto vehicle frame aligning rear bed pivot plate holes with holes in rear frame channel and install (2) clevis pins and lynch pins (Fig. 5). 3. With bed lowered, secure each cylinder rod end, to appropriate slots in bed mounting plates with clevis pin and lynch pin.
-
Page 18: Before Operating
2. Filler cap Fuel tank capacity is approximately 7 gallons. 3. The engine uses any high-quality detergent oil having The Toro Company Strongly Recommends The Use Of the American Petroleum Institute -API- “service Fresh, Clean, Unleaded Regular Grade Gasoline In classification”... -
Page 19: Check Transaxle / Hydraulic Fluid
2. Remove fuel tank cap. 3. Unscrew dipstick from top of transaxle and wipe it with a clean rag. Danger Under certain conditions, diesel fuel and fuel vapors are highly flammable and explosive. A fire or explosion from fuel can burn you and others and can cause property damage. -
Page 20: Check Brake Fluid
3. Fluid level should be up to FULL line on reservoir. Important When replacing tires, on the 4wd vehicle, only use replacements approved for the Workman. Use of tires not approved may cause turf damage or accelerated drive train damage. Check Brake Fluid The brake fluid reservoir is shipped from the factory filled with “DOT 3”... -
Page 21: Operation
Operation Caution Note: Determine the left and right side of the machine from Worn or misadjusted brakes may result in the normal operating position. personal injury. If brake pedal travels to within 1–1/2” of the vehicle floor board, the brakes must Controls be adjusted or repaired. -
Page 22: Ignition Switch
• Depress clutch pedal fully. • Move lever fully forward for High and fully rearward for Low. HIGH is for higher speed driving on level, dry surfaces with light loads. LOW is for low speed driving. Use this range when greater than normal power or control is required. -
Page 23: Horn Button
If oil level was low, but adding oil does not cause requires little or no choking. light to go out when engine is restarted, turn engine off immediately and contact your local TORO distributor for assistance. Passenger Hand Hold To check operation of warning lights: On dashboard (Fig. -
Page 24: Pre-Starting Checks
• Check all fluid levels and add the appropriate amount of 5. When vehicle gains enough speed, remove foot from Toro specified fluids, if any are found to be low. accelerator pedal, fully depress clutch pedal, move gear • Check brake pedal operation. -
Page 25: Stopping Engine
Stopping Engine Caution To stop engine, rotate ignition key to OFF and engage parking brake. Remove key from switch to prevent If safety interlock switches are disconnected or accidental starting. damaged the machine could operate unexpectedly causing personal injury. New Vehicle Break–in •... -
Page 26: Passengers
Many factors contribute to accidents. You have control over several of the most important. Your actions, such as driving too fast for conditions, braking too fast, turning too sharp, and combinations of these, are frequent cause of accidents. One of the major causes of accidents is fatigue. Be sure to take occasional breaks. -
Page 27: Braking
The TORO WORKMAN® is equipped with a roll bar, hip restraints, seat belts and hand hold. The ROPS system used... -
Page 28: Loading And Dumping
Loading And Dumping back, the front wheels can even come off of the ground when going over bumps or up a hill. This will result in a loss of steering and may lead to the vehicle tipping over. The weight and position of the cargo and passenger can change the vehicle center of gravity and vehicle handling. -
Page 29: Transporting Vehicle
In case of emergency, the vehicle can be towed for a short distance. However, Toro does not recommend this as a standard procedure. Control Lever Positions... - Page 30 Lower (Quick Coupler “B” Position) Important Check hydraulic oil level after installation of attachment. Check operation of attachment by cycling This position will lower the bed, rear hitch attachment or attachment several times to purge air from system, then apply pressure to quick coupler ”B”. This also allows return recheck hydraulic oil level.
- Page 31 Hydraulic Control Trouble Shooting: • Difficulty in connecting or disconnecting quick couplers. • Pressure not relieved (Quick coupler under pressure). • Power steering hard. • Hydraulic oil level low. • Hydraulic oil hot. • Pump not operating. • Hydraulic leaks. •...
-
Page 32: Maintenance
Maintenance Note: Determine the left and right side of the machine from the normal operating position. Service Interval Chart Lubrication The vehicle has grease fittings that must be lubricated regularly with No. 2 General Purpose Lithium Base Grease. If machine is operated under normal conditions, lubricate all bearings and bushings after every 100 hours of operation. - Page 33 Figure 27 Figure 25 Figure 28 Figure 26...
-
Page 34: Recommended Maintenance Schedule
Recommended Maintenance Schedule Maintenance Service Maintenance Procedure Interval After first 5 hours • Replace the engine oil and filter. • Check cable adjustments • Check pump drive belt tension After first 10 hours • Torque wheel lug nuts • Replace transaxle filter •... -
Page 35: Daily Maintenance Checklist
Daily Maintenance Checklist Duplicate this page for routine use. For the week of: Mon. Tues. Wed. Thurs. Fri. Sat. Sun. Maintenance Check Item Check the safety interlock operation. Check service and park brake operation. Check the fuel level. Check the accelerator operation Check the clutch and shifter operation Check the engine oil level. -
Page 36: Heavy Duty Operation
Caution If you leave the key in the ignition switch, someone could accidently start the engine and seriously injure you or other bystanders. Remove the key from the ignition before you do any maintenance. Heavy Duty Operation Warning Important If the vehicle is subjected to any of the conditions listed below, maintenance should be performed Before servicing or making adjustments to the twice as frequently:... -
Page 37: Jacking Vehicle
3. Push bed support onto cylinder rod, making sure 3. The jacking point at the front of the vehicle is under the support end tabs rest on end of cylinder barrel and on front center frame support and at the rear it is under the cylinder rod end (Fig. -
Page 38: Changing Engine Oil And Filter
Figure 34 1. Engine oil drain plug 2. Engine oil filter 4. Add oil to crankcase, refer to Check Engine Oil. Fuel System Fuel Lines and Connections Check lines and connections every 400 hours or yearly, whichever comes first. Inspect for deterioration, damage, or Figure 33 loose connections. -
Page 39: Removing Debris From Engine
Adjusting Choke 4. Remove clamps securing fuel filter to fuel lines. 5. Install new fuel filter to fuel lines with clamps 1. Raise bed and place safety support on extended lift previously removed. Filter to be mounted so arrow cylinder to hold up bed. Stop engine and engage points toward carburetor. -
Page 40: Adjusting Accelerator
Adjusting Accelerator pedal arm and top of diamond tread floor plate, when a 25 lb. force is applied to center of pedal. Tighten locknut. Check adjustment every 200 hours. 1. Position vehicle on level surface, stop engine and engage the parking brake. 2. -
Page 41: Replacing Transaxle Filter
Replacing Transaxle Filter Initially, replace the hydraulic filter after 10 operating hours, thereafter, replace filter every 800 hours. Use the Toro replacement filter (Part No. 54–0110). Important Use of any other filter may void the warranty on some components. -
Page 42: Adjusting Clutch Pedal
3. Loosen jam nuts securing yoke to master cylinder shaft 3. Adjust jam nuts/or ball joint until bottom rear edge of (Fig. 43). clutch pedal is 3.75” + .12” from top of floor plate diamond pattern, when an 4 lb. force is applied to pedal. 4. -
Page 43: Adjusting Parking Brake
3. Lift up on clutch pedal (Fig. 44) until it contacts frame. 4. Tighten set screw after adjustment has been attained. 4. Adjust clutch cable until ball joint end is aligned with 5. Install rubber grip onto parking brake lever. hole in clutch pedal pivot. -
Page 44: Adjusting Differential Lock Cable
Adjusting Differential Lock Front Wheel Toe Cable After every 400 operating hours or annually, check front wheel toe–out. Check adjustment every 200 hours. 1. Measure center–to–center distance (at axle height) at 1. Move differential lock lever to Off position. front and rear of steering tires. The measurement must be .25 $ .12“... - Page 45 • If engine will not crank, the load and box (attachment) must be removed to service engine or transaxle. Jumping Hydraulic System Caution Before servicing or making adjustments to the machine, stop engine, set parking brake and remove key from the switch. Any load material must be removed from bed or other attachment before working under raised bed.
-
Page 46: Fuses
Fuses Jump Starting Procedure The fuses for the machine’s electrical system are located Warning under the center of the dash panel. Jump starting can be dangerous. To avoid personal injury or damage to electrical components in vehicle, observe the following warnings: •... -
Page 47: Battery Storage
Battery Care negative post of the discharged battery. Connect it to the engine. Do not connect the jumper cable to the fuel system. 1. Battery electrolyte level must be properly maintained and the top of the battery kept clean. lf the machine is 4. -
Page 48: Hydraulic Schematic
Hydraulic Schematic... -
Page 49: Electrical Schematic
Electrical Schematic... -
Page 52: The Toro General Commercial Products Warranty
If for any reason you are dissatisfied with your Distributor’s service or have difficulty obtaining guarantee information, contact the Toro importer. If all other remedies fail, you may contact us at Toro Warranty Company.