
Related Manuals for Panasonic BM-ET300AE


Summary of Contents for Panasonic BM-ET300AE
-
Page 1: Operating Instructions
Iris Camera Operating Instructions BM-ET300AE Model No. REJECT ACCEPT Before attempting to connect or operate this product, please read these instructions carefully and save this manual for future use. - Page 2 You should note the serial number of this unit in the space provided and retain this book as a permanent record of your purchase to aid identification in the event of theft. Model No. BM-ET300AE Serial No. Directive...
-
Page 3: Important Safety Instructions
IMPORTANT SAFETY INSTRUCTIONS 1) Read these instructions. 2) Keep these instructions. 3) Heed all warnings. 4) Follow all instructions. 5) Do not use this apparatus near water. 6) Clean only with dry cloth. 7) Do not block any ventilation openings. Install in accordance with the manufacturer's instructions. 8) Do not use near any heat sources such as radiators, heat registers, stoves, or other apparatus (including amplifiers) that produce heat. -
Page 4: Table Of Contents
IMPORTANT SAFETY INSTRUCTIONS ... 3 PREFACE ... 5 FEATURES ... 6 NOTIFICATION ABOUT THIS DOCUMENT ... 7 TRADEMARKS ... 7 LIMITATION OF LIABILITY ... 7 DOCUMENT CONVENTION ... 8 PRECAUTIONS ... 9 MAJOR OPERATING CONTROLS AND THEIR FUNCTIONS ... 11 ■... -
Page 5: Preface
PREFACE Iris Camera BM-ET300AE is used in an access control system. The iris camera, which captures a user's iris image, is available for following uses. • As an enrollment camera for iris image capturing and iris server enrollment To activate iris recognition, it is necessary to capture the iris images of a user and enroll the iris data in the iris server. -
Page 6: Features
Iris cameras and the iris server can compose an access control system in combination with access control panels* readers* , and electric locks* These devices are independent to BM-ET300AE. • Supporting a common access control interface Recognition result outputs support Wiegand, which is one of the interfaces commonly used for access control systems. -
Page 7: Notification About This Document
These manuals are intended for system installers and administrators. • System installers and administrators should read the following manuals as well as this document. To set up iris cameras: BM-ET300AE Setup Manual, BM-ET300AE Software Installation Guide To use Administration Software BM-ES300AE: BM-ES300AE User's Manual These manuals are PDF documents contained on the CD-ROM that is supplied with Administration Software BM-ES300AE. -
Page 8: Document Convention
The setting in the administration software will determine whether to carry out server certifica- tion. User license software: Panasonic User License Software BM-EU30000E Series that is required to enroll iris data You need to purchase the software which supports the total number of users enrolled. -
Page 9: Precautions
Panasonic is NOT RESPONSIBLE FOR ANY CRIME OR TROUBLE CAUSED BY USING THIS UNIT. • In some cases, recognition or enrollment doesn’t work properly. - Page 10 • The camera settings are configured by the iris server. The operational setting of this appliance is configured by the optional Administration Software BM-ES300AE, which is to be installed in the iris server. Depending on the settings, the voice guidance will not be output or the live indicator will be off at all times.
-
Page 11: Major Operating Controls And Their Functions
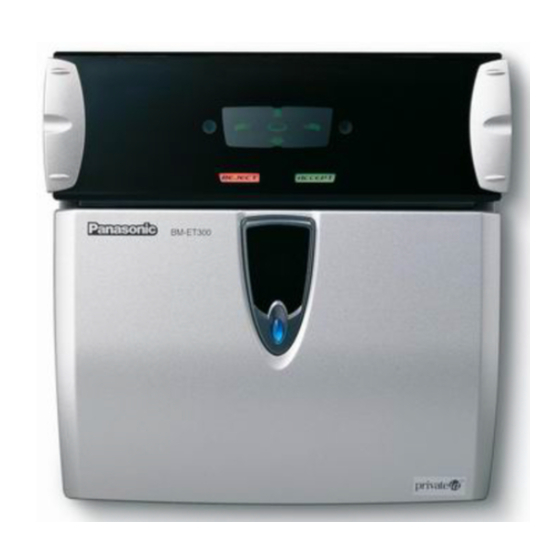
MAJOR OPERATING CONTROLS AND THEIR FUNCTIONS ■ External View ● Front View q Mirror This mirror is used for eye positioning at the time of iris data enrollment/recognition. View the mirror from the front side where you can position both eyes in the mir- ror. -
Page 12: Rear View
■ Rear View Remove the cable hole cover by loosening the screws with a Phillips screwdriver. System Instruction * Refer to the setup manual (PDF file) supplied to the administration software. ■ Internal View ● Front View Connection terminal Front tamper detection switch Cable hole Video cable... -
Page 13: Connection Terminal
● Connection terminal Pin No. Not in use Not in use q Wiegand power (card reader) Supplies power to a card reader. w Wiegand GND (card reader) This is the ground terminal for the power supply and communication between the iris camera and a card reader. -
Page 14: Specifications Of Wiegand Connectors (For Card Reader)
SPECIFICATIONS OF WIEGAND CONNECTORS (FOR CARD READER) Pin No. Port Name POWER DATA 0 DATA 1 SPECIFICATIONS OF WIEGAND CONNECTORS (FOR ACCESS CONTROL PANEL) Pin No. Port Name POWER DATA 0 DATA 1 Note: This port is for wiring designation convenience only. SPECIFICATIONS OF ALARM OUTPUT CONNECTORS Pin No. -
Page 15: Installation And Connections
System Instruction Wiegand REJECT ACCEPT Wiegand Card Reader * BM-ET300AE (for recognition) Wiegand REJECT ACCEPT Wiegand Card Reader * BM-ET300AE (for recognition) * These products are independent to BM-ET300AE. Access Control Access Control Server * Panel * Electric Lock*... -
Page 16: Preparation
■ Preparation Prepare the following items before the installation. The necessary items and their lengths differ depending on situation. ● Preparing the Necessary Items Item Power cable Coaxial cable LAN cable Anchor bolt * Only cables without connector covers are usable. Note: When you use the alarm output and Wiegand terminals, you need optional cables suited for the connectors of the exter- nal devices. -
Page 17: Installation Space And Recognition Range
Keep the iris camera away in the following, in addition to the above surroundings. • Vibration (It may cause invalid iris image capturing and recognition. It may also cause other trouble or damage.) • Places whose humidity is not between 30 % and 80 % and whose temperature is not between 0 °C and 40 °C {between 32 °F and 104 °F}. -
Page 18: Installation
■ Installation Cautions: • Mount the iris camera to the flat and firm wall with the supplied mounting bracket. Besides, secure the iris camera and bracket with the supplied mounting screw, at the time of the mounting. Otherwise, it may cause dropping, trouble or injury. - Page 19 3. When you use the built-in video surveillance camera, connect the video cable of the video surveillance cam- era to the BNC connector of the video input cable con- nected to an external device (for example, a digital disk recorder). Video cable Coaxial cable from a connected device...
-
Page 20: Instructions For Proper Enrollment And Recognition
INSTRUCTIONS FOR PROPER ENROLLMENT AND RECOGNITION You (user) should follow the instructions mentioned in this page for proper enrollment and recognition. • Open your eyes as wide as you can so as not to hide the irises with eyelids and eyelashes. Not preferable •... -
Page 21: Operating Procedures (Instructions For Iris Camera Users)
OPERATING PROCEDURES (INSTRUCTIONS FOR IRIS CAMERA USERS) This section explains how to use the iris camera, register the iris data in the iris server, and recognize yourself with a recogni- tion camera in the following order. • How to position your eyes in the mirror This is a fundamental operating procedure. - Page 22 2. Hold the tilt handles at the sides of the front panel. Keep bending your arms moderately while holding the handles. 3. Make sure that you can see both eyes in the mirror. When the eyes are not positioned in the mirror, move to the point where you can see the eyes in the mirror or adjust the angle of the front panel by holding the tilt handles.
-
Page 23: If You Have Difficulty In Eye Positioning
7. Overlap your eyes on the "two" ellipse symbols by moving the front panel slowly, according to the voice guidance and/or guide indicator. This iris camera guides your eye position with voice guidance and/or guide indicator. ■ If You Have Difficulty in Eye Positioning When trying the procedure of "How to Position Your Eyes in the Mirror"... -
Page 24: How To Carry Out Enrollment
■ How to Carry out Enrollment The following is how to control the iris camera when your (the user's) iris data is enrolled in the iris server. Notes: • Follow the direction of system administrators or operators when you carry out enrollment. •... - Page 25 When your eyes are positioned within the capturing range, all the allow symbols will light up, and your eyes will be captured four times. Keep your eyes opened widely during your iris image capturing. After your iris image has been captured four times, take your eyes off the mirror.
-
Page 26: How To Carry Out Recognition
■ How to Carry out Recognition The following is how to control the iris camera when a user (you), whose iris data has been enrolled in the iris server, carries out recognition. This document will explain about: • Recognition by an iris camera only •... - Page 27 When your eyes are positioned within the capturing range, all the allow symbols will light up, and your eyes will be captured. During capturing, open your eyes widely. After your iris image has been captured, take your eyes off the mirror.
- Page 28 ● Recognition by an Iris Camera and a Card Reader Stand (Sit down) in front of the iris camera. Follow the directions by system administrators or operators. Pass a card through the card reader. Note: If the card reader is a non-contact type, position the card close to the card reader. Move your face so that your eyes are positioned within 50 cm {1.64 ft.} from the iris camera.
- Page 29 After your iris image has been captured, take your eyes off the mirror. The recognition result is announced by a result indicator. • When you are recognized as an enrolled user, "ACCEPT" will light • The voice guidance will say, "Identification completed." It will take approx.
-
Page 30: Troubleshooting
TROUBLESHOOTING ■ When Enrollment/Recognition Becomes Invalid When iris data enrollment/recognition becomes invalid or takes too much time, check to see the following. If the trouble cannot be corrected even after checking and trying the remedy, refer to the system administrator. Check item You may not open your eyes widely enough during captur-... -
Page 31: Before Requesting For Repair
Check item The contact lenses may have not been on the appropriate position. You may have been wearing colour contact lenses. ● Cases of Enrollment/Recognition Failure • You have closed your eyes or not opened your eyes widely during capturing. •... - Page 32 Problem Enrollment/Recognition is invalid. Voice guidance is not heard. None of the guide indicator and result indicator light up. Buzzer sound is heard and all of the guide indicator and result indicator are blinking. The ellipse symbol at the centre of the guide indicator is lighting, but the iris camera does not work.
-
Page 33: Specifications
* Approx. 30 cm to 40cm {0.98 ft. to 1.32 ft.} between the eyes and the mirror BM-ET300AE: 1 000 users max. Iris server: 5 000 users max. 12 languages supported (Dutch, English, German, French, Spanish, Italian, Russian,... -
Page 34: Standard Accessories
STANDARD ACCESSORIES Operating instructions (This document) ... 1 pc. The following parts are used during installation procedures. Mounting bracket ... 1 pc. Mounting screw (M5) ... 1 pc. Front cover ... 1 pc. Tamperproof screw ... 2 pcs. Tamperproof screw driver tool ... 1 pc. Clamping tool ... - Page 35 Matsushita Electric Industrial Co., Ltd. Osaka, Japan http://www.panasonic.co.jp/global/ N0204-1054 3TR002413BAA Printed in Japan 2004 © Matsushita Electric Industrial Co., Ltd. All rights reserved. Gedruckt in Japan...