Table of Contents
Advertisement
Quick Links
Advertisement
Table of Contents

Related Manuals for Dell DS1000


Summary of Contents for Dell DS1000
- Page 1 Dell Dock With Monitor Stand DS1000 User Guide...
- Page 2 WARNING: A WARNING indicates a potential for property damage, personal injury, or death. Copyright © 2016 Dell Inc. All rights reserved. This product is protected by U.S. and international copyright and intellectual property laws. Dell and the Dell logo are trademarks of Dell Inc.
-
Page 3: Table Of Contents
Installing the stand riser assembly 4 Configuring the Intel HD Graphics utility............16 5 Technical specifications..................19 ..........................21 Display resolution 6 Troubleshooting the Dell Dock with Monitor Stand DS1000....22 ........................22 Symptoms and solutions 7 Contacting Dell....................25... -
Page 4: Introduction
Introduction The Dell Dock with Monitor Stand DS1000 is a device that links all your electronic devices to your computer using a USB Type-C cable interface. Connecting the computer to the docking station allows you to access all peripherals (mouse, keyboard, stereo speakers, external hard drive, and large-screen displays) without having to plug each one into the computer. -
Page 5: Before You Begin
Before you begin Package contents Your docking stand ships with the following components. Ensure that you have received all the components and contact Dell (see your invoice for contact information) if something is missing. The components shipped are: • Stand riser •... -
Page 6: Identifying Components And Features
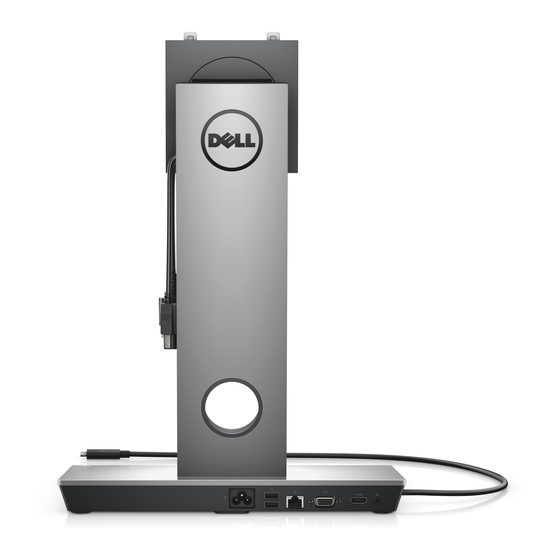
Identifying components and features Figure 1. Identifying components and features — Side panel... - Page 7 Figure 2. Identifying components and features — Back panel Icon I/O ports and button USB 3.0 port USB 3.0 port with PowerShare Audio headset connector Sleep/wake up button Power connector USB 2.0 port to connect keyboard and mouse...
- Page 8 Icon I/O ports and button Network connector (RJ — 45) VGA port HDMI port Line-out connector USB type-C connector to connect to the computer Combo cable to the monitor consisting of the power cable, USB 2.0 cable, and the display cable.
-
Page 9: Setting Up The Docking Stand
Setting up the docking stand Installing the stand riser assembly Open and pull the screw handle on the stand riser to loosen the screw. Insert the stand riser assembly onto the tab on the docking stand. - Page 10 Open the screw handle and rotate it to lock the screw into place. Route the cables through the cable routing channel and insert the cable holder into the slot on the stand riser assembly.
- Page 11 Align the tabs on the stand riser cover with the slots on the stand riser assembly and insert it into the slots. Insert the cable clip into the slot on the back of the VESA cover and rotate it to lock the cable clip into place.
- Page 12 Place the monitor face-down and slide the tabs on the VESA plate into the slots on the monitor. Insert the tabs on the VESA plate into the slots on the monitor.
- Page 13 Rotate the monitor to the vertical position to connect the cables. 10. Connect the cables to the monitor.
- Page 14 11. Connect the power cable to the docking stand and a power source. 12. Connect the USB Type-C connector to the computer.
- Page 15 13. Turn on the monitor.
-
Page 16: Configuring The Intel Hd Graphics Utility
Configuring the Intel HD Graphics utility If connecting two displays, follow these steps: Click the icon list on the task bar. Click the Intel HD Graphics utility on your taskbar as shown here. - Page 17 Click Graphics Properties. Click Display. Click Display and select Multiple Displays.
- Page 18 Select your preferred Display Mode. Select and arrange your displays to your preferred positions and then click Apply for the changes to take effect.
-
Page 19: Technical Specifications
Technical specifications Input standard USB Type-C Power delivery on Up to 90 W Dell computer Video ports • One DisplayPort (supports DP 1.2) • One HDMI (supports HDMI 1.4a) • One VGA port I/O ports • One headset connector •... - Page 20 • Monitor weight — 2.2 kg to 5.7 kg (4.9 lb to 12.6 lb) • Panel mount — Supports Dell Quick Release monitors, VESA adapter plate for use with any VESA-compliant monitor up to 27 inches • Height adjustment range — 130 mm •...
-
Page 21: Display Resolution
Display resolution Table 2. Maximum resolution and refresh rate supported on your display Support max dual display output 1920 x 1200 1920 x 1200 Not applicable 60 Hz 60 Hz 1920 x 1200 1920 x 1200 Not applicable 60 Hz 60 Hz 1920 x 1200 Not Applicable... -
Page 22: Troubleshooting The Dell Dock With Monitor Stand Ds1000
Troubleshooting the Dell Dock with Monitor Stand DS1000 Symptoms and solutions NOTE: The Dell Dock with Monitor Stand DS1000 only works with DisplayPort over USB-C or Thunderbolt protocols and is not compatible with all USB-C ports. Table 3. Symptoms and solutions... - Page 23 Please reinstall the Realtek Ethernet Driver or update your BIOS from Dell.com/support. Cable LED is not ON after it is connected to your • Ensure that your DS1000 is connected to AC. host. • Ensure that the computer is connected to the docking station.
- Page 24 Symptoms Suggested solutions Enable Thunderbolt Boot Support PXE boot on dock does not function. • If your BIOS has an Integrated NIC page, please select Enabled w/PXE. • If your BIOS has a USB/Thunderbolt Configuration page, please make sure that the following options are checked: Enable USB Boot Support Enable Thunderbolt Boot Support...
-
Page 25: Contacting Dell
Dell product catalog. Dell provides several online and telephone-based support and service options. Availability varies by country and product, and some services may not be available in your area. To contact Dell for sales, technical support, or customer service issues: Go to Dell.com/support.