Table of Contents
Advertisement
Advertisement
Table of Contents

Related Manuals for Sanyo VPC-HD100


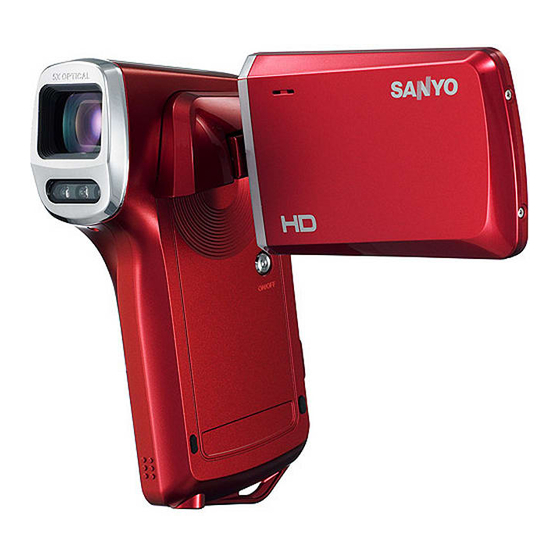
Summary of Contents for Sanyo VPC-HD100
-
Page 2: Fcc Statement
FCC STATEMENT This device complies with Part 15 of the FCC Rules. Operation is subject to the following two conditions: (1) This device may not cause harmful interference, and (2) This device must accept any interference received, including interference that may cause undesired operation. -
Page 3: Read This First
READ THIS FIRST Trademark Information ® Microsoft and Windows ® Pentium is a registered trademark of Intel Corporation. Macintosh is a trademark of Apple Inc. SD™ is a trademark. SDHC™ is a trademark. Other names and products may be trademarks or registered trademarks of their respective owners. -
Page 4: Safety Instructions
SAFETY INSTRUCTIONS Read and understand all Warnings and Cautions before using this product. Warnings If foreign objects or water have entered the camera, turn the power off and remove the battery. Continued use might cause fire or electric shock. Consult the store of purchase. - Page 5 Cautions Insert the battery paying careful attention to the polarity (+ or –) of the terminals. Inserting the battery with its polarities inverted might cause fire and injury, or damage to the surrounding areas due to the battery rupturing or leaking. Do not fire the flash close to anyone’s eyes.
- Page 6 Warning: TO PREVENT THE RISK OF FIRE OR ELECTRIC SHOCK, DO NOT EXPOSE THIS APPLIANCE TO RAIN OR MOISTURE FOR AMERICAN USERS The following advisory is included in accordance with the laws of the State of California (USA): WARNING: This product contains chemicals, including lead, known to the States of California to cause cancer, birth defects or other reproductive harm.
- Page 7 This symbol mark and recycling systems described below apply to EU countries and do not apply to countries in other areas of the world. Your SANYO product is designed and manufactured with high quality materials and components which can be recycled and/or reused.
-
Page 8: Symbols Used In This Manual
“Troubleshooting”. Declaration of Conformity Model number: VPC-HD100 Trade Name: SANYO Responsible party: SANYO FISHER COMPANY Address: 21605 Plummer Street Chatsworth, California 91311 Telephone No.: (818) 998-7322 This device complies with Part 15 of the FCC Rules. Operation is subject to the... - Page 9 To prevent short-circuiting or fire, keep the battery away from other metal objects when carrying or storing. CAUTION Danger of explosion if battery is incorrectly replaced. Replace only with the same or equivalent type. - SANYO Li-ion Battery, NP-61, 3.7V, 1100mAh - BYD Li-ion Battery, NP60, 3.7V, 1050mAh EN-8...
-
Page 10: Table Of Contents
CONTENTS 10 INTRODUCTION 10 Overview 10 Package Contents 12 GETTING TO KNOW YOUR DIGITAL VIDEO CAMERA 12 Front View 12 Rear View 13 LCD Monitor Display 16 GETTING STARTED 16 Preparation 17 Charging the Battery 18 Turning the Power On/Off 18 LED Indicators 19 Handling the Digital Video Camera 20 Setting the Date and Time... -
Page 11: Introduction
INTRODUCTION Overview Congratulations on your purchase of the new digital video camera. Equipped with a 5.0-megapixel sensor, this digital video camera captures still images and video clips with high definition. Package Contents Carefully unpack your digital video camera and ensure that you have the following items: Common Product Components: Digital video camera... -
Page 12: Getting To Know Your Digital Video Camera
GETTING TO KNOW YOUR DIGITAL VIDEO CAMERA Front View 1. Lens 2. LED assist light 3. Speaker 4. Battery cover 5. Strap holder 6. DC door 7. Tripod mount EN-11... -
Page 13: Rear View
Rear View 1. Microphone 2. Status LED Play button Up button MODE Mode button Right button O Focus button Down button MENU Menu button OK / Record / Shutter button 8. T Zoom in (telephoto) button EN-12 button / Thumbnail button Left button Assist light button Power button... -
Page 14: Lcd Monitor Display
LCD Monitor Display Standby Mode Video Mode 11 10 1. Video mode icon 2. Available recording time 3. Storage media [q] SD/SDHC memory card 4. Battery condition ] Full battery power ] Medium battery power ] Low battery power ] No battery power 5. - Page 15 Audio Recording Mode (Standby) 1. Audio mode icon 2. Available recording time 3. Storage media 4. Battery condition 5. Elapsed time 6. Recording indicator 7. Status indicator (standby) Playback Mode Video Mode 1. Video playback mode icon 2. Elapsed time 3.
- Page 16 MP3 Mode 1. MP3 mode icon 2. Elapsed time 3. Storage media 4. Battery condition 5. Volume indicator 6. MP3 title 7. MP3 list 8. MP3 menu 9. Playback indicator 10. Play mode indicator 11. MP3 status bar Audio Playback Mode 1.
-
Page 17: Getting Started
GETTING STARTED Preparation 1. Attach the camera strap. 2. Open the battery cover. 3. Insert the supplied battery with correct orientation as shown. Close the battery cover and make sure it is locked securely. 4. Insert an SD/SDHC memory card. The digital video camera does not have built-in memory and cannot operate without an SD/SDHC memory card inserted. -
Page 18: Charging The Battery
Charging the Battery Charge the battery fully with the supplied battery charger before use. 1. Insert the battery into the battery charger. 2. Connect the power cord to the charger and insert the plug into a wall outlet. The status LED on the charger lights red when charging has started and lights green when charging is completed. -
Page 19: Turning The Power On/Off
Turning the Power On/Off Load the battery and insert an SD/SDHC memory card before starting. Press the button until the digital video camera turns on. To turn the power off, press the The power is turned off automatically when the digital video camera has not been operated for a defined period of time. -
Page 20: Handling The Digital Video Camera
Handling the Digital Video Camera 1. Open the panel by pulling it away from the digital video camera. 2. Choose the angle of the monitor that suits you best by rotating the panel. The panel rotates up to 270°. It is useful for self-portrait. Make sure you open the LCD panel at 90 degrees before attempting to rotate it. -
Page 21: Setting The Date And Time
Setting the Date and Time The date/time needs to be set if/when: The digital video camera is turned on for the first time. The digital video camera is turned on after being left without battery for an extended period of time. 1. -
Page 22: Formatting The Memory Card
Formatting the Memory Card This utility formats the SD/SDHC memory card and deletes all stored images, video clips, and data. 1. Press the MENU button. 2. Select [Setup] menu with the 3. Select [Format] with the buttons, and press the 4. -
Page 23: Capture Mode
CAPTURE MODE Your digital video camera is equipped with a 2.5" full color LTPS LCD monitor to help you capture/playback images and video clips or adjust menu settings. Recording Video Clips 1. Press the button until the digital video camera turns on. The default mode is Video Mode. -
Page 24: Using The Zoom Function
Using the Zoom Function Using a combination of 5x optical zoom and 4x digital zoom permits zoom photogra- phy at up to 20x magnification. While the digital zoom can be a useful feature, the more an image is enlarged (zoomed), the more pixelated (grainier) the image will appear. -
Page 25: Recording Shots Using Face Detection Technology
Recording Shots using Face Detection Technology Face Detection Technology can identify and focus on the human faces in the image. This advanced function simultaneously detects up to 9 human faces regardless of their position in the scene. White frame Face detection function is on 1. -
Page 26: Setting Manual White Balance
Setting Manual White Balance You can manually set and store the white balance when the menu options do not offer a good match. 1. In video/capture mode, press the MENU button. 2. Select [W.Balance] with the (MENU) buttons, and press the 3. -
Page 27: Audio Mode
AUDIO MODE Recording Audio Files The digital video camera enables you to record and playback audio files anytime and anywhere. 1. Press the MODE button to switch to audio mode. 2. Press the button to start audio recording. To stop recording, press the Playing Back Audio Files 1. -
Page 28: Playback Mode
PLAYBACK MODE You can play back all the recorded files on the LCD monitor. Playing Back Video Clips 1. Press the button. The last recorded file appears on the LCD monitor. 2. Select the desired video clip with the (O) buttons. 3. -
Page 29: Playing Back Still Images/Video Clips On Tv
Playing Back Still Images/Video Clips on TV You can also playback your images on a TV screen. Before connecting to any devices, make sure to select NTSC / PAL system to match the video input system of the TV/video equipment you are going to connect to the digital video camera, then turn all connected devices off. -
Page 30: Thumbnail Display
Thumbnail Display This function allows you to view thumbnail images on the LCD monitor so you may search for a particular image/video clip/audio file. 1. In playback mode, press the 3 thumbnail images are displayed simultaneously. 2. Use the (MODE) / (MENU) buttons to select the file to be displayed. -
Page 31: Protecting Images/Video Clips/Audio Files
Protecting Images/Video Clips/Audio Files Set the data to read-only to prevent files from being deleted by mistake. Protecting One File 1. Press the button. 2. Select the file you wish to protect with the (O) buttons. 3. Press the MENU button. 4. -
Page 32: Deleting Images/Video Clips/Audio Files
Deleting Images/Video Clips/Audio Files 1. Press the button. 2. Select the file you wish to delete with the (O) buttons. 3. Press the MENU button. 4. Select [Delete File] or [Delete All] with the (MODE) / (MENU) buttons and press the button. -
Page 33: Mp3 Mode
MP3 MODE The digital video camera enables you to playback MP3 files. You may download MP3 files to your computer and then copy them into an SD/SDHC memory card (into an "MP3" folder). Insert an SD/SDHC memory card with MP3 files recorded into the digital video camera. -
Page 34: Menu Options
MENU OPTIONS Video Menu This menu is for the basic settings to be used when shooting video clips. Video Auto Scene Self-timer Size 1280 x 720 Standard Quality Exit 1. The default mode is Video Mode. 2. Press the MENU button. 3. - Page 35 Your digital video camera adjusts the exposure of each shot automatically. However, if the subject is very dark, or very bright, you may override the digital video camera's automatic exposure determination to make the subject brighter or darker. This is called EV compensation.
-
Page 36: Capture Menu
Capture Menu This menu is for the basic settings to be used when capturing still images. Capture Scene Auto Self-timer Size Standard Quality Exit 1. Press the MODE button to switch to capture mode. 2. Press the MENU button. 3. Select the desired option item with the button to enter its respective menu. - Page 37 Digi. Zoom Refer to the section in this manual titled “Digi. Zoom” in Video Menu (page 34) for fur- ther details. This sets the sensitivity for capturing images. When the sensitivity is raised (and the ISO figure is increased), photography will become possible even in dark locations, but the more pixelated (grainier) the image will appear.
-
Page 38: Playback Menu
Playback Menu In this menu, choose which settings are to be used for still image/video clip playback. Play Delete File Delete All Next Menu Slide Show 5 Sec. Protect Single Exit 1. Press the button. 2. Press the MENU button. 3. -
Page 39: Mp3 Menu
MP3 Menu This menu is for the basic settings to be used when playing back MP3 files. Single Play Mode Repeat Exit 1. Press the MODE button to switch to MP3 mode. 2. Press the MENU button. 3. Select the desired option item with the button to enter its respective menu. -
Page 40: Setup Menu
Setup Menu This menu sets your digital video camera’s operating environment. Setup Language English Beep Format Next Menu LCD Bright. Date/Time Next Menu Exit 1. Press the MENU button. 2. Select the [Setup] menu with the 3. Select the desired option item with the button to enter its respective menu. - Page 41 Video Out Set TV/video compatibility with the equipment you are going to connect to the digital video camera. * NTSC / PAL Light Freq. The function allows to change the light frequency of environment to 60 Hz or 50 Hz. * 50 Hz / 60 Hz Sys.
-
Page 42: Installing Software Program
INSTALLING SOFTWARE PROGRAM 1. Please make sure you have Windows Media Player 9 or QuickTime 7.0 installed onto your computer first. 2. Please install the decoder program (available in the CD). H.264 files may be played back with Windows Media Player 9. (Decoder is designed for H.264 decode) MP4/H.264 playback system requirements: At least 512MB of RAM... -
Page 43: Transferring Files To Your Computer
TRANSFERRING FILES TO YOUR COMPUTER System Requirement Windows Pentium III 800 MHz or equivalent Windows 2000/XP/Vista 256MB RAM (512MB recommended) 150MB available hard disk space CD-ROM drive Available USB port Downloading / Deleting Your Files via Computer 1. Press the button until the digital video camera turns on. -
Page 44: Specifications
SPECIFICATIONS Item Description Image sensor 1/2.5” CMOS sensor Effective pixels 5.0 megapixels Image resolution <Still image> 7.7M: 3200 x 2400 (FW interpolation), 5M: 2560 x 1920, 3M: 2048 x 1536, 1M: 1280 x 960, VGA: 640 x 480 <Video clip> 1440 x 1080 (30 fps), 1280 x 720 (30 fps), 640 x 480 (30 fps) Recording media Supports SD/SDHC memory card (up to 8GB) (optional) -
Page 45: Appendix
APPENDIX Possible Number of Shots The table shows the approximate shots/recording time that you can capture/record at each setting based on the capacity of the SD/SDHC memory card. Possible recording time / sec (video clip) Size Quality 128MB y Fine 00:01:57 00:04:04 00:08:17 00:16:46 00:33:12 01:05:46 02:11:38 x Standard 00:02:14 00:04:39 00:09:28 00:19:08 00:37:52 01:15:00 02:30:06... -
Page 46: Troubleshooting
Troubleshooting Refer to the symptoms and solutions listed below before sending the digital video camera for repairs. If the problem persists, contact your local reseller or service center. Symptom Cause The power does not The battery is not inserted. come on. The battery is exhausted.