Table of Contents
Advertisement
Advertisement
Table of Contents

Summary of Contents for LG TEC Multi
- Page 1 LG TEC Multi INSTRUCTION MANUAL www.LGMedSupply.com...
- Page 2 This manual is valid for the LG TEC Multi This user manual is published by Current Solutions™, LLC Current Solutions™, LLC does not guarantee its contents and reserves the right to improve and amend it at any time without prior notice. Amendments may however be published in new editions of this manual.
-
Page 3: Table Of Contents
TABLE OF CONTENTS FOREWORD....…..…………………………....…….4 1.1 Introduction 1.2 Medical background SAFETY INFORMATION…..…………………………....…….6 2.1 Indication for use 2.2 Contraindications 2.3 Warnings 2.4 Precautions PRESENTATION……………………………..……......…9 3.1 Front and Rear panel 3.2 LCD display 3.3 The key functions SPECIFICATION………………………………………......12 4.1 Accessories 4.2 Technical information INSTRUCTION FOR USE ………………………………..…..13 5.1 Check Battery 5.2 Connect electrodes to lead wires... -
Page 4: Foreword
1. FOREWORD 1.1 Introduction The LG TEC Multi is a battery operated pulse generator that sends electrical impulses to the body and reach the nerves and underlying muscle group, this is a unit to be used for pain relief, muscle stimulation and massage. The device... - Page 5 which determine which impulses are allowed to continue on to the brain. The gates prevent the brain from receiving too much information too quickly. Since the same nerve cannot carry a pain and a non-pain impulse at the same time, the stronger, non-pain impulse from the device “controls the gate.”...
-
Page 6: Safety Information
2. SAFETY INFORMATION 2.1 Indications for use This device is used in following instance: 1) Symptomatic relief of chronic intractable pain, acute post traumatic pain or acute post surgical pain. 2) Increase of blood flow in the treatment area. 3) Relaxation of muscle spasm. 4) Immediate post-surgical stimulation of muscles to prevent venous thrombosis. -
Page 7: Precautions
6) Do not apply stimulation over painful areas. If you have painful areas, you should consult with your physician before using this device. 7) Do not apply stimulation over open wounds or rashes, or over swollen, red, infected, or inflamed areas or skin eruptions (e.g., phlebitis, thrombophlebitis, varicose veins). - Page 8 4) TENS is a symptomatic treatment and, as such, suppresses the sensation of pain that would otherwise serve as a protective mechanism; 5) Effectiveness is highly dependent upon patient selection by a practitioner qualified in the management of pain patients; 6) The long-term effects of electrical stimulation are unknown;...
-
Page 9: Presentation
3. PRESENTATION 3.1 Front and Rear Panel (1) LED for channel 1 (2) LED for channel 2 (3) LCD (4) ON /OFF button (5) Increasing the output intensity of channel 1 (6) Select User 1 or User 2 (7) Decreasing the output intensity of channel 1 (8) Program selection backward (9) Reducing the output intensity of channel 2 (10) Enter the user program parameter setting/Pause... -
Page 10: Lcd Display
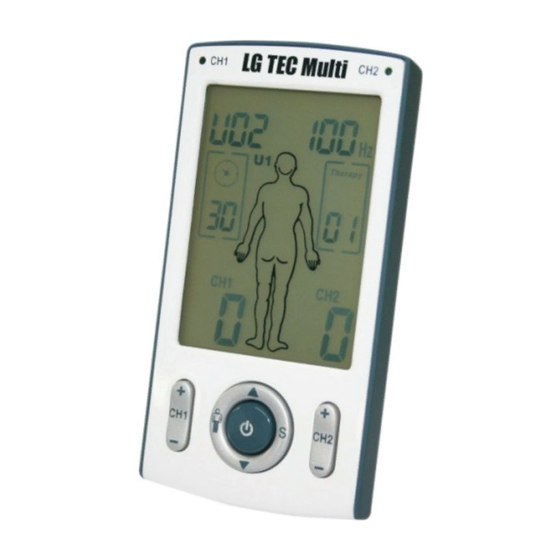
3.2 LCD Display TENS MASSAGE E M S Therapy emo r y PAUSE (1) TENS,EMS and MASSAGE display (2) Lock intensity (3) Program number (4) Output pulse frequency and width (5) User 1 (6) User 2 (7) Pause (8) Treatment sign (9) Memory checking (10) Low battery indicator (11) Treatment time... -
Page 11: The Key Functions
3.3 The Key Functions The buttons on the device has the different functions in the different states except the basic function. Button In working mode: ON/OFF the device Stop the treatment Press and hold on 3 seconds turn off device In set mode: Confirmed the setting parameter and return the normal state [▲]... -
Page 12: Specification
4. SPECIFICATION 4.1 Accessories No DESCRIPTION Q’TY TENS stimulator device 1 piece Electrodes Leads 2 pieces 40mm x 40mm adhesive electrodes 4 pieces AAA Battery 4 pieces Instruction Manual 1 piece Carrying case 1 piece 4.2 Technical Information Channel Two channel Power supply DC6V, 4 x AAA batteries Biphase square-wave pulse... -
Page 13: Instruction For Use
5. INSTRUCTIONS FOR USE 5.1 Check Battery Insert a fresh 4xAAA batteries into the battery compartment. Make sure you are installing the battery properly. The battery is inserted in the casing on the back of the stimulator. Be sure to match the positive and negative ends of the battery to the markings in the battery compartment of unit. -
Page 14: Connect Electrodes To Lead Wires
5.2 Connect electrodes to lead wires Insert the lead wire connector into electrodes connector. Make sure no bare metal of the pins is exposed. Caution: Always use the electrodes CE mark, or which are legally marketed in the US under 510(K) procedure. 5.3 Connect lead wires to the device Before proceeding to this step, be sure the device is completely turned OFF. -
Page 15: Place Electrodes On Skin
5.4 Electrode 5.4.1 Electrode options The electrodes are disposable and should be routinely replaced when they start to lose their adhesive nature. If you are unsure of your electrode adhesive properties, order new replacement electrodes. Replacement electrodes should be re-ordered through or on the advice of your physician to ensure proper quality. -
Page 16: Checking The Memory
importance is the willingness of the physician to try the various styles of electrode placement to find which method best fits the needs of the individual patient. Every patient responds to electrical stimulation differently and their needs may vary from the conventional settings suggested here. -
Page 17: Selection The Treatment User (U1 Or U2)
5.7 Selection the treatment User (U1 or U2) LG TEC Multi has special design which can be used and has memory for two users. The user 1 (U1) or user 2 (U2) can operate device independently with their own program and treatment memory. -
Page 18: Set The Parameter In The Doctor Mode
Press [ ] button first and then press the [▼] button to select the doctor mode. The display as follow: 5.9 Set the parameter in the doctor mode 1) Select the treatment program Press [ ] button first and then press the[▼] button to select the doctor mode. -
Page 19: Select The Treatment
E M S Therapy Therapy Caution: Consult your physician for your suitable stimulation program. 5.11 Select the treatment Press [CH1+] or [CH2+] button to adjust the output intensity of channel 1 or channel 2. Press [CH1-] or [CH2-] to decrease the output intensity of channel 1 or channel 2. The step is 1mA. - Page 20 Press [▲] and [▼] button to set the treatment frequency. Press [ S ] button to enter the setting the pulse duration. Press [▲] and [▼] button to set the treatment pulse width. 5.10 Select the program Press [▲] or [▼] button to select the treatment program form TENS, EMS, MASSAGER and USER program.
-
Page 21: Pause
5.13 Pause Press [ ] button to stop the output. Press [ S ] button to pause treatment and press again to continue the treatment. TENS Therapy PAUSE 5.14 Lock the button If there is no operation in the panel for 10 seconds, the button will be locked automatically. -
Page 22: Replace Batteries
plug the cord. If treatment will be resumed shortly, the electrodes may be left on the skin. When the electrodes are removed, clean the skin thoroughly with mild soap and water. If there is skin irritation, consult your medical professional. 5.16 Replace batteries To replace the batteries, open the lid cover and extract the battery. - Page 23 TNES Program Pulse Treatment Frequency program Width time (Min) Waveform (Hz) (us) default Continuous Continuous Continuous Continuous Alternate Adaptation 100/2 150/200 Hans 100/2 150/200 Burst Modulation 2~80 200~100 Modulation 70~110 200~100 Pulse rate 10~100 modulation Pulse rate 80~120 modulation Deep TENS Burst rate:2Hz Fixed rate:150Hz Burst...
-
Page 24: Ems Muscle Training Program
6.2 EMS muscle training program 1) Athletic Training Neglected for many years, muscle preparation has today become indispensable for the competitive athlete. In this respect, muscular electro stimulation is a complementary training technique widely used by an increasing number of athletes aiming to improve their level of performance. - Page 25 3) Esthetic Program Thanks to their great diversity and their high specificity, the Aesthetic programs provide the solution for everyone who wants to regain and keep the benefits of intense muscular activity. These programs allow you to restore and maintain a firm body, shapely figure and toned skin.
- Page 26 EMS Program treat- Ramp Ramp Pulse program Frequency ment down Width (Hz) time time (s) time (us) (min.) (default) 80/60/4/2 180/200/220/240 30/30/30/2 150/170/200/200 80/60/30/2 150/170/200/200 80/2 80/2 5/60/3 200/250/200 5/15/3 200/250/200 5/90/3 200/250/200 5/120/3 200/250/200 5/80/5/2 200/270/190/210 5~60 150/250 2~60 5~60 150/200 8/60/5...
-
Page 27: Massage Program
6.3 Massage program The programs of the Massage category subject the muscles of the stimulated region to moderate activity, which produces beneficial effects that help to improve physical comfort and well- being. Remaining in the same working position for a long time (for example, sitting in front of a computer screen), conditions of stress, repeated jostling, insufficient muscular conditioning before physical activity are all very frequent situations that are... -
Page 28: Cleaning The Device
7. CLEANING AND MAINTENANCE 7.1 Cleaning the device 1) Remove the batteries from the device every time before cleaning. 2) Clean the device with a soft, slight moistened cloth. In case of more extreme soiling you can also moisten the cloth with mild soapy water. -
Page 29: Cleaning The Electrodes Cords
To remove your electrodes: Lift the corner of the electrode and gently remove it from the skin. Apply the protective backing to the tacky side of the electrode. Place the electrode on the side of the protective backing that is labeled with the word, on. Store the electrodes in the resalable pouch or a plastic bag. -
Page 30: Troubleshooting
8. TROUBLESHOOTING If your device does not seem to be operating correctly, refer to the chart below to determine what may be wrong. Should none of these measures correct the problem, the device should be serviced. Problem Possible Cause Solution 1. - Page 31 3. If still intermittent after replacing lead wire, a component may have failed. Call the repair department. Some programs will seem intermittent. This is expected. Refer to the Program Program option in Option Controls in the Operation section for a description of the program option.
-
Page 32: Storage
9. STORAGE For a prolonged pause in treatment, store the device in a dry room and protect it against heat, sunshine and moisture. Store the device in a cool, well-ventilated place Never place any heavy objects on the device. 10. DISPOSAL Used fully discharged batteries must be disposed of in a specially labeled collection container, at toxic waste collection points or through an... - Page 33 emissions Class B CISPR11 The device is suitable for use in all establishments other than domestic and those directly Harmonic connected to the public low- emissions voltage power supply network that supplies buildings used for applicable 61000-3-2 domestic purposes. Voltage fluctuations /flicker applicable...
- Page 34 ±2kV for Not applicable Mains power quality Electrical power supply should be that of a fast lines typical commercial transient/ ±1kV for or hospital burst IEC input/output environment. 61000-4-4 lines ±1kV Surge Not applicable Mains power quality differential should be that of a 61000-4-5 mode typical commercial...
- Page 35 Guidance and- manufacturer's declaration. Electromagnetic immunity The device is intended for use in. the electromagnetic environment specified below. The customer or the user should assure that it is used in such an environment. Immunity IEC 60501 Compliance Electromagnetic test test level level environment - guidance...
- Page 36 Where P is the maximum output power rating of the transmitter In watts (W) according to the. Transmitter manufacturer and d is the recommended separation distance in meters (m). Field strengths from fixed RF transmitters, as determined by an electromagnetic site survey,a should be less than the compliance level in...
- Page 37 Recommended separation distances between portable and mobile RF communications equipment and the device The device is intended for use in an electromagnetic environment in which radiated RF disturbances are controlled. The customer or the user of the device can help prevent electromagnetic interference by maintaining a minimum distance between portable and mobile RF communications equipment (transmitters) and the as recommended below, according to the...
-
Page 38: Glossary Of Symbols
For transmitters rated at a maximum output power not listed above, the recommended separation distance d in meters (m) can be estimated using the equation applicable to the frequency of the transmitter, where P is the maximum output power rating of the transmitter in watts (W) accordable to the transmitter manufacturer. -
Page 39: Warranty
13. WARRANTY Please contact LG MedSupply in case of a claim under the warranty. If you have to send in the unit, enclose a copy of your receipt and state what the defect is. The following warranty terms apply: 1) The warranty period for device is one year from date of purchase.