Silvercrest KH 2029 Operating Instructions Manual
Multi-band radio
Hide thumbs
Also See for KH 2029:
- User manual ,
- Operating instructions manual (50 pages) ,
- Operating instructions manual (34 pages)
Table of Contents
Advertisement
Available languages
Available languages
Quick Links
5
new
KOMPERNASS GMBH
BURGSTRASSE 21 · D-44867 BOCHUM
www.kompernass.com
ID-Nr.: KH2029-11/09-V1
RADIO MULTIBANDA
RICEVITORE UNIVERSALE
KH 2029
Radio multibanda
Instrucciones de uso
Ricevitore universale
Istruzioni per l'uso
Receptor mundial
Manual de instruções
Multi-Band Radio
Operating instructions
Weltempfänger
Bedienungsanleitung
Advertisement
Chapters
Table of Contents

Related Manuals for Silvercrest KH 2029


Summary of Contents for Silvercrest KH 2029
- Page 1 RADIO MULTIBANDA RICEVITORE UNIVERSALE KH 2029 Radio multibanda Instrucciones de uso Ricevitore universale Istruzioni per l'uso Receptor mundial Manual de instruções Multi-Band Radio KOMPERNASS GMBH Operating instructions BURGSTRASSE 21 · D-44867 BOCHUM www.kompernass.com Weltempfänger ID-Nr.: KH2029-11/09-V1 Bedienungsanleitung...
- Page 2 KH 2029...
-
Page 3: Table Of Contents
ÍNDICE PÁGINA Uso previsto Datos técnicos Símbolos utilizados Indicaciones de seguridad Elementos de mando Puesta en funcionamiento Funciones generales Funciones de fecha y hora Hora, fecha, zona horaria y tiempo universal ....13 Selección del modo de presentación . -
Page 4: Uso Previsto
RADIO MULTIBANDA KH2029 Antes de la primera puesta en funcionamiento lea detenidamente las instrucciones de funcionamiento y guárdelas para su uso más adelante. Al entregar el aparato a terceros entregue también estas instrucciones. Esta documentación está protegida por derechos de autor. Cualquier reproducción o copia incluso de forma extractada, así... - Page 5 Consumo de energía: 5 vatios Consumo Standby: 1,4 vatios Temperatura de funcionamiento: +5 ~ +35°C Humedad ambiental: 5 ~ 90 % (ninguna condensación) Medidas (L x Al x A): 181 x 111 x 39 mm Peso del aparato: 375 g aprox. Peso fuente de alimentación: 185 g aprox.
-
Page 6: Símbolos Utilizados
Datos generales Posiciones de memoria: 1600 (400 por cada banda de frecuencia) Auriculares Modelo: E105 Nivel de salida: 32 Ω Tensión de identificación de banda ancha (WBCV): aprox. 206 mV Salida de auricular Tensión de salida máxima: aprox. 80 mV Bloque de alimentación Fabricante: S&S MFG. -
Page 7: Indicaciones De Seguridad
Este símbolo le advierte contra la inmersión del aparato en agua o en otros líquidos. Este símbolo le advierte contra daños auditivos. Indicación: Con este símbolo se le da consejos acerca de la manipulación del aparato. Indicaciones de seguridad • Este aparato no ha sido concebido para ser utilizado por personas (incluyendo niños) con discapacidad física, sensorial o psíquica, o por aquellas que no tengan la suficiente experiencia o conocimientos, a no ser que, para su propia seguridad sean supervisadas por una persona... - Page 8 ¡Peligro de descarga eléctrica! • Conecte la fuente de alimentación de clavija sólo a una base de enchufe instalada correctamente y puesta a tierra de acuerdo con la normativa. La tensión de red debe corresponderse a los datos de la placa de características del aparato.
- Page 9 • No tape nunca las ranuras de ventilación del aparato cuando está conectado. • No coloque objetos que puedan provocar fuego, como p.ej. velas, sobre y cerca del aparato. ¡Peligro de lesiones! • Mantenga alejados a los niños de los cables de conexión y del aparato. Los niños subestiman frecuentemente los peligros de los aparatos eléctricos.
- Page 10 Indicaciones para la desconexión de la red POWER La tecla de este aparato no lo desconecta completamente de la red eléctrica. Además, el aparato consume corriente eléctrica en el modo Standby. Para desconectar el aparato completamente de la red se debe desenchufar el adaptador de red de la toma de corriente. Indicaciones para el manejo de las pilas El aparato funciona con pilas.
-
Page 11: Elementos De Mando
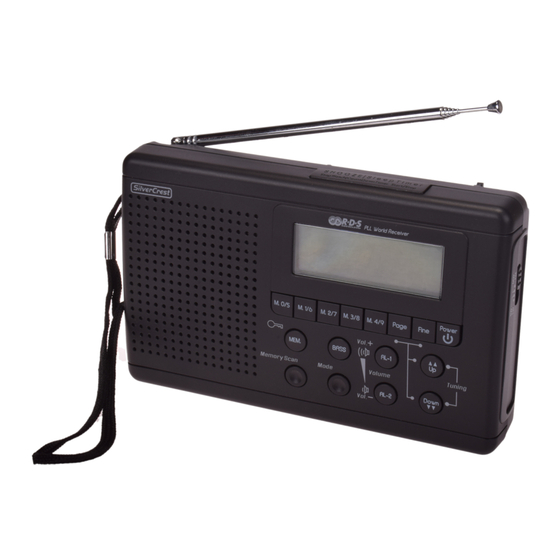
Elementos de mando Lado frontal M.0/5 M.4/9 Teclas de memoria Pantalla SNOOZE Botón (LW/SW/MW/FM) Selector de banda POWER Tecla FINE Tecla PAGE Tecla UP/DOWN Teclas VOL+(AL-1)/VOL-(AL-2) Teclas MODE Tecla BASS Tecla MEMORY SCAN Tecla Tecla Altavoz Lado posterior Antena Cinta de sujeción SW SEN. -
Page 12: Puesta En Funcionamiento
Puesta en funcionamiento Desembalar el aparato Retire todos los materiales de embalaje. ¡Atención! No permita que los niños pequeños jueguen con los plásticos. ¡Existe peligro de asfixia! Comprobar el volumen de suministro Al desembalar, cerciórese de que se hayan incluido las piezas siguientes: •... - Page 13 • Coloque las cuatro pilas en el compartimento, teniendo en cuenta su respectiva polaridad +/-. • Vuelva a colocar en su sitio la tapa del compartimento. Cuando las pilas se hayan gastado, parpadeará el símbolo correspon- diente en la pantalla. Conexión a la red •...
-
Page 14: Funciones Generales
Funciones generales Bloqueo de teclas Para evitar que al tocar accidentalmente las teclas se cambien los ajustes, se puede activar el bloqueo de las teclas. • Para ello mantenga pulsada la tecla durante aprox. 3 segundos. En la pantalla parpadea la indiación Ahora. -
Page 15: Hora, Fecha, Zona Horaria Y Tiempo Universal
Las funciones de fecha y hora sólo pueden ajustarse si la radio está apagada. Cuando no se recibió ninguna señal RDS en la primera puesta en funciona- miento, la hora preajustada del receptor mundial comienza en "0:00 00". Si se desconecta el aparato de la red, se perderán los ajustes. Hora, fecha, zona horaria y tiempo universal MODE Mediante la tecla... - Page 16 Ajustar la hora MODE • Pulse una vez. En la pantalla parpadea la última hora seleccionada. DOWN • Pulse la tecla , para hacer avanzar o retroceder la hora en pasos de minutos. Mantenga pulsada una de las dos teclas durante unos segundos, para hacer avanzar o retroceder el tiempo a mayor velocidad, en intervalos de diez minutos.
- Page 17 Ajustar la zona horaria MODE • Pulse otra vez, o sea, tres veces. En la pantalla parpadea la zona horaria ajustada en forma de la abreviatura de la ciudad correspondiente a esa zona (en la primera puesta en funcionamiento del aparato aparece UTC); la indicación horaria desaparece. DOWN •...
- Page 18 Abreviatura Diferencia con CET Horario de verano Ciudad -10:00 Honolulu/EE.UU. sí -9:00 Anchorage/EE.UU. sí -8:00 Vancouver/Canadá sí -8:00 Los Ángeles/EE.UU. sí -7:00 Denver/EE.UU. sí -6:00 Chicago/EE.UU. -6:00 México D.F./México sí -5:00 Nueva York/EE.UU. sí -5:00 Toronto/Canadá sí -5:00 Montreal/Canadá -4:00 Caracas/Venezuela -3:00 Río de Janeiro/Brasil...
- Page 19 *UTC Universal Time Coordinated (español: tiempo universal coordinado). La hora UTC es la hora de referencia a partir de la que se calculan las horas de las diferentes zonas horarias de la tierra. Horario de verano No todas las zonas horarias de la tierra diferencian entre horario de verano y de invierno.
- Page 20 Alarma de fecha especial MODE • Pulse la tecla por quinta vez para ajustar la alarma de fecha especial. En la pantalla parpadean alternando la indicación SDA1 y la fecha. PAGE • Pulse la tecla , para cambiar entre diez alarmas de fecha ajusta- bles (SDA1 - SDA 10).
-
Page 21: Selección Del Modo De Presentación
Conectar/desconectar la actualización automática (RDS) Mediante esta función el dispositivo puede actualizar automáticamente los ajustes para fecha y hora mediante la señal RDS. MODE • Pulse nueve veces la tecla . En la pantalla aparece la indicación UPDA ON. DOWN •... - Page 22 Ajustar la hora de la alarma Con su receptor universal se pueden programar dos alarmas. Función despertador Símbolo en pantalla Radio Avisos acústicos Desconectado ningún símbolo VOL.+/AL–1 VOL.-/AL–2 • Pulse con radio apagada la tecla (o bien En pantalla aparecerá la última hora de alarma ajustada y el símbolo para el tipo de alarma.
- Page 23 SNOOZE • Pulse la tecla para ajustar el día de la semana deseado. Para volver a la selección de días laborables, fines de semana o toda la SNOOZE semana, vuelva a mantener pulsada brevemente la tecla MODE • Pulse la tecla para memorizar el ajuste y para volver al modo de hora.
-
Page 24: Función Cronómetro
Ajustar la interrupción de la alarma Con la radio apagada pulse 7x la tecla MODE. En pantalla aparecerá • el intervalo de interrupción de alarma ajustado (en la primera puesta en funcionamiento “SNO 10”). DOWN • Con las teclas puede ajustar la interrupción de la alarma entre 1 y 59 minutos. - Page 25 Ajustar y memorizar la cuenta atrás MEMORY SCAN • Pulse la tecla y manténgala pulsada durante aprox. 2 segundos; en pantalla aparece D 00.00. DOWN • Pulse la tecla para ajustar el tiempo deseada. En las teclas de memoria están preajustados los 5 tiempos de cuenta atrás, a los que podrá...
-
Page 26: Radio
Radio Conexión/Volumen POWER • Pulse la tecla para encender la radio. En pantalla aparecerá brevemente ON y, a continuación, la emisora de radio sintonizada actualmente y su banda de frecuencia. VOL.+/AL–1 VOL.-/AL–2 • Ajuste el volumen mediante las teclas VOL.-/AL–2 Tecla : bajar el volumen;... -
Page 27: Sintonizar Las Emisoras
Función temporizador SNOOZE Mediante la tecla también puede activar la función temporizador. Puede ajustar el temporizador en unidades de diez minutos y hasta un to- tal de 90 minutos, para que, transcurrido el tiempo indicado, la radio se apague automáticamente. Para ello, desconecte primero la radio. SNOOZE •... -
Page 28: Sintonización Fina De Emisoras
Con la radia apagada puse seis veces la tecla MODE y seleccione a • continuación con la tecla UP o bien DOWN, la gama de sintonización correspondiente conforme a la tabla siguiente: Región Zona de banda Intervalos de frecuencias Amerika 10 kHz 520-1710 kHz Europa... -
Page 29: Funciones De Memorización
La antena telescópica no tiene ningún efecto para la recepción de las bandas de frecuencia AM y LW. En dichas bandas de frecuencia la radio recibe la emisión mediante la antena de ferrita que lleva incorporada. • Mueva todo el aparato hasta obtener la mejor recepción. Funciones de memorización Memorización de emisoras El receptor universal puede memorizar 400 emisoras por banda de frecuencia. - Page 30 Seleccionar una emisora memorizada • Para seleccionar directamente una emisora memorizada, ajuste pri- mero mediante el selector de banda la banda de frecuencia en la que se encuentra la emisora. PAGE DOWN • Pulse la tecla y seleccione con las teclas UP o una página (de 00 - 39).
-
Page 31: Limpieza
Indicación: Tenga en cuenta que con ello se activa la función de repetición de SNOOZE alarma. Pulse la tecla las veces necesarias hasta que aparez- ca 00 en el display. Limpieza Peligro de muerte por descarga eléctrica: • ¡Desconecte el aparato de la red elétrica antes de limpiarlo! •... -
Page 32: Importador
Eliminar las pilas/baterías No tire las pilas a la basura doméstica. Todo consumidor está obligado por la ley a llevar las pilas/baterías a un punto oficial de recogida de su municipio / su barrio o entregarlas en un establecimiento comercial. Esta obligación sirve para que las pilas sean eliminadas de forma respe- tuosa con el medio ambiente. -
Page 33: Garantía Y Servicio
Garantía y servicio Con este aparato recibe usted 3 años de garantía desde la fecha de compra. El aparato ha sido fabricado cuidadosamente y ha sido probado antes de su entrega. Guarde el comprobante de caja como justificante de compra. Si necesitara hacer uso de la garantía, póngase en contacto por teléfono con su centro de servicio habitual. - Page 34 - 32 -...
- Page 35 INDICE PAGINA Impiego previsto Dati tecnici Simboli utilizzati Avvertenze di sicurezza Elementi di comando Messa in funzione Funzioni generali Funzioni orarie Ora, data, fuso orario e orario internazionale ....45 Selezione della visualizzazione .
-
Page 36: Impiego Previsto
RICEVITORE UNIVERSALE KH2029 Prima dell’uso, leggere attentamente le istruzioni di funzionamento e con- servarle per futura consultazione. In caso di cessione dell’apparecchio a terzi consegnare anche le istruzioni. La presente documentazione è tutelata dal diritto d'autore. Qualsiasi riproduzione, ad es. ristampa, anche parziale, nonché... - Page 37 Potenza assorbita: 5 Watt Potenza assorbita in standby: 1,4 W Temperatura di esercizio: +5 ~ +35°C Umidità: 5 ~ 90 % (senza condensa) Dimensioni (L x P x A): 181 x 111 x 39 mm Peso dell'apparecchio: ca. 375 g Peso dell'alimentatore: ca.
-
Page 38: Simboli Utilizzati
In generale Posizioni di memoria: 1600 (400 per banda di frequenza) Auricolari Modello: E105 Impedenza: 32 Ω Tensione di riconoscimento banda larga (WBCV): ca. 206 mV Tensione di uscita massima dell'uscita auricolari: ca. 80 mV Alimentatore Produttore: S&S MFG. LTD. Modello: A400-75 Primario:... -
Page 39: Avvertenze Di Sicurezza
Questo simbolo avvisa di non immergere l'apparecchio in acqua o altri liquidi. Questo simbolo avverte della possibilità di danni all'udito. Avviso: con questo simbolo vengono indicati suggerimenti per l'uso dell' apparecchio. Avvertenze di sicurezza • Questo apparecchio non è destinato ad essere utilizzato da persone (compresi i bambini) con capacità... - Page 40 Pericolo di scossa elettrica! • Connettere l'alimentatore a spina solo a una presa installata a norma e provvista di messa a terra. La tensione di rete deve corrispondere ai dati riportati sulla targhetta tipo dell'apparecchio. • Far sostituire immediatamente gli alimentatori a spina dal personale autorizzato o dall’assistenza clienti al fine di evitare possibili pericoli.
- Page 41 • Non coprire mai la feritoia di ventilazione dell’apparecchio quando è acceso. • Non posizionare nessuna sorgente di combustione aperta vicino o so- pra l’apparecchio, come ad esempio candele. Pericolo di lesioni • Tenere i bambini lontani dal cavo di collegamento e dall’appa- recchio.
- Page 42 Avvertenza sull’interruzione dell’alimentazione L’apparecchio non viene scollegato completamente dalla rete elettrica POWER tramite il tasto . Inoltre l’apparecchio assorbe corrente in modalità standby. Per scollegare l’apparecchio completamente dalla corrente, è necessario estrarre l’alimentatore a spina dalla presa di corrente. Avvertenze sull’utilizzo delle pile L’apparecchio utilizza delle pile.
-
Page 43: Elementi Di Comando
Elementi di comando Fronte M.0/5 M.4/9 Tasti di memoria Display SNOOZE Tasto di allarme ritardato (LW/SW/MW/FM) Selettore di banda POWER Tasto FINE Tasto PAGE Tasto UP/DOWN Tasti VOL+(AL-1)/VOL-(AL-2) Tasti MODE Tasto BASS Tasto MEMORY SCAN Tasto Tasto Altoparlanti Retro Base Antenna Laccetto SW SEN. -
Page 44: Messa In Funzione
Messa in funzione Estrarre l’apparecchio dalla confezione. Rimuovere tutto il materiale d’imballaggio. Attenzione! Non far geiocare i bambini piccoli con la plastica da imballaggio. Pericolo di soffocamento! Controllo della fornitura Nel disimballare, accertarsi della presenza dei seguenti componenti: • Ricevitore mondiale •... - Page 45 • Far scorrere nuovamente il coperchio sul vano. Quando le pile diventano troppo deboli, ciò viene segnalato dal simbolo che lampeggia sul display. Collegamento alla rete elettrica • Collegare lo spinotto dell’alimentatore alla presa contrassegnata con EXT. DC 7.5 V 400 mA presente a fianco dell’apparecchio.
-
Page 46: Funzioni Generali
Funzioni generali Blocco tasti Per evitare che attraverso movimenti non intenzionali vengano modificate le impostazioni dei tasti, è possibile attivare il blocco tasti. • Spingere e tenere premuto il tasto per ca. 3 secondi. Sul display SNOOZE lampeggia la scritta Tutti i tasti, escluso il tasto e il tasto , sono ora bloccati. -
Page 47: Ora, Data, Fuso Orario E Orario Internazionale
Le funzioni orarie possono essere impostate solamente a radio spenta. Se nella prima messa in funzione non si riceve alcun segnale RDS, l'orario preimpostato del ricevitore mondiale è „0:00 00“. Se l’apparecchio viene staccato dalla corrente le impostazioni vanno perse. Ora, data, fuso orario e orario internazionale MODE Tramite il tasto... - Page 48 Impostazione dell’orario MODE • Premere una volta . Sul display lampeggia l’ultimo orario impostato. DOWN • Premere il tasto oppure per spostare l’orario in avanti o indietro con incrementi di un minuto. Tenere premuto uno dei due tasti per alcuni secondi per mandare avanti e indietro il tempo in modalità...
- Page 49 Impostazione del fuso orario MODE • Premere ancora una volta oppure tre volte . Sul display il fuso orario impostato lampeggia indicando l’abbreviazione della relativa città (alla prima messa in funzione UTC); l’orario sparisce. DOWN • Premere il tasto oppure per ottenere un fuso orario precedente o successivo.
- Page 50 Sigla Diff. rispetto a MEZ Periodo estivo Città -10:00 Honolulu/USA sì -9:00 Anchorage/USA sì -8:00 Vancouver/Canada sì -8:00 Los Angeles/USA sì -7:00 Denver/USA sì -6:00 Chicago/USA -6:00 Città del Messico/Messico sì -5:00 New York/USA sì -5:00 Toronto/Canada sì -5:00 Montreal/Canada -4:00 Caracas/Venezuela -3:00...
- Page 51 *UTC Universal Time Coordinated (it.: orario internazionale coordinato) L’UTC è l’orario di riferimento da cui derivano gli orari dei diversi fusi orari della terra. Ora solare Non tutti i fusi orari della terra fanno una distinzione fra ora legale e ora solare.
- Page 52 Allarme data speciale MODE • Premere il tasto una quinta volta per impostare l’allarme data speciale. Sul display lampeggiano alternativamente l’indicazione SDA1 e la data. PAGE • Premere il tasto per scegliere fra i dieci allarmi data che è possi- bile impostare SDA1 - SDA 10).
-
Page 53: Selezione Della Visualizzazione
Attivazione/disattivazione dell'aggiornamento automatico (RDS) Tramite questa funzione l'apparecchio può attualizzare automaticamente le impostazioni di data e ora tramite il segnale RDS. MODE • Premere nove volte il tasto Nel display compare il messaggio UPDA ON. DOWN • Premere il tasto , per disattivare l'aggiornamento automatico. - Page 54 Impostazione dell’orario di sveglia Il ricevitore mondiale consente di programmare due orari di sveglia. Funzione sveglia Simbolo nel display Radio Segnali d’allarme Spento nessun simbolo VOL.+/AL–1 VOL.-/AL–2 • Con la radio spenta, premere il tasto Sul display appare l’ultimo orario di sveglia impostato e il simbolo relativo al tipo d’allarme.
- Page 55 SNOOZE • Premere il tasto per impostare il giorno della settimana desiderato. Per poter selezionare nuovamente i giorni della settimana, il fine settimana SNOOZE o l’intera settimana, tenere di nuovo premuto brevemente il tasto MODE • Premere il tasto , per memorizzare l’impostazione e ritornare al modo orario.
-
Page 56: Funzione Cronometro
Impostazione dell’interruzione sveglia MODE • A radio spenta, premere sette volte il tasto . Sul display appare l’interruzione sveglia impostata (alla messa in funzione “SNO 10”). DOWN • Con i tasti è possibile impostare l’interruzione sveglia in un lasso temporale che va da 1 a 59 minuti. Spegnimento della funzione sveglia VOL.+/AL–1 VOL.-/AL–2... - Page 57 Impostazione e memorizzazione del conto alla rovescia MEMORY SCAN • Spingere e tenere premuto il tasto per ca. 2 sec., sul display appare D 00.00. DOWN • Premere il tasto oppure per impostare il tempo desiderato. Sui tasti di memorizzazione sono preimpostati 5 tempi di conto alla rovescia, che è...
-
Page 58: Funzionamento Radio
Funzionamento radio Accensione/Volume POWER • Premere il tasto per accendere la radio. Dopo breve tempo sul display scompare ON e, in seguito, appare la frequenza attualmente impostata con la banda selezionata. VOL.+/AL–1 VOL.-/AL–2 • Regolare il volume tramite i tasti oppure VOL.-/AL–2 Tasto... -
Page 59: Impostazione Delle Stazioni Radio
Funzione snooze SNOOZE Tramite il tasto è anche possibile attivare la funzione snooze. È possibile impostare una durata di fino a 90 minuti con incrementi di dieci minuti, in seguito alla quale la radio si spegne automaticamente. Prima di farlo, spegnere la radio. -
Page 60: Sintonia Fine Delle Stazioni Radio
Impostazione del campo onde medie Poiché i sistemi di trasmissione radio differiscono da paese a paese, è necessario adattare il campo di ricezione: A radio spenta, premere sei volte il tasto MODE e selezionare con il • tasto UP o DOWN il relativo campo di ricezione in base alla seguente tabella: Regione Campionamento Banda... -
Page 61: Funzioni Di Memorizzazione
SW SEN. Tramite l’interruttore sul lato sinistro dell’apparecchio è possibile migliorare la qualità di ricezione per la gamma AM. Selezionare LX per stazioni radio con segnale forte, e DX per migliorare la ricezione delle stazioni radio con segnale debole. L’antenna telescopica non funziona per la banda delle onde medie e delle onde lunghe. - Page 62 Avvertenza: Se la presa è collegata al ricevitore mondiale e non sono inserite le pile, gli spazi di memoria vanno persi quando la spina viene estratta dalla presa. Selezione delle stazioni radio memorizzate • Per selezionare direttamente una stazione radio memorizzata, impos- tare per prima cosa la banda di frequenza con l’interruttore di sele- zione banda per trovare la stazione radio.
-
Page 63: Pulizia
Richiamo degli spazi di memoria MEMORY SCAN • Premere il tasto per richiamare tutti gli spazi di memoria impostati della banda di frequenza selezionata. Tutte le stazioni radio memorizzate vengono passate in rassegna l’una dopo l’altra per ca. cinque secondi. SNOOZE •... -
Page 64: Smaltimento
Smaltimento Smaltimento dell’apparecchio Non gettare per alcun motivo l’apparecchio insieme ai normali rifiuti domestici. Smaltire l’apparecchio attraverso un’azienda di smaltimento autorizzata o attraverso l’ente di smaltimento comunale. Questo prodotto è soggetto alla direttiva europea 2002/96/EC. Si prega di rispettare le norme attualmente vigenti. In caso di dubbio mettersi in contatto con l’ente di smaltimento competente. -
Page 65: Garanzia & Assistenza
Garanzia & assistenza Questo apparecchio è garantito per tre anni a partire dalla data di acquisto. L'apparecchio è stato prodotto con cura e debitamente collaudato prima della consegna. Conservare lo scontrino come prova d'acquisto. In caso di interventi in garanzia, contattare telefonicamente il proprio centro di assistenza. - Page 66 - 64 -...
- Page 67 ÍNDICE PÁGINA Finalidade de utilização Dados técnicos Símbolos utilizados Indicações instrutivas de segurança Elementos de comando Colocação em funcionamento Funções gerais Funções de tempo Horas, data, fuso horário e hora mundial ....77 Seleccionar modo de indicação .
-
Page 68: Finalidade De Utilização
RECEPTOR MUNDIAL KH2029 Leia o manual de instruções com muita atenção antes da primeira utilização e guarde-o para uso posterior. Na entrega a terceiros, junte também, este manual. Esta documentação está protegida por direitos de autor. Qualquer reprodução ou cópia, ainda que de excertos, assim como a repro- dução de imagens, mesmo se alteradas, só... - Page 69 Consumo de energia: 5 Watt Consumo de energia Standby: 1,4 W Temperatura de funcionamento: +5 ~ +35°C Humidade: 5 ~ 90 % (nenhuma condensação) Dimensões (C x A x L): 181 x 111 x 39 mm Peso do aparelho: aprox. 375 g Peso da fonte de alimentação: aprox.
-
Page 70: Símbolos Utilizados
Dados Gerais Posições de memória : 1600 (400 dependendo da banda de frequência) Auscultadores Modelo: E105 Impedância: 32 Ω Tensão característica em banda larga (WBCV): aprox. 206 mV Tensão máxima de saída da saída dos auscultadores: aprox. 80 mV Fonte de alimentação a partir da rede Fabricante: S&S MFG. -
Page 71: Indicações Instrutivas De Segurança
Este símbolo alerta para a não colocação do aparelho em água ou outros líquidos. Este símbolo avisa-o contra lesões auditivas. Nota: Este símbolo representa dicas relativas ao manuseamento do aparelho. Indicações instrutivas de segurança • Este aparelho não se destina a ser utilizado por pessoas (incluindo crianças) com capacidades físicas, sensoriais ou mentais limitadas ou com falta de experiência e/ou conhecimento, a não ser que se encon- trem sob vigilância de uma pessoa responsável pela sua segurança ou... - Page 72 Perigo devido a choque-eléctrico! • Ligue o aparelho a uma tomada de rede correctamente instalada e ligada à terra. A tensão de rede deve estar de acordo com a indicação existente na placa de identificação do aparelho. • Transformadores ou cabo de rede danificados devem ser substituídos imediatamente por técnicos especializados ou pela assistência ao cliente para evitar perigos.
- Page 73 • Nunca cubra as ranhuras de ventilação do aparelho quando este se encontra em funcionamento. • Não coloque fontes de incêndio abertas, como por ex., velas em cima ou ao lado do aparelho. Perigo de ferimentos • Mantenha as crianças afastadas do cabo de ligação e do aparelho. As crianças subavaliam com muita frequência os perigos que advêm de aparelhos eléctricos.
- Page 74 Indicações relativas à desconexão de rede POWER O botão deste aparelho não desliga o mesmo completamente da corrente. Além disso, o aparelho consome energia no modo Standby. Para desligar o aparelho completamente da corrente, o transformador tem de ser retirado da tomada de rede. Indicações relativas ao manuseio com pilhas O aparelho utiliza pilhas.
-
Page 75: Elementos De Comando
Elementos de comando Parte dianteira M.0/5 - M.4/9 Botões de memória Visor SNOOZE Botão (LW/SW/MW/FM) Interruptor de selecção da banda POWER Botão FINE Botão PAGE Botão UP/DOWN Botões VOL+(AL-1)/VOL-(AL-2) Botões MODE Botões BASS Botão MEMORY SCAN Botão Botão Colunas Parte traseira Base de apoio Antena Alça para transporte... -
Page 76: Colocação Em Funcionamento
Colocação em funcionamento Retirar o aparelho da embalagem Remova todo o material de embalagem. Atenção! Nunca deixar crianças pequenas brincar com a película de plástico. Existe o perigo de asfixia! Verificar o volume do fornecimento Certifique-se ao retirar o aparelho da embalagem de que foram fornecidos os seguintes componentes: •... - Page 77 • Abra o compartimento das pilhas no verso do aparelho, empurrando a tampa para baixo. • Coloque quatro pilhas no compartimento de acordo com a polaridade. • Volte a deslocar a tampa para o compartimento. Se as pilhas estiverem fracas, isto é indicado no visor através do símbolo intermitente Ligação à...
-
Page 78: Funções Gerais
Funções gerais Bloqueio das teclas Para evitar que as configurações sejam alteradas ao tocar nos botões sem intenção, pode activar um bloqueio dos botões. • Prima e mantenha premido o botão durante aprox.3 segundos. No visor aparece a indicação Todos os botões, à excepção do SNOOZE botão , estão agora bloqueados. -
Page 79: Horas, Data, Fuso Horário E Hora Mundial
As funções de tempo podem ser configuradas enquanto o rádio está ligado ou desligado. Se na primeira colocação em funcionamento não for recebido nenhum sinal RDS, o tempo predefinido do receptor de ondas curtas começa em "0:00 00". Se o aparelho for desligado da rede as configurações perdem-se. Horas, data, fuso horário e hora mundial MODE Pode configurar os botões... - Page 80 Acertar as horas MODE • Prime uma vez . No visor pisca a hora configurada pela última vez. DOWN • Prima o botão de modo a ajustar a hora em minutos. Mantenha um dos botões premido durante alguns segundos, de modo a configurar as horas em avanço rápido em intervalos de dez minutos.
- Page 81 Regular fuso horário MODE • Prima uma vez mais ou três vezes em . No visor, o fuso horário configurado pisca como abreviatura da respectiva cidade (na primeira colocação em funcionamento UTC); a indicação das horas desaparece. DOWN • Prima no botão para ir para o próximo fuso horário ou para o anterior.
- Page 82 Abreviaturas Dif. r. MEZ Hora de Verão Cidade -10:00 não Honolulu/EUA -9:00 Anchorage/EUA -8:00 Vancouver/Canadá -8:00 Los Angeles/EUA -7:00 Denver/EUA -6:00 Chicago/EUA -6:00 não Cidade do México/México -5:00 Nova Iorque/EUA -5:00 Toronto/Canadá -5:00 Montreal/Canadá -4:00 não Caracas/Venezuela -3:00 não Rio de Janeiro/Brasil -3:00 não Buenos Aires/Argentina...
- Page 83 *UTC Universal Time Coordinated (isto quer dizer: hora mundial coordenada). O UTC é a hora de referência, da qual são sincronizadas as horas nos fusos horários da terra. Ajuste da hora de Verão Nem todos os fusos horários do mundo estabelecem uma distinção entre hora de Verão e hora de Inverno.
- Page 84 Alarme de data especial MODE • Prima o botão uma quinta vez para configurar o alarme da data especial. No visor piscam alternadamente a indicação SDA1 e a data. PAGE • Prima o botão para escolher entre dez alarmes de datas configu- ráveis (SDA1 - SDA 10).
-
Page 85: Seleccionar Modo De Indicação
Ligar/desligar a actualização automática (RDS). Através desta função, o aparelho pode actualizar automaticamente as configurações da data e da hora com base no sinal RDS. MODE • Prima nove vezes a tecla . No visor surge a indicação UPDA ON. DOWN •... - Page 86 Ajustar hora de despertar Pode programar com o seu receptor mundial duas horas de despertar. Função de despertar Símbolo no visor Rádio sons sonoros desligado sem símbolo VOL.+/AL–1 VOL.-/AL–2 • Com o rádio desligado, prima o botão No visor surge a hora de despertar por último configurada e o símbolo para o tipo de alarme.
- Page 87 SNOOZE • Prima o botão para configurar o dia da semana desejado. Para retroceder para a selecção dos dias úteis, fins-de- semana ou semana SNOOZE completa, mantenha novamente premido o botão por breves instantes. MODE • Prima o botão para memorizar a configuração e para voltar ao modo da hora.
-
Page 88: Função Cronómetro
Regular interrupção do despertar MODE • Prima o botão 7 vezes, com o rádio desligado. No visor surge a interrupção do despertar regulada (aquando da colocação em funcionamento “SNO 10“). DOWN • Com os botões pode regular a interrupção do despertar para um tempo de 1 a 59 minutos. - Page 89 Regular e memorizar a contagem decrescente MEMORY SCAN • Prima e mantenha o botão para aprox. 2 seg., no visor surge a indicação D 00.00. DOWN • Prima os botões para configurar a hora desejada. Nos botões de memorização estão pré-memorizados 5 tempos de crono- metragem, que pode consultar directamente ao premir o botão de memo- rização correspondente: M.0/5...
-
Page 90: Funcionamento Do Rádio
Quando o tempo ajustado terminar, soa um sinal de alarme durante um minuto, que aumenta de volume e soa mais alto. MEMORY SCAN • Prima o botão de modo a interromper a contagem decrescente e a sair do modo contagem decrescente. Funcionamento do rádio Ligar/volume POWER... -
Page 91: Ajustar A Emissora
Função Snooze SNOOZE Pode activar através do botão a função snooze. Pode regular uma hora até 90 minutos em intervalos de 10 minutos, na qual o rádio se deverá desligar. Para isso, desligue primeiramente o rádio. SNOOZE • Prime o botão . -
Page 92: Sintonia Emissoras
Região Distância de anda de exploração requência Amerika 10 kHz 520-1710 kHz Europa 9 kHz 522-1656 kHz Sintonia emissoras Quando uma emissora não é encontrada, é possível melhorar a recepção através de um ajuste preciso. FINE • Durante a localização de emissora, prima o botão no visor surge a indicação FINE. -
Page 93: Funções De Memória
Funções de memória Memorizar emissoras O receptor mundial pode memorizar 400 emissoras para cada banda de frequência. De modo a memorizar uma emissora, proceda do seguinte modo: • Ajuste com o interruptor de selecção de bandas a banda de frequên- cia e depois a emissora, que deseja memorizar. - Page 94 PAGE DOWN • Prima o botão e seleccione depois com os botões UP ou uma página de memória (de 00 - 39). M.0/5 M.4/9 • Seleccione no prazo de 10 segundos com os botões posição de memória, na qual está colocada uma emissora. A emissora é...
-
Page 95: Limpeza
Limpeza Perigo de vida devido a choque eléctrico: • Desligue o aparelho da rede, antes de o limpar! • Nunca submergir as peças do aparelho em água ou outros líquidos! • Não deixe entrar humidade para dentro do aparelho. Limpeza da caixa: Limpe a superfície da caixa com um pano levemente húmido. -
Page 96: Importador
Eliminar pilhas/baterias As pilhas não podem ser deitadas no lixo doméstico. Cada consumidor é legalmente obrigado a entregar pilhas/baterias num pilhómetro da sua junta de freguesia/ ou no comércio. Esta obrigação serve para que as pilhas/baterias possam ser eliminadas de forma ecológica. Entregue as pilhas/ baterias apenas quando estão descarregadas. -
Page 97: Garantia & Assistência Técnica
Garantia & Assistência Técnica Este aparelho tem 3 anos de garantia a partir da data de compra. Este aparelho foi fabricado com o máximo cuidado e escrupulosamente testado antes da sua distribuição. Guarde o talão de compra como comprovativo da compra. Em caso de reivindicação da garantia, entre em contacto com o seu serviço de assistência técnica por telefone. - Page 98 - 96 -...
- Page 99 CONTENTS PAGE Intended use Technical Data Symbols used Safety information Operating elements Starting up General functions Time functions Time, date, time zone and world time ....109 Select display mode .
-
Page 100: Intended Use
MULTI-BAND RADIO KH2029 Before using the device for the first time, read these operating instructions carefully and keep them for later reference. Hand the instructions over when transferring the device to a third party. This documentation is copyright protected. Every duplication resp. every copying, also as extracts, as well as any reproduction of images, even in an altered state, is only permitted with the written consent of the manufacturer. - Page 101 Power consumption: 5 watts Power consumption Standby: 1.4 W Operating temperature: +5 ~ +35°C Humidity: 5 ~ 90% (no condensation) Dimensions (W x H x D): 181 x 111 x 39 mm Appliance weight: 375 g approx. Power transformer weight: 185 g approx.
-
Page 102: Symbols Used
General Memory positions : 1600 (400 for each frequency range) Headphones Model: E105 Impedance: 32 Ω Wideband characteristic Voltage (WBCV): approx. 206 mV Headphone socket max. Output voltage: approx. 80 mV Power transformer Manufacturer: S&S MFG. LTD. Model: A400-75 Primary: 230 V ~ 50 Hz / 30 mA Secondary: 7.5 V DC 400 mA / 3VA... -
Page 103: Safety Information
This symbol warns about submersing the appliance in water or other liquids. This symbol warns you about hearing damage. Note: With this symbol you are given tips about interaction with the appliance. Safety information • This device has not been designed for use by people (including children) with restricted physical, sensory or intellectual abilities or lack of expe- rience and/or knowledge, unless they are supervised by a responsible person (for their own safety) or have received instructions on how to... - Page 104 Risk of electric shock! • Connect the mains-power adapter only to correctly installed and earthed mains sockets. Ensure that the rating of the local power supply tallies completely with the details given on the rating plate of the appliance. • Damaged adapters or mains cables should be exchanged immediately by an authorised technician or the Customer Service in order to avoid risks.
- Page 105 Risk of injury • Keep children away from the connection cable and device. Children frequently underestimate the danger of electrical devices. • If the device has fallen down or is damaged it must no longer be used. Have the device checked by a qualified specialist and, if necessary, repaired.
- Page 106 Notes on handling batteries The device uses batteries. Please note the following on handling batteries: Risk of explosion! Do not throw batteries into a fire. Do not recharge batteries. • Never open, solder or weld batteries. There is a risk of explosion and injury! •...
-
Page 107: Operating Elements
Operating elements Front panel M.0/5 - M.4/9 Save buttons Display SNOOZE Button (LW/SW/MW/FM) Waveband selector switch POWER button FINE button PAGE button UP/DOWN buttons VOL+(AL-1)/VOL-(AL-2) buttons MODE button BASS button MEMORY SCAN button button Loudspeakers Back Stand Aerial Carrying strap SW SEN. -
Page 108: Starting Up
Starting up Unpack the device Remove all packaging materials. Caution! Do not let children play with the plastic film. There is a risk of suffocation. Check the items supplied Whilst unpacking, check that all of the following items are available to you: •... - Page 109 • Replace the cover on the battery compartment. If the batteries are too weak, this is indicated on the screen by a flashing symbol Mains connection EXT. DC 7.5 V 400 mA • Connect the plug of the mains adapter to the socket on the side of the device.
-
Page 110: General Functions
General functions Key lock In order to prevent changing the settings unintentionally by touching the buttons, you can activate the key lock. • Press and hold down the button for around 3 seconds. On screen, the message flashes. All buttons, except the buttons SNOOZE , are now blocked. -
Page 111: Time, Date, Time Zone And World Time
The time functions can only be set when the radio is switched off. If an RDS signal is not received at the first switch-on, the pre-adjusted time for the multi-band radio begins with "0:00 00". If the device is disconnected from its power supply the settings are lost. Time, date, time zone and world time MODE You can set the time, date and time zone via the... - Page 112 Setting clock time MODE • Press once. The most recently set time flashes on the screen. DOWN • Press the button to move the time forward or backward at minute intervals. Hold down one of the buttons for a few seconds to move the setting forward or backward quickly at 10 minute intervals.
- Page 113 Setting the time zone MODE • Press again or three times. The selected time zone flashes on the screen as the abbreviation for the corresponding city (UTC when first switched on); the time disappears. DOWN • Press the button to move the time zone forward or backward. The following table summarises the city abbreviations for the time zones and time differences.
- Page 114 Short code Difference from CET Summer time Town -10:00 Honolulu/USA -9:00 Anchorage/USA -8:00 Vancouver/Canada -8:00 Los Angeles/USA -7:00 Denver/USA -6:00 Chicago/USA -6:00 Mexico City/Mexico -5:00 New York/USA -5:00 Toronto/Canada -5:00 Montreal/Canada -4:00 Caracas/Venezuela -3:00 Rio de Janeiro/Brazil -3:00 Buenos Aires/Argentina UTC* 0:00 Universal Time Coordinated...
- Page 115 *UTC Universal Time Coordinated (UTC). UTC is the reference for the times of the various time zones around the world. Summer time offset Not every time zone around the world differentiates between summer and winter time. To display your timezone correctly you must, subject to the actual time zone, activate or deactivate the Summer Time offset.
- Page 116 Special date alarm MODE • Press the button a fifth time to set the special date alarm. The screen flashes SDA1 and the date in succession. PAGE • Press the button to select one of the ten settable date alarms (SDA1–SDA 10).
-
Page 117: Select Display Mode
Switch Automatic Update (RDS) On/Off With this function the device can automatically update the settings for date and time from the RDS signal. MODE • Press the button nine times. In the display the indication UPDA ON appears. DOWN • Press the button to switch the automatic update off. - Page 118 Setting the alarm time You can set two alarm times in your world receiver. Alarm function Symbol on the screen Radio Acoustic signals Switched off No symbol VOL.+/AL–1 VOL.-/AL–2 • With the radio switched off, press the buttons The screen shows the most recently set alarm time and the symbol for the alarm type.
- Page 119 SNOOZE • Press the button until the desired alarm days are set. Hold down SNOOZE button until the screen shows an individual week day. SNOOZE • Press the button to set the desired week day. To go back to selecting week days, weekend or every day, briefly hold SNOOZE down the button again.
-
Page 120: Stop Watch Function
Set snooze time MODE • With the radio switched off, press the button seven times. The screen displays the snooze time set (default is”SNO 10”). DOWN • Use the buttons to set the snooze time to a time between 1 and 59 minutes. Turning off the alarm function VOL.+/AL–1 VOL.–/AL–2... - Page 121 DOWN • Press the button to set the desired time. 5 countdown times are preset on the memory buttons and you can open these directly using the corresponding memory button: M.0/5 Button 10:00 M.1/6 Button 30:00 M.2/7 Button 45:00 M.3/8 Button 60:00 M.4/9...
-
Page 122: Radio Operation
Radio operation Switching on/volume control POWER • Press the button to switch the radio on. ON will appear briefly on the screen, followed by the current frequency and band selection. VOL.+/AL–1 VOL.–/AL–2 • Press the button to control the volume: VOL.–/AL–2 Button : quieter;... -
Page 123: Setting The Station
Sleep function SNOOZE You can activate the sleep function via the button. You can set a time of up to 90 minutes in ten-minute steps, after which the radio will auto- matically turn itself off. To do so, first switch the radio off. SNOOZE •... -
Page 124: Fine Tuning
Region Channel Band range spacing Amerika 10 kHz 520-1710 kHz Europa 9 kHz 522-1656 kHz Fine tuning If a station can not be found precisely the fine tuning can be use to improve reception. FINE • During the channel search press the button, the screen shows FINE. -
Page 125: Memory Functions
Memory functions Save station The world receiver can save 400 stations in each frequency range. To store a station, proceed as follows: • Set the frequency range with the frequency selection switch and then the station that you want to save. •... - Page 126 Selecting a saved station • In order to select a saved station directly, first use the frequency selection switch to select the frequency range where the station is saved. PAGE DOWN • Press the button and then use the buttons to select a memory page (from 00–39).
-
Page 127: Cleaning
Cleaning Risk of injury from electric shock: • Disconnect the device from the mains power before cleaning it! • Never immerse the device’s parts into water or other liquids! • Do not allow liquid to penetrate the housing. Cleaning the housing: Clean the housing surface with a slightly damp cloth. -
Page 128: Importer
Disposal of packaging Ensure all packaging materials are disposed in an environmentally friendly manner. Importer KOMPERNASS GMBH BURGSTRASSE 21 D-44867 BOCHUM www.kompernass.com - 126 -... -
Page 129: Warranty & Service
Warranty & Service The warranty for this appliance is for 3 years from the date of purchase. The appliance has been manufactured with care and meticulously examined before delivery. Please retain your receipt as proof of purchase. In the event of a warranty claim, please make contact by telephone with our Service Department. - Page 130 - 128 -...
- Page 131 INHALTSVERZEICHNIS SEITE Verwendungszweck Technische Daten Verwendete Symbole Sicherheitshinweise Bedienelemente Inbetriebnahme Allgemeine Funktionen Zeitfunktionen Uhrzeit, Datum, Zeitzone und Weltzeit ....141 Anzeigemodus wählen .......147 Weckfunktion .
-
Page 132: Verwendungszweck
WELTEMPFÄNGER KH2029 Lesen Sie die Bedienungsanleitung vor der ersten Verwendung aufmerksam durch und heben Sie diese für den späteren Gebrauch auf. Händigen Sie bei Weitergabe des Gerätes an Dritte auch die Anleitung aus. Diese Dokumentation ist urheberrechtlich geschützt. Jede Vervielfältigung, bzw. - Page 133 Leistungsaufnahme: 5 Watt Leistungsaufnahme Standby: 1,4 W Betriebstemperatur: +5 ~ +35°C Feuchtigkeit: 5 ~ 90 % (keine Kondensation) Abmessungen (B x H x T): 181 x 111 x 39 mm Gewicht Gerät: ca. 375 g Gewicht Netzteil: ca. 185 g Batterien 4x 1,5 V, Typ AA/LR6/Mignon (Nicht im Lieferumfang enthalten) Frequenzbereich Radio:...
-
Page 134: Verwendete Symbole
Allgemein Speicherplätze: 1600 (400 je Frequenzband) Kopfhörer Modell: E105 Impedanz: 32 Ω Breitband-Kennungsspannung (WBCV): ca. 206 mV Kopfhörerausgang maximale Ausgangsspannung: ca. 80 mV Netzteil Hersteller: S&S MFG. LTD. Modell: A400-75 Primär: 230 V ~ 50 Hz / 30 mA Sekundär: 7,5 V DC 400 mA / 3VA Verwendete Symbole Dieses Warnsymbol macht Sie drauf aufmerksam, dass hier ein... -
Page 135: Sicherheitshinweise
Dieses Symbol warnt vor dem Eintauchen des Gerätes in Wasser oder andere Flüssigkeiten. Dieses Symbol warnt Sie vor Gehörschäden. Hinweis: Bei diesem Symbol werden Ihnen Tipps zum Umgang mit dem Gerät gegeben. Sicherheitshinweise • Dieses Gerät ist nicht dafür bestimmt, durch Personen (einschließlich Kinder) mit eingeschränkten physischen, sensorischen oder geistigen Fähigkeiten oder mangels Erfahrung und/oder mangels Wissen benutzt zu werden, es sei denn, sie werden durch eine für ihre Sicherheit... - Page 136 Gefahr durch elektrischen Schlag! • Schließen Sie das Steckernetzteil nur an eine vorschriftsmäßig installierte und geerdete Netzsteckdose an. Die Netzspannung muss mit den Angaben auf dem Typenschild des Gerätes übereinstimmen. • Lassen Sie beschädigte Steckernetzteile oder Netzkabel sofort von autorisiertem Fachpersonal oder dem Kundenservice austauschen, um Gefährdungen zu vermeiden.
- Page 137 • Decken Sie niemals die Lüftungsschlitze des Gerätes ab, wenn es eingeschaltet ist. • Stellen Sie keine offenen Brandquellen, wie z. B. Kerzen auf oder neben das Gerät. Verletzungsgefahr • Halten Sie Kinder von Anschlussleitung und Gerät fern. Kinder unter- schätzen häufig die Gefahren von Elektrogeräten.
- Page 138 Hinweis zur Netztrennung POWER Die Taste dieses Gerätes trennt das Gerät nicht vollständig vom Stromnetz. Außerdem nimmt das Gerät im Standby-Betrieb Strom auf. Um das Gerät vollständig vom Netz zu trennen, muss das Steckernetzteil aus der Netzsteckdose gezogen werden. Hinweise zum Umgang mit Batterien Das Gerät verwendet Batterien.
-
Page 139: Bedienelemente
Bedienelemente Vorderseite M.0/5 M.4/9 Speichertasten Display SNOOZE Taste (LW/SW/MW/FM) Bandwahlschalter POWER Taste FINE Taste PAGE Taste UP/DOWN Tasten VOL+(AL-1)/VOL-(AL-2) Tasten MODE Taste BASS Taste MEMORY SCAN Taste Taste Lautsprecher Rückseite Standfuß Antenne Trageschlaufe SW SEN. (DX/LX) Schalter Kopfhörerausgang EXT. DC 7.5 V 400 mA : Anschluss für Steckernetzteil - 137 -... -
Page 140: Inbetriebnahme
Inbetriebnahme Gerät auspacken Entfernen Sie sämtliches Verpackungsmaterial. Achtung! Lassen Sie kleine Kinder nicht mit Folie spielen. Es besteht Erstickungsgefahr! Lieferumfang prüfen Vergewissern Sie sich beim Auspacken, dass folgende Teile mitgeliefert wurden: • Weltempfänger • Netzteil • Kopfhörer • Aufbewahrungstasche • Diese Bedienungsanleitung Netz- und Batteriebetrieb Wenn Sie das Gerät vom Netz nehmen, gehen eventuell vorgenommene... - Page 141 • Schieben Sie den Deckel wieder auf das Fach. Werden die Batterien zu schwach, so wird dies im Display durch das blinkende Symbol angezeigt. Netzanschluss • Schließen Sie den Gerätestecker des Steckernetzteils an die Buchse EXT. DC 7.5 V 400 mA an der Geräteseite an.
-
Page 142: Allgemeine Funktionen
Allgemeine Funktionen Tastensperre Um zu verhindern, dass durch unabsichtliches Berühren der Tasten Einstel- lungen geändert werden, können Sie eine Tastensperre aktivieren. • Drücken und halten Sie dazu die Taste für ca. 3 Sekunden. Im Display SNOOZE MEM, blinkt die Anzeige . -
Page 143: Uhrzeit, Datum, Zeitzone Und Weltzeit
Wenn bei der Erstinbetriebnahme kein RDS-Signal empfangen wurde, beginnt die voreingestellte Zeit des Weltempfängers bei „0:00 00“. Wenn das Gerät vom Netz genommen wird, gehen die Einstellungen verloren. Uhrzeit, Datum, Zeitzone und Weltzeit MODE Sie können über die Taste Uhrzeit, Datum und Zeitzone einstellen. Weiterhin können Sie die Weltzeit, den Datumsalarm, den Mittelwellen- empfang, die Weckzeitunterbrechung, den Stundenmodus abfragen und einstellen sowie das automatische Update ein- und ausschalten. - Page 144 Uhrzeit einstellen MODE • Drücken Sie einmal . Im Display blinkt die zuletzt eingestellte Uhrzeit. DOWN • Drücken Sie die Taste bzw. , um die Uhrzeit in Minuten-Schritten vor bzw. zurückzustellen. Halten Sie eine der Tasten ein paar Sekunden gedrückt , um die Zeit im Schnelllauf in Zehn-Minuten-Schritten vor bzw. zurückzustellen.
- Page 145 Zeitzone einstellen MODE • Drücken Sie ein weiteres Mal bzw. dreimal . Im Display blinkt die eingestellte Zeitzone als Kürzel für die zugehörige Stadt (bei der ersten Inbetriebnahme UTC); die Uhrzeit verschwindet. DOWN • Drücken Sie die Taste bzw. , um zur nächsten bzw. vorherigen Zeitzone zu gelangen.
- Page 146 Kürzel Diff. z. MEZ Sommerzeit Stadt nein -10:00 Honolulu/USA -9:00 Anchorage/USA -8:00 Vancouver/Kanada -8:00 Los Angeles/USA -7:00 Denver/USA -6:00 Chicago/USA nein -6:00 Mexico City/Mexico -5:00 New York/USA -5:00 Toronto/Kanada -5:00 Montreal/Kanada nein -4:00 Caracas/Venezuela nein -3:00 Rio de Janeiro/Brasilien nein -3:00 Buenos Aires/Argentinien UTC*...
- Page 147 *UTC Universal Time Coordinated (dt.: koordinierte Weltzeit). Die UTC ist die Referenzzeit, von der die Zeiten in den verschiedenen Zeitzonen der Erde abgeleitet werden. Sommerzeitversatz Nicht jede Zeitzone der Erde unterscheidet zwischen Sommer- und Winter- zeit. Um Ihre Zeitzone richtig darzustellen, müssen Sie den Sommerzeitver- satz je nach Zeitzone aktivieren bzw.
- Page 148 Spezieller Datumsalarm MODE • Drücken Sie die Taste ein fünftes Mal, um den speziellen Datums- alarm einzustellen. Im Display blinken abwechselnd die Anzeige SDA1 und das Datum. PAGE • Drücken Sie die Taste , um zwischen zehn einstellbaren Datumsalar- men (SDA1 - SDA 10) zu wählen. DOWN •...
-
Page 149: Anzeigemodus Wählen
Automatisches Update (RDS) ein- / ausschalten Über diese Funktion kann das Gerät die Einstellungen für Datum und Uhrzeit anhand des RDS-Signals automatisch aktualisieren. MODE • Drücken Sie neunmal die Taste . Im Display erscheint die Anzeige UPDA ON. DOWN • Drücken Sie die Taste , um das automatische Update auszuschalten. - Page 150 Weckzeit einstellen Sie können mit Ihrem Weltempfänger zwei Weckzeiten programmieren. Weckfunktion Symbol im Display Radio Signaltöne Ausgeschaltet kein Symbol VOL.+/AL–1 • Drücken Sie bei ausgeschaltetem Radio die Taste VOL.-/AL–2 (oder ). Im Display erscheint die zuletzt eingestellte Weckzeit und das Symbol für den Typ des Alarms. DOWN •...
- Page 151 SNOOZE • Drücken Sie die Taste , um den gewünschten Wochentag einzu- stellen. Um wieder zurück zur Auswahl von Werktagen, Wochenende oder ganzer SNOOZE Woche zu gelangen, halten Sie die Taste erneut kurz gedrückt. MODE • Drücken Sie die Taste , um die Einstellung zu speichern und in den Uhrzeit-Modus zurückzukehren.
-
Page 152: Stoppuhr-Funktion
Weckunterbrechung einstellen MODE • Drücken Sie bei ausgeschaltetem Radio 7x die Taste . Im Display erscheint die eingestellte Weckunterbrechung (bei der Inbetriebnahme SNO 10). DOWN • Mit den Tasten können Sie die Weckunterbrechung auf eine Zeit zwischen 1 und 59 Minuten einstellen. Weckfunktion ausschalten VOL.+/AL–1 VOL.-/AL–2... - Page 153 Countdown einstellen und speichern MEMORY SCAN • Drücken und halten Sie die Taste für ca. 2 Sek., im Display erscheint die Anzeige D 00.00. DOWN • Drücken Sie die Tasten bzw. um die gewünschte Zeit einzustellen. Auf den Speichertasten sind 5 Countdownzeiten vorgespeichert, die Sie durch Drücken der entsprechenden Speichertaste direkt aufrufen können: M.0/5 Taste...
-
Page 154: Radiobetrieb
Radiobetrieb Einschalten/Lautstärke POWER • Drücken Sie die Taste , um das Radio einzuschalten. Im Display wird kurz ON eingeblendet, anschließend erscheint die aktuell einge- stellte Frequenz mit dem gewählten Band. VOL.+/AL–1 VOL.-/AL–2 • Regeln Sie über die Tasten bzw. die Lautstärke: VOL.-/AL–2 Taste : leiser;... -
Page 155: Sender Einstellen
Schlummerfunktion SNOOZE Über die Taste können Sie auch die Schlummerfunktion aktivieren. Sie können eine Zeit bis zu 90 Minuten in Zehn-Minuten-Schritten einstel- len, nach der sich das Radio automatisch abschalten soll. Schalten Sie das Radio hierzu vorher aus. SNOOZE • Drücken Sie die Taste . -
Page 156: Senderfeinabstimmung
Region Abtastabstand Bandbereich Amerika 10 kHz 520-1710 kHz Europa 9 kHz 522-1656 kHz Senderfeinabstimmung Wenn ein Sender nicht genau gefunden werden kann, ist es möglich durch eine Feinabstimmung, den Empfang zu verbessern. FINE • Drücken Sie während der Sendersuche die Taste , im Display erscheint FINE die Anzeige... -
Page 157: Speicherfunktionen
Speicherfunktionen Sender speichern Der Weltempfänger kann 400 Sender für jedes Frequenzband speichern. Um einen Sender zu speichern gehen Sie wie folgt vor: • Stellen Sie mit dem Bandwahlschalter das Frequenzband und dann den Sender ein, den Sie abspeichern möchten. • Drücken Sie die Taste . - Page 158 Gespeicherten Sender auswählen • Um einen gespeicherten Sender direkt auszuwählen, stellen Sie zunächst mit dem Bandwahlschalter das Frequenzband ein, in dem der Sender zu finden ist. PAGE • Drücken Sie die Taste und wählen Sie dann mit den Tasten bzw. DOWN eine Speicherseite (von 00 - 39) aus.
-
Page 159: Reinigung
Hinweis: Bitte beachten Sie, dass hierbei die Schlummerfunktion aktiviert wird. SNOOZE Drücken Sie sooft die Taste , bis 00 im Display erscheint. Reinigung Lebensgefahr durch elektrischen Schlag: • Trennen Sie das Gerät vom Stromnetz, bevor Sie es reinigen! • Tauchen Sie die Geräteteile niemals in Wasser oder andere Flüssigkeiten! •... -
Page 160: Importeur
Batterien/Akkus entsorgen Batterien dürfen nicht im Hausmüll entsorgt werden. Jeder Verbraucher ist gesetzlich verpflichtet, Batterien/ Akkus bei einer Sammelstelle seiner Gemeinde/seines Stadtteils oder im Handel abzugeben. Diese Verpflichtung dient dazu, dass Batterien/Akkus einer umweltscho- nenden Entsorgung zugeführt werden können. Geben Sie Batterien/Akkus nur im entladenen Zustand zurück. - Page 161 Die Garantieleistung gilt nur für Material- oder Fabrikationsfehler, nicht aber für Transportschäden, Verschleißteile oder für Beschädigungen an zerbrechlichen Teilen, z. B. Schalter oder Akkus. Das Produkt ist lediglich für den privaten und nicht für den gewerblichen Gebrauch bestimmt. Bei missbräuchlicher und unsachgemäßer Behandlung, Gewaltanwendung und bei Eingriffen, die nicht von unserer autorisierten Service-Niederlassung vorgenommen wurden, erlischt die Garantie.