
Related Manuals for Hitachi HCWA21NEWH


Summary of Contents for Hitachi HCWA21NEWH
- Page 1 INSTALLATION AND OPERATION MANUAL HITACHI WIRED CONTROLLER Installation and Operation Manual Model HCWA21NEWH HPU2017003HA...
-
Page 2: Table Of Contents
CONTENTS Safety precautions ..................1 Wired Controller installation ..............3 Wired Controller introduction ..............8 Wired Controller ...................8 LCD Screen....................9 Basic Operation..................10 Function Set....................11 Super mode ....................11 Mute mode....................11 Sleep mode ....................11 Button Lock ....................12 Filter Clean Reset ..................12 Clock Set .....................12 Single Timer ON/OFF ................13 Daily ON/OFF Timer ..................13 Weekly Timer....................14 Maintenance, Troubleshooting and After-Sale Service ......15... -
Page 3: Safety Precautions
Safety Precautions 1. Important Notice ● We pursue a policy of continuous improvement in design and performance of products. Company reserves the right to change the specifications without notice. ● We cannot anticipate every possible circumstance that might involve a potential hazard. ●... - Page 4 Safety Precautions ● Please be sure to cut off the main power supply before opening the panel to repair. ● Please use specified cable. Connect it firmly to the connection terminals avoiding the shielding. Do not apply wire stress to these parts. Otherwise it might cause electric shock or fire, etc. ●...
-
Page 5: Wired Controller Installation
Wired Controller Installation Checking accessories Check that the following accessories are included with the unit before installation: Quality certification Controlling cable Connecting terminal Manual Screw 2 pcs 2 pcs How to install 1.Selecting the Installation Location. Please select the installation location according to safety precautions . 2. - Page 6 Wired Controller Installation Wiring ② A.Connect the controlling cable with upper cover terminal as the figure above. B.Connect the other attached controlling cable with indoor unit control board. C.Connect the 2 controlling cables with attached connecting terminal as the figure below: Controlling cable Controlling cable Firmly fasten the connection cord after connection.
- Page 7 Wired Controller Installation Custom- setting Implication of code display Description Remarks parameter code When “boot” blinks, press “ ” to restore to boot factory default and quit parameter set. Temperature display setting 0-Display the set temperature; 1-Display the indoor environment temperature 0-Display in Celsius;...
- Page 8 Wired Controller Installation Temp. limit setting (cooling mode) Temp. limit setting (heating mode) Setting method: Press down the " " and " " button at the same time for 5s to enter parameter setting mode. Press " " or " "...
- Page 9 Wired Controller Installation How to cancel: Press the " " button to exit without saving, all values will blink on the display. Upper cover assembly Align the upper cover with the hasp of lower cover of the wired controller, and then press the upper cover onto the lower cover.
-
Page 10: Wired Controller Introduction
Wired Controller Introduction Wired controller ON/OFF BUTTON The appliance will be started or stopped when this button is pressed. MODE BUTTON Press this button to select the operation mode. FAN BUTTON TIMER/CLOCK BUTTON Used to set the current time or set timer on/off. UP SETTING BUTTON Used to raise the setting values or to set the airflow direction. -
Page 11: Lcd Screen
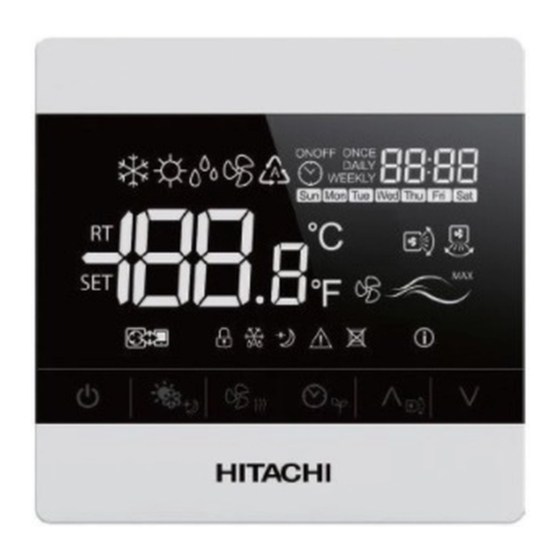
Wired Controller Introduction LCD screen Mode indication area,which indicate the current operation mode Timer setting Clock Up/Down airflow swing Left/Right airflow swing Display room temperature /set temperature Fan speed display Parameter revision indicator Filter clean indicator Electric heater indicator Button lock indicator Error Indicator Defrost indicator Sleep indicator... -
Page 12: Basic Operation
Basic operation This wired controller should be used with the air-conditioner, it can be used for cooling, heating, dry and fan etc. Other functions and settings please refer to the specific operation in this manual 1. Turning ON/OFF Press the button, the appliance will be started or stopped. -
Page 13: Function Set
Function set Super mode The maximum cooling/heating capacity can be activated at the super mode. How to activate: Press and hold" " and " " buttons for 5s simultaneously with the working unit to activate the super mode, and the indoor unit will run at the ultrahigh fan speed, and displays icon. -
Page 14: Button Lock
Function set Button lock After the wired controller setting is completed, lock buttons to avoid wrong operation by children and others. User settings are overwritten with lock function. All operations are disabled after button lock function has been set. How to activate: ”... -
Page 15: Single Timer On/Off
Function set Single TIMER ON/OFF How to activate: During OFF condition, repetitively press " " button until icon ONCE appears, “ON” and clock set are flickering, press “ ” button to enter timer on setting. Press “ ” button to adjust the timer hour. Enter “Single TIMER ON/OFF ”... -
Page 16: Weekly Timer
Function set Weekly Timer Weekly timer can be used to set on/off time respectively for seven days a week. Air conditioner can be on/off in preset time every day, without manual control. The air conditioner can be set on/off automatically before you wake up in the morning, back home from work or during sleep at night. -
Page 17: Maintenance, Troubleshooting And After-Sale Service
Maintenance, troubleshooting and after-sales service Maintenance Wipe the LCD or the body of the wired controller with a dry cloth. If the dirt on the surface cannot be removed, soak the cloth in neutral detergent diluted with water, squeeze the cloth tightly and clean the surface. Wipe the surface with a dry cloth. Do not use any thinner, organic solvents, or strong acid. - Page 18 Specifications in this document are subject to change without notice, in order that Hitachi-Johnson Controls Air Conditioning, Inc. may bring the latest innovations to their customers. Hitachi-Johnson Controls Air Conditioning, Inc. © 2017 Hitachi-Johnson Controls Air Conditioning, Inc.