Table of Contents
Advertisement
Available languages
Available languages
Quick Links
WelcomeEye Link
531034
FR -Notice téléchargeable sur philips.com
GB - Downloadable instructions at phillips.com
D - Anleitung kann auf philips.com heruntergeladen werden
NL - De handleiding kan gedownload worden op philips.com
PL - Instrukcja do pobrania na philips.com
IT- Il manuale è disponibile anche su www.philips.com.
ES - Manual que puede descargar en philips.com
PT - Manual de instruções disponível no site philips.com
V1
Scan me
to fi nd out about our products
Flashez-moi
pour découvrir nos produits
Advertisement
Chapters
Table of Contents

Related Manuals for Philips WelcomeEye Link


Summary of Contents for Philips WelcomeEye Link
- Page 1 FR -Notice téléchargeable sur philips.com GB - Downloadable instructions at phillips.com D - Anleitung kann auf philips.com heruntergeladen werden NL - De handleiding kan gedownload worden op philips.com PL - Instrukcja do pobrania na philips.com IT- Il manuale è disponibile anche su www.philips.com.
- Page 2 WelcomeEye / Link / V1...
-
Page 3: Table Of Contents
SOMMAIRE CONSIGNES DE SÉCURITÉ............2 CONTENU DU KIT................3 PRÉSENTATION................4 PARAMÉTRAGE POUR UNE UTILISATION WIFI....5 RÉINITIALISATION................6 INSTALLATION ET CÂBLAGE............p.10 7 MODE D’EMPLOI................p.13 8 POUR ALLER PLUS LOIN..............p.14 9 CARACTÉRISTIQUES TECHNIQUES..........p.14 10 ACCESSOIRES ……………………………..........…. p.14 11 ASSISTANCE TECHNIQUE - GARANTIE........ - Page 4 1. CONSIGNE DE SÉCURITÉ Important ! • Veuillez lire le manuel d’utilisation soigneusement avant d’installer ou d’utiliser ce produit. • Si vous installez ce produit pour d’autres, pensez à laisser le manuel ou une copie à l’utilisateur final. Avertissement : •...
-
Page 5: Contenu Du Kit
2. CONTENU DU KIT 1. Platine de rue 2. Batterie 3 • Support 4 • Double face pour inclinaison horizontale 6 • Carte micro SD.(déjà insérée dans son emplacement) 5 • 2 câbles pour la 7 • Cordon USB 8 • Pack de vis (3 chevilles, commande portail 3 vis murales, 3 vis noires de fixation sur le support... -
Page 6: Présentation
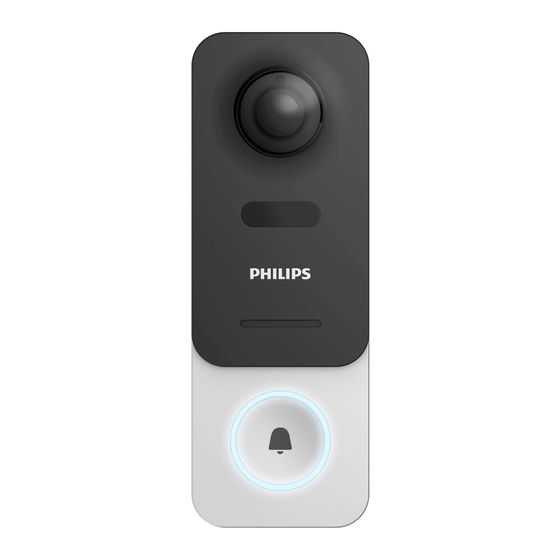
3. PRÉSENTATION Cellule crépusculaire (permet l'éclairage des led IR à la pénombre) Objectif caméra (fixe, non inclinable) Face avant Détecteur platine de rue de présence Eclairage infra rouge (non visible), permet d’identifier un visiteur à 1 mètre Haut-parleur Bouton d'appel Bouton reset Emplacement Micro... -
Page 7: Paramétrage Pour Une Utilisation Wifi
Connectez votre téléphone sur le wifi 2,4GHz qui sera utilisé par votre platine de rue. F. Téléchargez et installez l’application Philips WelcomeHome à partir de l’App Store / Google Play. (validez toutes les demandes d’autorisation) WelcomeEye / Link / V1... - Page 8 G. Vous devez créer un compte. Cliquez sur « s’inscrire » en bas à droite, et remplissez les champs demandés. N’oubliez pas de remplir le captcha. Validez « s’inscrire ». H. Vous allez recevoir un mail de confirmation de création de compte, validez le lien reçu. (Attention, vérifier le dossier «...
- Page 9 Depuis la page d’accueil, appuyez sur « ajouter un appareil », sélectionnez PHILIPS, puis PHILIPS WelcomeHome, et « par choix ». K. cliquez sur l’icône de la platine de rue et renseignez l’UID de votre platine de rue LECS-(6 chiffres)-(7 lettres).
- Page 10 M. Si votre platine de rue ne clignote plus en rouge, relancez un reset. Appuyez sur « Suivant », votre téléphone émet alors une série de signaux aigus. Placez votre téléphone à côté de votre platine de rue, (vérifiez que le volume du téléphone soit pas trop bas) La platine de rue clignote bleu, reste fixe, puis s’éteint.
-
Page 11: Réinitialisation
Si vous souhaitez configurer un autre téléphone sur cette même platine de rue, 2 solutions sont possibles : - Pour une utilisation permanente : téléchargez l’application Philips WelcomeHome sur le nouveau téléphone et connectez-vous en utilisant l’adresse mail et mot de passe de votre compte principal. -
Page 12: Installation Et Câblage
6. INSTALLATION ET CÂBLAGE Avant de placer la platine de rue à son emplacement définitif, nous vous conseillons d’effectuer un essai pour vérifier la connexion Wifi. Si la platine se connecte à votre réseau Wifi, vous pouvez alors procéder à l’installation définitive. - Page 13 - La visser au mur directement - Utiliser le support d’inclinaison horizontal, si vous avez besoin Attention : Si besoin, n’oubliez pas de connecter la commande motorisation (contact sec au dos) avant de fixer la platine de rue. Utilisez les 2 vis fournies à cet effet. Important : La commande est un contact sec.
- Page 14 Étape 2. : Insérez la batterie (Attention au sens, côté fiche micro USB en premier) jusqu’au clic de l’ergot de maintien. Étape 3. : Vérifiez la présence de la carte micro SD, si vous ne l’avez pas fait pendant les essais sur table.
-
Page 15: Mode D'emploi
A. Un appel sur le bouton de la platine de rue déclenche un appel ou une notification sur l’appareil mobile. Pensez à autoriser les appels ou notifications depuis Philips WelcomeHome dans les réglages de votre appareil mobile. B. Après avoir accepté l’appel, vous pouvez voir votre visiteur et lui répondre. -
Page 16: Pour Aller Plus Loin
Dans le cas où la batterie demande à être chargée, retirez la façade de la platine pour accéder à la batterie. Chargez au moins 5 heures avec le cordon USB fourni. 8. POUR ALLER PLUS LOIN Pour découvrir plus de fonctionnalités sur votre produit WelcomeEye LINK, vous pouvez télécharger la notice complète sur le site www.philips.com 9. -
Page 17: Assistance Technique - Garantie
Important : veuillez conserver précieusement cette carte de garantie, ainsi que votre preuve d’achat. Philips et l’emblème bouclier Philips sont des marques déposées de Koninklijke Philips N.V. et sont utilisées sous licence. Ce produit a été fabriqué par et est vendu sous la responsabilité... -
Page 18: Mesures De Sécurité
12. MESURES DE SÉCURITÉ Les dommages provoqués par le manque de conformité au manuel mènent à l’expiration de la garantie. Nous n’assumerons aucune responsabilité pour les dommages en résultant ! Nous n’assumerons aucune responsabilité concernant tout dommage, sur les biens ou les personnes, causé... -
Page 19: 14 Déclaration De Conformité
4. DÉCLARATION DE CONFORMITÉ Le soussigné, AVIDSEN, déclare que l’équipement radioélectrique du type WelcomeEye est conforme à la directive 2014/53/UE. Le texte complet de la déclaration UE de conformité est disponible à l’adresse internet suivante : www.avidsen.com. WelcomeEye / Link / V1... - Page 20 CONTENTS SAFETY INSTRUCTIONS............2 KIT CONTENTS................3 OVERVIEW..................4 SETTINGS FOR WIFI USE............5 RESETTING................... 6 INSTALLATION AND WIRING..........p.10 7 USER MANUAL................p.13 8 FURTHER INFORMATION............p.14 9 TECHNICAL CHARACTERISTICS........... p.14 10 ACCESSORIES................p.14 11 TECHNICAL SUPPORT - WARRANTY......... p.15 12 SAFETY MEASURES..............
-
Page 21: Safety Instructions
1. SAFETY INSTRUCTIONS Important! • Please carefully read the user manual before installing or using this product. • If you are installing this product for someone else, remember to leave the manual or a copy of it with the end user. Warning: •... -
Page 22: Kit Contents
2. KIT CONTENTS 1. Intercom 2. Battery 3 • Bracket 4 • Double- panel sided tape horizontal tilting 6 • Micro SD card.(already inserted in its slot) 5 • 2 cables for the 7 • USB cable 8 • Pack of screws (3 wall gate control plugs, 3 wall screws, 3 black screws for fixing the... -
Page 23: Overview
3. OVERVIEW Dawn-to-dusk cell (allows IR LED lighting at twilight) Camera lens (fixed, cannot be tilted) Intercom panel Presence front sensor Infra-red lighting (not visible), allows a visitor to be identified at 1 metre Loudspeaker Call button Reset button Micro SD card Microphone slot installation... -
Page 24: Settings For Wifi Use
10 seconds. Note: Connect your phone to the 2.4 GHz WiFi which will be used for your intercom panel. F. Download and install the Philips WelcomeHome app from the App Store/Google Play. (Confirm all authorisation requests.) WelcomeEye / Link / V1... - Page 25 G. You must create an account. Click “s’inscrire” (register) at the bottom right-hand side and fill in the fields requested. Don’t forget to fill in the captcha. Confirm “s’inscrire” (register). H. You will receive an email confirming that you have created an account. Confirm the link received.
- Page 26 J. If your phone cannot scan the code, you can register manually. On the home page, press “ajouter un appareil” (add a device), select PHILIPS, then PHILIPS WelcomeHome, and “par choix” (by choice). K. Click the intercom panel icon and complete the UID for your LECS intercom panel (6 numbers)-(7 letters).
- Page 27 M. If your intercom panel is no longer flashing red, start a reset. Click “Suivant” (Next). Your phone will now give a series of high-pitched signals. Place your phone next to your intercom panel (having checked that the phone’s volume is not too low) The intercom panel will flash blue, remain stable, then go out.
-
Page 28: Resetting
If you wish to configure another phone to the same intercom panel, there are 2 possible ways of doing this: - For permanent use: download the Philips WelcomeHome app onto the new phone and log in using the email address and password of your main account. -
Page 29: Installation And Wiring
6. INSTALLATION AND WIRING Before placing the intercom panel in its permanent position, we recommend that you check the WiFi connection. If the panel connects to your WiFi network, you can then proceed with the permanent installation. If you are positioning the device outside the range of your Internet router, it might be necessary to use an external WiFi terminal. - Page 30 - Or screw it straight onto the wall. - Use the horizontal tilting bracket if you need to. Note: If applicable, don’t forget to connect the motorised control (dry contact on the back) before fixing the intercom panel. Use the 2 screws provided for this purpose. Important: The control is a dry contact.
- Page 31 Step 2. : Insert the battery (making sure you insert it the right way up, with the micro USB plug side first) until the support lug clicks. Step 3. : Check that the micro SD card is there, if you did not do so while carrying out tests on a table.
-
Page 32: User Manual
A. When someone presses the button on the intercom panel button, this triggers a call or notification to the mobile device. Remember to authorise calls or notifications from Philips WelcomeHome in your mobile device settings. B. Once you have accepted the call, you will be able to see and respond to your visitor. -
Page 33: Further Information
If the battery needs to be recharged, remove the front of the panel to access it. Charge for at least 5 hours using the USB cable provided. 8. FURTHER INFORMATION For more information about the features of your WelcomeEye LINK product, download the www.philips.com full instructions from the website 9. -
Page 34: Technical Support - Warranty
Important : veuillez conserver précieusement cette carte de garantie, ainsi que votre preuve d’achat. Philips and the Philips Shield Emblem are registered trademarks of Koninklijke Philips N.V. and are used under license. This product was manufactured and is sold by AVIDSEN SAS, the sole guarantor of the product. -
Page 35: Safety Measures
12. SAFETY MEASURES Damage caused by failing to adhere to the manual nullifies the warranty. We will not accept liability for damage resulting from non-compliance! We will not accept liability for any harm to goods or people caused by improper handling or failure to adhere to safety instructions. - Page 36 INHALT SICHERHEITSANWEISUNGEN............2 INHALT DES SETS................. 3 PRÄSENTATION..................4 EINSTELLUNGEN FÜR EINE VERWENDUNG MIT WLAN..5 RESET....................... 6 INSTALLATION UND VERKABELUNG..........S.10 7 BEDIENUNGSANLEITUNG..............S.13 8 VERTIEFENDE INFORMATIONEN............ S.14 9 TECHNISCHE MERKMALE..............S.14 10 ZUBEHÖR/ZUSATZGERÄTE .............. S.14 11 TECHNISCHER SERVICE - GARANTIE..........S.15 12 SICHERHEITSMAẞNAHMEN.............
-
Page 37: Sicherheitsanweisungen
1. SICHERHEITSANWEISUNGEN Wichtig! • Bitte lesen Sie das Bedienungshandbuch vor der Installation oder der Verwendung dieses Geräts aufmerksam durch. • Wenn Sie dieses Gerät für Drittpersonen installieren, denken Sie bitte daran, dem Endanwender das Handbuch oder eine Kopie davon zu geben. Warnhinweis: •... -
Page 38: Inhalt Des Sets
2. INHALT DES SETS 1. Türsprechanlage 2. Akku 3 • Halterung 4 • für Schrägstellung Doppelseitiges (horizontale Klebeband Neigung) 6 • MicroSD-Karte (bereits in den Steckplatz eingesetzt) 5 • 2 Kabel für die 7 • USB-Ladekabel 8 • Schraubenpaket Torsteuerung (3 Dübel, 3 Wandschrauben, 3 schwarze Schrauben für... -
Page 39: Präsentation
3. PRÄSENTATION Dämmerungssensor (er- möglicht die IR-LED-Be- leuchtung bei Dunkelheit) Kameraobjektiv (feststehend, nicht kippbar) Vorderseite Sensor Türsprechanlage Anwesenheitserkennung Infrarot-Beleuchtung (nicht sichtbar) ermöglicht es, einen Besucher in 1 Meter Entfernung auszumachen Lautsprecher Ruftaste Reset-Taste Steckplatz Mikrofon MicroSD-Kar- QR-Code für Montage Sicherheits- Steuerung Akkuschacht (einschie-... -
Page 40: Einstellungen Für Eine Verwendung Mit Wlan
Taste 10 Sek. lang gedrückt. Achtung: Verbinden Sie Ihr Telefon mit dem von Ihrer Türsprechanlage genutzten 2,4-GHz-WLAN-Netzwerk. F. Laden Sie die Anwendung Philips WelcomeHome im App Store/in Google Play herunter und installieren Sie sie. (Bitte allen Berechtigungsaufforderungen zustimmen.) WelcomeEye / Link / V1... - Page 41 G. Sie müssen ein Konto erstellen. Tippen Sie unten rechts auf „s’inscrire (registrieren)“ und füllen Sie die erforderlichen Felder aus. Vergessen Sie nicht, das Captcha-Feld auszufüllen. Bestätigen Sie „s’inscrire (registrieren)“. H. Sie erhalten eine E-Mail zur Bestätigung der Konto-Erstellung. Bitte bestätigen Sie den darin erhaltenen Link.
- Page 42 Dazu drücken Sie auf der Startseite auf „ajouter un appareil (Gerät hinzufügen)“, wählen dann PHILIPS und danach PHILIPS WelcomeHome und „par choix (per Listenauswahl)“. K. Tippen Sie auf das Türstationssymbol und geben Sie die UID Ihrer Türsprechanlage LECS- (6 Ziffern)-(7 Buchstaben) ein. Denken Sie an die Bindestriche! L.
- Page 43 M. Wenn Ihre Türsprechanlage nicht mehr rot blinkt, führen Sie ein erneutes Reset durch. Drücken Sie auf „Suivant (Weiter)“, Ihr Telefon gibt nun eine Reihe hoher Signaltöne aus. Platzieren Sie Ihr Telefon neben die Türsprechanlage (achten Sie darauf, dass die Lautstärke Ihres Telefons nicht zu niedrig eingestellt ist).
-
Page 44: Reset
Wenn Sie für diese Türsprechanlage ein weiteres Telefon konfigurieren möchten, können Sie auf zweierlei Art verfahren: - Für eine permanente Nutzung: Laden Sie die Philips-WelcomeHome-App auf dem neuen Telefon herunter und melden Sie sich mit der E-Mail-Adresse und dem Passwort Ihres Hauptkontos an. -
Page 45: Installation Und Verkabelung
6. INSTALLATION UND VERKABELUNG Bevor Sie die Türsprechanlage an ihrem endgültigen Standort anbringen, empfehlen wir Ihnen, einen Test durchzuführen, um die WLAN-Verbindung zu überprüfen. Wenn sich die Türsprechanlage mit Ihrem WLAN-Netzwerk verbindet, können Sie die endgültige Montage vornehmen. Im Falle einer Positionierung außerhalb der Reichweite Ihrer Internet-Box ist ggf. ein WLAN- Access-Point notwendig. - Page 46 - Eine direkte Verschraubung an der Wand wählen. - Falls erforderlich die Halterung für Schrägstellung (horizontale Neigung) verwenden. Achtung: Falls zutreffend, vergessen Sie bitte nicht, vor der Befestigung der Türsprechanlage die Antriebssteuerung (potenzialfreier Kontakt auf der Rückseite) anzuschließen. Benutzen Sie die 2 zu diesem Zweck mitgelieferten Schrauben. Wichtig: Die Steuerung ist als potenzialfreier Kontakt ausgelegt.
- Page 47 2. SCHRITT : Setzen Sie den Akku ein (Richtung beachten, Micro-USB-Steckerseite zuerst), bis die Rastnase hörbar einrastet. 3. SCHRITT : Überprüfen Sie das Vorhandensein der MicroSD-Karte, falls Sie dies nicht bereits während der Tests getan haben. 4. SCHRITT : Bringen Sie die Frontplatte an, indem Sie zuerst den oberen Teil (A) und dann den unteren Teil (B) aufsetzen.
-
Page 48: Bedienungsanleitung
A. Das Betätigen der Ruftaste der Türsprechanlage löst einen Anruf oder eine Benachrichtigung auf dem mobilen Endgerät aus. Denken Sie daran, Anrufe oder Benachrichtigungen von Philips WelcomeHome in den Einstellungen Ihres Mobilgeräts zuzulassen. B. Nachdem Sie den Anruf angenommen haben, können Sie Ihren Besucher sehen und ihm antworten. -
Page 49: Vertiefende Informationen
Akku zu gelangen. Laden Sie den Akku mindestens 5 Stunden lang mit dem mitgelieferten USB-Ladekabel auf. 8. VERTIEFENDE INFORMATIONEN Weitere Funktionen Ihres Produkts WelcomeEye LINK können Sie der vollständigen Anleitung entnehmen, die unter www.philips.com heruntergeladen werden kann. -
Page 50: Zubehör/Zusatzgeräte
Der Kassenzettel oder die Rechnung gelten als Nachweis des Kaufdatums. Die Kontaktinformationen und Servicezeiten unserer Kundendienstzentren sind einsehbar auf der Website www.philips.eu. Sie können Ihre Fragen auch an unseren Chatbot richten. Dieser Service ist rund um die Uhr, 7 Tage die Woche erreichbar und kostenlos: http:/ / philips.cfi-extel.com/chatbot-philips.html. -
Page 51: Sicherheitsmaßnahmen
Philips und der Philips-Schild sind eingetragene Marken der Koninklijke Philips N.V. und werden unter Lizenz verwendet. Dieses Produkt wurde von AVIDSEN SAS hergestellt und wird unter der Verantwortung von AVIDSEN SAS vertrieben. AVIDSEN SAS ist der alleinige Garantiegeber für dieses Gerät. -
Page 52: Konformitätserklärung
wird dem Anwender empfohlen, die Störung durch eine oder mehrere der folgenden Maßnahmen zu beseitigen: • Richten Sie die Empfangsantenne neu aus oder wechseln Sie deren Standort. • Vergrößern Sie den Abstand zum Empfänger. • Schließen Sie das Gerät an einen vom Stromkreis des Empfängers getrennten Stromkreis 14. - Page 53 INHOUDSOPGAVE 1 VEILIGHEIDSVOORSCHRIFTEN............2 INHOUD VAN DE KIT................3 PRESENTATIE................... 4 INSTELLING VOOR WIFI-GEBRUIK........... 5 RESET......................6 INSTALLATIE EN BEDRADING............p.10 7 HANDLEIDING..................p.13 8 OM EEN STAPJE VERDER TE GAAN..........p.14 9 TECHNISCHE KENMERKEN..............p.14 10 ACCESSOIRES ……………………………............…. p.14 11 TECHNISCHE ONDERSTEUNING - GARANTIE......
- Page 54 1. VEILIGHEIDSVOORSCHRIFTEN Belangrijk! • Lees de gebruikershandleiding aandachtig voordat u dit product installeert of gebruikt. • Als u dit product voor anderen installeert, laat dan de handleiding of de kopie achter bij de eindgebruiker. Waarschuwing: • De verschillende onderdelen mogen alleen door een bevoegde technicus worden gedemonteerd.
- Page 55 2. INHOUD VAN DE KIT 1. Straatunit 2. Batterij 3 - Horizontale 4 • kantel Dubbelzijdige basis tape 6 • Micro SD-kaart (reeds ingevoerd in het daarvoor bestemde vak) 5 • 2 draden voor de 7 • USB-kabel 8 • Set van schroeven poortbediening (3 pluggen, 3 muurschroeven, 3 zwarte...
- Page 56 3. PRESENTATIE Schemercel (voor ver- lichting van de IR-leds bij schemering) Cameralens (vast, niet kantelbaar) Voorkant Aanwezigheids straatunit detector Infrarood verlichting (onzichtbaar), voor het identificeren van een bezoeker op 1 meter Luidspreker Oproepknop Resetknop Sleuf voor Microfoon Micro SD- kaart QR-code voor installatie Antidiefstal-...
- Page 57 Verbind uw telefoon met 2,4GHz wifi waar uw straatunit op aangesloten zal worden. F. Download en installeer de applicatie Philips WelcomeHome op de App Store / Google Play. (ga akkoord met alle verzoeken om toestemming) WelcomeEye / Link / V1...
- Page 58 G. U moet een account aanmaken. Klik op “zich inschrijven” rechts beneden en vul de verplichte velden in. Vergeet niet om de captcha in te vullen. Valideer “zich inschrijven”. H. U zult een e-mail ter bevestiging van het aanmaken van uw account ontvangen. Valideer de ontvangen link.
- Page 59 J. Als uw telefoon de code niet kan scannen, kunt u de code manueel opslaan. Druk vanaf de homepage op “een apparaat toevoegen”, selecteer PHILIPS, vervolgens PHILIPS WelcomeHome en “bij keuze”. K. Klik op het icoon van de straatunit en voer de UID van uw straatunit in LECS-(6 cijfers)-(7 letters).
- Page 60 M. Als uw straatunit niet meer rood knippert, voert u een reset uit. Druk op “Volgende”, uw telefoon zendt dan een serie scherpe signalen uit. Plaats uw telefoon naast uw straatunit (controleer of het volume van uw telefoon niet te laag staat) De straatunit knippert blauw, licht vervolgens continu blauw op en gaat daarna uit.
- Page 61 Als u een andere telefoon op dezelfde straatunit wilt instellen, zijn er 2 oplossingen mogelijk: - Voor permanent gebruik: download de applicatie Philips WelcomeHome op de nieuwe telefoon en meld u aan door het e-mailadres en het wachtwoord van uw hoofdaccount te gebruiken.
- Page 62 6. INSTALLATIE EN BEDRADING Voordat u de straatunit definitief installeert, raden wij u aan om eerst de wifi-verbinding te testen. Als de unit zich met uw wifi-netwerk verbindt, kunt u overgaan tot de definitieve installatie. Als de unit geplaatst wordt buiten het bereik van de internetbox, kan het nodig zijn om een externe wifi-hotspot te installeren.
- Page 63 - De unit rechtstreeks op de muur te schroeven - Indien nodig, de horizontale kantelbasis te gebruiken Opgelet: Indien nodig, vergeet niet om de motorisatiebediening aan te sluiten (droogcontact aan de achterkant) voordat u de straatunit bevestigt. Gebruik hiervoor de 2 meegeleverde schroeven. Belangrijk: Bediening met droogcontact.
- Page 64 Stap 2. : Voer de batterij in (let hierbij op de richting, eerst kant micro USB-stekker) totdat u een klikgeluid hoort. Stap 3. : Controleer of er een micro SD-kaart aanwezig is als u dit niet gedaan heeft tijdens de test op de tafel. Stap 4.
- Page 65 Vergeet niet om akkoord te gaan met het ontvangen van oproepen en meldingen vanuit Philips WelcomeHome in de instellingen van uw mobiele apparaat. B. Na de oproep geaccepteerd te hebben, kunt u uw bezoeker zien en beantwoorden.
- Page 66 Laad de batterij minstens 5 uur op met de meegeleverde USB-kabel. 8. OM EEN STAPJE VERDER TE GAAN Om meer functies te ontdekken van uw WelcomeEye LINK-product, kunt u de volledige handleiding downloaden op de website www.philips.com 9.
- Page 67 Indien nodig zijn de contacten en openingsuren van onze technische ondersteuningscentra beschikbaar op de site www.philips.com. U kunt tevens hulp krijgen via onze Chatbot. Toegankelijk 24/24u, 7/7d, gratis service: http:/ /philips.cfi-extel.com/chatbot-philips.html CARTE DE GARANTIE M/Mme : Numéro de téléphone :...
- Page 68 Philips en het embleem in de vorm van een schild van Philips zijn gedeponeerde handelsmerken van de Koninklijke Philips N.V. En worden onder licentie gebruikt. Dit product is geproduceerd en wordt verkocht onder de verantwoordelijkheid van AVIDSEN SAS en is staat als enige garant voor dit product.
- Page 69 maatregelen te treffen: • Richt of verplaats de ontvangstantenne opnieuw • Vergroot de afstand tussen het apparaat en de ontvanger • Sluit het apparaat aan op een stopcontact dat bij een ander circuit hoort dan dat waarop de ontvanger is aangesloten 14.
- Page 70 SOMMARIO ISTRUZIONI DI SICUREZZA............2 CONTENUTO DEL KIT..............3 PRESENTAZIONE................4 IMPOSTAZIONI PER l’UTILIZZO TRAMITE WI-FI....5 RESET....................6 INSTALLAZIONE E CABLAGGIO..........p.10 7 ISTRUZIONI PER L’USO..............p.13 8 PER SPINGERSI ANCORA OLTRE..........p.14 9 CARATTERISTICHE TECNICHE............ p.14 10 ACCESSORI ……………………………..........…..p.14 11 ASSISTENZA TECNICA - GARANZIA.........
-
Page 71: Istruzioni Di Sicurezza
1. ISTRUZIONI DI SICUREZZA Importante! • Prima di installare e utilizzare il prodotto, leggere attentamente il manuale d’uso. • Se si installa il prodotto per terze persone, lasciare il manuale originale o copia di esso all’utente finale. Avvertenza: • I vari componenti del prodotto devono essere smontati solo da un tecnico autorizzato. Misure di sicurezza: •... -
Page 72: Contenuto Del Kit
2. CONTENUTO DEL KIT: 1. Citofono 2. Batteria 3 • Supporto 4 • Supporto esterno per inclinazione biadesivo orizzontale 6 • Scheda micro SD (preinserita nell’apposito alloggiamento) 5 • 2 cavi per 7 • Cavo USB 8 • Set di viti (3 tasselli, 3 comando cancello viti per muro, 3 viti nere per fissaggio supporto... -
Page 73: Presentazione
3. PRESENTAZIONE Cellula crepuscolare (permette di illuminare i led IR quando c’è poca luce) Obiettivo telecamera (fisso, Parte anteriore non inclinabile) pulsantiera Rilevatore esterna di presenza Illuminazione infrarossa (non visibile), permette di identificare il visitatore a 1 metro di distanza Altoparlante Pulsante di chia- mata... -
Page 74: Impostazioni Per L'utilizzo Tramite Wi-Fi
Attenzione: Connettere il telefono alla stessa rete Wi-Fi 2.4GHz che sarà utilizzata dalla pulsantiera esterna. F. Scaricare e installare l’app Philips WelcomeHome da App Store / Google Play (acconsentire a tutte le richieste di autorizzazione) WelcomeEye / Link / V1... - Page 75 G. Creare un account. Toccare “s’inscrire” (iscriviti) in basso a destra e compilare i campi richiesti. Ricordarsi di compilare lo spazio con il codice captcha. Confermare con “s’inscrire” (iscriviti). H. Accedere al link contenuto nell’e-mail di conferma ricevuta (attenzione: controllare lo “spam”...
- Page 76 Nella pagina iniziale, toccare “ajouter un appareil” (aggiungi dispositivo), selezionare PHILIPS, quindi PHILIPS WelcomeHome, e infine “par choix” (a scelta). K. Toccare l’icona della pulsantiera esterna e inserire l’UID della pulsantiera esterna LECS- (6 cifre)-(7 lettere). Attenzione a non dimenticare i trattini! L.
- Page 77 M. Se la pulsantiera esterna non lampeggia più rosso, eseguire un reset. Toccare “Suivant” (successivo), il telefono emetterà una serie di segnali acustici acuti. Porre il telefono accanto alla pulsantiera esterna (controllare che il volume del telefono non sia troppo basso) La pulsantiera esterna lampeggia blu, per poi rimanere accesa fissa e infine spegnersi.
-
Page 78: Reset
Per configurare un altro telefono per la stessa pulsantiera esterna, esistono due possibilità: - Accesso permanente: scaricare l’app Philips WelcomeHome sul nuovo smartphone e effettuare l’accesso fornendo l’indirizzo e-mail e la password dell’account principale. -
Page 79: Installazione E Cablaggio
6. INSTALLAZIONE E CABLAGGIO Prima di fissare la pulsantiera esterna nella sua collocazione definitiva, si consiglia di fare una prova della connessione Wi-Fi. Se la pulsantiera è correttamente connessa alla rete Wi-Fi, è possibile procedere alla sua installazione definitiva. Se invece la pulsantiera è fuori portata, è possibile che si renda necessario installare un ripetitore Wi-Fi esterno. - Page 80 - Avvitare la pulsantiera direttamente al muro; - O infine, se necessario, utilizzare il supporto per inclinazione orizzontale Attenzione: Ove necessario, ricordarsi di collegare il comando della motorizzazione (contatto pulito sul retro) prima di fissare la pulsantiera esterna. Usare le 2 apposite viti incluse. Importante: Il comando è...
- Page 81 Passaggio 2.: Introdurre la batteria (attenzione al verso, inserire prima il lato con la presa micro USB) fino ad avvertire il “clic” del gancetto di blocco. Passaggio 3.: Se non si è provveduto a farlo durante la prova al banco, controllare che la scheda micro SD sia inserita.
-
Page 82: Istruzioni Per L'uso
A. Premendo il pulsante di chiamata sulla pulsantiera esterna, si genera una chiamata o una notifica sul dispositivo mobile. Ricordarsi di autorizzare le chiamate o le notifiche da Philips WelcomeHome nelle impostazioni del dispositivo mobile. B. Dopo aver accettato la chiamata, è possibile vedere chi ha suonato e interagire con il visitatore. -
Page 83: Per Spingersi Ancora Oltre
Lasciare la batteria in carica per almeno 5 ore usando il cavo USB in dotazione. 8. PER SPINGERSI ANCORA OLTRE Per scoprire tutte le funzioni di WelcomeEye LINK, scaricare il manuale d’istruzioni completo sul sito www.philips.com 9. CARATTERISTICHE TECNICHE Wi-Fi: IEE 802.11 b/g/n, 2.4 GHz. -
Page 84: Assistenza Tecnica - Garanzia
In caso di necessità, i contatti e gli orari di apertura dei centri di assistenza tecnica sono disponibili sul sito www.philips.com. È inoltre possibile ricevere assistenza anche attraverso la Chatbot. Accessibile 24 ore su 24 ore, 7 giorni su 7, servizio gratuito: http:/ /philips.cfi-extel.com/ chatbot-philips.html CARTE DE GARANTIE M/Mme : Numéro de téléphone :... -
Page 85: Misure Di Sicurezza
Philips e il simbolo dello scudo Philips sono marchi registrati di proprietà di Koninklijke Philips N.V. concessi in licenza. Il presente prodotto è stato fabbricato da AVIDSEN SAS, è commercializzato sotto la sua responsabilità e AVIDSEN SAS ne è il solo garante. -
Page 86: Dichiarazione Di Conformità
provare a correggere le interferenze adottando una o più delle seguenti misure: • Riorientare o riposizionare l’antenna ricevente • Aumentare la distanza tra l’apparecchiatura e il ricevitore • Collegare l’apparecchiatura a una presa di corrente su un circuito diverso da quello a cui è... - Page 87 ÍNDICE NORMAS DE SEGURIDAD............pág.2 2 CONTENIDO DEL KIT..............pág.3 3 PRESENTACIÓN................pág.4 4 CONFIGURACIÓN PARA UN USO CON WIFI......pág.5 5 REINICIO.................... pág.9 6 INSTALACIÓN Y CABLEADO............pág.10 7 INSTRUCCIONES DE USO............pág.13 8 PARA MÁS INFORMACIÓN............pág.14 9 CARACTERÍSTICAS TÉCNICAS........... pág.14 10 ACCESORIOS ……………………………..........….
- Page 88 1. NORMAS DE SEGURIDAD ¡Importante! • Lea detenidamente el manual de instrucciones antes de instalar o usar este producto. • Si instala este producto para terceros, recuerde dejar el manual o una copia al usuario final. Aviso: • Solo puede desmontar los diferentes elementos un técnico especializado. Medidas de seguridad: •...
- Page 89 2. CONTENIDO DEL KIT 1. Placa externa 2. Batería 3 - Soporte 4 • Adhesivo para inclinación de doble cara horizontal 6 • Tarjeta micro-SD (ya introducida en su ranura) 5 • 2 cables para 7 • Cable USB 8 • Juego de tornillos (3 el control de la tacos, 3 tornillos para cancela...
- Page 90 3. PRESENTACIÓN Célula crepuscular (permite iluminar los ledes IR en la penumbra) Objetivo de la cámara (fijo, no inclinable) Cara delantera Detector de la placa de presencia externa Iluminación infrarroja (invisible) que permite identificar a un visitante a un metro de distancia Altavoz Botón de llamada Botón...
- Page 91 Atención: Conecte su teléfono a la wifi de 2,4 GHz que utilizará para su placa externa. F. Descargue e instale la aplicación Philips WelcomeHome en la App Store / Google Play. (Valide todas las solicitudes de autorización). WelcomeEye / Link / V1...
- Page 92 G. Cree una cuenta. Haga clic en el botón «Inscribirse» situado en la parte inferior derecha y cumplimente los campos solicitados. No olvide rellenar también el captcha. Valide en el botón «Inscribirse». H. Recibirá un correo electrónico para confirmar la creación de la cuenta. Valide el vínculo incluido en este correo electrónico.
- Page 93 J. Si su teléfono no puede escanear el código, puede registrar el aparato de forma manual. En la página de inicio, pulse en «Añadir un aparato», seleccione PHILIPS, a continuación, PHILIPS WelcomeHome y, finalmente, «Mediante elección». K. Haga clic en el icono de la placa externa e introduzca la UID de su placa externa LECS-(6 cifras)-(7 letras).
- Page 94 M. Si su placa externa no parpadea en rojo, reiníciela. Pulse en «Siguiente», entonces su teléfono emitirá una serie de pitidos agudos. Coloque su teléfono al lado de su placa externa. Compruebe que el volumen de su teléfono no esté demasiado bajo. La placa externa parpadea en azul, a continuación, permanece fija y, finalmente, se apaga.
- Page 95 «Configuración avanzada» del manual disponible en www.philips.com. Si desea configurar otro teléfono a esta misma placa externa, tiene dos posibilidades: - Para un uso permanente: descargue la aplicación Philips WelcomeHome en el nuevo teléfono y conéctese utilizando la dirección de correo electrónico y la contraseña de su cuenta principal.
- Page 96 6. INSTALACIÓN Y CABLEADO Antes de colocar la placa externa en su ubicación definitiva, le recomendamos efectuar una prueba para comprobar la conexión wifi. Si la placa se conecta a su red wifi correctamente, puede realizar la instalación definitiva. Si la placa se coloca fuera del alcance del módem de internet, puede que tenga que utilizar un borne wifi externo.
- Page 97 - Atornillarla a la pared directamente. - Utilizar el soporte de inclinación horizontal si lo necesita. Atención: no olvide conectar el control de la motorización (contacto seco en la parte trasera) antes de fijar la placa externa, si fuese necesario. Utilice los 2 tornillos suministrados para ello.
- Page 98 Etapa 2. : introduzca la batería (preste atención al sentido, introduzca el lado con el enchufe micro-USB en primer lugar) hasta que la pestaña de sujeción haga clic. Etapa 3. : compruebe que la tarjeta micro-SD esté colocada en su ranura si no lo ha hecho previamente.
- Page 99 A. Si se pulsa el botón de la placa externa, se activa una llamada o una notificación en el dispositivo móvil. Recuerde autorizar las llamadas o notificaciones desde Philips WelcomeHome en los ajustes de su dispositivo móvil. B. Después de aceptar la llamada, puede ver a su visitante y responderle.
- Page 100 Si necesita volver a cargar la batería, retire la parte delantera de la placa para poder acceder a la misma. Cárguela al menos durante 5 horas con el cable USB incluido. 8. PARA MÁS INFORMACIÓN Si desea descubrir otras funcionalidades de su producto WelcomeEye LINK, puede www.philips.com descargar el manual completo en la página web 9.
- Page 101 Si lo necesita, puede encontrar los nombres de los contactos y los horarios de nuestros centros de asistencia técnica en la página web www.philips.com. También puede encontrar asistencia técnica en nuestro chatbot. Accesible los 7 días de la semana, las 24 h del día, servicio gratuito: http:/ /philips.cfi-extel. com/chatbot-philips.html CARTE DE GARANTIE M/Mme : Numéro de téléphone :...
- Page 102 Philips y el emblema del escudo Philips son marcas registradas de Koninklijke Philips N.V. que se usan con licencia. Este producto ha sido fabricado y se vende bajo la responsabilidad de AVIDSEN SAS, que se constituye como único garante del mismo.
- Page 103 • Reoriente o desplace la antena receptora. • Aumente la distancia entre el equipo y el receptor. • Conecte el equipo a una toma que forme parte de un circuito distinto de aquel al que está conectado el receptor. 14. DECLARACIÓN DE CONFORMIDAD El abajo firmante, AVIDSEN, declara que el equipo radioeléctrico de tipo WelcomeEye cumple con la Directiva 2014/53/UE.
- Page 104 ÍNDICE Instruções de segurança............2 CONTEÚDO DO KIT............... 3 APRESENTAÇÃO................4 CONFIGURAÇÃO PARA UTILIZAÇÃO DE WI-FI....5 REINICIALIZAÇÃO................ 6 INSTALAÇÃO E CABLAGEM............p.10 7 INSTRUÇÕES DE UTILIZAÇÃO..........p.13 8 PARA IR MAIS LONGE..............p.14 9 CARACTERÍSTICAS TÉCNICAS..........p.14 10 ACESSÓRIOS ……………………………...........…. p.14 11 ASSISTÊNCIA TÉCNICA - GARANTIA........
-
Page 105: Instruções De Segurança
1. INSTRUÇÕES DE SEGURANÇA Importante! • Leia atentamente o manual de utilização antes de instalar ou utilizar este produto. • Se instalar este produto para outras pessoas, não se esqueça de transmitir o manual ou uma cópia para o utilizador final. Advertência: •... -
Page 106: Conteúdo Do Kit
2. CONTEÚDO DO KIT 1. Placa de rua 2. Bateria 3 • Suporte 4 • Adesivo de para inclinação dupla face horizontal 6 • Cartão micro SD (já inserido na ranhura) 5 • 2 cabos para o 7 • Cabo USB 8 •... -
Page 107: Apresentação
3. APRESENTAÇÃO Célula crepuscular (permi- te a iluminação dos LED in- fravermelhos em condições de baixa luminosidade) Objetiva da câmara (fixa, não inclinável) Parte frontal da Detetor placa de rua de presença Iluminação infravermelha (não visível), permite identificar um visitante até... -
Page 108: Configuração Para Utilização De Wi-Fi
10 segundos. Atenção: ligue o seu telefone à rede Wi-Fi 2,4 GHz que será utilizada pela sua placa de rua. F. Descarregue e instale a aplicação Philips WelcomeHome na App Store ou Google Play. (aceite todos os pedidos de autorização) WelcomeEye/Link/V1... - Page 109 G. Crie uma conta. Clique em «s’inscrire» (Efetuar registo) no canto inferior direito e preencha os campos solicitados. Não se esqueça de inserir o código de confirmação (captcha). Confirme o registo, clicando em «s’inscrire» (Efetuar registo). H. Irá receber um e-mail de confirmação da criação da conta; valide o link recebido. (Atenção, verifique a caixa de spam da sua caixa de e-mail).
- Page 110 Na página inicial, prima o botão «ajouter un appareil» (Adicionar um aparelho), selecione PHILIPS e, depois, clique em PHILIPS WelcomeHome e «par choix» (Por opção). K. Clique no ícone da placa de rua e insira o UID da sua placa de rua LECS-(6 dígitos)-(7 letras).
- Page 111 M. Se a sua placa de rua não piscar a vermelho, faça um reset. Prima o botão «Suivant» (Seguinte). O seu telefone deverá emitir uma série de sinais sonoros agudos. Aproxime o seu telefone da parte lateral da sua placa de rua, (certifique-se de que o volume não está...
-
Page 112: Reinicialização
Se pretende configurar outro telefone para a mesma placa de rua, pode optar por uma de duas soluções: - Para uma utilização permanente: descarregue a aplicação Philips WelcomeHome e instale-a no novo telefone; entre na aplicação utilizando o seu e-mail e a palavra-passe da sua conta principal. -
Page 113: Instalação E Cablagem
6. INSTALAÇÃO E CABLAGEM Antes de fixar a placa de rua no seu local definitivo, recomendamos que realize um teste para verificar a ligação Wi-Fi. Depois de ligar a placa à sua rede Wi-Fi, proceda à instalação definitiva. Se o local escolhido para a instalação da placa de rua estiver fora do alcance da box de Internet, poderá... - Page 114 - Utilizar o suporte de inclinação horizontal, se necessário Atenção: se necessário, não se esqueça de ligar o controlo do portão automático (contacto seco na parte traseira) antes de fixar a placa de rua. Utilize os 2 parafusos fornecidos para esse efeito. Importante: o controlo é...
- Page 115 SD deve ser inserido em primeiro lugar) até ouvir o clique do gancho de fixação. Passo 3. : confirme se o cartão micro SD foi corretamente inserido, caso não o tenha feito durante os ensaios em mesa. Passo 4. : encaixe a parte frontal, instalando primeiro a parte superior (A) e depois a parte inferior (B).
-
Page 116: Instruções De Utilização
A. Uma chamada efetuada através do botão da placa de rua aciona uma chamada ou uma notificação no dispositivo móvel. Autorize as chamadas ou notificações a partir do Philips WelcomeHome nas configurações do seu dispositivo móvel. B. Depois de aceitar a chamada, pode visualizar o seu visitante e responder-lhe. -
Page 117: Para Ir Mais Longe
Quando for necessário carregar a bateria, retire a parte frontal da placa para aceder à bateria. Carregue o aparelho durante pelo menos 5 horas com o cabo USB fornecido. 8. PARA IR MAIS LONGE Para descobrir mais funcionalidades do seu produto WelcomeEye LINK, descarregue o manual completo a partir do site www.philips.com 9. -
Page 118: Assistência Técnica - Garantia
Caso sejam necessários, os contactos e os horários de atendimento dos nossos centros de assistência técnica estão disponíveis no site www.philips.com. Pode também procurar assistência junto do nosso chatbot. Acessível 24 horas por dia, 7 dias por semana, serviço gratuito: http:/ /philips.cfi-extel.com/ chatbot-philips.html CARTE DE GARANTIE M/Mme : Numéro de téléphone :... -
Page 119: Medidas De Segurança
Philips e o emblema Philips são marcas comerciais da Koninklijke Philips N.V. e são utilizadas sob licença. Este produto foi fabricado por e é comercializado sob a responsabilidade da AVIDSEN SAS, sendo esta a única responsável por este produto. 12. MEDIDAS DE SEGURANÇA Os danos provocados pela falta de conformidade com o manual resultam no cancelamento da garantia.