
Related Manuals for Lenovo ThinkAgile HX2320 Appliance


Summary of Contents for Lenovo ThinkAgile HX2320 Appliance
- Page 1 User Guide for ThinkAgile HX2320 Appliance and HX2321 Node Machine Types: 7Y89, 7Z04, 7X83, 7Z40, 7X41...
- Page 2 Before using this information and the product it supports, be sure to read and understand the safety information and the safety instructions, which are available at: http://thinksystem.lenovofiles.com/help/index.jsp?topic=%2Fsafety_documentation%2Fpdf_files.html In addition, be sure that you are familiar with the terms and conditions of the Lenovo warranty for your server, which can be found at: https://datacentersupport.lenovo.com/us/en/warrantylookup Third Edition (July 2019) ©...
-
Page 3: Table Of Contents
Chapter 7. Installing and setting up technical assistance ..89 Lenovo XClarity Integrator..37 Appendix C. Trademarks ..91 Deploying Lenovo XClarity Integrator for VMware vCenter . - Page 4 User Guide for ThinkAgile HX2320 Appliance and HX2321 Node...
-
Page 5: Chapter 1. Introduction
Chapter 1. Introduction The ThinkAgile HX2320 Appliance and HX2321 Certified Node servers are 1U rack servers that are fully qualified and that come with AHV hypervisors preinstalled. It is designed to simplify IT operations and management for customers through predefined server configurations that are optimized around specific types of workloads, while conforming to best practices and compliance guidelines for Nutanix. -
Page 6: Typical Nutanix Architecture
Lastly, a 1–node replication target is possible, using the ThinkAgile HX1521-R. The systems are connected through switches for management and data: • A dedicated management network is used by the Lenovo XClarity Administrator to communicate with the Lenovo XClarity Controller (XCC) on each of the ThinkAgile HX Series servers. -
Page 7: Identifying Your Server
For customers who do not require prebundled Nutanix software licenses or deployment services, Lenovo offers another fully validated and certified choice: the Lenovo ThinkAgile HX Certified Node, which includes: • Fully validated and integrated Lenovo hardware and firmware, certified with Nutanix software •... -
Page 8: Specifications
• Thermal Design Power (TDP): up to 205 watts For more important information about the processor, refer to “Important information for system board, processor, and heat sink” on page 9. For a list of supported processors, see: http://static.lenovo.com/us/en/serverproven/index.shtml User Guide for ThinkAgile HX2320 Appliance and HX2321 Node... - Page 9 Notes: – NVMe drives means Non-Volatile Memory express drives. – Only use M.2 drives provided by Lenovo. – 480 GB M.2 drives are only supported on M.2 backplane with two M.2 drive slots. – The backplane for ten 2.5-inch hot-swap NVMe drives is supported only when the following configuration requirements are met: –...
- Page 10 One or two hot-swap power supplies for redundancy support • 550-watt ac 80 PLUS Platinum • 750-watt ac 80 PLUS Platinum • 750-watt ac 80 PLUS Titanium • 1100-watt ac 80 PLUS Platinum User Guide for ThinkAgile HX2320 Appliance and HX2321 Node...
- Page 11 Table 1. Server specifications (continued) Specification Description Electrical input • Sine-wave input (50–60 Hz) required • Input voltage low range: – Minimum: 100 V ac – Maximum: 127 V ac • Input voltage high range: – Minimum: 200 V ac –...
- Page 12 • The following processors are not installed: – Processors with TDP higher than or equal to 150 watts – Intel Xeon 4112, 5122, 6126, 6128, 6132, 6134, 6134M, and 8156 processors User Guide for ThinkAgile HX2320 Appliance and HX2321 Node...
- Page 13 Important information for system board, processor, and heat sink There are two types of system board for your server: • Left: System board with large lift handle • Right: System board with small lift handle Figure 3. Two types of system board There are two shape types of heat sink for your server: •...
-
Page 14: Management Options
Lenovo XClarity Administrator provides a central interface to perform the following functions for all managed endpoints: • Manage and monitor hardware. Lenovo XClarity Administrator provides agent-free hardware management. - Page 15 Configuration settings (such as local storage, I/O adapters, boot settings, firmware, ports, and Lenovo XClarity Controller and UEFI settings) are saved as a server pattern that can be applied to one or more managed servers. When the server patterns are updated, the changes are automatically deployed to the applied servers.
- Page 16 User Guide for ThinkAgile HX2320 Appliance and HX2321 Node...
-
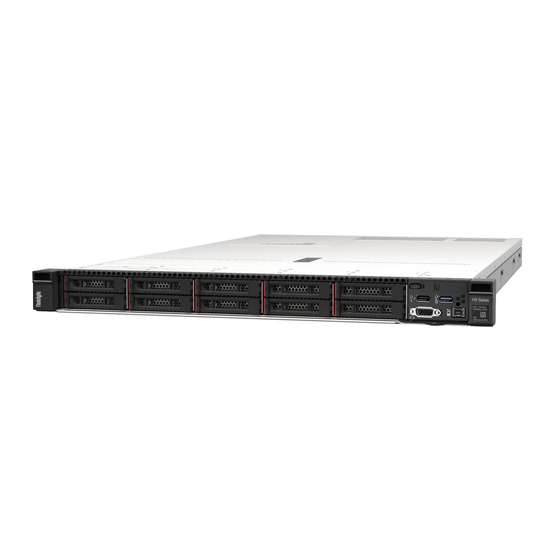
Page 17: Chapter 2. Server Components
The front view of the server varies by model. Depending on the model, your server might look slightly different from the illustrations in this topic. Figure 5. Front view of ThinkAgile HX2320 Appliance and HX2321 Certified Node servers Table 2. Components on the front of the server... -
Page 18: Operator Information Panel
The drive is active. Operator information panel The operator information panel of the server provides controls and LEDs. The following illustration shows the operator information panel of the server. Figure 6. Operator information panel User Guide for ThinkAgile HX2320 Appliance and HX2321 Node... - Page 19 Each time you press the system ID button, the state of both the system ID LEDs changes. The LEDs can be changed to on, blinking, or off. You can also use the Lenovo XClarity Controller or a remote management program to change the state of the system ID LEDs to assist in visually locating the server among other servers.
-
Page 20: Rear View
XClarity Controller network connector Ethernet connectors on LOM adapter (available on some models) PCIe slots on riser 1 assembly Your server supports three types of riser cards for riser 1 assembly. User Guide for ThinkAgile HX2320 Appliance and HX2321 Node... - Page 21 The hot-swap redundant power supplies help you avoid significant interruption to the operation of the system when a power supply fails. You can purchase a power supply option from Lenovo and install the power supply to provide power redundancy without turning off the server.
- Page 22 The hot-swap redundant power supplies help you avoid significant interruption to the operation of the system when a power supply fails. You can purchase a power supply option from Lenovo and install the power supply to provide power redundancy without turning off the server.
-
Page 23: Rear View Leds
Press this button to force a nonmaskable interrupt (NMI) to the processor. By this way, you can make the operating system halt (such as Windows Blue Screen of Death) and take a memory dump. You might have to use a pen or the end of a straightened paper clip to press the button. USB 3.0 connectors (2) Used to attach a device that requires a USB 2.0 or 3.0 connection, such as a USB keyboard, USB mouse, or USB storage device. -
Page 24: System Board Components
Each time you press the system ID button, the state of both the system ID LEDs changes. The LEDs can be changed to on, blinking, or off. You can also use the Lenovo XClarity Controller or a remote management program to change the state of the system ID LEDs to assist in visually locating the server among other servers. - Page 25 Figure 10. System board components Serial-port-module connector RAID adapter slot (slot 4) BIOS ROM programming connector Riser 1 slot LOM adapter connector XCC ROM programming connector Front USB connector Operator-information-panel connector Rear-backplane power connector Front VGA connector Processor 1 socket /TPM connector (for China only) DIMM slots (24)
-
Page 26: System Board Leds
Use the parts list to identify each of the components that are available for your server. For more information about ordering the parts shown in Figure 12 “Server components” on page 23: ThinkAgile HX2320 (7X83) User Guide for ThinkAgile HX2320 Appliance and HX2321 Node... - Page 27 ThinkAgile HX2321 (7Y89) https://datacentersupport.lenovo.com/us/en/products/solutions-and-software/thinkagile-hx/hx2321/7y89/parts ThinkAgile HX2321 (7Z04) https://datacentersupport.lenovo.com/us/en/products/solutions-and-software/thinkagile-hx/hx2321/7z04/parts Note: Depending on the model, your server might look slightly different from the illustration. Some of the components might not be available on your server. Figure 12. Server components Chapter 2...
- Page 28 Tier 1 CRU at your request with no service agreement, you will be charged for the installation. • Tier 2 customer replaceable unit: You may install a Tier 2 CRU yourself or request Lenovo to install it, at no additional charge, under the type of warranty service that is designated for your server.
- Page 29 Table 7. Parts listing (continued) Index Description Tier 1 CRU Tier 2 CRU Consumable and Structural parts Front I/O assembly for server models with √ eight 2.5-inch drive bays Front I/O assembly for server models with ten √ 2.5-inch drive bays 2.5-inch drive filler √...
-
Page 30: Power Cords
The cord set should have the appropriate safety approvals for the country in which the equipment will be installed. • Power cords for a specific country or region are usually available only in that country or region. User Guide for ThinkAgile HX2320 Appliance and HX2321 Node... -
Page 31: Chapter 3. Network/Infrastructure Planning
Virtual Network Physical Adapters VMkernel Adapter vSwitch 0 vSwitch 1 VLAN Name VLAN ID VLAN Portgroup Assigned vSwitch VMKernel vMotion Provision- Manage- vSphere vSphere Adapter Logging ment Replica- Replica- Services tion tion NFC Adapter 1 Adapter 2 © Copyright Lenovo 2019... - Page 32 User Guide for ThinkAgile HX2320 Appliance and HX2321 Node...
-
Page 33: Chapter 4. Server Setup Checklist
For more information, see Chapter 5 “Installing and configuring a cluster on ThinkAgile HX Series servers” on page 33. 4. Connect the Lenovo XClarity Controller to the management network. See “Set the network connection for the Lenovo XClarity Controller” on page 31. -
Page 34: Cable The Server
• One of the ports on the network is connected to the management network (if there is a separate data and management network). Connect to storage Connect the server to any storage devices. User Guide for ThinkAgile HX2320 Appliance and HX2321 Node... -
Page 35: Power On The Server
Power off the server The server remains in a standby state when it is connected to a power source, allowing the Lenovo XClarity Controller to respond to remote power-on requests. To remove all power from the server (power status LED off), you must disconnect all power cables. - Page 36 (once every couple of seconds). To connect using the Lenovo XClarity Administrator Mobile app: 1. Connect the USB cable of your mobile device to the Lenovo XClarity Administrator USB connector on the front panel. 2. On your mobile device, enable USB tethering.
-
Page 37: Chapter 5. Installing And Configuring A Cluster On Thinkagile Hx Series Servers
• All ThinkAgile HX Series servers must be connected to a network that is reachable from the host where the Foundation tool is running. Note: This includes both the Lenovo XClarity Controller connections, as well as the data connections (10Gb, 25Gb, etc.) •... - Page 38 User Guide for ThinkAgile HX2320 Appliance and HX2321 Node...
-
Page 39: Chapter 6. Installing And Setting Up Lenovo Xclarity Administrator
Deploying Lenovo XClarity Administrator Use this information to deploy Lenovo XClarity Administrator Before you begin, make sure that you download the Lenovo XClarity Administrator from Lenovo. Refer to the ThinkAgile HX Series Best Recipe to determine the correct version to be downloaded. - Page 40 A server pattern is used as an overall pattern to quickly configure multiple servers at one time. You can create a server pattern that could be applied to all of the ThinkAgile HX2320 Appliance and HX2321 Certified Node in the cluster.
-
Page 41: Chapter 7. Installing And Setting Up Lenovo Xclarity Integrator
Certified Node servers using the ESXi hypervisor. Lenovo XClarity Integrator for VMware vCenter expands the management capabilities of VMware vCenter by integrating Lenovo hardware management functionality. Lenovo XClarity Integrator is used to perform the following functions for the ThinkAgile HX2320 Appliance and HX2321 Certified Node cluster: •... - Page 42 Information about configuring Lenovo XClarity Integrator is available at: http://sysmgt.lenovofiles.com/help/topic/com.lenovo.lxci_vcenter.doc/vcenter_install_config_lxci.html Step 4. Manage the cluster by requesting access to the BMC of each of the servers in the cluster. Information about requesting BMC access is available at: http://sysmgt.lenovofiles.com/help/topic/com.lenovo.lxci_vcenter.doc/vcenter_using_vsphere_web_ client_request_imm_access.html User Guide for ThinkAgile HX2320 Appliance and HX2321 Node...
-
Page 43: Chapter 8. Hardware Replacement Procedures
The ThinkAgile HX2320 Appliance and HX2321 Certified Node appliances are based on the ThinkSystem SR630 server. For hardware replacement procedures not listed in this section, you can find replacement instructions here: http://thinksystem.lenovofiles.com/help/index.jsp?topic=%2F7X05%2Fmaintenance_manual_hardware_... -
Page 44: System Reliability Guidelines
• Adequate space around the server must be spared to allow server cooling system to work properly. Leave approximately 50 mm (2.0 in.) of open space around the front and rear of the server. Do not place any object in front of the fans. User Guide for ThinkAgile HX2320 Appliance and HX2321 Node... -
Page 45: Working Inside The Server With The Power On
• For proper cooling and airflow, refit the server cover before you turn the power on. Do not operate the server for more than 30 minutes with the server cover removed, for it might damage server components. • Cabling instructions that come with optional components must be followed. •... - Page 46 • When handling a device, carefully hold it by the edges or the frame. • Do not touch solder joints, pins, or exposed circuitry. • Keep the device from others’ reach to prevent possible damages. User Guide for ThinkAgile HX2320 Appliance and HX2321 Node...
-
Page 47: Hot-Swap Drive Replacement
Follow these instructions to replace a front HDD/SSD in theThinkAgile HX2320 Appliance and HX2321 Certified Node server. Each ThinkAgile HX2320 Appliance and HX2321 Certified Node server supports solid-state-drives (SSDs) and hard-disk-drives (HDDs). As user data are striped across these drives, they are referred to as data drives. While a node might be able to self-correct for a data drive failure, it does lead to system degradation. -
Page 48: Install A Hot-Swap Drive
2. Touch the static-protective package that contains the new drive to any unpainted surface on the outside of the server. Then, take the new drive out of the package and place it on a static-protective surface. User Guide for ThinkAgile HX2320 Appliance and HX2321 Node... -
Page 49: Hot-Swap Power Supply Replacement
After installing all hot-swap drives, if you have removed the security bezel, reinstall it. Hot-swap power supply replacement Follow these instructions to replace a power supply unit in the ThinkAgile HX2320 Appliance and HX2321 Certified Node appliance. The ThinkAgile HX2320 Appliance and HX2321 Certified Node appliances use two power supply units. Those power supplies are redundant when using 208 - 230V input power, allowing one power supply to meet the needs of the node. -
Page 50: Remove A Hot-Swap Power Supply
A failed power supply unit is indicated by: • The amber warning LED on node front panel is illuminated. • The Lenovo XClarity Controller Web interface shows a power supply alert. • The Lenovo XClarity Administrator Web console shows a power supply alert. - Page 51 cord. To remove all electrical current from the device, ensure that all power cords are disconnected from the power source. S001 DANGER Electrical current from power, telephone, and communication cables is hazardous. To avoid a shock hazard: • Do not connect or disconnect any cables or perform installation, maintenance, or reconfiguration of this product during an electrical storm.
- Page 52 The device also might have more than one connection to dc power. To remove all electrical current from the device, ensure that all connections to dc power are disconnected at the dc power input terminals. S029 User Guide for ThinkAgile HX2320 Appliance and HX2321 Node...
- Page 53 6. Turn ON all the power sources. To remove a hot-swap power supply, complete the following steps: Notes: ThinkAgile HX2320 Appliance and HX2321 Certified Node appliances contain two power supplies. A failed power supply unit is indicated by: • The amber warning LED on node front panel is illuminated.
- Page 54 Notes: Slightly pull the power supply upwards when sliding the power supply out of the chassis, if you have installed one of the following CMA kits: • 1U CMA Upgrade Kit for Toolless Slide Rail • Toolless Slide Rail Kit with 1U CMA User Guide for ThinkAgile HX2320 Appliance and HX2321 Node...
-
Page 55: Install A Hot-Swap Power Supply
• Ensure that the devices that you are installing are supported. For a list of supported optional devices for the server, see http://www.lenovo.com/us/en/serverproven/ Notes: • Ensure that the two power supplies installed on the server have the same wattage. - Page 56 The device also might have more than one power cord. To remove all electrical current from the device, ensure that all power cords are disconnected from the power source. S001 User Guide for ThinkAgile HX2320 Appliance and HX2321 Node...
- Page 57 DANGER Electrical current from power, telephone, and communication cables is hazardous. To avoid a shock hazard: • Do not connect or disconnect any cables or perform installation, maintenance, or reconfiguration of this product during an electrical storm. • Connect all power cords to a properly wired and grounded electrical outlet. •...
- Page 58 • Connect and disconnect cables as described in the following table when you install, move, or open covers on this product or attached devices. User Guide for ThinkAgile HX2320 Appliance and HX2321 Node...
- Page 59 To Connect: To Disconnect: 1. Turn OFF all power sources and equipment that is to 1. Turn OFF all power sources and equipment that is to be attached to this product. be attached to this product. 2. Attach signal cables to the product. •...
- Page 60 • The amber warning LED on node front panel is off. • The green indicator light on each power supply is illuminated. • No errors are shown in the Lenovo XClarity Controller. User Guide for ThinkAgile HX2320 Appliance and HX2321 Node...
-
Page 61: System Fan Replacement
A failed chassis fan is indicated by: • The amber warning LED on node front panel is illuminated. • The Lenovo XClarity Controller Web interface shows a system fan alert. • The Lenovo XClarity Administrator Web console shows a system fan alert. -
Page 62: Install A System Fan
39 on page 41 S033 CAUTION: Hazardous energy present. Voltages with hazardous energy might cause heating when shorted with metal, which might result in spattered metal, burns, or both. S017 User Guide for ThinkAgile HX2320 Appliance and HX2321 Node... - Page 63 After installing the system fan, complete the following steps: 1. Replace the top cover. 2. Install the ThinkAgile HX2320 Appliance and HX2321 Certified Node back in the rack. 3. Verify that the system fan is replaced successfully: • No error is shown in the Nutanix Prism Web console.
-
Page 64: Raid Adapter (Hba) Replacement
3. Remove the appliance from the rack. 4. Remove the top cover. 5. Disconnect any cables that might impede your access to the HBA. To remove the RAID adapter on the system board, complete the following steps: User Guide for ThinkAgile HX2320 Appliance and HX2321 Node... -
Page 65: Install The Raid Adapter
Figure 26. RAID adapter removal Step 1. Slide the left-side latch to the unlocked position. Step 2. Push and hold the right-side latch in the direction as shown. Step 3. Grasp the RAID adapter by its edges and carefully remove it from the RAID adapter slot on the system board. -
Page 66: Lom Adapter Replacement
Use this information to remove and install the LOM adapter. ThinkAgile HX2320 Appliance and HX2321 Certified Node appliances can support up to eight network ports; two or four 10 GbE ports (up to two NICs), and two or four 10 GbE ports on the LOM adapter, connected to the system board. -
Page 67: Remove The Lom Adapter
Before removing the LOM adapter: 1. ThinkAgile HX2320 Appliance and HX2321 Certified Node appliances can contain zero or one LOM NIC, with two or four ports, as well as up to two PCIe NICs. For nodes with multiple NICs, verify which has failed. -
Page 68: Install The Lom Adapter
2. Install the node back into the rack and reconnect all cables. 3. Power on the node. 4. Exit maintenance mode. 5. Verify that the NIC is replaced successfully: • The amber warning light on the node front panel is off. User Guide for ThinkAgile HX2320 Appliance and HX2321 Node... -
Page 69: Pcie Adapter Replacement
Before removing a PCIe adapter from the riser assembly: 1. ThinkAgile HX2320 Appliance and HX2321 Certified Node appliances can contain zero or one LOM NIC, with two or four ports, as well as up to two PCIe NICs. For nodes with multiple NICs, verify which has failed. -
Page 70: Install A Pcie Adapter
Align the PCIe adapter with the PCIe slot on the riser card. Then, carefully press the PCIe adapter straight into the slot until it is securely seated and its bracket also is secured. User Guide for ThinkAgile HX2320 Appliance and HX2321 Node... -
Page 71: Dimm Replacement
Table 11. PCIe adapter installation Figure 33. Riser 1 assembly (LP Figure 34. Riser 1 assembly (LP +LP) +FHHL) Figure 35. Riser 2 assembly (LP) Step 2. (Skip this step for riser 2 assembly.) Pivot the latch on the riser bracket to the closed position. After installing the PCIe adapter on the riser assembly: 1. -
Page 72: Remove A Dimm
– Handle DIMMs with care: never bend, twist, or drop a DIMM. Before removing a DIMM: 1. Identify the failed DIMM by either checking the event logs in UEFI setup or use the Lenovo XClarity Controller Web console to browse the post event log. The event log contains information about the location of the DIMM fault. -
Page 73: Dimm Installation Rules
Figure 36. DIMM removal Step 1. Open the retaining clips on each end of the DIMM slot. Attention: To avoid breaking the retaining clips or damaging the DIMM slots, handle the clips gently. Step 2. Grasp the DIMM at both ends and carefully lift it up to remove it from the slot. After removing a DIMM: 1. - Page 74 (CPU1) is installed. Notes: • If there are three identical DIMMs to be installed for CPU1, and the three DIMMs have the same Lenovo part number, move the DIMM to be installed in slot 8 to slot 1. User Guide for ThinkAgile HX2320 Appliance and HX2321 Node...
- Page 75 • If there are ten identical DIMMs to be installed for CPU1, and the ten DIMMs have the same Lenovo part number, move the DIMM to be installed in slot 6 to slot 12. Table 12. Independent mode with one processor...
- Page 76 Table 14. Mirroring mode with one processor Total Processor 1 Total DIMMs DIMMs The following table shows the DIMM population sequence for mirroring mode when two processors (CPU1 and CPU2) are installed. User Guide for ThinkAgile HX2320 Appliance and HX2321 Node...
- Page 77 Table 15. Mirroring mode with two processors Total Processor 2 Processor 1 Total DIMMs 24 23 22 21 20 19 18 17 16 15 14 13 12 11 10 1 DIMMs 22 21 20 19 18 17 16 15 22 21 20 19 18 17 16 15 22 21 20 19 18 17 16 15 12 11 10 22 21 20 19 18 17 16 15...
-
Page 78: Install A Dimm
Then, take the new DIMM out of the package and place it on a static-protective surface. 2. Locate the required DIMM slot on the system board. See “DIMM installation rules” on page 69. Ensure that you observe the installation rules and sequence. User Guide for ThinkAgile HX2320 Appliance and HX2321 Node... - Page 79 • No errors are displayed in the Nutanix Prism Web console. • The system boots successfully with no POST errors. • No errors are displayed in the Lenovo XClarity Controller interface. • No errors are displayed in the Lenovo XClarity Administrator •...
-
Page 80: M.2 Backplane And M.2 Drive Replacement
M.2 backplane and M.2 drive replacement An assembled M.2 backplane and M.2 drive is also known as M.2 module. Lenovo support may ask that the M.2 module or M.2 backplane and M.2 drive be replaced. Remove the M.2 backplane and M.2 drive Use this information to remove the M.2 backplane and M.2 drive. -
Page 81: Adjust The Retainer On The M.2 Backplane
Figure 40. M.2 drive removal Press both sides of the retainer Slide the retainer backward to loosen the M.2 drive from the M.2 backplane. Note: If the M.2 backplane has two M.2 drives, they will both release outward when you slide the retainer backward. -
Page 82: Install The M.2 Backplane And M.2 Drive
• Some M.2 backplanes support two identical M.2 drives. When two M.2 drives are installed, align and support both M.2 drives when sliding the retainer forward to secure the M.2 drives. • Install the M.2 drive in slot 0 first. User Guide for ThinkAgile HX2320 Appliance and HX2321 Node... - Page 83 Slot 0 Slot 1 Figure 42. M.2 drive slot Note: 480 GB M.2 drives are only supported on M.2 backplane with two M.2 drive slots. To install the M.2 backplane and M.2 drive, complete the following steps: Figure 43. M.2 drive installation Step 1.
- Page 84 3. Install the node back into the rack and reconnect all cables. 4. Power on the node. 5. Exit maintenance mode. 6. Use the Lenovo XClarity Provisioning Manager to configure the RAID. For more information, see: User Guide for ThinkAgile HX2320 Appliance and HX2321 Node...
- Page 85 http://sysmgt.lenovofiles.com/help/topic/LXPM/RAID_setup.html 7. Verify that the M.2 module is replaced successfully: • The amber warning light on the node front panel is off. • The system boots successfully with no POST errors or other errors. Chapter 8 Hardware replacement procedures...
- Page 86 User Guide for ThinkAgile HX2320 Appliance and HX2321 Node...
-
Page 87: Chapter 9. Updating Firmware
Hat Enterprise Linux (RHEL) and SUSE Linux Enterprise Server (SLES) operating system distributions. Machine-type-specific firmware-only UXSPs are also available. See the following table to determine the best Lenovo tool to use for installing and setting up the firmware: © Copyright Lenovo 2019... - Page 88 Additional information about using Lenovo XClarity Provisioning Manager to update firmware is available http://sysmgt.lenovofiles.com/help/index.jsp?topic=%2FLXPM%2Fplatform_update.html • Lenovo XClarity Controller If you need to install a specific update, you can use the Lenovo XClarity Controller interface for a specific server. Notes: – To perform an in-band update through Windows or Linux, the operating system driver must be installed and the Ethernet-over-USB (sometimes called LAN over USB) interface must be enabled.
- Page 89 Lenovo XClarity Administrator monitors changes to the inventory for those endpoints and flags any endpoints that are out of compliance. Specific details about updating firmware using Lenovo XClarity Administrator are available at: http://sysmgt.lenovofiles.com/help/index.jsp?topic=%2Fcom.lenovo.lxca.doc%2Fupdate_fw.html Chapter 9 Updating firmware...
- Page 90 User Guide for ThinkAgile HX2320 Appliance and HX2321 Node...
-
Page 91: Appendix A. Configuration Procedures
Appendix A. Configuration procedures Lenovo recommends the following UEFI settings for Lenovo ThinkAgile HX Series appliances. The following procedure will configure the systems to the recommended levels: 1. Set UEFI to default settings: OneCli config loaddefault UEFI 2. Set the following values: OneCli config set BootModes.SystemBootMode "Legacy Mode"... - Page 92 User Guide for ThinkAgile HX2320 Appliance and HX2321 Node...
-
Page 93: Appendix B. Getting Help And Technical Assistance
Appendix B. Getting help and technical assistance If you need help, service, or technical assistance or just want more information about Lenovo products use the Lenovo Support Plan for ThinkAgile HX. Details for the ThinkAgile HX Support Plan are available at: ThinkAgile HX Support Plan ©... - Page 94 User Guide for ThinkAgile HX2320 Appliance and HX2321 Node...
-
Page 95: Appendix C. Trademarks
Intel and Xeon are trademarks of Intel Corporation in the United States, other countries, or both. Microsoft and Windows are trademarks of the Microsoft group of companies. Linux is a registered trademark of Linus Torvalds. All other trademarks are the property of their respective owners. © 2019 Lenovo. © Copyright Lenovo 2019... - Page 96 User Guide for ThinkAgile HX2320 Appliance and HX2321 Node...
-
Page 97: Index
ID label hot-swap power supply installation removing guidelines DIMMs installation guidelines hard disk drive installing HBA on the system board DIMM hot-swap drive hard disk drive LOM adapter hot-swap drive system fan hot-swap power supply © Copyright Lenovo 2019... - Page 98 LOM adapter M.2 backplane and M.2 drive PCIe adapter system fan retainer on M.2 backplane trademarks adjusting warranty server setup checklist working inside the server software 13–14 power on static-sensitive devices handling User Guide for ThinkAgile HX2320 Appliance and HX2321 Node...