Table of Contents
Advertisement
Quick Links
Technical Reference Guide
Product Overview
This chapter explains features.
Setup
This chapter explains the network settings for this product.
Application Development Information
This chapter provides the information required to develop
applications.
Programming Samples
This chapter provides information related to programming.
Troubleshooting
This chapter explains what to do when trouble occurs.
Product Specifications
This chapter explains product specifications.
Appendix
This chapter explains network parameters and provides a
comparison of UB-R04 and UB-R05.
M00136800
Rev. A
Advertisement
Table of Contents

Related Manuals for Epson UB-R05


Summary of Contents for Epson UB-R05
- Page 1 This chapter provides information related to programming. Troubleshooting This chapter explains what to do when trouble occurs. Product Specifications This chapter explains product specifications. Appendix This chapter explains network parameters and provides a comparison of UB-R04 and UB-R05. M00136800 Rev. A...
- Page 2 Neither is any liability assumed for damages resulting from the use of the information contained herein. Neither Seiko Epson Corporation nor its affiliates shall be liable to the purchaser of this product or third parties for damages, losses, costs, or expenses incurred by the purchaser or third parties as a result of: accident, misuse, or abuse of this product or unauthorized modifications, repairs, or alterations to this product, or (excluding the U.S.) failure to strictly comply with Seiko Epson Corporation’s operating and...
-
Page 3: For Safety
For Safety Key to Symbols The symbols in this manual are identified by their level of importance, as defined below. Read the following carefully before handling the product. You must follow warnings carefully to avoid serious bodily injury. WARNING Provides information that must be observed to prevent damage to the equipment or loss of data. ... -
Page 4: Cautions
Product Servicing This product cannot be serviced at the component level. In case of a fault, replace the UB-R05 itself. -
Page 5: Wireless Lan Connection
Wireless LAN Connection Be aware of the following matters if using a wireless LAN connection. The influence on the environment of radio wave radiation This product is equipped with a certified Radio Frequency module for low-power data communication systems in accordance with the Radio Act. The electromagnetic energy radiated from this product is suppressed so that it is much lower than that of radio equipment like cell phones. -
Page 6: Cautions Regarding Wireless Lan Connections
Cautions Regarding Wireless LAN Connections Because not all the combinations of the product and wireless LAN devices have been checked for operation, the operation of the product in combination with all the wireless LAN devices is not guaranteed. Cautions about Security Important Cautions about Your Privacy Protection The advantage of using a wireless LAN over a LAN cable is that, because information is exchanged using radio signals, you can easily connect to the network if you are within range of the radio signals. - Page 7 Notes on Setting SSID (Service Set Identifier) For protection of security, note the following precautions when setting the SSID. Change the SSID from the default setting. Do not set texts by which the owner can be identified as the SSID. Notes on Setting Cryptographic Key For protection of security, note the following precautions when setting the cryptographic key.
-
Page 8: About This Manual
Chapter 3 Application Development Information Chapter 4 Programming Samples Chapter 5 Troubleshooting Chapter 6 Product Specifications Appendix Ethernet and Wireless LAN Shared Settings and Browsable Items Ethernet Settings and Browsable Items Wireless LAN Settings and Browsable Items UB-R04 and UB-R05... -
Page 9: Table Of Contents
Contents For Safety..........................3 Key to Symbols..................................3 Warnings ....................................3 Cautions....................................4 Restriction of Use ........................4 Product Servicing........................4 Wireless LAN Connection ......................5 The influence on the environment of radio wave radiation................5 The influence on the human body of radio wave radiation ................5 Cautions about Interference ............................ - Page 10 Automatic IP Address Assignment Protocols......................41 Protocol for acquiring status and setting ........................42 System Bootup Time......................43 Supported TM Printers......................43 Environmental Specifications.................... 43 Limitations..........................44 TM Printer Settings ................................44 Communication................................44 Using Peripheral Devices...............................44 Using the UB-R05 with the TM-T88VI ........................44...
- Page 11 Open Source Software License..................46 Appendix......................47 Ethernet and Wireless LAN Shared Settings and Browsable Items ......47 Ethernet Settings and Browsable Items ................49 Wireless LAN Settings and Browsable Items..............49 UB-R04 and UB-R05 ......................50...
-
Page 12: Product Overview
It supports TLS1.2. Setting The settings utility, EpsonNet Config, is available. Please download it from the Epson Web site and use it. You can use your Web browser to access EpsonNet Config (Web version) to browse and set network parameters. -
Page 13: Parts Name And Function
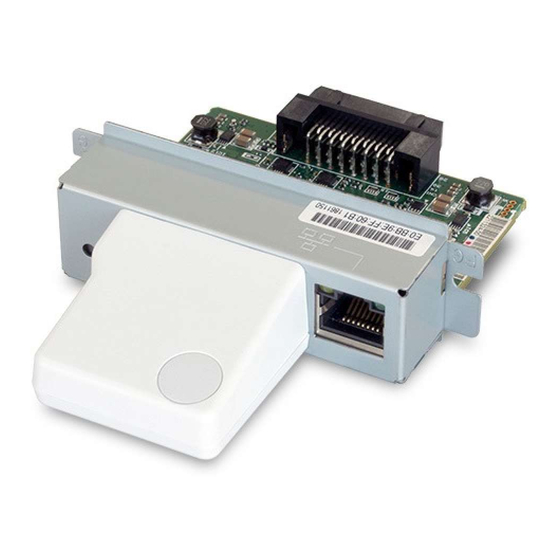
Chapter 1 Product Overview Parts Name and Function LAN connector LED (Green) LED (Yellow) Antenna Push button LAN connector You can connect a LAN cable (RJ45 plug) to the LAN connector. When connecting the LAN cable, insert it all the way until you hear the click. Do not insert a customer display cable, drawer kick cable, or a general public circuit cable into the LAN connector. - Page 14 (approx. 10 seconds) to restore all settings to their factory default. After turning the printer's power on, it can take about 15 to 20 seconds until the UB-R05 functions are enabled. If printing the status sheet, turn the printer on and wait for 20 seconds or longer, then press the push button.
-
Page 15: Setup
"Download" on page Method 2: Set up using EpsonNet Config (Web version) This method involves opening the Web application equipped in the UB-R05 from a Web browser to perform settings. Because you specify the printer's IP address to open it, you need to set your computer to the same network segment as the printer. -
Page 16: Setup Work Flow
Chapter 2 Setup Setup Work flow Method 1 Method 2 Method 3 Printing the status sheet (check settings) Change network settings on Use arp/ping command to set Set up using EpsonNet Config setting computer printer IP address Set up using EpsonNet Config Other settings (Web version) EpsonNet Config (Web version) -
Page 17: Printing The Status Sheet (Check Settings)
Printing the status sheet (Check Settings) Turn on the printer equipped with the UB-R05, then after 20 seconds or longer, press and hold the push button to the right of the LAN connector for about 3 seconds to print the status sheet. Once printing starts, release the push button. -
Page 18: Connecting To Ethernet
LAN cable until you hear a click. There might be multiple LAN connectors, depending on the printer you are using. If you connect the LAN cable to the LAN connector on the printer, you will be unable to configure the UB-R05 settings correctly. - Page 19 Chapter 2 Setup Match the settings on the computer with the network settings indicated on the status sheet. By factory default, the printer is set to an IP address that is assigned by the DHCP server. If multiple IP addresses are in conflict on the same network, you will be unable to perform the setup procedure.
-
Page 20: Connecting To Wireless Lan
Once wireless LAN network settings are performed, the printer will not start up in SimpleAP mode. If you want to start it up in SimpleAP mode, factory reset the UB-R05 that is mounted on the printer. For details about the factory reset procedure, see "Factory Reset"... - Page 21 Chapter 2 Setup Activate Wireless Network Connection on the computer used to configure the settings, and select [EPSON_Printer] as the connection device on the screen that appears. If the window to enter a pass phrase appears, enter “12345678”. Default settings on printer are the following values. Network mode SimpleAP mode SSID...
-
Page 22: Set Up Using Epsonnet Config
Chapter 2 Setup Set up using EpsonNet Config Select the target printer to set up from the EpsonNet Config device list. If the network for the printer is still set to factory defaults, the printer's MAC address will be detected and shown in the device list even if the printer and the computer do not have the same network address. -
Page 23: Set Up Using Epsonnet Config (Web Version)
Chapter 2 Setup Set up using EpsonNet Config (Web version) Use the following method to open EpsonNet Config (Web version) to check and change settings. If performing set up using EpsonNet Config (Web version), you need to set the network settings of the device used for configuring settings to the same network segment as the printer to be connected to. - Page 24 Input your user name and password on the authentication window. The user name is "epson", and the default password is the printer's serial number. You can find the serial number by performing a printer self-test, or by checking the manufacturing nameplate attached to the printer.
-
Page 25: Set Up Using Arp/Ping Commands (For Wired Lan Connection Only)
Check that the setting computer is connected to the network in the same segment as the printer, and that the Set IP Address Using ARP + Ping for the UB-R05 is set to Enable. (The factory default is Disable.) You can check the UB-R05 settings on the status sheet. -
Page 26: Factory Reset
Chapter 2 Setup Factory Reset If you become unable to connect to the network, you can use the following procedure to initialize settings and restore the device to factory default. Turn off the printer's power. With the push button pressed, turn on the printer's power. Use tweezers or a similar fine-tipped object to push the push button. -
Page 27: Epsonnet Config (Web Version)
EpsonNet Config (Web version) This section describes the items that can be displayed and set using EpsonNet Config (Web version), the Web application equipped in the UB-R05. Information Menu On the Information menu, you can check the following settings. For the details of each protocol or the settings other than the Information menu, check the Configuration menu. -
Page 28: Configuration Menu
Chapter 2 Setup Configuration Menu On the Configuration menu, you can check and set the following items. Ethernet You can check and set the communication standard. (Auto / 10Base-T Half Duplex / 10Base-T Full Duplex / 100Base-TX Half Duplex / 100Base-TX Full Duplex) Wireless You can check and set the following wireless settings. - Page 29 Chapter 2 Setup Security This is required when using HTTPS. SSL/TLS You can check and set the SSL/TLS. Selection of the server certificate type (Selfsigned Certificate / CA signed Certificate1 / CA signed Certificate2 / CA signed Certificate3) Encryption strength setting (Medium / Low / High) ...
- Page 30 Chapter 2 Setup TCP/IP IP v4 Address This sets the IP address when setting the manual. Setting for IP address acquisition method (Manual / Auto) IP address setting Subnet mask address setting Default gateway address setting ...
- Page 31 Chapter 2 Setup Time Setting You can check and set the time server. Use of time server (Disable / Enable) Time server address setting Time setting for refresh interval (Can be set between 1 to 10,080 min) - Default is 60 min. ...
-
Page 32: Optional Menu
However, if you execute [Reset] after executing [Send] on the settings pages, it is not necessary to perform a reset here. Restore the UB-R05 network settings to the default values. This might prevent you from communicating with your web browser. -
Page 33: Application Development Information
XML commands, you can print in environments where http communication is available and from OS applications. For detailed information about ePOS-Print XML, see the ePOS-Print XML User's Manual. To use ePOS-Print XML or Epson ePOS SDK, set ePOS-Print to Enable in EpsonNet Config (Web version) beforehand. -
Page 34: Software
Description Operating environment EpsonNet Config A network setting tool for Epson network Windows, Mac products. UB-R05 Network Firmware A tool for updating the UB-R05 firmware. Windows Updater Others Manual Description ePOS-Print XML User's Manual Describes ePOS-Print XML statements. This manual comes with sample programs. -
Page 35: Programming Samples
(Page Printing to a TM printer The UB-R05 is equipped with LPR protocol as a general printing protocol. It is easy to print by using LPR because the printing is also supported by the operating system. The printer status cannot be acquired because LPR is one-way communication. -
Page 36: Direct Printing By Port9100
Chapter 4 Programming Samples Direct printing by PORT9100 For Windows Console The following program is a sample of printing "EPSON UB-R05" to a TM printer with the UB-R05 from the Windows shell, through the Ethernet connection. /* TCP9100 programming sample for win32 * HOW TO BUILD * cl wtcp.cpp wsock32.lib... -
Page 37: For Linux
Chapter 4 Programming Samples For Linux The following program is a sample of printing "EPSON UB-R05" to a TM printer with the UB-R05 from the Linux shell, through the Ethernet connection. /* TCP9100 programming sample for LINUX * HOW TO BUILD * cc ltcp.c... -
Page 38: Monitoring Of The Asb Status
Monitoring of the ASB Status The ASB status function of the printer is used for the UB-R05 to monitor the state of the printer. Therefore, when the transmission data from the application includes the command to nullify the ASB status function, the UB-R05 cannot control the state of the printer. -
Page 39: Troubleshooting
Chapter 5 Troubleshooting Troubleshooting This chapter describes the measures for finding and resolving problems. See the printer Technical Reference Guide for problems related to printing and the printer. If this product is mounted on the TM-T88VI, also see "Limitations" on page No Communication Cause Recovery Procedure... -
Page 40: Product Specifications
Chapter 6 Product Specifications Product Specifications This chapter describes the specifications of the UB-R05. Software Specifications Supported Protocols The UB-R05 supports the following protocols. Protocol Explanation IP, ARP, ICMP, UDP, TCP Basic transmission protocols for various functions. (They are used by the various following higher protocols.) -
Page 41: Automatic Ip Address Assignment Protocols
Not supported Automatic IP Address Assignment Protocols The UB-R05 supports DHCP and APIPA, the protocols that assign an IP Address automatically. Automatic IP address assignment is performed with the protocols in the order of descending priorities shown in the table below. -
Page 42: Protocol For Acquiring Status And Setting
Chapter 6 Product Specifications Protocol for acquiring status and setting The following protocols are used to acquire the status and set for the UB-R05. SNMP The general purpose MIB management tool, OPOS/APD, uses this to acquire and set the TM printer status. -
Page 43: System Bootup Time
Chapter 6 Product Specifications System Bootup Time The UB-R05 requires some bootup time for initializing the system after power-on or system reset. The network communication functions are unavailable during system bootup. The required bootup time is as follows. When setting the IP address in the Manual mode:... -
Page 44: Limitations
You cannot connect a customer display or barcode scanner to the printer's USB connector (Type-A). Using the UB-R05 with the TM-T88VI Some of the printer's functions are not available when the UB-R05's LAN connector is used. If you want access to all of the printer's functions, use the printer's LAN connector. - Page 45 If the printer's status sheet button or paper feed button is used to print the status sheet, the QR code information that is printed is information for the LAN connector that is mounted on the printer. For information about the LAN connector on the UB-R05, use the push button on the UB-R05 to print the status sheet.
-
Page 46: Open Source Software License
Chapter 6 Product Specifications Open Source Software License This product uses open source software in addition to Epson proprietary software. For information of the open source software used in this product, see the following URL. http://xxx.xxx.xxx.xxx/licenses.html (xxx.xxx.xxx.xxx is the printer's IP address.) -
Page 47: Appendix
Appendix Appendix The following indicates the defaults for the UB-R05 network parameters, if they can be displayed and set using EpsonNet Config / EpsonNet Config (Web version), and if they are displayed on the status sheet. Ethernet and Wireless LAN Shared Settings and Browsable... - Page 48 Appendix EpsonNet EpsonNet Printing Config Config Articles Parameters Default the status (Web version) sheet Refer Setting Refer Setting Time Server Status Invalid Invalid Success Synchronize Failure Time Server Address – 0.0.0.0 × ePOS-print Enable Disable × × × Disable Printing Method Impact Thermal (180dpi) ×...
-
Page 49: Ethernet Settings And Browsable Items
Appendix Ethernet Settings and Browsable Items EpsonNet EpsonNet Config Printing the Config Articles Parameters Default (Web version) status sheet Refer Setting Refer Setting arp+ping IP setting Enable Disable × Disable Communication mode Auto Negotiation Auto setting 10BASE-T Half negotiation 10BASE-T Full 100BASE-TX Half 100BASE-TX Full MAC Address... -
Page 50: Ub-R04 And Ub-R05
Appendix UB-R04 and UB-R05 The comparison table between the UB-R04 and the UB-R05 is shown below. Specifications UB-R04 UB-R05 Communication Ethernet standard – 10Base-T, 100Base-TX function Full duplex, Half duplex, Auto duplex Wireless LAN standard IEEE 802.11a/b/g/n IEEE 802.11a/b/g/n/ac Frequency 2.4 GHz/5 GHz...