Table of Contents
Advertisement
Quick Links
Advertisement
Table of Contents

Related Manuals for Epson Workforce Pro WF-M5299DW


Summary of Contents for Epson Workforce Pro WF-M5299DW
- Page 1 User's Guide NPD5934-01 EN...
-
Page 2: Table Of Contents
Introduction to the Manuals....5 Menu Options for Epson Open Platform Using the Manual to Search for Information..5 Information. - Page 3 Installing a PostScript Printer Driver... . 91 Using Epson iPrint..... . . 72 Installing a PostScript Printer Driver - Windows.
- Page 4 Printing Slows Down Dramatically During Contacting Epson Support....133 Continuous Printing.....110 Cannot Cancel Printing from a Computer Running Mac OS X v10.6.8.
-
Page 5: About This Manual
About This Manual Introduction to the Manuals The following manuals are supplied with your Epson printer. As well as the manuals, check the various types of help information available from the printer itself or from the Epson software applications. ❏ Important Safety Instructions (paper manual) Provides you with instructions to ensure the safe use of this printer. - Page 6 User's Guide About This Manual Searching by keyword Click Edit > Advanced Search. Enter the keyword (text) for information you want to find in the search window, and then click Search. Hits are displayed as a list. Click one of the displayed hits to jump to that page. Jumping directly from bookmarks Click a title to jump to that page.
-
Page 7: Marks And Symbols
User's Guide About This Manual Marks and Symbols Caution: Instructions that must be followed carefully to avoid bodily injury. Important: Instructions that must be observed to avoid damage to your equipment. Note: Provides complementary and reference information. & Related Information Links to related sections. - Page 8 User's Guide About This Manual ❏ Microsoft ® ® Windows Server 2008 R2 operating system ❏ Microsoft ® ® Windows Server 2008 operating system ❏ Microsoft ® ® Windows Server 2003 R2 operating system ❏ Microsoft ® ® Windows Server 2003 operating system Mac OS In this manual, "Mac OS"...
-
Page 9: Important Instructions
❏ Some of the symbols used on your printer are to ensure safety and proper use of the printer. Visit the following Web site to learn the meaning of the symbols. http://support.epson.net/symbols ❏ Use only the power cord supplied with the printer and do not use the cord with any other equipment. Use of other cords with this printer or the use of the supplied power cord with other equipment may result in fire or electric shock. -
Page 10: Printer Advisories And Warnings
User's Guide Important Instructions ❏ Be careful when you handle used ink supply units, as there may be some ink around the ink supply port. ❏ If ink gets on your skin, wash the area thoroughly with soap and water. ❏... -
Page 11: Advisories And Warnings For Using The Printer
User's Guide Important Instructions Advisories and Warnings for Using the Printer ❏ Do not insert objects through the slots in the printer. ❏ Do not put your hand inside the printer during printing. ❏ Do not touch the white flat cable inside the printer. ❏... - Page 12 User's Guide Important Instructions Settings > General Settings > System Administration > Restore Default Settings > All Settings...
-
Page 13: Printer Basics
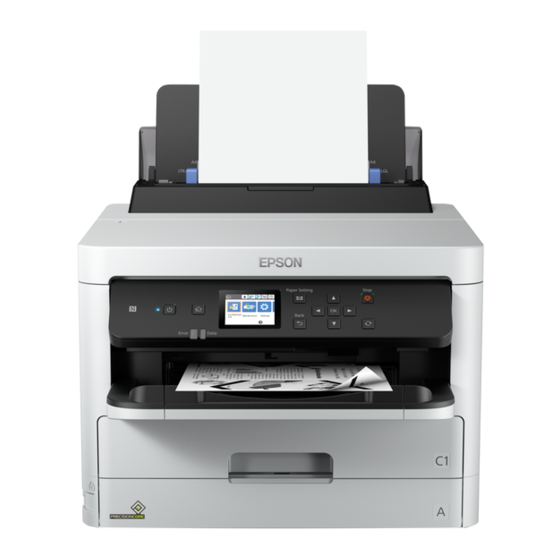
User's Guide Printer Basics Printer Basics Part Names and Functions Control panel Operates the printer. You can change the angle of the control panel. Paper cassette 1 or Paper cassette (C1) Loads paper. Paper cassette 2 (C2) Optional paper cassette unit. Loads paper. - Page 14 User's Guide Printer Basics Edge guides Feeds the paper straight into the printer. Slide to the edges of the paper. Paper support Supports loaded paper. Feeder guard Prevents foreign substance from entering the printer. Usually keep this guard closed. Rear paper feed (B) Loads paper.
- Page 15 User's Guide Printer Basics Printer cover (J) Open when removing jammed paper inside the printer. Print head Fires ink. Ink supply unit tray Sets an ink supply unit. Front cover (A) Open when replacing ink supply unit. Front cover lock Locks the front cover.
-
Page 16: Control Panel
User's Guide Printer Basics LAN port Connects a LAN cable. USB port Connects a USB cable. Service USB port USB port for future use. Do not remove the sticker. AC inlet Connects the power cord. Rear Cover (D) Open when removing jammed paper. Rear Cover (E) Open when removing jammed paper. -
Page 17: Basic Screen Configuration
User's Guide Printer Basics Basic Screen Configuration Indicates items that have been setup for the printer as icons. Select the icon to check the current settings or access each setting menu. This action bar is displayed on the home screen only. Displays each mode. -
Page 18: Basic Operations
User's Guide Printer Basics Indicates whether or not Quiet Mode is set for the printer. When this feature is enabled, the noise made by printer operations is reduced, but print speed may slow down. However, noises may not be reduced depending on the selected paper type and print quality. -
Page 19: Entering Characters
User's Guide Printer Basics u d l r To enter the value, name, address, and so on, move the focus to the input field using the buttons, and then press the OK button to display the on-screen keyboard. Entering Characters On-screen Keyboard You can enter characters and symbols by using on-screen keyboard when you make network settings and so on. -
Page 20: Viewing Animations
User's Guide Printer Basics Enters a space. Confirms the entered characters. Deletes a character to the left. Viewing Animations You can view animations of operating instructions such as loading paper or removing jammed paper on the LCD screen. ❏ Select on the home screen: Displays the help screen. -
Page 21: Preparing The Printer
Note: ❏ The availability of paper varies by location. For the latest information on paper available in your area, contact Epson support. ❏ When printing on genuine Epson paper at a user defined size, only Standard or Normal print quality settings are available. - Page 22 User's Guide Preparing the Printer Media Name Size Loading Capacity (Sheets or Envelopes) 2-Sided Printing Paper Cassette 1 Paper Rear Cassette Paper Feed Plain paper, Copy Up to the line indicated by the Auto, Letter, A4, Executive , B5, A5, SP1 paper Manual (210×270 mm)
- Page 23 User's Guide Preparing the Printer Media Name Size Loading Capacity (Sheets or Envelopes) 2-Sided Printing Paper Cassette 1 Paper Rear Cassette Paper Feed Thick paper Auto, Letter, A4, Executive , B5, A5, SP1 Manual (210×270 mm) , 16K (195×270 (91 to 160 g/m2) Legal, 8.5×13 in, Half letter , A6, Manual...
-
Page 24: Loading Paper In The Paper Cassette
User's Guide Preparing the Printer Only printing from computer is available. You can load up to 5 sheets for paper with one side already printed. Related Information “Part Names and Functions” on page 13 & Paper Handling Precautions ❏ Read the instruction sheets supplied with the paper. ❏... - Page 25 User's Guide Preparing the Printer 1. Check that the printer is not operating, and then pull out the paper cassette. 2. Slide the front edge guide to its maximum position, and then slide the side edge guides to adjust to the paper size you want to use.
- Page 26 User's Guide Preparing the Printer Note: When using paper larger than A4 size, extend the paper cassette. 3. Load paper with the printable side facing down, and then slide the front edge guide to the edge of the paper. Important: Do not load more than the maximum number of sheets specified for the paper.
-
Page 27: Loading Paper In The Rear Paper Feed
User's Guide Preparing the Printer Related Information “Paper Handling Precautions” on page 24 & “Available Paper and Capacities” on page 21 & “List of Paper Type” on page 30 & “Loading Envelopes and Precautions” on page 29 & Loading Paper in the Rear Paper Feed 1. - Page 28 User's Guide Preparing the Printer Important: ❏ Do not load more than the maximum number of sheets specified for the paper. For plain paper, do not load above the line just under the triangle symbol inside the edge guide. ❏ Load paper short edge first. However, when you have set the long edge as the width of the user defined size, load paper long edge first.
-
Page 29: Loading Envelopes And Precautions
User's Guide Preparing the Printer 6. Slide out the output tray when loading paper longer than A4 size. Note: Return the remaining paper to its package. If you leave it in the printer, the paper may curl or the print quality may decline. -
Page 30: Loading Long Papers
List of Paper Type To obtain optimum printing results, select the paper type that suits the paper. Media Name Media Type Control Panel Printer Driver PostScript Printer Epson Universal Printer Driver Driver Epson Bright White Plain paper Plain paper Plain... -
Page 31: Menu Options For Settings
User's Guide Preparing the Printer Media Name Media Type Control Panel Printer Driver PostScript Printer Epson Universal Printer Driver Driver Epson Matte Paper- Matte Epson Matte Epson Matte Heavyweight Epson Double-Sided Matte Paper Epson Photo Quality Matte Epson Matte Epson Matte... - Page 32 User's Guide Preparing the Printer ❏ Power Off If Inactive Select this setting to turn the printer off automatically if it is not used for a specified period of time. Any increase will affect the product’s energy efficiency. Please consider the environment before making any change.
- Page 33 User's Guide Preparing the Printer Paper Source Settings: Paper Setting: Select the paper size and paper type you loaded in the paper sources. Rear Paper Feed Priority: Select On to give printing priority to paper loaded in the rear paper feed. A4/Letter Auto Switching: Select On to feed paper from the paper source set as A4 size when there is no paper source set as Letter, or feed from the paper source set as Letter size when there is no paper source set as...
- Page 34 User's Guide Preparing the Printer PDL Print Configuration: Select the PDL Print Configuration options you want to use for PCL or PostScript printing. Common Settings: ❏ Paper Size Select the default paper size for PCL or PostScript printing. ❏ Paper Type Select the default paper type for PCL or PostScript printing.
- Page 35 User's Guide Preparing the Printer ❏ Height Set the default font height if the font is scalable and proportional. You can select from 4.00 to 999.75 points, in 0.25 increments. This item may not appear depending on the font source or font number settings. ❏...
- Page 36 User's Guide Preparing the Printer Quiet Mode: Select On to reduce noise during printing, however, this may lower the print speed. Depending on the paper type and print quality settings you selected, there may be no difference in the printer's noise level.
- Page 37 You cannot change settings that have been locked by your administrator. Epson Connect Services: Displays whether the printer is registered and connected to Epson Connect. You can register to the service by selecting Register and follow the instructions. When you have registered, you can change the following settings.
-
Page 38: Menu Options For Print Counter
User's Guide Preparing the Printer http://www.epsonconnect.eu (Europe only) System Administration Select the menu on the control panel as described below. Settings > General Settings > System Administration Administrators use this feature. See the Administrator's Guide for details. Menu Options for Print Counter Select the menus on the control panel as described below. -
Page 39: Menu Options For Language
User's Guide Preparing the Printer ❏ Ruled Line Alignment Select this feature to align vertical lines. ❏ Horizontal Alignment Select this feature if horizontal banding appears at regular intervals in your printouts. Paper Guide Cleaning: Select this feature if there are ink stains on the internal rollers. The printer feeds paper to clean the internal rollers. -
Page 40: Menu Options For Authentication Device Status
Select the menus on the control panel as described below. Settings > Epson Open Platform Information Displays the status of the Epson Open Platform. Saving Power The printer enters sleep mode or turns off automatically if no operations are performed for a set period. You can adjust the time before power management is applied. - Page 41 User's Guide Preparing the Printer 3. Do one of the following. ❏ Select Sleep Timer or Power Off Settings > Power Off If Inactive or Power Off If Disconnected, and then make settings. ❏ Select Sleep Timer or Power Off Timer, and then make settings. Note: Your product may have the Power Off Settings or Power Off Timer feature depending on the location of purchase.
-
Page 42: Printing
User's Guide Printing Printing Printing from the Printer Driver on Windows If you cannot change some of the printer driver settings, they may have been restricted by the administrator. Contact your printer administrator for assistance. Accessing the Printer Driver When accessing the printer driver from the computer's control panel, the settings are applied to all of the applications. - Page 43 User's Guide Printing 1. Open the file you want to print. Load paper in the printer if it has not already been loaded. 2. Select Print or Page Setup from the File menu. 3. Select your printer. 4. Select Preferences or Properties to access the printer driver window. 5.
-
Page 44: Printing On 2-Sides
“Available Paper and Capacities” on page 21 & Print Settings Manual 2-sided printing is available when EPSON Status Monitor 3 is enabled. However, it may not be available when the printer is accessed over a network or is used as a shared printer. Note: To enable EPSON Status Monitor 3, click Extended Settings on the Maintenance tab, and then select Enable EPSON Status Monitor 3. -
Page 45: Printing Several Pages On One Sheet
User's Guide Printing 3. Click Print. For manual 2-sided printing, when the first side has finished printing, a pop-up window is displayed on the computer. Follow the on-screen instructions. Related Information “Printing Basics” on page 42 & “Main Tab” on page 58 &... -
Page 46: Printing And Stacking In Page Order (Reverse Order Printing)
User's Guide Printing Printing and Stacking in Page Order (Reverse Order Printing) You can print from the last page so that the documents are stacked in page order. Print Settings On the printer driver's Main tab, select Reverse Order. Related Information “Printing Basics”... -
Page 47: Printing One Image On Multiple Sheets For Enlargement (Creating A Poster)
User's Guide Printing Related Information “Printing Basics” on page 42 & “More Options Tab” on page 59 & Printing One Image on Multiple Sheets for Enlargement (Creating a Poster) This feature allows you to print one image on multiple sheets of paper. You can create a larger poster by taping them together. - Page 48 User's Guide Printing The actual guides are printed in monochrome, but for this explanation they are shown as blue and red lines. 1. Prepare Sheet 1 and Sheet 2. Cut off the margins of Sheet 1 along the vertical blue line through the center of the top and bottom cross marks.
- Page 49 User's Guide Printing 2. Place the edge of Sheet 1 on top of Sheet 2 and align the cross marks, then temporarily tape the two sheets together from the back. 3. Cut the taped sheets in two along the vertical red line through the alignment markers (this time, the line to the left of the cross marks).
- Page 50 User's Guide Printing 4. Tape the sheets together from the back. 5. Repeat steps 1 to 4 to tape Sheet 3 and Sheet 4 together. 6. Cut off the margins of Sheet 1 and Sheet 2 along the horizontal blue line through the center of the left and right side cross marks.
- Page 51 User's Guide Printing 7. Place the edge of Sheet 1 and Sheet 2 on top of Sheet 3 and Sheet 4 and align the cross marks, and then temporarily tape them together from the back.
- Page 52 User's Guide Printing 8. Cut the taped sheets in two along the horizontal red line through the alignment markers (this time, the line above the cross marks). 9. Tape the sheets together from the back.
-
Page 53: Printing With A Header And Footer
User's Guide Printing 10. Cut off the remaining margins along the outer guide. Printing with a Header and Footer You can print information such as a user name and printing date in headers or footers. Print Settings On the printer driver's More Options tab, click Watermark Features, and then select Header/Footer. Click Settings, and then select the items you want to print. -
Page 54: Printing A Watermark
User's Guide Printing Related Information “Printing Basics” on page 42 & “More Options Tab” on page 59 & Printing a Watermark You can print a watermark such as "Confidential" or an anti-copy pattern on your printouts. If you print with an anti-copy pattern, the hidden letters appear when photocopied in order to distinguish the original from the copies. -
Page 55: Printing Password-Protected Files
User's Guide Printing Printing Password-Protected Files Yon can set a password for a print job so that it starts printing only after entering the password on the printer's control panel. Print Settings On the printer driver's More Options tab, select Confidential Job, and then enter a password. To print the job, select Confidential Job on the home screen of the printer's control panel. -
Page 56: Adjusting The Print Tone
User's Guide Printing When you select a print job added to Print Project in the Job Arranger Lite window, you can edit the page layout. Click Print from the File menu to start printing. Note: If you close the Job Arranger Lite window before adding all the print data to the Print Project, the print job you are currently working on is canceled. -
Page 57: Printing To Emphasize Thin Lines
User's Guide Printing Printing to Emphasize Thin Lines You can thicken thin lines that are too thin to print. Print Settings On the printer driver's More Options tab, click Image Options in the Tone Correction setting. Select Emphasize Thin Lines. Related Information “Printing Basics”... -
Page 58: Canceling Printing
User's Guide Printing You can use this feature under the following conditions. ❏ Paper: Plain paper, Copy paper, Letterhead, Recycled paper, Colored paper, Preprinted paper, High quality plain paper, Thick paper, or Envelope ❏ Quality: Standard Note: Deblurring may not always be possible depending on the circumstances. Print Settings On the printer driver's Maintenance tab, click Extended Settings, and then select Barcode mode. - Page 59 User's Guide Printing Document Size Select the paper size on which you want to print. If you select User-Defined, enter the paper width and height. Orientation Select the orientation you want to use to print. Paper Type Select the type of paper on which you print. Quality Select the pint quality you want to use for printing.
- Page 60 Job Arranger Lite Opens the Job Arranger Lite window. You can save and edit data. EPSON Status Opens the EPSON Status Monitor 3 window. Here you can confirm the status of the printer and the Monitor 3 consumables. Monitoring Allows you to make settings for items on the EPSON Status Monitor 3 window.
-
Page 61: Printing From The Postscript Printer Driver On Windows
User's Guide Printing Printing from the PostScript Printer Driver on Windows A PostScript Printer Driver is a driver that outputs printing commands to a printer using a PostScript Page Description Language. 1. Open the file you want to print. Load paper in the printer if it has not already been loaded. 2. -
Page 62: Menu Options For The Postscript Printer Driver
User's Guide Printing “Paper/Quality Tab” on page 62 & “Layout Tab” on page 62 & Menu Options for the PostScript Printer Driver Open the print window on an application, select the printer, and then access the printer driver window. Note: Menus vary depending on the option you selected. -
Page 63: Canceling Printing
User's Guide Printing Advanced Options Paper/Output Paper Size Select the paper size on which you want to print. Copies Set the number of copies you want to print. Graphic Print Quality Select the pint quality you want to use for printing. Scaling Allows you to reduce or enlarge the document. - Page 64 Printing 4. Select Print Settings from the pop-up menu. Note: On OS X Mountain Lion or later, if the Print Settings menu is not displayed, the Epson printer driver has not been installed correctly. Select System Preferences from the menu > Printers & Scanners (or Print & Scan, Print & Fax), remove the printer, and then add the printer again.
-
Page 65: Printing On 2-Sides
User's Guide Printing Printing on 2-Sides You can print on both sides of the paper. Note: ❏ If you do not use paper that is suitable for 2-sided printing, the print quality may decline and paper jams may occur. ❏ Depending on the paper and the data, ink may bleed through to the other side of the paper. Related Information “Available Paper and Capacities”... -
Page 66: Printing Several Pages On One Sheet
User's Guide Printing Printing Several Pages on One Sheet You can print two or four pages of data on a single sheet of paper. Print Settings Select Layout from the pop-up menu. Set the number of pages in Pages per Sheet, the Layout Direction (page order), and Border. -
Page 67: Printing A Reduced Or Enlarged Document
User's Guide Printing “Menu Options for Paper Handling” on page 68 & Printing a Reduced or Enlarged Document You can reduce or enlarge the size of a document by a specific percentage or to fit the paper size you loaded in the printer. -
Page 68: Menu Options For The Printer Driver
ColorSync Select the method for color adjustment. These options adjusts colors between the printer and the computer display to minimize the difference in color. EPSON Color Controls Menu Options for Paper Handling Collate pages Prints multi-page documents collated in order and sorted into sets. -
Page 69: Making Operation Settings For The Mac Os Printer Driver
User's Guide Printing Menu Options for Cover Page Print Cover Page Select whether or not to print a cover page. When you want to add a back cover, select After document. Cover Page Type Select the contents of the cover page. Menu Options for Print Settings Paper Source Select the paper source from which the paper is fed. -
Page 70: Mac Os
User's Guide Printing ❏ Lower Cassette: Add the optional paper cassette units to the paper source. Printing from the PostScript Printer Driver on Mac OS A PostScript Printer Driver is a driver that outputs printing commands to a printer using a PostScript Page Description Language. -
Page 71: Menu Options For The Postscript Printer Driver
User's Guide Printing “Loading Paper in the Rear Paper Feed” on page 27 & “List of Paper Type” on page 30 & “Menu Options for Printer Features” on page 72 & Menu Options for the PostScript Printer Driver Open the print window on an application, select the printer, and then access the printer driver window. Note: Menus vary depending on the option you selected. -
Page 72: Canceling Printing
Using Epson iPrint Epson iPrint is an application that allows you to print photos, documents, and web pages from a smart device such as a smartphone or tablet. You can use local print, printing from a smart device that is connected to the same... - Page 73 User's Guide Printing wireless network as your printer, or remote print, printing from a remote location over the Internet. To use remote print, register your printer in the Epson Connect service. Related Information “Printing Using a Network Service” on page 94 &...
- Page 74 Printing Using Epson iPrint Start Epson iPrint from your smart device and select the item you want to use from the home screen. The following screens are subject to change without notice. The contents may vary depending on the product.
- Page 75 Starts printing. Note: To print from the document menu using iPhone, iPad, and iPod touch running iOS, start Epson iPrint after transferring the document you want to print using the file sharing function in iTunes. Printing by Touching Smart Devices to the N-Mark You can simply connect and print by touching your smart device to the printer's N-Mark.
-
Page 76: Using Epson Print Enabler
You can wirelessly print your documents, emails, photos, and web pages right from your Android phone or tablet (Android v4.4 or later). With a few taps, your Android device will discover an Epson printer that is connected to the same wireless network. -
Page 77: Using Airprint
1. Load paper in your product. 2. Set up your product for wireless printing. See the link below. http://epson.sn 3. Connect your Apple device to the same wireless network that your product is using. 4. Print from your device to your product. -
Page 78: Replacing An Ink Supply Unit And Other Consumables
2. Click EPSON Status Monitor 3 on the Maintenance tab, and then click Details. Note: If EPSON Status Monitor 3 is disabled, click Extended Settings on the Maintenance tab, and then select Enable EPSON Status Monitor 3. Checking the Status of the Remaining Ink and the Maintenance Box - Mac OS 1. -
Page 79: Ink Supply Unit Codes
The following are the codes for genuine Epson ink supply units. Note: ❏ Ink supply unit codes may vary by location. For the correct codes in your area, contact Epson support. ❏ Not all ink supply units are available in all regions. - Page 80 User's Guide Replacing an Ink Supply Unit and Other Consumables ❏ Do not touch the sections shown in the illustration. Doing so may prevent normal operation and printing. ❏ Do not turn off the printer during ink charging. If the ink charging is incomplete, you may not be able to print. ❏...
-
Page 81: Replacing An Ink Supply Unit
The need for replacement of the box does not mean that your printer has ceased to operate in accordance with its specifications. The Epson warranty does not cover the cost of this replacement. It is a user- serviceable part. - Page 82 User's Guide Replacing an Ink Supply Unit and Other Consumables Related Information “Maintenance Box Handling Precautions” on page 81 &...
-
Page 83: Maintaining The Printer
We recommend to turn off the printer. If print quality has still not improved, contact Epson support. ❏ To prevent the print head from drying out, do not unplug the printer while the power is on. -
Page 84: Checking And Cleaning The Print Head - Windows
User's Guide Maintaining the Printer 7. When cleaning is finished, print the nozzle check pattern again. Repeat cleaning and printing the pattern until all lines are printed completely. Related Information “Loading Paper in the Paper Cassette” on page 24 & Checking and Cleaning the Print Head - Windows 1. - Page 85 User's Guide Maintaining the Printer 1. Load A4-size plain paper in the paper cassette 1. 2. Select Maintenance on the home screen. u d l r To select an item, move the focus to the item using the buttons, and then press the OK button. 3.
-
Page 86: Cleaning The Paper Path For Ink Smears
User's Guide Maintaining the Printer Related Information “Loading Paper in the Paper Cassette” on page 24 & Cleaning the Paper Path for Ink Smears When the printouts are smeared or scuffed, clean the roller inside. Important: Do not use tissue paper to clean the inside of the printer. The print head nozzles may be clogged with lint. 1. -
Page 87: Network Service And Software Information
User's Guide Network Service and Software Information Network Service and Software Information This section introduces the network services and software products available for your printer from the Epson website or the supplied software disc. Application for Configuring Printer Operations (Web Config) Web Config is an application that runs in a web browser, such as Internet Explorer and Safari, on a computer or smart device. -
Page 88: Running Web Config On Windows
User's Guide Network Service and Software Information IPv6: http://[2001:db8::1000:1]/ Note: Using the smart device, you can also run Web Config from the maintenance screen of Epson iPrint. Related Information “Using Epson iPrint” on page 72 & Running Web Config on Windows When connecting a computer to the printer using WSD, follow the steps below to run Web Config. -
Page 89: Software Update Tools (Epson Software Updater)
Click the start button, and then select All Programs or Programs > Epson Software > EPSON Software Updater. Note: You can also start EPSON Software Updater by clicking the printer icon on the task bar on the desktop, and then selecting Software Update. Starting on Mac OS Select Go >... - Page 90 Note: ❏ You can download the latest applications from the Epson website. http://www.epson.com ❏ If you use Windows Server operating systems, you cannot use EPSON Software Updater. Download the latest applications from the Epson website. Related Information “Software Update Tools (EPSON Software Updater)” on page 89...
-
Page 91: Installing A Postscript Printer Driver
Follow the on-screen instructions to connect the printer to the computer. 5. Follow the on-screen instructions to install the PostScript printer driver. Installing a PostScript Printer Driver - Mac OS Download the printer driver from the Epson Support website, and then install it. http://www.epson.eu/Support (Europe) http://support.epson.net/... -
Page 92: Installing The Epson Universal Printer Driver (For Windows Only)
Installing the Epson Universal Printer Driver (for Windows Only) The Epson universal printer driver is the universal PCL6 compatible print driver. Once you install this printer driver , you can print from every Epson printer that supports this printer driver. -
Page 93: Uninstalling Applications - Mac Os
6. Select the application you want to uninstall, and then click Uninstall. Important: The Uninstaller removes all drivers for Epson inkjet printers on the computer. If you use multiple Epson inkjet printers and you only want to delete some drivers, delete all of them first, and then install the necessary printer... -
Page 94: Printing Using A Network Service
If you cannot find the application you want to uninstall in the application list, you cannot uninstall using the Uninstaller. In this situation, select Go > Applications > Epson Software, select the application you want to uninstall, and then drag it to the trash icon. -
Page 95: Solving Problems
Turn the power off and on again, and then reinsert the paper cassette. If print from another cassette. the error message is still displayed, contact Epson support or an authorised Epson service provider to request repairs. You need to replace Ink Supply Unit. -
Page 96: Checking The Printer Status - Windows
2. Click EPSON Status Monitor 3 on the Maintenance tab, and then click Details. You can check the printer status, ink levels, and error status. Note: If EPSON Status Monitor 3 is disabled, click Extended Settings on the Maintenance tab, and then select Enable EPSON Status Monitor 3. Related Information “Accessing the Printer Driver”... -
Page 97: Paper Does Not Feed Correctly
User's Guide Solving Problems Caution: Never touch the buttons on the control panel while your hand is inside the printer. If the printer starts operating, it could cause an injury. Be careful not to touch the protruding parts to avoid injury. Important: Remove the jammed paper carefully. -
Page 98: Paper Feeds At A Slant
User's Guide Solving Problems Paper Feeds at a Slant Load paper in the correct direction, and slide the edge guides against the edges of the paper. Related Information “Loading Paper in the Paper Cassette” on page 24 & “Loading Paper in the Rear Paper Feed” on page 27 &... -
Page 99: Power Turns Off Automatically
User's Guide Solving Problems Power Turns Off Automatically ❏ Select Settings > General Settings > Basic Settings > Power Off Settings, and then disable the Power Off If Inactive and Power Off If Disconnected settings. ❏ Select Settings > General Settings > Basic Settings, and then disable the Power Off Timer setting. Note: Your product may have the Power Off Settings or Power Off Timer feature depending on the location of purchase. -
Page 100: Checking The Connection (Network)
Checking the Software and Data ❏ Make sure that a genuine Epson printer driver is installed. If a genuine Epson printer driver is not installed, the available functions are limited. We recommend using a genuine Epson printer driver. See the related information link below for details. - Page 101 User's Guide Solving Problems Click the Driver tab. If your printer name is displayed in the list, a genuine Epson printer driver is installed on your computer. Mac OS Select System Preferences from the menu > Printers & Scanners (or Print & Scan, Print & Fax), and then select the printer.
-
Page 102: Checking The Printer Status From The Computer (Windows)
Network connection: EPSON XXXX Series (network) If you install the printer driver multiple times, copies of printer driver may be created. If copies such as "EPSON XXXX Series (copy 1)" are created, right-click the copied driver icon, and then click Remove Device. -
Page 103: Cannot Print From An Iphone Or Ipad
User's Guide Solving Problems ❏ Make sure the printer status is not Pause. Select System Preferences from the menu > Printers & Scanners (or Print & Scan, Print & Fax), and then double-click the printer. If the printer is paused, click Resume (or Resume Printer). Cannot Print from an iPhone or iPad ❏... -
Page 104: Printout Is Scuffed Or Color Is Missing
User's Guide Solving Problems 5. Follow the on-screen instructions to print the patterns for print head alignment, and then align the print head. ❏ This pattern allows you to perform alignment if your printouts look blurry. Find and select the number for the most solid pattern. ❏... -
Page 105: Banding Appears
User's Guide Solving Problems Related Information “Checking and Cleaning the Print Head” on page 83 & Banding Appears The print head nozzles may be clogged. Perform a nozzle check to check if the print head nozzles are clogged. Clean the print head if any of the print head nozzles are clogged. Related Information “Checking and Cleaning the Print Head”... -
Page 106: Blurry Prints, Vertical Banding, Or Misalignment
User's Guide Solving Problems Blurry Prints, Vertical Banding, or Misalignment Align the print head using the Print Quality Adjustment feature. Related Information “Adjusting the Print Quality” on page 103 & Print Quality Does Not Improve Even After Aligning the Print Head During bidirectional (or high speed) printing, the print head prints while moving in both directions, and vertical lines may be misaligned. -
Page 107: Paper Is Smeared Or Scuffed
Checking the ink supply unit ❏ Try to use genuine Epson ink supply units. This product is designed to adjust colors based on the use of genuine Epson ink supply units. The use of non-genuine ink supply units may cause print quality to decline. -
Page 108: Paper Is Smeared During Automatic 2-Sided Printing
User's Guide Solving Problems ❏ When printing on thick paper, the print head is close to the printing surface and the paper may be scuffed. In this case, enable the reduce scuff setting. If you enable this setting, print quality may decline or printing may slow down. -
Page 109: Printed Characters Are Incorrect Or Garbled
User's Guide Solving Problems Related Information “Loading Paper in the Paper Cassette” on page 24 & “Loading Paper in the Rear Paper Feed” on page 27 & “Printable Area” on page 113 & Printed Characters Are Incorrect or Garbled ❏ Connect the USB cable securely to the printer and the computer. ❏... -
Page 110: Other Printing Problems
User's Guide Solving Problems Related Information “Uninstalling Applications” on page 92 & “Installing the Latest Applications” on page 89 & Other Printing Problems Printing Is Too Slow ❏ Close any unnecessary applications. ❏ Lower the quality setting. High quality printing slows down the printing speed. ❏... -
Page 111: Postscript Printer Driver Problems
User's Guide Solving Problems Run Web Config, and then select Port9100 as the Top Priority Protocol setting in AirPrint Setup. Select System Preferences from the menu > Printers & Scanners (or Print & Scan, Print & Fax), remove the printer, and then add the printer again. -
Page 112: Operation Sounds Are Loud
> Printers & Scanners (or Print & Scan, Print & Fax), and then select the printer. Click Options & Supplies > Options (or Driver). Select On as the Quiet Mode setting. Forgot Your Password If you forget the administrator's password, contact Epson support. Related Information “Contacting Epson Support” on page 133 &... -
Page 113: Appendix
User's Guide Appendix Appendix Technical Specifications Printer Specifications Print Head Nozzle Placement Black ink nozzles: 1600 Plain Paper 64 to 90 g/m2(17 to 24lb) Weight of Paper Thick Paper 91 to 256 g/m2 (25 to 68 lb) Envelopes Envelope #10, DL, C6: 75 to 90 g/m2 (20 to 24 lb) Envelope C4: 80 to 100 g/m2 (21 to 26 lb) Even when the paper thickness is within this range, the paper may not feed in the printer or print result may adversely affected depending on the paper property or quality. -
Page 114: Interface Specifications
IPv4, IPv6 UPnP Printing IPv4 Information appliance PictBridge Printing (Wi-Fi) IPv4 Digital camera ✓ Epson Connect (Email Print, IPv4 Remote Print) ✓ AirPrint (iOS, Mac OS) IPv4, IPv6 iOS 5 or later, Mac OS X v10.7 or later ✓ Google Cloud Print... -
Page 115: Ethernet Specifications
User's Guide Appendix Frequency Range 2.4 GHz Maximum Radio-Frequency 20 dBm (EIRP) Power Transmitted Coordination Modes Infrastructure, Wi-Fi Direct (Simple AP) Wireless Securities WEP (64/128bit), WPA2-PSK (AES) , WPA2-Enterprise (AES) IEEE802.11n is only available for the HT20. Not supported for IEEE 802.11b. Wi-Fi Direct supports WPA2-PSK (AES) only. -
Page 116: Supported Third Party Services
User's Guide Appendix Supported Third Party Services AirPrint Print iOS 5 or later/Mac OS X v10.7.x or later Google Cloud Print Dimensions Only the printer Dimensions Storage ❏ Width: 425 mm (16.7 in.) ❏ Depth : 535 mm (21.1 in.) ❏... -
Page 117: Electrical Specifications
Power off: Approx. 0.2 W Note: ❏ Check the label on the printer for its voltage. ❏ For European users, see the following Website for details on power consumption. http://www.epson.eu/energy-consumption Environmental Specifications Operation Use the printer within the range shown in the following graph. -
Page 118: System Requirements
User's Guide Appendix System Requirements ❏ Windows 10 (32-bit, 64-bit)/Windows 8.1 (32-bit, 64-bit)/Windows 8 (32-bit, 64-bit)/Windows 7 (32-bit, 64- bit)/Windows Vista (32-bit, 64-bit)/Windows XP SP3 or later (32-bit)/Windows XP Professional x64 Edition SP2 or later/Windows Server 2016/Windows Server 2012 R2/Windows Server 2012/Windows Server 2008 R2/ Windows Server 2008/Windows Server 2003 R2/Windows Server 2003 SP2 or later ❏... -
Page 119: Available Fonts For Pcl (Urw)
User's Guide Appendix Font Name Family HP Equivalent URW Bookman Light, Demi, Light Italic, Demi Italic ITC Bookman URW Century Schoolbook Roman, Bold, Italic, Bold Italic New Century Schoolbook Nimbus Roman Medium, Bold, Italic, Bold Italic Times URW Chancery Medium Italic ITC Zapf Chancery Italic Symbol Symbol... - Page 120 User's Guide Appendix Font Name Family HP Equivalent Symbol Set for PCL5 Palladio Roman, Bold, Italic, Bold Italic Palatino URW Gothic Book, Demi, Book Oblique, Demi Oblique ITC Avant Garde Gothic URW Bookman Light, Demi, Light Italic, Demi Italic ITC Bookman URW Century Schoolbook Roman, Bold, Italic, Bold Italic New Century Schoolbook...
-
Page 121: List Of Symbol Sets
User's Guide Appendix List of Symbol Sets Your printer can access a variety of symbol sets. Many of these symbol sets differ only in the international characters specific to each language. When you are considering which font to use, you should also consider which symbol set to combine with the font. Note: Since most software handles fonts and symbols automatically, you will probably never need to adjust the printer's settings. - Page 122 User's Guide Appendix Symbol Set Attribute Font Classification Name ✓ ✓ ✓ ✓ ✓ Math-8 ✓ ✓ ✓ ✓ Roman-8 ✓ ✓ ✓ WiE.Europe ✓ ✓ ✓ Pc1004 ✓ ✓ ✓ ✓ 8859-15ISO ✓ ✓ ✓ PcTk437 ✓ ✓ ✓ Windows ✓...
-
Page 123: Installing The Optional Units
User's Guide Appendix Symbol Set Attribute Font Classification Name ✓ ✓ Hebrew7 ✓ ✓ 8859-8 ISO ✓ ✓ Hebrew8 ✓ ✓ Pc862Heb ✓ ✓ PC-862, Hebrew ✓ Arabic8 ✓ HPWARA ✓ Pc864Ara ✓ Symbol ✓ Wingdings 579L ✓ ZapfDigbats ✓ OCR A ✓... -
Page 124: Installing The Optional Paper Cassette Units
User's Guide Appendix Installing the Optional Paper Cassette Units Caution: ❏ Make sure you turn off the printer, unplug the power cord from the printer, and disconnect any cables before starting installation. Otherwise, the power cord may be damaged resulting in fire or electric shock. ❏... - Page 125 User's Guide Appendix 6. Place the sticker indicating the cassette number. 7. Reconnect the power cord and any other cables, and then plug in the printer. 8. Turn on the printer by pressing the button. 9. Pull out and reinsert the optional paper cassette unit to check that the optional paper cassette unit is displayed on the Paper Setting screen.
-
Page 126: Regulatory Information
Manufacturer: Seiko Epson Corporation Type: J26H006 This product conforms to Part 15 of the FCC Rules and RSS-210 of the IC Rules. Epson cannot accept responsibility for any failure to satisfy the protection requirements resulting from a non-recommended modification of the product. Operation is subject to the following two conditions: (1) this device may not cause... -
Page 127: German Blue Angel
Netherlands, Italy, Portugal, Spain, Denmark, Finland, Norway, Sweden, Iceland, Croatia, Cyprus, Greece, Slovenia, Malta, Bulgaria, Czech, Estonia, Hungary, Latvia, Lithuania, Poland, Romania, and Slovakia. Epson cannot accept responsibility for any failure to satisfy the protection requirements resulting from a non- recommended modification of the products. -
Page 128: Transporting The Printer
User's Guide Appendix Copying of the following items is prohibited by law: ❏ Bank bills, coins, government-issued marketable securities, government bond securities, and municipal securities ❏ Unused postage stamps, pre-stamped postcards, and other official postal items bearing valid postage ❏ Government-issued revenue stamps, and securities issued according to legal procedure Exercise caution when copying the following items: ❏... - Page 129 User's Guide Appendix Important: ❏ When storing or transporting the printer, avoid tilting it, placing it vertically, or turning it upside down; otherwise ink may leak. ❏ Leave the ink supply units installed. Removing the ink supply units can dry out the print head and may prevent the printer from printing.
- Page 130 User's Guide Appendix 7. Close the printer cover. 8. Uninstall the optional paper cassette if it is installed.
-
Page 131: Copyright
Neither Seiko Epson Corporation nor its affiliates shall be liable to the purchaser of this product or third parties for damages, losses, costs, or expenses incurred by the purchaser or third parties as a result of accident, misuse, or... -
Page 132: Trademarks
Seiko Epson Corporation's operating and maintenance instructions. Seiko Epson Corporation and its affiliates shall not be liable for any damages or problems arising from the use of any options or any consumable products other than those designated as Original Epson Products or Epson Approved Products by Seiko Epson Corporation. -
Page 133: Where To Get Help
Technical Support Web Site If you need further help, visit the Epson support website shown below. Select your country or region and go to the support section of your local Epson website. The latest drivers, FAQs, manuals, or other downloadables are also available from the site. - Page 134 Depending on the product, network settings may be stored in the product’s memory. Due to breakdown or repair of a product, settings may be lost. Epson shall not be responsible for the loss of any data, for backing up or recovering settings even during a warranty period.
- Page 135 Epson Helpdesk Phone: 1300-361-054 Epson Helpdesk is provided as a final backup to make sure our clients have access to advice. Operators on the Helpdesk can aid you in installing, configuring and operating your Epson product. Our Pre-sales Helpdesk staff can provide literature on new Epson products and advise where the nearest dealer or service agent is located.
- Page 136 To obtain technical support as well as other after-sales services, users are welcome to contact Epson Hong Kong Limited. Internet Home Page http://www.epson.com.hk Epson Hong Kong has established a local home page in both Chinese and English on the Internet to provide users with the following information: ❏ Product information ❏ Answers to Frequently Asked Questions (FAQs) ❏...