Siemens RDS110.R User Manual
Smart thermostat wireless
Hide thumbs
Also See for RDS110.R:
- Quick manual (96 pages) ,
- Mounting instructions (4 pages) ,
- User manual (59 pages)

Related Manuals for Siemens RDS110.R


Summary of Contents for Siemens RDS110.R
- Page 1 RDS110.R Smart Thermostat Wireless User Guide A6V11562455_en--_d Smart Infrastructure 2022-01-30...
- Page 2 All rights created by patent grant or registration of a utility model or design patent are reserved. Issued by: Siemens Switzerland Ltd. Smart Infrastructure Global Headquarters Theilerstrasse 1a CH-6300 Zug Tel. +41 58 724-2424 www.siemens.com/buildingtechnologies Edition: 2022-01-30 Document ID: A6V11562455_en--_d © Siemens Switzerland Ltd, 2022 2 | 60 A6V11562455_en--_d...
-
Page 3: Table Of Contents
Table of Contents About this user guide ................... 7 Revision history ....................7 Reference documents ..................7 Before you start ....................7 Summary ...................... 10 Brief description..................... 10 2.1.1 Operation overview ................ 10 Inbox items ....................11 Equipment combinations ................11 Mounting and installation ................ - Page 4 Downloading the application ................. 45 Account creation and pairing ................. 45 Exploring the app using demo mode ............. 46 Viewing and controlling devices in different locations ........46 9.4.1 Viewing and filtering devices ............46 9.4.2 Widgets ..................47 9.4.3 Switching between "Away"...
- Page 5 11.1.22 How does the thermostat adapt start optimization of outside temperature?.................. 57 11.1.23 How does the temperature switching differential work? ....57 11.2 Technical specifications ................57 11.3 Cyber security disclaimer ................57 11.4 Limited warranty .................... 58 Index ........................59 A6V11562455_en--_d 5 | 60...
-
Page 7: About This User Guide
First edition. Thermostat software version 45.4.44. 1.2 Reference documents Ref. Document title Document number Smart Thermostat RDS110.R A6V11562441 Mounting instructions Smart Thermostat RDS110.R Quick guide A6V11562445 Smart Thermostat RDS110.R Datasheet A6V11562461 Smart Thermostat Receiver RCR114.1 A6V11562443 Mounting instructions Smart Thermostat Receiver RCR114.1... - Page 8 The 'i' symbol identifies supplementary information and tips for an easier way of working. Document use/ request Before using products from Siemens Industry, Inc., it is important that you read the to the reader documents supplied with or ordered at the same time as the products (equipment, applications, tools, and so on) carefully and in full.
- Page 9 About this user guide Before you start Siemens assumes no liability to the extent allowed under the law for any losses resulting from a failure to comply with the aforementioned points or for the improper compliance of the same. A6V11562455_en--_d...
-
Page 10: Summary
(RCR114.1) or smart valve actuator (SSA911.01TH). As a smart thermostat, the RDS110.R can be controlled locally and remotely, via a mobile application on your smartphone. The mobile application offers additional features such as intuitive schedules and temperature trends to ensure that your home is comfortable and saving energy at the right times. -
Page 11: Inbox Items
Summary Inbox items Operations Thermostat Mobile Sections/links application √ √ Turning on/off the supply of Section 6.5 domestic hot water [➙ 30] Section 9.4.2 [➙ 47] √ √ Changing the preset temperature Section 6.7.2 setpoints [➙ 31] Section 9.4.2 [➙ 47] √... - Page 12 Summary Equipment combinations Remote sensors DC 0…10 Type of unit Product no. LG- Pt100 Datasheet Ni100 0 at 10k at 0 at 0 ° C 25 ° C 0 ° C Room temperature sensors - Wall-mounted QAA24 CM1N172 QAA2012 CE1N174 QAA2030 CE1N174 QAA2061...
- Page 13 QXA2101 A6V10741 monitor with offset sensor * The documents can be downloaded from http://siemens.com/bt/download specifying the product number as shown in the above table. 1) Requires a mounting plate and/or design frames. 2) With digital display. A6V11562455_en--_d 13 | 60...
- Page 14 (1 set) NOTE: Accessories are not included with the unit and should be ordered separately. * The documents can be downloaded from http://siemens.com/bt/download specifying the product number as shown in the above table. 14 | 60 A6V11562455_en--_d...
-
Page 15: Mounting And Installation
Mounting and installation 3 Mounting and installation Mounting NOTICE We recommend hiring licensed installers to mount and install the thermostat. ● The thermostat is suitable for wall mounting. ● The recommended height is 1.50 m above the floor. ● Do not mount the thermostat in recesses, shelves, behind curtains or doors, or above or near heat sources. - Page 16 Mounting and installation 7. Screw the mounting plate tightly on the conduit box using a screwdriver, making sure the mounting plate is placed correctly (the part with the upward arrow placed on the top). 8. Connect the labeled wires to the terminals following the thermostat terminal designations.
-
Page 17: Getting Started With Your Thermostat
Getting started with your thermostat Setup wizard 4 Getting started with your thermostat 4.1 Setup wizard When your thermostat is powered up for the first time, a setup wizard displays to guide you through the following procedures: ● Setting a display language ●... -
Page 18: Thermostat Display Overview
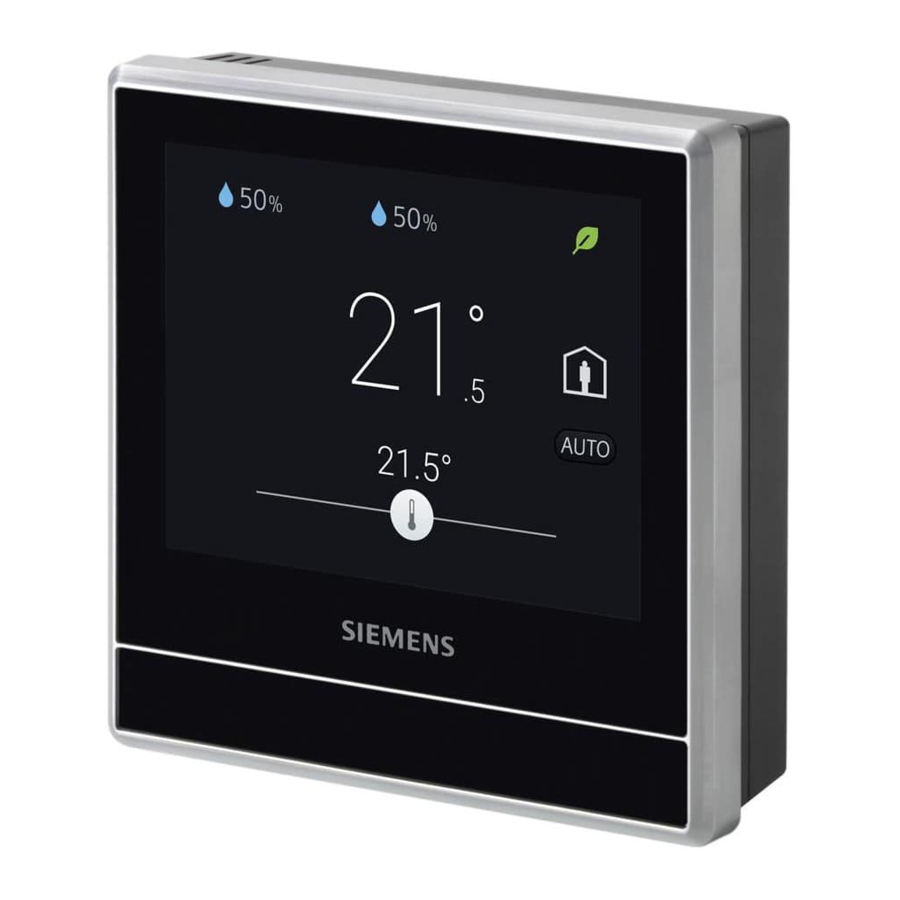
NOTICE! * There is a few seconds’ delay between the color change in the temperature bar and the reaction of the relays. The RDS110.R screen switches to idle mode after 2 minutes of inactivity. The idle Idle display screen of the RDS110.R can be displayed as a simple screen with basic room values, or as a blank, black screen. - Page 19 Getting started with your thermostat Thermostat display overview Relative room humidity Room air quality status: good , average , poor . (Displayed only if an external air quality sensor is connected to the thermostat) Outside air temperature (displayed only if an external temperature sensor is connected to the thermostat) Green leaf: Energy-optimized mode.
-
Page 20: Home Screen Icon Overview
Getting started with your thermostat Home screen icon overview 4.3 Home screen icon overview Icon Description Indicates there are notifications. “At home” mode is on. “AWAY” mode is on. You must manually tap to activate this mode. Displays when the system works in an energy-optimized mode. If the leaf is red, it means that some pre-defined settings have been changed. -
Page 21: Connecting To Wireless Devices
(distance or blockades [walls, and so on.]), you can install a maximum of three wireless repeaters (RCR114.1) in between to extend the reach of the RDS110.R control signals. Once the connection between the thermostat and the wireless devices has been established, no manual re-connection is needed, even if a power supply interruption should occur. -
Page 22: Connecting To Smart Thermostat Receivers
Connecting to wireless devices Connecting to Smart Thermostat receivers 5.2 Connecting to Smart Thermostat receivers The thermostat can connect to a maximum of six Smart Thermostat receivers (RCR114.1 as a relay) to control the following heating equipment: ● Gas boiler ●... - Page 23 Connecting to wireless devices Connecting to wireless valve actuators 5. Perform the above action on all valve actuators if you have more than one SSA911.01TH on hand. On SSA911.01TH, the THREAD network symbol blinks during connection establishment. Information about successful pairing is displayed on the thermostat. 6.
-
Page 24: Operating The Thermostat On The Device
Operating the thermostat on the device Temperature control 6 Operating the thermostat on the device 6.1 Temperature control The thermostat acquires the room temperature using the built-in sensor and/or the external room temperature sensor, and maintains the setpoint by delivering control commands to heating and/or cooling equipment. -
Page 25: Operating Modes With Manual Switchover
Operating the thermostat on the device Operating modes 6.2.1 Operating modes with manual switchover Operating mode overview You can manually switch to the following operating modes on the thermostat or in the mobile application. Operating Description mode At home You can use this mode when you stay at home or inside the room where the thermostat is located. -
Page 26: Operating Modes In A Schedule
Operating the thermostat on the device WLAN connection Change the thermostat behavior under the “OFF” mode 1. On the Home screen, tap , then tap and . 2. When prompted, enter the administrator password. , and then tap “Off/protection configuration”. 3. - Page 27 Operating the thermostat on the device WLAN connection See the Quick guide for guidance to the setup wizard. You must perform a factory reset if you want to change the network connection type after you’ve set up the thermostat following the wizard. Note that a factory reset erases all user data. See Changing system setup [➙...
-
Page 28: Screen Lock Protection
Operating the thermostat on the device Screen lock protection – Note: To customize the current network settings, tap “Manual”, select a field, or tap to scroll to the desired field, and then enter a new setting. – again to enter “Advanced Bacnet setting” page. You can manually change the BACnet ID or enable/disable a foreign device. -
Page 29: Creating An Administrator Password
Operating the thermostat on the device Screen lock protection Modify screen lock password 1. On the “Settings” page, tap > “Change”, specify a new numeric lock of six numbers, and then tap 2. Tap “OK”. 3. Tap “OK” to confirm. Remove screen lock password 1. -
Page 30: Turning On/Off The Supply Of Domestic Hot Water
Operating the thermostat on the device Turning on/off the supply of domestic hot water 6.5 Turning on/off the supply of domestic hot water Use your thermostat to manage the supply of DHW (Domestic Hot Water) if corresponding external equipment is connected to your thermostat and you’ve also configured the thermostat output as a domestic hot water boiler. -
Page 31: Naming A Room
Operating the thermostat on the device Advanced settings 6.7.3 Naming a room You can give a unique name to a room where your thermostat is installed. Doing so helps you easily recognize the room when you are remotely controlling the thermostat. - Page 32 Operating the thermostat on the device Advanced settings Multi-functional inputs No. Application Descriptions Factory Range Dependencies settings settings 0…50 ° C A DC 0…10 V Room Room temperature 0 ° C temperature at 0 V of the 0-10 V external room 1, 0 V value input in terminal X1 temperature...
- Page 33 Operating the thermostat on the device Advanced settings Heating setpoints No. Application Descriptions Factory Range Dependencies settings settings 0…50 ° C 11. Comfort The default heating 21 ° C setpoint for “Comfort” heating setpoint defined in a schedule. This setpoint must be higher than that for protection.
- Page 34 Operating the thermostat on the device Advanced settings Humidification setpoints No. Application Descriptions Factory Range Dependencie settings settings 40 % RH 0…100 % RH Displays only 16. Rel.room The humidification if you’ve humidity setpoint for “Comfort”. This setpoint for configured the comfort setpoint must be output as...
- Page 35 Operating the thermostat on the device Advanced settings Dehumidification No. Application Descriptions Factory Range Dependencie setpoints settings settings 60 % RH 0…100 % RH Displays only 20. Rel.room if you’ve dehmdf.setp dehumidification oint for setpoint for configured the “Comfort”. This comfort output as “Dehumidifier...
- Page 36 Operating the thermostat on the device Advanced settings Functions No. Application Descriptions Factory Range Dependencies settings settings 1…8760 h 24. Kick cycle A circle kicked in to 500 h Application turn on a constantly setting No. 38; idle pump or valve This function for a minimum period displays only if...
- Page 37 Operating the thermostat on the device Advanced settings Minimum switchover No. Application Descriptions Factory Range Dependencies time adjustment settings settings 0…60 min You’ve 29. Humidify (no The minimum 3 min fan) min. ON working time of a configured the time standalone thermostat humidifier.
- Page 38 Operating the thermostat on the device Advanced settings Other settings No. Application Descriptions Factory Range Dependencies settings settings 35. Off/protection Configures whether Protection Off configuration the thermostat goes Protection to the protection mode or completely turns off in “OFF” mode. 36.
-
Page 39: Changing System Setup
NOTICE When selecting the gas boiler application, make sure hydronic heating is used. The RDS110.R is not calibrated for use with a gas-fired duct heating system. Change basic settings 1. On the Home screen, tap , then tap and . - Page 40 Operating the thermostat on the device Advanced settings 3. Tap > 4. Tap “OK” to stop all thermostat applications. Your thermostat restarts. 5. After restarting, tap “Equipment” > “Adapt”. 6. If necessary, tap to scroll through all the listed equipment types and then choose one as desired.
- Page 41 Operating the thermostat on the device Advanced settings – LG-Ni1000 – Pt1000 (EU) – Pt1000 (NA) – NTC 10k – 0…10 V* ● Set the sensor evaluation mode if an external sensor is connected to either terminal X1 or X2. You can use either built-in and external sensors, or only the external sensors, for control and monitoring.
-
Page 42: Checking Basic Information About Your Thermostat
Operating the thermostat on the device Software updates Resetting the thermostat You can reset the thermostat to factory settings. A factory reset clears all local settings but keeps the link between the thermostat and user account. Note that after a factory reset, the connection state in the mobile application is indicated as “offline”... -
Page 43: Green Leaf Indication
Green leaf indication 7 Green leaf indication The Green leaf indication informs you that the system offers an energy- optimized mode. When the heating output is energized and if the thermostat detects that the room air temperature is 2 K higher than the default heating setpoint for “Comfort”... -
Page 44: Air Quality Display
Air quality display 8 Air quality display By connecting to an external VOC (Volatile Organic Compounds) sensor or CO sensor, your thermostat shows the room air quality via three status symbols on the local idle screen. In the mobile app, the status is indicated by text instead. Symbol on the Text in the Description... -
Page 45: Operating The Thermostat From The Mobile Application
9 Operating the thermostat from the mobile application 9.1 Downloading the application You can download the “Siemens Smart Thermostat RDS” application from Google Play or App Store. 9.2 Account creation and pairing Create an account and associate it with thermostat(s) for wireless control. -
Page 46: Exploring The App Using Demo Mode
Operating the thermostat from the mobile application Exploring the app using demo mode ● Change background color ● Change time format Manage account information in the application 1. In the application, tap > 2. Manage your account information as needed. 9.3 Exploring the app using demo mode Before controlling the thermostat in the downloaded mobile application, check the demo mode of the mobile application to check out the application. -
Page 47: Widgets
Operating the thermostat from the mobile application Viewing and controlling devices in different locations Device connection state Online The thermostat is connected to the cloud server. Offline The thermostat is not connected to the cloud server. Several reasons may result in disconnection: ●... -
Page 48: Switching Between "Away" And "At Home
Operating the thermostat from the mobile application Viewing and controlling devices in different locations When viewed horizontally, the widget also allows you to scroll among available pages. NOTE: You can show/hide the trend in the chart by tapping the specific legend atop. -
Page 49: Switching Between Heating And Off Modes
Operating the thermostat from the mobile application Viewing and controlling devices in different locations 6. Tap "Save". 7. To copy the current day's schedule to other days, tap “Copy” and follow the on- screen instructions. NOTE: Max. eight switching points per day can be set. To delete one, tap on the switching point marker. -
Page 50: Checking Device Notifications
Operating the thermostat from the mobile application Checking device notifications 9.5 Checking device notifications The mobile application notifies you of condensation risks and universal contact state changes. If there are notifications, a red indication is displayed on the upper right corner of the menu icon, . -
Page 51: Multiple User Management
Operating the thermostat from the mobile application Device setup 4. Search by address or tap on the map to set your location. The new location with a different address is created. 5. Return to the "Setup" page and tap the device to be moved. 6. -
Page 52: Revoking Devices
Operating the thermostat from the mobile application Viewing mobile app info Restart thermostat > “Setup”. 1. Tap 2. Select the device to be restarted. 3. Tap "Restart device" > "Yes". 9.6.4 Revoking devices Revoke user access to the thermostat to disconnect the current user account from the thermostat. -
Page 53: Disassembly And Disposal
Your thermostat is designed for maintenance-free operations. Disassembling should only be done after the power supply is off and is only limited to the licensed installers only for disposal purpose. Siemens doesn’t guarantee the user’s safety if the disassembly process is managed by any unlicensed installers. -
Page 54: Appendices
Appendices Frequently asked questions 11 Appendices 11.1 Frequently asked questions 11.1.1 What should I do if I forget the screen lock code? Try using the administrator password to unlock the screen. Unlock the screen using the administrator password 1. On the hardware unit screen indicating that the screen lock code is incorrect, tap the question mark >... -
Page 55: Can I Change The Green Leaf Settings
Appendices Frequently asked questions “Setup” page where you can check the previous settings, perform factory resetting or do nothing but return to the normal home screen. 11.1.6 Can I change the Green leaf settings? No, you can’t. The Green leaf settings are defined by the system and are not changeable from user side. -
Page 56: I've Registered An Account But Cannot Log In
Appendices Frequently asked questions For more information about equipment selection and activation of the “Kick cycle” function, see Changing system setup [➙ 39]. For more information about the interval of running the pump or valve forcibly, see Parameter 24 in Managing application settings [➙... -
Page 57: How Does Adaptive Gain Control Work
In order to protect plants, systems, machines and networks against cyber threats, it is necessary to implement – and continuously maintain – a holistic, state-of-the-art security concept. Siemens’ portfolio only forms one element of such a concept. A6V11562455_en--_d 57 | 60... -
Page 58: Limited Warranty
11.4 Limited warranty The software included in this product is licensed for use subject to the Siemens end-user license agreement (EULA) posted at www.siemens.com/smart-thermostat or this software identified by product model or part number on the website. The open source software (OSS) information about the software can also be found from the same website. -
Page 59: Index
Index Index add ..............27 configuration ............. 27 account connect ............. 27 creation ............. 45 push button ............28 management ............. 45 administrator passwords ........29 screen lock create ..............29 create ..............28 manage ............. 29 modify ............... 29 remove .............. - Page 60 Issued by Siemens Switzerland Ltd Smart Infrastructure Global Headquarters Theilerstrasse 1a CH-6300 Zug +41 58 724 2424 www.siemens.com/buildingtechnologies © Siemens Switzerland Ltd, 2022 Technical specifications and availability subject to change without notice. A6V11562455_en--_d...