
Related Manuals for Haier HWO60S7EX3


Summary of Contents for Haier HWO60S7EX3
- Page 1 ● HWO60S7EX3 ● HWO60S7EB4 ● HWO60S7EX4 ● HWO60S7EG4 ● HWO60S7ELG4 USER INSTRUCTIONS OVENS Haier Overseas Electric Appliances Corp. Ltd...
- Page 2 SAFETY AND WARNINGS Your oven has been carefully designed to operate safely during normal cooking procedures. Please keep the following safety instructions in mind when you are using it: WARNING! Electrical Shock Hazard Turn the oven off at the wall before replacing the oven lamp or before carrying out any work or maintenance on it.
- Page 3 SAFETY AND WARNINGS WARNING! Hot Surface Hazard Accessible parts may become hot when in use. To avoid burns and scalds, be careful not to touch any hot part and keep children away. Use oven mitts or other protection when handling hot surfaces such as oven shelves or dishes.
- Page 4 SAFETY AND WARNINGS IMPORTANT SAFETY INSTRUCTIONS To reduce the risk of fire, electrical shock, injury to persons or damage when using the oven, follow the important safety instructions listed below: • Read all the instructions before using the oven. Use the oven only for its intended purpose as described in these instructions.
- Page 5 they understand the hazards involved. Cleaning and user maintenance shall not be done by children without supervision. • Do not place heavy objects on the oven door. • Wear proper apparel. Do not wear loose fitting or hanging garments when using the appliance. They could ignite or melt if they touch an element or hot surface and you could be burned.
- Page 6 directed upwards and in the back of the cavity. The shelf must be inserted completely into the cavity. • Do not clean the oven seal or use any oven-cleaning products on it. It is essential for a good seal, which ensures that the oven operates efficiently.
- Page 7 • The oven must be switched off before removing the removable parts. After cleaning, reassemble them according the instructions. • WARNING: Never remove the oven door seal. • When inserting the grid tray pay attention that the anti-slide edge is positioned rearwards and upwards •...
-
Page 8: Table Of Contents
Summary General Instructions 1.1 Safety indications 1.2 Electrical safety 1.3 Recommendations 1.4 Waste management 2.1 Overview Product Description 2.2 Accessories 2.3 First use Use of the Oven 3.1 Display description 3.2 Cooking modes Oven Cleaning and Maintenance 4.1 General notes on cleaning 4.2 Self-cleaning oven with catalytic panels 4.3 Maintenance •... -
Page 9: General Instructions
1. General Instructions We thank you for choosing one of our products. For the best results with your oven, you should read this manual carefully and retain it for future reference. Before installing the oven, take note of the serial number so that you can give it to customer service staff if any repairs are required. -
Page 10: Recommendations
A low light around the central main switch could be present when the oven is off. This is a normal behavior. It can be removed just turning the plug upside down or swapping the supply terminals. 1.3 Recommendations After each use of the oven, a minimum of cleaning will help keep the oven perfectly clean. Do not line the oven walls with aluminium foil or single-use protection available from stores. -
Page 11: Product Description
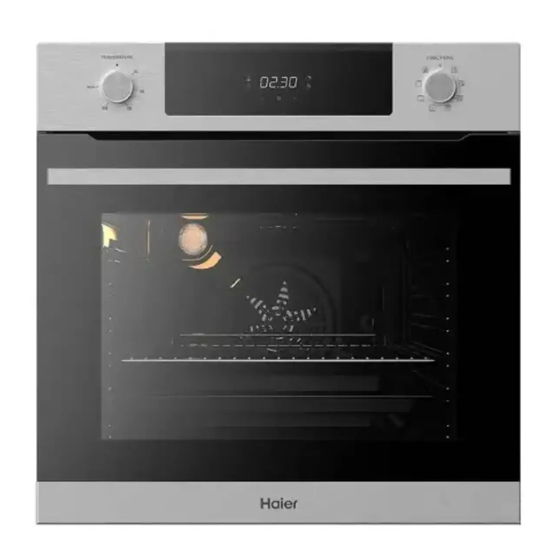
2. Product Description 2.1 Overview 1. Control Panel 2. Side Racks 3. Wire Shelves (x2) 4. Roasting Dish 5. Air Fry Tray 6. Oven Door 2.2 Accessories Roasting dish Wire Shelves For roasting and grilling. Can be placed on a lower Holds baking trays and plates. -
Page 12: Use Of The Oven
3. Use of the Oven 3.1 Display description 1. Minute minder 2. Clock setting 3. Cooking time 4. Child Lock 5. Temperature or clock display 6. LCD display adjustment controls 7. Temperature selector knob 8. Function selector knob WARNING : the first operation to carry out after the oven has been installed or following the interruption of power supply (this is recognizable by the display pulsating and showing 12:00 ) is setting the correct time. -
Page 13: Cooking Modes
3.2 Cooking Modes Function T °C T °C Function Dial default range LIGHT: Turns on the oven light. DEFROST PLUS: When the dial is set to this position, fan circulates air at room temperature around the frozen food so that it defrosts. FAN FORCED: Uses the rear element in conjunction with fan and recommended for most applications, including poultry, pastries, fish and vegetables. -
Page 14: Oven Cleaning And Maintenance
4. Oven cleaning and maintenance 4.1 General notes on cleaning The lifecycle of the appliance can be extended through regular cleaning. Wait for the oven to cool before carrying out manual cleaning operations. Never use abrasive detergents, steel wool or sharp objects for cleaning, so as to not irreparably damage the enamelled parts. -
Page 15: Maintenance
4.3 Maintenance INSTRUCTION FOR REMOVAL AND CLEANING OF THE SIDE RACKS 1. Remove the wire racks by pulling them in the direction of the arrows (see below) 2. To clean the wire racks either put them in the dishwasher or use a wet sponge, ensuring that they are dried afterwards. -
Page 16: Removal And Cleaning Of The Door Glass
REMOVAL AND CLEANING OF THE DOOR GLASS 1. Open the oven door. 2.3.4. Lock the hinges, remove the screws and remove the upper metal cover by pulling it upwards. 5.6. Remove the glass, carefully extracting it from the oven door (NB: in pyrolytic ovens, also remove the second and third glass (if present)). -
Page 17: Changing The Bulb
CHANGING THE BULB 1. Disconnect the oven from the mains supply. 2. Undo the glass cover, unscrew the bulb and replace it with a new bulb of the same type. 3. Once the defective bulb is replaced, replace the glass cover. 5. - Page 20 Installation Mounting Under Cooktop The cabinetry should follow the dimensions shown. This allows for sufficient airflow behind the oven and between the oven and cooktop for cooling. If the cabinetry base is fully sealed, an opening(s) should be provided to allow cool air to enter. 600 mm 595 mm Air Entry...
- Page 21 Max Power (W) Frequency (Hz) Voltage (V) Amps (A) 2400 W 50 / 60 Hz 220 - 240 ~ 10 - 10.9 HWO60S7EX3 2400 W 50 / 60 Hz 220 - 240 ~ 10 - 10.9 HWO60S7EB4 HWO60S7EX4 2400 W...
- Page 22 The manufacturer will not be responsible for any inaccuracy resulting from printing or transcript errors contained in this brochure. We reserve the right to carry out modifications to products as required, including the interests of consumption, without prejudice to the characteristics relating to safety or function.