Table of Contents
Advertisement
Quick Links
Central remote controller
TU2C-LINK/TCC-LINK compatible
Model name
TCB-SC640U-UL
Multilingual installation manuals and owner's manual
https://www.toshiba-carrier.co.jp/global/manual/tcb-sc640u.htm
● Thank you for purchasing this central control device.
● In order to use this product safely and correctly, please read this operation manual carefully before use and make
sure that you fully understand the contents.
In particular, please be sure to read the "Safety Precautions".
● After reading this manual, be sure to keep it in a place where the operator of the Unit can always view it.
[English] Installation manual and Owner's manual Download / [Español] Descarga del
Manual de instalación y del Manual del propietario / [Français] Téléchargement du
manuel d'installation et du manuel du propriétaire
Owner's Manual
Central Control Device
For commercial use
Advertisement
Table of Contents

Related Manuals for Toshiba TCB-SC640U-UL


Summary of Contents for Toshiba TCB-SC640U-UL
- Page 1 For commercial use Central remote controller TU2C-LINK/TCC-LINK compatible Model name TCB-SC640U-UL Multilingual installation manuals and owner’s manual [English] Installation manual and Owner’s manual Download / [Español] Descarga del Manual de instalación y del Manual del propietario / [Français] Téléchargement du manuel d'installation et du manuel du propriétaire...
-
Page 2: Table Of Contents
Central remote controller Owner’s Manual Contents 1 Quick Start Guide ........... . . 4 2 Safety Precautions . - Page 3 Central remote controller Owner’s Manual 6 Administrator Menu........... 38 Renaming a zone (Zone Name Settings) .
-
Page 4: Quick Start Guide
Central remote controller Owner’s Manual Quick Start Guide Basic Usage To start/stop the air conditioner operation “Start/Stop Operation” (P.17) To change the set temperature “Changing air conditioner Settings (Set Temperature, Operation Mode, Fan Speed, and Louver)” (P.20) To change the operation mode (Cool, Heat, Auto, Dry, or Fan) “Changing air conditioner Settings (Set Temperature, Operation Mode, Fan Speed, and Louver)”... -
Page 5: Safety Precautions
* 3: Damage to property refers to extended damage related to houses, household goods, livestock, or pets, etc. WARNING Installation Precautions Ask the dealer from whom you purchased Use a designated TOSHIBA air conditioner. the unit or a professional for installation Please use a designated TOSHIBA air work. - Page 6 Central remote controller Owner’s Manual CAUTION Installation Precautions Do not install in areas with high humidity or Do not install in direct sunlight or near heat vibration. sources. Doing so may cause a failure. Doing so may cause a failure. Check the Check the installation...
-
Page 7: Before Usage
Central remote controller Owner’s Manual Before Usage System Configurations The system configurations that this unit can control are as follows: 10 Zones, up to a total of 64 units Set all air conditioners at once. Zone 1 Unit Zone Set the air conditioners All air conditioners or other individually. -
Page 8: Names And Functions Of Each Part
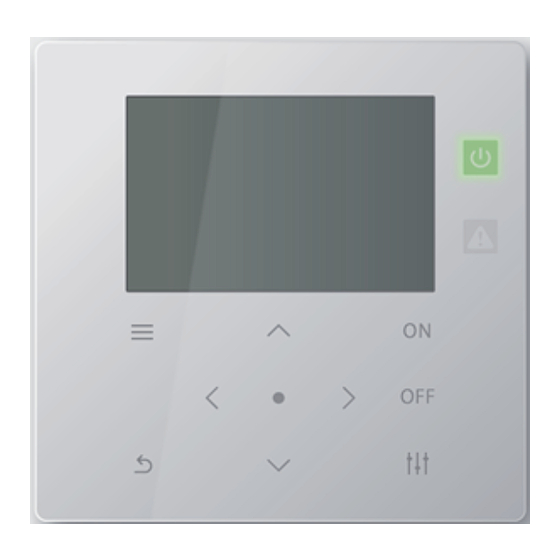
Central remote controller Owner’s Manual Each screen shows a display example. The display content may vary with the usage environment settings. Names and Functions of Each Part Operation Panel Part Name Functions LCD display part (P.10) Run lamp Lights up during operation and turns off when stopped. * The Run lamp lights up if any of the air conditioners is operating and turns off when all the air conditioners are stopped. -
Page 9: Icon List
Central remote controller Owner’s Manual Icon List Icon Description An abnormality is occurring. Check with “Check history” (P.42), and contact the dealer from whom you purchased the product. A notice code is occurring. Check with “Notice history” (P.42). Displayed when it is time to clean the filter. (P.33) Displayed when preparation for heating is in progress. -
Page 10: Lcd Display Part
Central remote controller Owner’s Manual LCD Display Part There are “All”, “Zone”, and “Unit” screens on which you can check the operation status of each area, the “Control” screen on which can control the operation status, and the “Menu” screen for detailed settings. For details on how to switch between screens, see “Changing Screens”... - Page 11 Central remote controller Owner’s Manual Unit screen You can check and control the operation status of the air conditioners in each Zone individually. Also, you can check the set temperature and other statuses, as well as whether there are any abnormalities and whether filter cleaning is required. Functions The name of the Zone displayed on the screen and the number of air conditioners in operation/stopped in the Zone are displayed.
- Page 12 Central remote controller Owner’s Manual When “--” is displayed on the “Control” screen of All or Zone Displayed when the air conditioner settings do not match. • When you have configured the settings on the “Control” screen of All or Zone but there is an air conditioner whose settings become invalid because there is no corresponding function.
-
Page 13: Changing Screens
Central remote controller Owner’s Manual Changing Screens To switch between the All, Zone and Unit screens and to display each “Control” screen and “Menu” screen, operate the buttons as follows. (Confirm) button (Return) button (Control) button All screen Zone screen Unit screen [ ] (Confirm) [ ] (Confirm) -
Page 14: Setting The Clock (Clock)
Central remote controller Owner’s Manual Setting the Clock (Clock) ●REQUIREMENT The clock must be set before start using this central remote controller. If the clock is not set, clock display blinks and the schedule does not operate. If the clock is not set, Check code / Notice code history will not recorded with correct time. Clock In the “Settings Menu”... - Page 15 Central remote controller Owner’s Manual Daylight-saving In the “Settings Menu” screen, select “Clock” and then press ] (Confirm). The “Clock setting” screen is displayed. Select “Daylight-saving” using [∧] and [∨], and then press [ (Confirm). The “Daylight-saving” screen is displayed. ...
-
Page 16: Changing The First Day Of The Week (First Day)
Central remote controller Owner’s Manual Changing the First Day of the Week (First Day) Set the first day of the week to be displayed in the “Weekly display”, “Weekly Schedule”, and other screens of the Operating Schedule. In the “Settings Menu” screen, select “Schedule settings” and then press [ ] (Confirm). -
Page 17: Basic Usage
Central remote controller Owner’s Manual Basic Usage This section explains commonly used functions such as starting/stopping air conditioner operation, set temperature, and operation mode. Start/Stop Operation CAUTION Always turn off the power circuit breaker if the product malfunctions due to lightning or wireless, etc. during operation. -
Page 18: Start/Stop Operation Of All Air Conditioners In A Zone
Central remote controller Owner’s Manual Start/Stop Operation of All air conditioners in a Zone (Start) (Stop) 2, 4 Display the “Zone” screen. (P.13) Press [∧] [∨] [<] [>] to select a Zone. The selected Zone is highlighted. To start Press [ The confirmation screen is displayed. -
Page 19: Start/Stop Operation Of An Individual Air Conditioner
Central remote controller Owner’s Manual Start/Stop Operation of an Individual air conditioner (Start) (Stop) Display the “Unit” screen. (P.13) Press [<] [>] to select a Zone then press [∧] [∨] to select an air conditioner. To start Press [ The selected air conditioner starts operation and changes to To stop Press [... -
Page 20: Changing Air Conditioner Settings (Set Temperature, Operation Mode, Fan Speed, And Louver)
Central remote controller Owner’s Manual Changing air conditioner Settings (Set Temperature, Operation Mode, Fan Speed, and Louver) You can change the set temperature, operation mode, fan speed, and louver. Depending on the range of the area to be set, display and operate the “Control” screen of All, Zone, or Unit. Display the “Control”... -
Page 21: Setting The Operating Schedule
Central remote controller Owner’s Manual Setting the Operating Schedule In the “All” screen, press [ ] (Menu). The “Settings Menu” screen is displayed. In the “Settings Menu” screen, select “Schedule settings” and then press [ ] (Confirm). The “Schedule settings” screen is displayed. Select “Operating Sch settings”... - Page 22 Central remote controller Owner’s Manual Select the day of week to set using [<] and [>] and the schedule to set using [∧] and [∨], and then press [ (Confirm). The “Schedule editing” screen is displayed. Move the cursor using [<] and [>], and set the time using [∧] and [∨].
-
Page 23: Changing The Operating Schedule (Operating Sch Enable/Void And Operating Sch Settings)
Central remote controller Owner’s Manual Changing the Operating Schedule (Operating Sch Enable/Void and Operating Sch settings) ● NOTE • Set the clock before setting the schedule. • If the Operating Schedule or Energy Saving Schedule is enabled, is displayed above the clock. •... - Page 24 Central remote controller Owner’s Manual Operating Sch settings In the “All” screen, press [ ] (Menu). The “Settings Menu” is displayed. In the “Settings Menu” screen, select “Schedule settings” and then press [ ] (Confirm). The “Schedule settings” screen is displayed. Select “Operating Sch settings”...
- Page 25 Central remote controller Owner’s Manual Schedule editing Move the cursor using [<] and [>], and set the time using [∧] and [∨]. Select an item using [<] and [>], change the setting using [∧] and [∨], and then press [ ] (Confirm).
-
Page 26: Copying The Operating Schedule
Central remote controller Owner’s Manual Copying the Operating Schedule Copying the Operating Schedule to another zone Display the “Select Zone” screen (Steps 1 to 3 of “Operating Sch settings” (P.24)). Select the copy source zone using [<], [∧], [∨], and [>], and then press [ ] (Control). -
Page 27: Deleting The Operating Schedule
Central remote controller Owner’s Manual After selecting the copy destination, press [ ] (Control). “Copy Complete” is displayed, and the “Weekly Schedule” screen is displayed again. Deleting the Operating Schedule Display the “Weekly Schedule” screen (Steps 1 to 7 of “Operating Sch settings”... -
Page 28: Changing The Details Of The Special Day Schedule Settings
Central remote controller Owner’s Manual Changing the details of the special day schedule settings On a day set as a special day in the “Weekly display” screen, the operation occurs according to the schedule set in “Sp1” or “Sp2”, not the schedule set for the day of the week. Weekly display Display the “Weekly display”... -
Page 29: Changing The Energy Saving Schedule (Energy Saving Schedule)
Central remote controller Owner’s Manual Changing the Energy Saving Schedule (Energy Saving Schedule) Changing the details of the Energy Saving Schedule settings In the “Settings Menu” screen, select “Schedule settings” and then press [ ] (Confirm). The “Schedule settings” screen is displayed. Select “Energy Saving Schedule”... -
Page 30: Copying The Energy Saving Schedule
Central remote controller Owner’s Manual Copying the Energy Saving Schedule Copying the Energy Saving Schedule to another zone Display the “Select Zone” screen (Steps 1 and 2 of “Changing the details of the Energy Saving Schedule settings” (P.29)). Select the copy source zone using [<], [∧], [∨], and [>], and then press [ ] (Control). -
Page 31: Deleting The Energy Saving Schedule
Central remote controller Owner’s Manual After selecting the copy destination, press [ ] (Control). “Copy Complete” is displayed, and the “Weekly Schedule” screen is displayed again. Deleting the Energy Saving Schedule Display the “Weekly Schedule” screen (Steps 1 to 3 of “Changing the details of the Energy Saving Schedule settings”... -
Page 32: Various Functions
Central remote controller Owner’s Manual Various Functions Setting the Operation Details You can check the current settings of the air conditioner or other equipment and set the details of the operation method. Displaying the “Menu” screen Display the “Control” screen of All, Zone, or Unit (P.13). Press [ ] (Control). -
Page 33: Operation After Filter Cleaning (Filter Sign Reset)
Central remote controller Owner’s Manual Operation after filter cleaning (Filter Sign Reset) Depending on the range of the area to be cancelled, display and operate the “Control” screen of All, Zone, or Unit. After cleaning the filter, perform Filter Sign Reset and cancel the Filter Sign displayed on the screen. If you reset the time, the remaining time to clean the filter is also reset. -
Page 34: Limit The Output Of The Air Conditioner (Energy Saving Operation)
Central remote controller Owner’s Manual Limit the output of the air conditioner (Energy saving operation) Energy-saving operation that limits the output of the air conditioner is possible. Depending on the range of the area to be set, display the “Control” screen of All or Zone and perform the operation. All “Control”... -
Page 35: Lock The Local Remote Control Operation (Key Lock)
Central remote controller Owner’s Manual Lock the local remote control operation (Key lock) You can restrict button operation of the remote controls connected to each air conditioner. Depending on the range of the area to be set, display the “Control” screen of All, Zone, or Unit and perform the operation. “Control”... -
Page 36: Make All The Louver Settings In The Group At Once (Louver Setting In Group)
Central remote controller Owner’s Manual Make all the louver settings in the group at once (Louver setting in Group) Display the “Control” screen of All, Zone, or Unit (P.13) Press [ ] (Control) The “Menu” screen is displayed. Select “Louver setting in Group” using [∧] and [∨], and then press [ ] (Confirm). -
Page 37: Shows The Model Names And Serial Numbers (Unit Information)
Central remote controller Owner’s Manual Shows the model names and serial numbers (Unit Information) Display the “Control” screen of Unit. (P.13) Press [ ] (Control). The “Menu” screen is displayed. ∧ ∨ Select “Unit Information” using [ ] and [ ], and then press ] (Confirm). -
Page 38: Administrator Menu
Central remote controller Owner’s Manual Administrator Menu Renaming a zone (Zone Name Settings) In the “Settings Menu” screen, select “Zone Name Settings” and then press [ ] (Confirm). The “Admin. Password Entry” screen is displayed. Enter a password using [<], [∧], [∨], and [>], and then press ] (Confirm). -
Page 39: Changing The Screen Display (Screen Display Settings)
Central remote controller Owner’s Manual Changing the screen display (Screen Display Settings) In the “Settings Menu” screen, select “Screen Display Settings” and then press [ ] (Confirm). The “Screen Display Settings” screen is displayed. Select an item using [∧] and [∨], and then press [ ] (Confirm). -
Page 40: Changing A Button Operation (Button Settings)
Central remote controller Owner’s Manual Changing a button operation (Button Settings) In the “Settings Menu” screen, select “Button Settings” and then press [ ] (Confirm). The “Button Settings” screen is displayed. Select an item using [∧] and [∨], and then press [ ] (Confirm). - Page 41 Central remote controller Owner’s Manual When “ON” is set for Button Long Press Settings If you set “ON”, set the long press time as well. Display the “ON butt. long press” screen (Steps 1 and 2 of “Button Long Press Settings” (P.40)). Select “Long press time”...
-
Page 42: Checking The Check / Notice History (Check/Notice History)
Central remote controller Owner’s Manual Checking the Check / Notice history (Check/Notice history) In the “Settings Menu” screen, select “Check/Notice history” and then press [ ] (Confirm). The “Admin. Password Entry” screen is displayed. Enter a password using [<], [∧], [∨], and [>], and then press ] (Confirm). -
Page 43: Changing The Administrator Password (Admin. Password Settings)
• If you press [ ] (Return), the “Settings Menu” screen is displayed again. “ ” in the model name represents the product series name. See the Label table below. For the model, see the label. Destination Model North America TCB-SC640U-UL... -
Page 44: Troubleshooting
Central remote controller Owner’s Manual Troubleshooting The following cases are not faults with the Unit. Problem Cause When an air conditioner is stopped, its If you stop the air conditioner using the local remote control, it may take time operation status is displayed on the LCD before the operation is reflected on the Central remote controller. -
Page 45: Appendix
Central remote controller Owner’s Manual Appendix Specifications Power supply 120 V AC 60 Hz Consumed current 0.1 A Operating temperature 32~104°F (0~40°C) and humidity ranges 10~90% (no condensation) Dimensions H: 4.72” (120 mm) × W: 4.72” (120 mm) × D: 0.78” (20 mm) + 1.99” (+50.6 mm) Weight 1.21 lb (550 g) Number of connected units... - Page 46 Customer Memo Model Name TCB-SC640U-UL Installation Date Month Year Name of dealer from whom you purchased the unit Phone number It is convenient to fill this in at the time of purchase in case you need to request repair, etc.