DeWalt DW744 Instruction Manual
Dewalt table saw instruction manual dw744
Hide thumbs
Also See for DW744:
- Instructions manual (101 pages) ,
- Instruction manual (84 pages) ,
- Instruction manual (36 pages)
Table of Contents
Advertisement
Available languages
Available languages
Before returning this product
call
1-800-4-D
See our catalog on the World Wide Web at www.dewalt.com
INSTRUCTION MANUAL
GUIDE D'UTILISATION
MANUAL DE INSTRUCCIONES
DW744
Table Saw
Scies circulaires à table
Sierra de banco
IF YOU SHOULD EXPERIENCE A PROBLEM WITH YOUR DEWALT PURCHASE,
IN MOST CASES, A DEWALT REPRESENTIVE CAN RESOLVE YOUR
WALT
E
CALL 1-800-4 DEWALT.
PROBLEM OVER THE PHONE.
IF YOU HAVE A SUGGESTION OR COMMENT, GIVE US A CALL.
YOUR FEEDBACK IS VITAL TO THE SUCCESS OF DEWALT'S
QUALITY IMPROVEMENT PROGRAM.
INSTRUCTIVO DE OPERACIÓN, CENTROS DE SERVICIO Y PÓLIZA DE
GARANTIA. ADVERTENCIA: LEASE ESTE INSTRUCTIVO ANTES DE
USAR EL PRODUCTO. SI TIENE DUDAS, POR FAVOR LLAME.
Advertisement
Table of Contents

Related Manuals for DeWalt DW744


Summary of Contents for DeWalt DW744
- Page 1 Before returning this product call 1-800-4-D WALT See our catalog on the World Wide Web at www.dewalt.com INSTRUCTION MANUAL GUIDE D'UTILISATION MANUAL DE INSTRUCCIONES DW744 Table Saw Scies circulaires à table Sierra de banco IF YOU SHOULD EXPERIENCE A PROBLEM WITH YOUR DEWALT PURCHASE, CALL 1-800-4 DEWALT.
- Page 2 WARNING: FOR YOUR OWN SAFETY, READ INSTRUCTION MANUAL BEFORE OPERATING SAW • ALWAYS WEAR EYE PROTECTION • DO NOT WEAR GLOVES, NECKTIES, JEWELRY OR LOOSE CLOTHING • CONTAIN LONG HAIR • KEEP HANDS AND FINGERS OUT OF THE SAW BLADE PATH — USE EXTRA CAUTION WHEN BEVELING •...
-
Page 3: Double Insulation
• AVOID awkward hand positions, where a sudden slip could cause a hand to move into a saw blade or other cutting tool. Never reach in back of, or around, the cutting tool with either hand to hold down the workpiece. DO NOT PLACE FINGERS OR HANDS IN THE PATH OF THE SAW BLADE. - Page 4 • IF YOU STALL OR JAM the saw blade in the workpiece, turn saw OFF, remove the workpiece from the saw blade, and check to see if the saw blade is parallel to the miter gauge slots or grooves and if the splitter is in proper alignment with the saw blade.
-
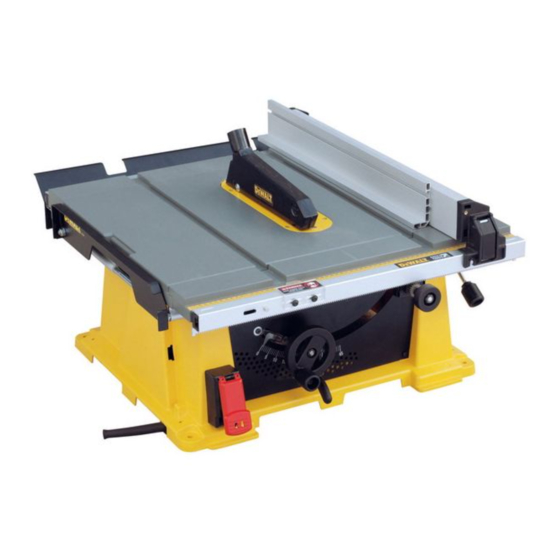
Page 5: Specifications
RPM, no load 3650 Unpacking Open the box and slide the saw out , as shown in Figure 1. Carefully unpack the table saw and all loose items from the carton. Examine all parts to make sure that parts have not been damaged during shipping. -
Page 6: Assembling Rip Fence
1. Raise the saw blade arbor to its maximum height by turning the blade height adjustment wheel clockwise. 2. Remove the arbor nut and flange from the saw arbor by turning counterclockwise. 3. Place the saw blade on to the spindle making sure the teeth of the blade point down at the front of the table. -
Page 7: Connecting Saw To Power Source
AC ONLY means that your saw will operate on alternat- ing current only. A voltage decrease of 10 percent or more will cause a loss of power and overheating. All DeWalt tools are factory tested. If this tool does not operate, check the power supply. -
Page 8: Adjustments
On-Off Switch Lift the switch paddle up to turn your saw ON and push it down to turn your saw OFF. A hole is provided in the switch for insertion of a padlock to lock the saw off (Figure 17). -
Page 9: Kickback
It can also drag the operator’s hand back into the blade if the operator’s hand is at the rear of the blade. If kickback occurs, turn the saw OFF and verify the proper functioning of the splitter, anti-kickback teeth and guards before resuming work. -
Page 10: Ripping Small Pieces
Keep both hands away from the blade and away from the path of the blade. 4. Turn the saw on and allow the blade to come up to speed. Both hands can be used in starting the cut. When there is approximately twelve (12) inches (305mm) left to be ripped…use only one hand, with your... -
Page 11: Dust Collection
If the saw is operated without a vacuum attached, most of the dust will be blown out the dust collection port. However, some dust will fall inside the base. If the saw is used on a table or other surface without an opening on the bottom, clean out the base and accumulated saw dust after each cut. - Page 12 AVERTISSEMENT : PAR MESURE DE SÉCURITÉ PERSONNELLE, LIRE LE GUIDE D’UTILISATION AVANT D’UTILISER LA SCIE. TOUJOURS PORTER DES LUNETTES DE SÉCU- RITÉ. NE PAS PORTER DE GANTS, DE CRAVATE, DE BIJOUX NI DE VETEMENTS AMPLES. PROTÉGER LA CHEVELURE LORSQU’ELLE EST LONGUE. ÉLOIGNER LES DOIGTS ET LES MAINS DE LA TRAJECTOIRE DE LA LAME;...
- Page 13 Importantes mesures de sécurité pour tous les outils AVERTISSEMENT : Afin de réduire les risques d’incendie, de secousses électriques ou de blessures lorsqu’on utilise des outils électriques, il faut toujours respecter les mesures de sécurité suivantes. LIRE TOUTES LES DIRECTIVES Pour tous les outils •...
- Page 14 • Faire particulièrement attention lorsqu’on retire le pro- tecteur pour effectuer des coupes de refente, des embrèvements, des feuillures ou des moulures. Remettre le protecteur en place dès la fin des travaux. • Ne jamais retenir ni toucher l’extrémité inutile de la pièce à...
-
Page 15: Fiche Technique
FIG. 3 TABLE TROUS DE FIXATION GUIDE D´ONGLET TROUS DE MONTAGE PROTECTEUR FIG. 4 RALLONGE (ESCAMOTÉE) ESPACE DE RANGEMENT DE LA LAME OU DE LA CLÉ INDICATOR DE L´ÉCHELLE DE REFENTE LEVIER DE VERROUILLAGE DES RAILS BOUTON DE RÉGLAGE DE PRÉCISION MANIVELLE DE REÉGLAGE DE LA HAUTEUR DE LA LAME LEVIER DE VERROUILLAGE... - Page 16 INSTALLATION ET REMPLACEMENT DE LA LAME 1. Soulever au maximum l’axe de la lame en faisant tourn- er dans le sens horaire la manivelle de réglage de la hauteur de la lame. 2. Retirer l’écrou et la bride de l’axe de la scie en les faisant tourner dans le sens antihoraire.
-
Page 17: Connexion Électrique
Une baisse de ten- sion de plus de 10 p. 100 entraîne une perte de puissance et la surchauffe. Tous les outils DeWALT sont essayés avant de quitter l’usine. Lorsque celui-ci refuse de fonction- ner, vérifier la source de courant électrique. - Page 18 BOUTON DE RÉGLAGE DE PRÉCISION Le bouton de réglage de précision (fig. 15) permet de régler le guide avec précision. Avant de procéder au réglage, s’assurer que le levier de verrouillage des rails est soulevé ou débloqué. INDICATEUR DE L’ÉCHELLE DE REFENTE NOTE : Il faut régler l’indicateur de l’échelle de refente lorsqu’on installe une lame d’une épaisseur différente.
- Page 19 FIG. 18 RONDELLES BELLEVILLE ÉCROU CAME DE BUTÉE DE BISEAU FIG. 19 VIS DE LINDICATEUR BEVEL STOP SCREW FIG. 20 FIG. 21 POIGNÉE DE VERROUILLAGE POIGNEEE DE VERROUILLAGE PLAQUE DE BUTÉE VIS DE RÉGLAGE FIG. 22 BÂTON POUR POUSSER FIG. 23 1.
- Page 20 Fonctionnement Les coupes ordinaires comprennent les refente et les coupes transversales, ainsi que d’autres opérations stan- dard de nature fondamentale. Les méthodes suivantes comportent des mesures de sûreté. Comme pour tous les outils électriques, on peut grandement minimiser les risques de blessures en travaillant avec soin et en respectant les consignes suivantes.
- Page 21 Pour obtenir de plus amples renseignements sur les pièces ou les réparations couvertes par la présente garantie, visiter le site www.dewalt.com ou composer le 1 800 433-9258 (1 800 4-D WALT). Cette garantie ne s’applique pas aux accessoires et ne vise pas les dommages causés par des...
- Page 22 accompagné d’un reçu, dans les 90 jours à compter de la date d’achat, pour obtenir un remboursement intégral, sans aucun problème. REMPLACEMENT GRATUIT DE L'ÉTIQUETTE Si vos étiquettes d'avertissement deviennent illisibles ou sont manquantes, composez le 1-800-4-D WALT pour obtenir une étiquette de remplacement gratuite.
- Page 23 ADVERTENCIA: POR SU PROPIA SEGURIDAD, LEA EL MANUAL DE INSTRUCCIONES ANTES DE OPERAR LA SIERRA · SIEMPRE UTILICE PROTECCION PARA LOS OJOS · NO EMPLEE GUANTES, CORBATA, JOYAS O ROPAS SUELTAS · SUJETE SU CABELLO SI LO TIENE LARGO · CONSERVE LAS MANOS Y LOS DEDOS FUERA DEL CAMINO DEL DISCO DE LA SIERRA —...
-
Page 24: Doble Aislamiento
Doble Aislamiento Las herramientas DOBLEMENTE aisladas se han elaborado de manera integral con dos capas separadas de aislamiento eléctrico o una capa doble de aislamiento entre usted y el sistema eléctrico que contienen. Las herramientas construidas con este sistema de aislamiento no requieren conectarse a tier- ra. - Page 25 • CONSERVE siempre el control de la pieza de trabajo. NO suelte la pieza hasta que haya quedado fuera del alcance de la herramienta de corte. • CUANDO RETIRE piezas cortas, o limpie la mesa, asegúrese que la sierra esté APAGADA y el disco ha dejado de girar.
- Page 26 FIG. 3 MESA ORIFICIOUS DE MONTAJE ESCALA DE INGLETE ORIFICIOUS DE MONTAJE GUARDO DEL DISCO FIG. 4 EXTENSION DE APOYO (RETRAIDA) COMPARTIMIENTO PARA HER- RAMIENTA Y DISCOS INDICADOR DE LA ESCALA DE CORTE AL HILO PALANCA DE SEGURO DEL RIEL PERILLO DE AJUSTE FINO PERILLA DE AJUSTE DE...
- Page 27 Ensamblaje DEBE ENSAMBLAR SU SIERRA EN EL SIGUIENTE ORDEN: 1. Disco 2. Guía para corte al hilo (NOTA: ajuste la escala de la guía para corte al hilo antes de proceder. Consulte la sección “Ajuste de la escala de corte al hilo” más adelante.) 3.
-
Page 28: Montaje En Banco
únicamente con corriente alterna. Disminuciones en el voltaje de 10 % o mayores causarán pérdida de potencia y sobrecalentamiento. Todas las her- ramientas DeWalt se prueban en la fábrica. Si esta her- ramienta no funciona, verifique la alimentación de corriente. -
Page 29: Interruptor De Encendido Y Apagado
Operación de la guía para corte al hilo PALANCA DE SEGURO DEL RIEL La palanca de seguro del riel sujeta los rieles de la guía para corte al hilo en su sitio, evitando el movimiento. Para ase- gurar esta palanca, empújela hacia abajo. Para desasegu- rarla, tire de la palanca hacia arriba (observe la figura 9). - Page 30 FIG. 18 ROLDANAS BELVILLE TUERCA LEVA DE TOPE DE BISEL FIG. 19 TORNILLO DEL INDICADOR TORNILLO DE TOPE DE BISEL FIG. 20 FIG. 21 MANGO DEL SEGURO TUERCA PLACA TOPE TORNILLO DE AJUSTE FIG. 22 PALO PARA EMPUJAR FIG. 23 NOTA: Si no hay suficiente carrera en el montaje del balero del piñón para permitir que la guía quede paralela al disco, lleve la unidad a un centro de servicio autorizado.
-
Page 31: Operación
1. Siempre utilice la guarda y asegúrese que esté en condiciones de trabajo. El separador de la guarda ayuda a evitar atorones y los trinquetes anti con- tragolpes a cada lado del disco minimizan la posibilidad de contragolpes. Tenga mucho cuidado hasta que la pieza haya pasado por completo a través del separador y de los trinquetes. -
Page 32: Corte Angular
5. Use ambas manos para sujetar la pieza contra la cara de la escala angular, y en plano contra la mesa, empu- je lentamente la pieza a través del disco. Observe la figura 23. 6. Nunca intente tirar de la pieza de trabajo cuando el disco esté... - Page 33 1 800 433-9258 (1-800-4- WALT). Esta garantía no aplica a accesorios o a daños causados por reparaciones realizadas o intentadas por ter- ceros.
- Page 35 WALT Industrial Tool Co., 701 East Joppa Road, Baltimore, MD 21286 (JUL04-CD-1) Form No. 626685-00 DW744 Copyright © 2002, 2004 D WALT The following are trademarks for one or more D WALT power tools: the yellow and black color scheme; the “D” shaped air intake grill; the array of pyramids on the handgrip; the kit box con-...