Table of Contents
Advertisement
G e f r i e r / C o n g é l a t e u r / C o n g e l a t o r e / F r e e z e r /
GEBRAUCHSANWEISUNG
NOTICE D'UTILISATION
INSTRUCTION BOOKLET
INSTRUCCIONES DE USO
818 20 21--05/8
C o n g e l a d o r / F r y s e s k a b
ISTRUZIONI D'USO
INSTRUÇÕES DE USO
BRUGSANVISNING
EUF2000 EUF2300 EUF2300X
DE
FR
IT
GB
ES
PT
DK
Advertisement
Table of Contents

Related Manuals for Electrolux EUF2000


Summary of Contents for Electrolux EUF2000
- Page 1 C o n g e l a d o r / F r y s e s k a b GEBRAUCHSANWEISUNG NOTICE D’UTILISATION ISTRUZIONI D’USO INSTRUCTION BOOKLET INSTRUCCIONES DE USO INSTRUÇÕES DE USO BRUGSANVISNING EUF2000 EUF2300 EUF2300X 818 20 21--05/8...
-
Page 2: Table Of Contents
Safety instructions Your new freezer may have other functions compared to your previous one. Carefully read these instructions to learn how the appliance works and how to care for it. Keep the instruction booklet. It will come in handy if you later sell the cabinet or give it to somebody else. These warnings are provided in the interests of your safety. -
Page 3: Description Of The Appliance
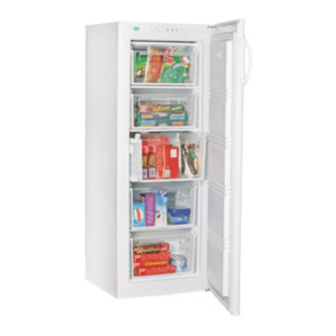
Description of the Appliance 1. Freezershelf with flap 2. Freezer drawer 3. Ventilationgrille 4. Accumulator 1. Freezershelf with flap 2. Freezer drawer 3. Ventilationgrille 4. Accumulator Control Panel -- 18 ACTION FREEZE C D E F G A. Freezer power switch E. -
Page 4: Before Use
Before use Position and clean the cabinet as explained in the section "Installation". Before inserting the power plug into the outlet and switching on the cabinet for the first time, leave it standing upright for about 4 hours. Otherwise the compressor may sustain damage. -
Page 5: Alarms And Other Features
Alarms and other features Door open alarm If the door remains open for more than about 1,5 minute, the red indicator lamp starts flashing and an audible alarm sounds. To switch off the alarm: Press the alarm shut-off button. As long as the door --18 ACTION FREEZE remains open, the audible alarm will sound anew at... -
Page 6: Suitable Storage Periods
Fast freeze can be discontinued by pressing the fast freeze button once again. The yellow fast freeze lamp remains lit as long as the fast freeze button is engaged. ACTION FREEZE "A" (ACTION FREEZE) is displayed in the temperature display. Practical advice on freezing ·... -
Page 7: Hints And Tips
Removable shelves There are the removable shelves inside the freezer. Remove the shelf when large food products need to be frozen. Hints and Tips Saving energy Food Storage · · Pay careful attention to where the cabinet is To obtain the best results from your appliance, placed. -
Page 8: Cleaning
Cleaning Clean the cabinet at regular intervals. Don't use detergents, abrasive powders, high perfumed cleaning products, wax polishes or cleaning products containing bleach or alcohol when cleaning the product Disconnect the appliance from electricity supply. Internal Cleaning Clean the inside and accessories with warm water and bicarbonate of soda (5ml to 0,5 litre water) Rinse and dry thoroughly. -
Page 9: Something Not Working
Something Not Working Before contacting your local Service Force Centre check the following point: Problem Possible cause / Remedy " " is displayed in the temperature Please contact your local Electrolux Service Force Centre display. Audible alarm + flashing red warning Switch off the audible alarm by pressing the alarm off button. -
Page 10: Guarantee Conditions
Power failure Do not unnecessarily open the cabinet, except when the power cut seems to be long, in which case the food products should be moved to another cabinet that works. If the frozen products are still hard following the power cut, they may be immediately refrozen. -
Page 11: Installation
Installation Electrical cord Do not remove the power cord by pulling on its lead, particulary when the product is being pulled out of its niche. · Damage to the cord may cause a short-circuit, fire and/or electric shock. · In the event of damage to the appliance's main cable, only an authorised service company recommended by the manufacturer or a similarly qualified person may adjust it in order to avoid... -
Page 12: Installing The Cabinet
Installing the cabinet When two appliances are placed beside each other, the distances enclosed in the plastic wrapping should be glued between the appliances. As shown in the illustration. Make sure that the power plug is not squashed or damaged by back of the product. ·... -
Page 13: Door Reversal
Door Reversal 1. Close the cabinet and remove the plug from the electrical socket. 2. Remove the ventilation grille. There is a part on the grille that can be removed. Remove and reposition it on the other side. 3. Put the cabinet on a wooden board when it is laid down. - Page 14 aáÉ=bäÉÅíêçäìñJdêìééÉ=áëí=ÇÉê=ïÉäíïÉáí=Öê∏≈íÉ=eÉêëíÉääÉê=îçå=Ö~ëJ=ìåÇ=ëíêçãÄÉíêáÉÄÉåÉå=dÉê®íÉå=ÑΩê=ÇáÉ=hΩÅÜÉI=òìã oÉáåáÖÉå=ìåÇ=ÑΩê=cçêëí=ìåÇ=d~êíÉåK=gÉÇÉë=g~Üê=îÉêâ~ìÑí=ÇáÉ=bäÉÅíêçäìñJdêìééÉ=áå=ΩÄÉê=NRM=i®åÇÉêå=ÇÉê=bêÇÉ=ΩÄÉê=RR jáääáçåÉå=mêçÇìâíÉ=EhΩÜäëÅÜê®åâÉI=eÉêÇÉI=t~ëÅÜã~ëÅÜáåÉåI=pí~ìÄë~ìÖÉêI=jçíçêë®ÖÉå=ìåÇ=o~ëÉåã®ÜÉêF=ãáí=ÉáåÉã tÉêí=îçå=êìåÇ=NQ=jêÇK=rpaK iÉ=dêçìéÉ=bäÉÅíêçäìñ=Éëí=äÉ=éêÉãáÉê=Ñ~ÄêáÅ~åí=ãçåÇá~ä=ÇD~éé~êÉáäë=ÇçãÉëíáèìÉëI=ÇDÉåíêÉíáÉå=Éí=éçìê=äDÉñí¨êáÉìêK mäìë=ÇÉ=RR=ãáääáçåë=ÇÉ=éêçÇìáíë=Çì=dêçìéÉ=bäÉÅíêçäìñ=EíÉäë=èìÉ=ê¨ÑêáÖ¨ê~íÉìêëI=Åìáëáåá≠êÉëI=ä~îÉJäáåÖÉI=~ëéáê~íÉìêëI íêçå´çååÉìëÉëI=íçåÇÉìëÉë=¶=Ö~òçåF=ëçåí=îÉåÇìë=ÅÜ~èìÉ=~åå¨É=éçìê=ìå=ãçåí~åí=ÇDÉåîáêçå=NQ=ãáääá~êÇë=ÇDbìêçë Ç~åë=éäìë=ÇÉ=NRM=é~óë=¶=íê~îÉêë=äÉ=ãçåÇÉK fä=dêìééç=bäÉÅíêçäìñ==ÉD=áä=éáìD=Öê~åÇÉ=éêçÇìííçêÉ=ãçåÇá~äÉ=Çá=~éé~êÉÅÅÜá~íìêÉ=éÉê=ä~=ÅìÅáå~I=éÉê=ä~=éìäáòá~=É=Çá ~ííêÉòò~íìêÉ==éÉê=áä=Öá~êÇáå~ÖÖáç=É=éÉê=ìëç=ÑçêÉëí~äÉK=läíêÉ=RR=ãáäáçåá=Çá=éêçÇçííá=ÇÉä=dêìééç=bäÉÅíêçäìñ==E=èì~äá=ÑêáÖçêáÑÉêáI ÅìÅáåÉI=ä~î~Äá~åÅÜÉêá~I=ä~î~ëíçîáÖäáÉI=~ëéáê~éçäîÉêÉI=ãçíçëÉÖÜÉ=É=ê~ë~ÉêÄ~=F=îÉåÖçåç=îÉåÇìíÉ=çÖåá=~ååç=áå=éáìD=Çá=NRM m~Éëá=ÇÉä=ãçåÇç=éÉê=ìå=î~äçêÉ=Çá=ÅáêÅ~=NQ=ãáäá~êÇá=Çá=Ççää~êáK qÜÉ=bäÉÅíêçäìñ=dêçìé=áë=íÜÉ=ïçêäÇDë=ä~êÖÉëí=éêçÇìÅÉê=çÑ=éçïÉêÉÇ=~ééäá~åÅÉë=Ñçê=âáíÅÜÉåI=ÅäÉ~åáåÖ=~åÇ=çìíÇççê=ìëÉK jçêÉ=íÜ~å=RR=ãáääáçå=bäÉÅíêçäìñ=dêçìé=éêçÇìÅíë=EëìÅÜ=~ë=êÉÑêáÖÉê~íçêëI=ÅççâÉêëI=ï~ëÜáåÖ=ã~ÅÜáåÉëI=î~Åììã=ÅäÉ~åÉêëI ÅÜ~áå=ë~ïë=~åÇ=ä~ïå=ãçïÉêëF=~êÉ=ëçäÇ=É~ÅÜ=óÉ~ê=íç=~=î~äìÉ=çÑ=~ééêçñK=rpa=NQ=Äáääáçå=áå=ãçêÉ=íÜ~å=NRM=ÅçìåíêáÉë ~êçìåÇ=íÜÉ=ïçêäÇK bä=dêìéç=bäÉÅíêçäìñ=Éë=Éä=ã~óçê=Ñ~ÄêáÅ~åíÉ=ÇÉä=ãìåÇç=ÇÉ=~é~ê~íçë=é~ê~=ä~=ÅçÅáå~I=äáãéáÉò~=ó=ìëç=ÉñíÉêáçêK=j•ë=ÇÉ=RR ãáääçåÉë=ÇÉ=éêçÇìÅíçë=ÇÉä=dêìéç=bäÉÅíêçäìñ=EÑêáÖçêáÑáÅçëI=ÅçåÖÉä~ÇçêÉëI=ÅçÅáå~ëI=ä~î~Ççê~ëI=~ëéáê~ÇçêÉëI=ãçíçëáÉêê~ë=ó Åçêí~ŨëéÉÇÉëF=ëÉ=îÉåÇÉå=Å~Ç~=~¥ç=éçê=ìå=î~äçê=~éêçñáã~Çç=ÇÉ=NQ=ÄáääçåÉë=ÇÉ=rpA=Éå=ã•ë=ÇÉ=NRM=é~áëÉë=ÇÉä=ãìåÇçK bäÉÅíêçäìñ=dêìééÉå=Éê=îÉêÇÉåë=ëí›êëíÉ=éêçÇìÅÉåí=~Ñ=ÉåÉêÖáÇêÉîåÉ=éêçÇìâíÉê=íáä=â›ââÉåJ=êÉåÖ›êáåÖëJ=çÖ=ìÇÉåÇ›êë ÄêìÖK=aÉê=ë‹äÖÉë=™êäáÖí=çîÉê=RR=ãáääáçåÉê=éêçÇìâíÉê=Ñê~=bäÉÅíêçäìñ=dêìééÉå=EÄä~åÇí=~åÇÉí=â›äÉëâ~ÄÉI=âçãÑìêÉê î~ëâÉã~ëâáåÉêI=ëí›îëìÖÉêÉI=ãçíçêë~îÉ=çÖ=éä‹åÉâäáééÉêÉF=íáä=Éå=î‹êÇá=~Ñ=Å~K=âêK=NMM=ãáääá~êÇÉêK=mêçÇìâíÉêåÉ=ë‹äÖÉë=á ãÉêÉ=ÉåÇ=NRM=ä~åÇÉ=îÉêÇÉå=çîÉêK MARIESTAD DT--AV...