
Related Manuals for Fujitsu ESPRIMO P5635


Summary of Contents for Fujitsu ESPRIMO P5635
- Page 1 System Operating Manual ESPRIMO P5635 / P5645 / P5730 ESPRIMO P5731 / P7935 ESPRIMO P7936 / P9900...
- Page 2 For automatic driver updates, go to: "http://support.ts.fujitsu.com/com/support/index.html" Should you have any technical questions, please contact: • our Hotline/Service Desk (see Service Desk list or visit: "http://ts.fujitsu.com/support/servicedesk.html") • Your sales partner • Your sales office We hope you really enjoy using your new Fujitsu system.
- Page 4 You will find more information at "http://ts.fujitsu.com/terms_of_use.html" Order No. Fujitsu Technology Solutions GmbH: A26361-K1006-Z220-1-7619, edition 4...
- Page 5 ESPRIMO P5635 / P5645 / P5730 ESPRIMO P5731 / P7935 ESPRIMO P7936 / P9900 Operating Manual Your ESPRIMO Ports and operating elements Important notes Getting started Operation Troubleshooting and tips System expansions Technical data Index...
- Page 6 ESPRIMO is a registered trademark of Fujitsu Technology Solutions GmbH. Windows 7, Windows Vista and Windows XP are registered trademarks of Microsoft Corporation. PS/2 is a registered trademark of International Business Machines, Inc. Pentium is a registered trademark of Intel Corporation, USA.
-
Page 7: Table Of Contents
Access authorisation via SmartCard ..........29 Fujitsu Technology Solutions... - Page 8 Index ................. . 63 Fujitsu Technology Solutions...
-
Page 9: Your Esprimo
Some of the manuals listed can be found in electronic form on the "Drivers & Utilities" DVD. You can access and view the required information using the Acrobat Reader program, which is also included on the DVD. You can of course also print out a copy of the manual if you prefer. Fujitsu Technology Solutions... -
Page 10: Notational Conventions
Names of CDs, DVDs and titles or designations of other materials, e.g.: "CD/DVD Drivers & Utilities" or "Safety" Manual indicates a key on the keyboard, e.g: indicates terms and texts that are emphasised or highlighted, e.g.: Do This font not switch off the device Fujitsu Technology Solutions... -
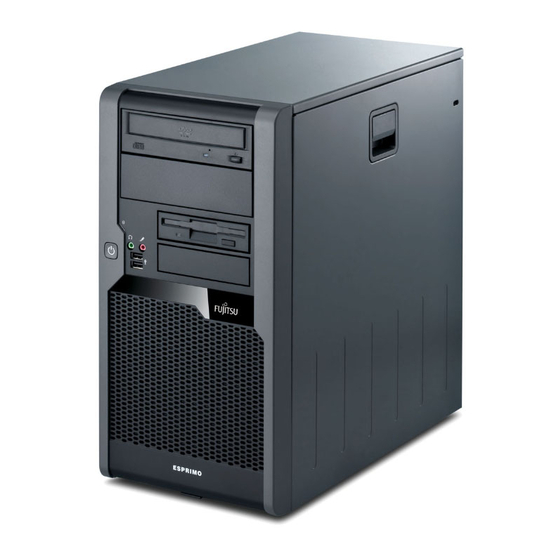
Page 11: Ports And Operating Elements
Please familiarise yourself with these components before starting to work with your device. Front 1 = Optical drive 4 = Microphone jack 2 = Module bay 5 = USB ports 3 = Headphone port 6 = ON/OFF switch Fujitsu Technology Solutions... -
Page 12: Rear
Ports and operating elements Rear 1 = Power connector for computer 3 = Ports for external devices 2 = Power connector for monitor (device-dependent) Fujitsu Technology Solutions... -
Page 13: Important Notes
If the device is brought from a cold environment into the room where it will be used, condensation may occur. Before operating the device, wait until it is absolutely dry and has reached approximately the same temperature as the installation site. Fujitsu Technology Solutions... -
Page 14: Cleaning The Device
Use disinfectant wipes to clean the keyboard and the mouse. Energy saving, disposal and recycling Disposal Energysaving Recycling Drivers& UtilitiesDVD User DocumentationDVD Further information can be found on the "Drivers & Utilities" DVD. Fujitsu Technology Solutions... -
Page 15: Ce Marking
Contact the corresponding government office in the respective country for current information on possible operating restrictions. If your country is not included in the list, then please contact the corresponding supervisory authority as to whether the use of this product is permitted in your country. Fujitsu Technology Solutions... -
Page 16: Getting Started
Drives and boards If you have received drives or boards with your device, please do not install them until after first-time setup. How to install drives and boards is described in the "System expansions", Page 35 chapter. Fujitsu Technology Solutions... -
Page 17: Setting Up The Device
Operating position Use the device only in the vertical operating position. Connecting the machine to the mains Mainsadapter, ► Connect the mains cable to the machine (1). ► Plug the mains plug into a three-pin socket (2). Fujitsu Technology Solutions... -
Page 18: Switching On For The First Time: Installing The Software
ON/OFF button on the front. As a result, there are different ways to switch on the two variants. ► Switch the monitor on (see the operating manual for the monitor). ► Switch the device on. To do this, follow the instructions below. Fujitsu Technology Solutions... - Page 19 ► Switch the device on with the main power switch (1) on the back of the device. ► Press the ON/OFF switch (2) on the front of the device. The power-on indicator lights green and the device is started. Fujitsu Technology Solutions...
-
Page 20: Installing The Software
► If anything is unclear regarding the data you are asked to input, read the online Help in your operating system. You will find more information on the system, as well as drivers, utilities and updates on the "Drivers & Utilities" DVD and on the Internet under "http://ts.fujitsu.com/support/". Fujitsu Technology Solutions... -
Page 21: Connecting External Devices
USB devices are hot-pluggable. This means you can connect and disconnect USB cables while your device is switched on. Additional information can be found in "Connecting external devices to the USB ports", Page 21 and in the documentation for the USB devices. Fujitsu Technology Solutions... -
Page 22: Ports On The Device
Depending on the device variant, the monitor ports on the mainboard (1) may be covered over and inoperable. In this case, only use the external monitor connections on the graphics card in one of the card slots (2). Fujitsu Technology Solutions... - Page 23 ► Depending on your device configuration level, plug the monitor power cable into either the monitor socket of the device (1) or a grounded power outlet (2). Fujitsu Technology Solutions...
-
Page 24: Connecting The Mouse
Connecting external devices to the parallel (optional) or serial port Parallelport Serialport Parallelport Serialport Externaldevices Devices External devices can be connected to the parallel or serial port (e.g. a printer or a modem). ► Connect the data cable to the external device. Fujitsu Technology Solutions... -
Page 25: Port Settings
USB device. To ensure the transmission capacity of USB 2.0, the cable from the external USB device to the USB port of your device must not be longer than 3 m. Fujitsu Technology Solutions... -
Page 26: Operation
After the emergency on button (1) has been pressed for a short time, the device can be switched on again using the ON/OFF switch at the front of the device. ► Press the emergency on button (1) to start the device. Fujitsu Technology Solutions... -
Page 27: Switching Off The Device
The main switch and the ON/OFF switch do not disconnect the device from the mains voltage. To completely disconnect from the mains voltage, remove the power plug from the power socket. ► If necessary, switch the monitor off (see the operating manual for the monitor). Fujitsu Technology Solutions... -
Page 28: Indicators On The Device
If the device is ready it can be switched on with the ON/OFF switch. In an energy-saving mode the device must not be switched off with the main power switch (if present) or disconnected from the mains, as this may result in data loss. Fujitsu Technology Solutions... -
Page 29: Keyboard
ACPI (Advanced Configuration and Power Management Interface). Otherwise the key is inoperative. The mainboard must support this function. Keys, Keys, Keys, Enter key confirms the highlighted selection. The Enter key is also referred to as the "Return" key. Fujitsu Technology Solutions... -
Page 30: Settings In Bios Setup
Software functions and mechanical locking offer a broad range of functions for protecting your device and your personal data from unauthorised access. You can also combine these functions. The following illustrations may differ slightly from your device, depending on its configuration level. Fujitsu Technology Solutions... -
Page 31: Anti-Theft Protection And Lead-Sealing
(2) and a padlock and chain which you have connected to a fixed object beforehand. Lead-sealing To prevent unauthorised persons from opening the system unit, the casing can be lead-sealed. To do this, feed the sealing chain through the holes (2) and seal the chain with the lead seal. Fujitsu Technology Solutions... -
Page 32: Mechanical Casing Lock (Optional)
Protect the device from being switched on by an external device You can also combine these functions. You will find a detailed description of the Security menus and how to assign passwords in the manual for the mainboard or in the "BIOS Setup" manual. Fujitsu Technology Solutions... -
Page 33: Access Authorisation Via Smartcard
Operating the SmartCard reader ► Connect the external SmartCard reader to your system as described in the instructions for the SmartCard reader. SmartCard reader, After the device is switched on, you will be prompted to insert your SmartCard. Fujitsu Technology Solutions... -
Page 34: Troubleshooting And Tips
SystemDiagnostics program pre-installed on your computer. ► To start the SystemDiagnostics program, click Start symbol - Program - Fujitsu - SystemDiagnostics. ► If a problem is detected during the test run, the SystemDiagnostics program outputs a code (e.g. -
Page 35: The Device Cannot Be Switched Off With The On/Off Switch
► Check that the device power cable is properly plugged into the device and a grounded mains outlet. ► Switch on the monitor and the device. Fujitsu Technology Solutions... - Page 36 ► SelectSafe Mode or Safe Mode with Network. ► Go to Start symbol – (Settings) – Control Panel – Appearance and Personalization – Personalization and enter the correct values for the connected monitor as described in the operating manual of the monitor. Fujitsu Technology Solutions...
-
Page 37: No Mouse Pointer Displayed On The Screen
► Check in the BIOS-Setup whether the mouse controller is enabled. ► Check that the mouse driver is properly installed and is present when the application programme is started. Detailed information can be found in the user guide for the mouse and application programme. Fujitsu Technology Solutions... -
Page 38: Time And/Or Date Is Not Correct
7 can be found in the "Recovery Guide" manual. Tips Topic Out of system resources ► Close unnecessary applications. ► Run the applications in a different order. Other manuals Further manuals are provided as PDF files on the "Drivers & Utilities" CD/DVD. Fujitsu Technology Solutions... -
Page 39: System Expansions
An update of the BIOS may be required for a system expansion or hardware upgrade. Further information can be found in the BIOS help section or if necessary in the Technical Manual for the mainboard. Fujitsu Technology Solutions... -
Page 40: Information About Boards
The equipment and tools you use must be free of static charges. • Only touch or hold the boards by the edge or, if present, at the areas marked green (Touch Points). • Never touch pins or conductors on boards fitted with ESDs. Fujitsu Technology Solutions... -
Page 41: Opening The Casing
► Remove any connected wires which are in the way. ► On devices with a casing lock: Unlock the casing. ► Lay the device on its side. ► Pull the locking device (1) and swivel the side part in the direction of the arrow (2). Fujitsu Technology Solutions... -
Page 42: Closing The Casing
► Insert the side part in the guide rail on the lower part of the casing. Casing, Device, ► Swivel the side cover in the direction of the arrow (1) until it engages. ► On devices with a casing lock: Lock the casing. ► Reconnect the cables that you disconnected before. Fujitsu Technology Solutions... -
Page 43: Installing The Locking Device With Casing Lock
► Place the removed side part on a flat surface with the inside facing upwards. ► Press the catch in the direction of the arrow (1). ► Carefully thread the locking device out of the side part in the direction of the arrow (2). Fujitsu Technology Solutions... -
Page 44: Installing The Locking Device With Casing Lock
► Guide the locking device with the casing lock in the direction of the arrow (1) into the side part. ► Press the catch in the direction of the arrow (2) and at the same time press the locking device into the side part (3) until the catch engages. Fujitsu Technology Solutions... -
Page 45: Opening The Drive Cage
► Open the casing (see "Opening the casing", Page 37). ► Unscrew the knurled screw (1). ► Fold open the drive cage (2). Thanks to the integrated torque controller the drive cage will stop in any position. Fujitsu Technology Solutions... -
Page 46: Closing The Drive Cage
Closing the drive cage ► Fold down the drive cage (1). Be careful that no wires become trapped. ► Secure the drive cage with the knurled screw (2). ► Close the casing (see "Closing the casing", Page 38). Fujitsu Technology Solutions... -
Page 47: Removing Ventilation Duct
► Unlock the ventilation duct by pressing locking hooks in the direction of the arrow (1). ► Keep pressing the locking hook and pull the ventilation duct in the direction of the arrow (2) out from the casing. Fujitsu Technology Solutions... -
Page 48: Installing The Ventilation Duct
► Reconnect the cables that were previously disconnected. ► Hook the wires into the holder on the ventilation duct. ► Fold down the drive cage (see "Closing the drive cage", Page 42). ► Close the casing (see "Closing the casing", Page 38). Fujitsu Technology Solutions... -
Page 49: Installing And Removing A Board
► Fold up the drive cage (see "Opening the drive cage", Page 41). ► Press on the curved part of the retaining clip (1). ► Pull the slot cover out of the slot in the direction of the arrow (2). Fujitsu Technology Solutions... -
Page 50: Removing A Board
"Low-profile boards", Page 48 chapter. Removing a board ► Open the casing (see "Opening the casing", Page 37). Board ► Fold up the drive cage (see "Opening the drive cage", Page 41). ► Disconnect the cables connected to the board. Fujitsu Technology Solutions... - Page 51 ► Slide the slot cover into the slot (1). ► Press on the retaining clip until it you feel it engage (2). ► Fold down the drive cage (see "Closing the drive cage", Page 42). Fujitsu Technology Solutions...
-
Page 52: Low-Profile Boards
► Fit the slot adapter to the slot cover of the low-profile board (1) and screw tight (2). Low-profile boards, Now you can install the low-profile board in a suitable slot like a normal board (see "Installing and removing a board", Page 45). Fujitsu Technology Solutions... -
Page 53: Removing A Slot Adapter
(two 3½-inch drives with half installation height) "Accessible drives" are e.g. DVD or CD ROM drives, into which a data medium can be inserted from outside. "Non-accessible drives" are for example hard disk drives. Fujitsu Technology Solutions... -
Page 54: Removing An Accessible Drive
► If you do not install a new drive, secure a cover (optional) at the location so that no foreign bodies can enter the casing. ► Close the casing (see "Closing the casing", Page 38). It may be necessary to modify the entry for the drive in the BIOS Setup. Fujitsu Technology Solutions... -
Page 55: Installing An Accessible Drive
► Press on the retaining clip (2) and, at the same time, slide it up slightly. ► Close the casing (see "Closing the casing", Page 38). It may be necessary to modify the entry for the drive in the BIOS Setup. Fujitsu Technology Solutions... -
Page 56: Installing And Removing The Hard Disk Drive
► Slightly press together the EasyChange rails mounted on the hard disk (1) and pull the hard disk drive out of the drive cage in the direction of the arrow (2). ► Pull the EasyChange rails off the hard disk drive. Fujitsu Technology Solutions... -
Page 57: Installing A Hard Disk Drive
► Open the casing (see "Opening the casing", Page 37). ► Fold up the drive cage (see "Opening the drive cage", Page 41). EasyChange rails for a second hard disk drive are mounted on the drive cage. Fujitsu Technology Solutions... - Page 58 ► Fold down the drive cage (see "Closing the drive cage", Page 42). ► Close the casing (see "Closing the casing", Page 38). It may be necessary to modify the entry for the drive in the BIOS Setup. Fujitsu Technology Solutions...
-
Page 59: Installing/Removing A Smartcard Reader And/Or Wlan Module (Optional)
37). ► Pull the data cable connectors from the carrier. ► Remove the screws (1) on the right side of the carrier. ► Slide the carrier out of the casing in the direction of the arrow (2). Fujitsu Technology Solutions... - Page 60 Screw the SmartCard reader onto the carrier ► Push the SmartCard reader - with the component side facing downwards - in the direction of the arrow (1) into the guide of the carrier (a). ► Secure the SmartCard reader with the screws (2). Fujitsu Technology Solutions...
- Page 61 ► Push the holder into the PC in the direction of the arrow (1). ► Fasten the holder with the screws (2). ► Connect the data cable connectors to the holder. Make sure the polarity is correct. ► Close the casing (see "Closing the casing", Page 38). Fujitsu Technology Solutions...
- Page 62 ► Slide the carrier out of the casing in the direction of the arrow (2). ► Close the casing (see "Closing the casing", Page 38). Removing SmartCard reader from carrier ► Undo the screws (1). ► Pull the SmartCard reader out of the carrier in the direction of the arrow (2). Fujitsu Technology Solutions...
-
Page 63: Installing Usb Ports On The Rear Panel
USBports, USBports, ► Slide the USB ports into the slot and secure them with the screw (1). ► Connect the USB cable to the mainboard – refer to the mainboard manual for details. Fujitsu Technology Solutions... -
Page 64: Mainboard Expansions
► Replace the processor as described in the manual for the mainboard. "Installing the ventilation duct", Page 44). ► Install the ventilation duct (see ► Fold down the drive cage (see "Closing the drive cage", Page 42). ► Close the casing (see "Closing the casing", Page 38). Fujitsu Technology Solutions... -
Page 65: Replacing The Lithium Battery
► Press the catch in the direction of the arrow (1). The battery jumps out of the holder slightly. ► Remove the battery (2). ► Push the new lithium battery of the identical type into the holder (3) and press it down until it engages. Fujitsu Technology Solutions... -
Page 66: Technical Data
Clearance required to ensure adequate ventilation: without air vents min. 10 mm with air vents min. 200 mm The data sheets of these devices contain further technical data. The data sheets can be found on our website "http://ts.fujitsu.com". Fujitsu Technology Solutions... -
Page 67: Index
Energy saving 6 Chain 23 Ergonomic Components Workstation 9 installing/removing 31 External devices Connecting a PS/2 keyboard 16 connecting 16 Connecting, Ports 14 keyboard 16 External devices, mouse 16 connecting 17 PS/2 keyboard 16 PS/2 mouse 16 Fujitsu Technology Solutions... - Page 68 Parallel port 14, 16 Connecting devices 16 Settings 17 Ports 3, 14 LAN port 14 Preparing for first use, overview 8 Lead-sealing 23 Preparing for use, Line in 14 overview 8 Line out 14 Printer 14 Lithium battery 56 Fujitsu Technology Solutions...
- Page 69 Serial port 14, 16 Connecting devices 16 Serial port, Settings 17 Ventilation duct Servicing 31 installing 40 Setup, removing 39 see BIOS Setup 22 SmartCard reader, operating 25 Software, Workstation 9 installing 10, 12 System expansion 31 System settings, Fujitsu Technology Solutions...