Table of Contents
Advertisement
Quick Links
NOTICE
Note that when converting this document from its original format to a .pdf file,
some minor font and format changes may occur causing slight variations. When
viewing and printing this document, we cannot guarantee that your specific PC or
printer will support all of the fonts or graphics. Therefore, when you view the
document fonts may be substituted and your individual printer may not have the
capability to print the document correctly.
Advertisement
Table of Contents

Related Manuals for NEC Dterm Cordless Lite II


Summary of Contents for NEC Dterm Cordless Lite II
- Page 1 NOTICE Note that when converting this document from its original format to a .pdf file, some minor font and format changes may occur causing slight variations. When viewing and printing this document, we cannot guarantee that your specific PC or printer will support all of the fonts or graphics.
-
Page 2: Document Revision
term ® Cordless Lite II (DTH-4R-1) ’ WNER UIDE INT-1018 (DTERM) Document Revision 2... - Page 4 NEC Unified Solutions, Inc. reserves the right to change the specifications, functions, or features, at any time, without notice. NEC Unified Solutions, Inc. has prepared this document for the use by its employees and customers. The information contained herein is the property of NEC Unified Solutions, Inc.
-
Page 6: Table Of Contents
Table of Contents Chapter 1 Specifications and Safety Information Section 1 Specifications ..............1-1 General ................... 1-1 Base Unit ................1-1 Handset ................. 1-1 Battery Charger ..............1-2 Section 2 Battery Safety ..............1-2 Section 3 Important Safety Instructions ..........1-3 Section 4 Important Electrical Considerations ........ - Page 7 Document Revision 2 NEC Unified Solutions, Inc. term Chapter 3 Installing the D Cordless Lite II Section 1 Selecting a Location ............3-1 Section 2 Installation Precautions ............3-1 Section 3 Connecting the Telephone Cords ........3-1 Section 4 Applying Power to the Charging Unit ........3-3 Section 5 Wall Installation ..............
- Page 8 NEC Unified Solutions, Inc. Document Revision 2 Programming Mode ............... 4-4 Switching Between the Desktop Multiline Telephone and the Cordless Telephone Using the Base Unit ....4-5 Switching from Desk to Cordless Using a Softkey ....4-6 Section 3 Using the Handset .............. 4-7 Acquiring Link ................
- Page 9 Document Revision 2 NEC Unified Solutions, Inc. THIS PAGE INTENTIONALLY LEFT BLANK Table of Contents...
- Page 10 List of Figures and Tables term Figure 2-1 Items Included with the D Cordless Lite II ........2-1 Figure 2-2 Handset Controls and Functions ............2-3 Figure 2-3 Base Unit Controls and Functions ............2-4 Figure 3-1 Connecting Telephone Cords to the Telephone Jack ......3-2 term Figure 3-2 Connecting the D...
- Page 11 Document Revision 2 NEC Unified Solutions, Inc. Figure 3-15 Removing the Belt Clip ................. 3-12 Figure 3-16 Removing the Battery Cover ..............3-13 Figure 3-17 Replacing the Battery Pack ..............3-13 Figure 3-18 Replacing the Battery Cover ..............3-14 Table 3-1 Low Battery ..................
-
Page 12: Chapter 1 Specifications And Safety Information
Specifications and Safety Chapter 1 Information ECTION PECIFICATIONS term The D Cordless Lite II complies with FCC and IC parts 15. General Frequency Control Phase Lock Loop Modulation 900 MHz FM with ADPMC (digital) ° ° ° ° Operating Temperature ~ +50 C (+32 F to +122... -
Page 13: Battery Charger
Document Revision 2 NEC Unified Solutions, Inc. Weight Approximately 5.2 oz with battery Battery Capacity 700 mAh, 3.6V Talk Mode 6 hours (typical) Standby Mode 5 days (typical) Specifications shown are typical and subject to change without notice. Battery Charger... -
Page 14: Important Safety Instructions
NEC Unified Solutions, Inc. Document Revision 2 Do not dispose of the battery pack in a fire, the cell may explode. Do not place the batteries in your regular trash. NiMH batteries must be collected, recycled, or disposed of in an environmentally sound manner. - Page 15 Document Revision 2 NEC Unified Solutions, Inc. Never push objects of any kind into this product through the base unit slots, as they may touch dangerous voltage points or short out parts that could result in a risk of fire or electrical shock. Never spill liquid of any kind on the product.
-
Page 16: Important Electrical Considerations
This telephone is no exception. Caution: Changes or modifications to this product not expressly approved by NEC America, Inc., or operation of this product in any way other than as detailed by this manual, could void your authority to operate this product. -
Page 17: Range
Document Revision 2 NEC Unified Solutions, Inc. Range The new telephone is designed to achieve a maximum range for transmitting and receiving (depending upon the environment) according to the highest specifications set forth by the FCC. We have rated this phone to operate at a maximum distance with the qualification that the range depends upon the environment in which the telephone is used. -
Page 18: More Than One Cordless Telephone
NEC Unified Solutions, Inc. Document Revision 2 Finally, it should be noted that some cordless telephones operate at frequencies that may cause interference to nearby TVs and VCRs. To minimize or prevent such interference, the base of the cordless telephone should not be placed near or on top of a TV or VCR. - Page 19 Document Revision 2 NEC Unified Solutions, Inc. THIS PAGE INTENTIONALLY LEFT BLANK 1 - 8 Specifications and Safety Information...
- Page 20 Chapter 2 term About the D Cordless Lite II term ECTION TEMS NCLUDED WITH THE ORDLESS term Congratulations on your purchase of the D Cordless Lite II. This telephone is designed and engineered to exacting standards for reliability, long life, and outstanding performance. To become familiar with the features of the cordless telephone, read this manual thoroughly.
-
Page 21: About The D Term Cordless Lite
Low Battery Protection System Wall Mountable Separate Base Unit Wall Mountable Separate Charging Unit Easy Installation Compact Handset Design Use with an NEC Digital Multiline Telephone Desk/Cordless Softkey Switch term The D Cordless Lite II can be used in conjunction with the, Electra ®... -
Page 22: Cordless Lite Ii Controls And Functions
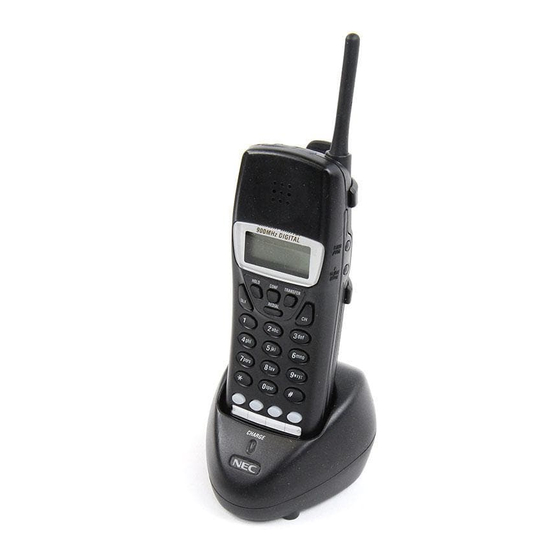
NEC Unified Solutions, Inc. Document Revision 2 term II C ECTION ORDLESS ONTROLS AND UNCTIONS term The primary components of the D Cordless Lite II consist of the handset and the base unit. Before using the telephone for the first time, you should become familiar with the controls and functions of the handset and base unit. - Page 23 Document Revision 2 NEC Unified Solutions, Inc. 20 21 22 23 Line Out Power Line In Desk LED Cordless Desk Cordless LED Figure 2-3 Base Unit Controls and Functions term 2 - 4 About the D Cordless Lite II...
-
Page 24: Chapter 3 Installing The D Term Cordless Lite
Chapter 3 term Installing the D Cordless Lite II ECTION ELECTING A OCATION term Select a location for the D Cordless Lite II to avoid excessive heat or term humidity. The base unit of the D Cordless Lite II can be placed on a desk or tabletop near a standard 120 Vac outlet and telephone line jack. - Page 25 Cordless Lite II. Line in From Telephone Jack Figure 3-1 Connecting Telephone Cords to the Telephone Jack term Connect a qualified NEC digital Multiline Terminal to the D Cordless Lite Line Out term Series E or Series i Multiline Terminal...
-
Page 26: Applying Power To The Charging Unit
NEC Unified Solutions, Inc. Document Revision 2 ECTION PPLYING OWER TO THE HARGING The unique design of the telephone allows the user to place the handset in the charging unit with or without the belt clip attached. The battery pack can be automatically be recharged in the handset unit. -
Page 27: Wall Installation
Document Revision 2 NEC Unified Solutions, Inc. Adapter” Wide Blade Figure 3-4 Polarized Plug ECTION NSTALLATION Standard Wall Plate Mounting The base unit is designed to be mounted on standard wall plate. To attach the wall mount stand to the base unit: Slide the wall mount stand into the notches at the top of the base unit. - Page 28 NEC Unified Solutions, Inc. Document Revision 2 Figure 3-5 Attaching the Wall Mount Stand to the Base Unit Plug the AC adapter into the base unit. Place the AC adapter cord inside the molded channel of the wall mount stand.
- Page 29 Plug one end of the short telephone cord (locally supplied) in the Line In jack on the base unit. Plug one end of the NEC digital multiline telephone into the Line Out jack. Place the telephone cords inside the molded channels on the bottom of the wall mount stand.
-
Page 30: Direct Wall Mounting
NEC Unified Solutions, Inc. Document Revision 2 Wide Blade Adapter Figure 3-8 Plugging the AC Adapter into the AC Wall Outlet Direct Wall Mounting If a standard wall plate is not available, mount the telephone directly on the wall. Before mounting the telephone, consider the following:... - Page 31 Document Revision 2 NEC Unified Solutions, Inc. Figure 3-9 Inserting Screws into the Wall for Wall Mounting the Telephone Plug in and secure the AC adapter. Plug the AC adapter into the base unit. Plug one end of the short telephone cord into the Line In jack on the base unit.
- Page 32 NEC Unified Solutions, Inc. Document Revision 2 Figure 3-10 Placing the Telephone Cords into Inside the Wall Mount Stand Place the base unit on the posts of the wall screws and push down until it is firmly seated. Figure 3-11 Attaching the Wall Mount Unit to the Wall Plug the other end of the short telephone cord into a telephone wall jack.
-
Page 33: Charging Unit Wall Mounting
Document Revision 2 NEC Unified Solutions, Inc. Plug the AC adapter into a standard 120 Vac wall outlet. Refer to Figure 3-8 Plugging the AC Adapter into the AC Wall Outlet on page 3-7. Do not use an outlet controlled by a wall switch. - Page 34 NEC Unified Solutions, Inc. Document Revision 2 Strain Relief Figure 3-13 Wrapping the AC Adapter Cord Around the Strain Relief Clip Plug the AC adapter into a standard 120 Vac wall outlet. ECTION TTACHING AND EMOVING THE A belt clip can be used to attach the handset to a belt or pocket for convenient portability.
-
Page 35: Section 2 Battery Safety
Document Revision 2 NEC Unified Solutions, Inc. Slide the clip into the tab slots. Press firmly until it snaps into place. The belt clip is designed to fit snugly onto the handset. Figure 3-14 Attaching the Belt Clip to the Handset To remove the clip, press the retaining clip in toward the belt clip blade and slide the clip up at the same time. - Page 36 NEC Unified Solutions, Inc. Document Revision 2 Remove the battery cover by pressing the latch and sliding the cover down and off of the handset. Figure 3-16 Removing the Battery Cover Slide the battery pack down into the handset. It may be necessary to remove the old battery at this time.
-
Page 37: Installing The Handset Battery Pack
Document Revision 2 NEC Unified Solutions, Inc. Replace the cover and slide it up until it latches onto the handset. Figure 3-18 Replacing the Battery Cover ECTION HARGING ATTERIES Charging the Handset Battery Pack term The rechargeable battery pack must be fully charged before using the D Cordless Lite handset for the first time. -
Page 38: Low Battery Indicator
NEC Unified Solutions, Inc. Document Revision 2 Low Battery Indicator The handset has visual and audible indicators to warn of a low battery condition. The indicators are different for standby mode and talk mode. Standby Mode The handset display turns on the battery low icon. - Page 39 Document Revision 2 NEC Unified Solutions, Inc. Table 3-1 Low Battery On a Call In Standby Mode What occurs when batt low is displayed: Only the TALK key operates None of the keys operate Handset beeps once every three Handset beeps every 15 seconds for...
-
Page 40: Section 10 Antenna
NEC Unified Solutions, Inc. Document Revision 2 ECTION NTENNA term Before using the D Cordless Lite II, raise the antenna to the vertical position as illustrated in Figure 3-20 Raising the Base Unit Antenna. Figure 3-20 Raising the Base Unit Antenna term Cordless Lite II Owner’s Guide... - Page 41 Document Revision 2 NEC Unified Solutions, Inc. THIS PAGE INTENTIONALLY LEFT BLANK term 3 - 18 Installing the D Cordless Lite II...
-
Page 42: Chapter 4 D Term Cordless Lite Ii Handset
Chapter 4 term Cordless Lite II Handset ECTION ANDSET ONTROLS term The operations of the D Cordless Lite II are performed using the handset. The HOLD, CONF (conference), TRANSFER, TALK, CH (channel), and REDIAL keys are used to control various functions. Volume, ringer, and mute are controlled by the keys on the side of the handset. - Page 43 Document Revision 2 NEC Unified Solutions, Inc. Table 4-1 Handset Control Functions Condition Action Hold Key Press HOLD on the front of the handset to place an existing call on hold. Transfer Key Press TRANSFER on the front of the handset to transfer a call.
- Page 44 NEC Unified Solutions, Inc. Document Revision 2 Table 4-1 Handset Control Functions (Continued) Condition Action Volume Control Press Ring/Vol on the side of the handset to select one (Talk Mode) of the following volume level settings (must be in talk...
-
Page 45: Programming Mode
Function keys (F1 ~ F4) can be programmed as line keys 1~16 for redial (LNR/SPD), answer (ANS), feature (FNC), or recall. When assigned, these keys operate the same as on an NEC multiline telephone. When initially installed, function keys (F1~F4) default to line keys 1~4 respectively and off-hook ringing defaults to ON. -
Page 46: Switching Between The Desktop Multiline Telephone And The Cordless Telephone Using The Base Unit
NEC Unified Solutions, Inc. Document Revision 2 Switching Between the Desktop Multiline Telephone and the Cordless Telephone Using the Base Unit term When the D Cordless Lite II is associated with a multiline telephone the following is applicable: Switching between cordless and desk mode must be done while both telephones are idle. -
Page 47: Switching From Desk To Cordless Using A Softkey
Document Revision 2 NEC Unified Solutions, Inc. Switching from Desk to Cordless Using a Softkey At system default, the REDIAL key can only be used for the redial function. However, the REDIAL key can be programmed to perform desk to cordless switching. -
Page 48: Using The Handset
NEC Unified Solutions, Inc. Document Revision 2 To restore the REDIAL key to the redial function: Enter setup mode (refer to steps 1~5 Switching from Desk to Cordless Using a Softkey on page 4-6). Press the F3 key and then the HOLD key. Digital (Redial) is displayed in the LCD indicating that the redial function has been restored to the REDIAL key. -
Page 49: Volume Low
Document Revision 2 NEC Unified Solutions, Inc. Volume Low When connection is established, the TALK icon is turned on and displays the current volume settings for two seconds. If the host system sends any V O L U M E... -
Page 50: Answering A Call
Press TALK to answer the incoming call. The Ringing Line Preference feature must be enabled in order to answer calls with the TALK key. Contact an authorized NEC Dealer for programming this feature. If two or more calls come in at the same time, pressing the TALK key answers the prime line. -
Page 51: Making A Call Using The D
Document Revision 2 NEC Unified Solutions, Inc. term ECTION AKING A SING THE ORDLESS Several advanced features for making calls are available depending on how the deskset is programmed. Refer to Section 6 Dedicated Feature Operations. This section describes normal call handling. -
Page 52: Placing A Call On Hold
NEC Unified Solutions, Inc. Document Revision 2 Placing a Call on Hold Press HOLD on the handset during the call. The LED associated with the line key being used flashes. To return to the holding call, press the associated line key. -
Page 53: Setting Up A Conference Call
Document Revision 2 NEC Unified Solutions, Inc. Setting up a Conference Call This feature allows the user to set up a 3-party conference (the user and two other parities). To set up the conference: Dial the first number for the first party. -
Page 54: Chapter 5 Optional Equipment Installation
Chapter 5 Optional Equipment Installation ECTION PTIONAL CCESSORIES AND EPLACEMENT ARTS Optional accessories and replacement parts can be obtained by contacting your NEC representative. Adapter for Base Unit Telephone Belt Clip NiMH Cord Battery Charger and AC Base Unit Wall... - Page 55 Document Revision 2 NEC Unified Solutions, Inc. To install the headset: Open the cover over the headset jack and plug the headset into the receptacle. Figure 5-2 Installing the Headset No other settings are needed. Operation of the headset is the same as the handset.
- Page 56 NEC Unified Solutions, Inc. Document Revision 2 Optional Available Parts Part Description Stock Number EXP 9360 Wall Mount for Charger Unit 730633 EXP 9385 Charger 730632 EXP 9302 Beltclip 730634 BT-930 Battery (NiMH, DC 3.6V 750 Mah) 730631 EXP 9660 Wall Mount for Base...
- Page 57 Document Revision 2 NEC Unified Solutions, Inc. THIS PAGE INTENTIONALLY LEFT BLANK 5 - 4 Optional Equipment Installation...
-
Page 58: Troubleshooting
If the D Cordless Lite II is not performing to your expectations, try these simple steps. If this does not resolve the problems, contact the NEC representative. Do not attempt to service this unit yourself. All service must be done by qualified service personnel. -
Page 59: Chapter 6 Troubleshooting
Document Revision 2 NEC Unified Solutions, Inc. Table 6-1 Troubleshooting (Continued) Problem Suggestion Handset does not ring • The NiMH battery may be weak. Charge the battery pack for eight hours. • Make sure the base unit antenna is fully vertical. - Page 60 Index Numerics rechargeable recycling 30 channels safety 5-day standby time battery 6-hour talk time safety considerations spare belt clip 2-1, 5-1 AC adapter 1-1, 2-1, 3-3, 5-1, 6-1 buttons acquiring link refer to keypad buttons alarm alert tone battery low 3-15 answering calls calls...
- Page 61 Document Revision 2 NEC Unified Solutions, Inc. Dterm Series i ringer ringer on/off switch size talk mode Electra Elite transmit frequency electrical considerations using volume weight F1~F4 keys headset 1-1, 1-6 installing 5-1, 5-2 features jack 2-2, 2-3 30 channels...
- Page 62 NEC Unified Solutions, Inc. Document Revision 2 volume control message display microphone modes safety programming battery standby electrical 3-15 talk general instructions 3-15 modulation Series i multiline telephone silent alarm using single access key multiple telephones site location mute control...
- Page 63 Document Revision 2 NEC Unified Solutions, Inc. multiline telephone multiple volume privacy control radio interference high range 1-6, 2-2 4-3, 4-8 rechargeable battery maximum wall plate adapter medium temperature on/off key specifications volume/ringer key transfer key 2-3, 4-2 troubleshooting charge light 1...
- Page 65 term ® Cordless Lite II ’ WNER UIDE N E C U n i f i e d S o l u t i o n s , I n c . D o c u m e n t R e v i s i o n 2...