Table of Contents
Advertisement
Advertisement
Table of Contents

Related Manuals for Fujitsu FUTRO S550-2


Summary of Contents for Fujitsu FUTRO S550-2
- Page 1 Thin Client Operating Manual FUTRO S550-2...
- Page 2 Are there ..any technical questions or problems? Please contact: • our Hotline/Service Desk (please refer to the enclosed Service Desk list or look up the contact details on our website at: "http://ts.fujitsu.com/support/servicedesk.html") • your sales partner • your sales office Further information can be found in the "Safety"...
- Page 4 You will find more information at "http://ts.fujitsu.com/terms_of_use.html" Order No. Fujitsu Technology Solutions GmbH: A26361-K528-Z200-1-7619 , edition 1...
- Page 5 FUTRO S550-2 Operating Manual Your FUTRO... Important notes Getting started Operation System expansions Technical data Index...
- Page 6 FUTRO is a registered trademark of Fujitsu Technology Solutions GmbH. Windows 7, Windows Vista and Windows XP are registered trademarks of Microsoft Corporation. PS/2 is a registered trademark of International Business Machines Corporation (IBM). Kensington is a registered trademark of ACCO World Corporation.
-
Page 7: Table Of Contents
Replacing the lithium battery ............. 33 Fujitsu Technology Solutions... - Page 8 Index ................. . 36 Fujitsu Technology Solutions...
-
Page 9: Your Futro
Names of CDs, DVDs and titles or designations of other materials, e.g.: "CD/DVD Drivers & Utilities" or "Safety" Manual indicates a key on the keyboard, e.g: indicates terms and texts that are emphasised or highlighted, e.g.: Do This font not switch off the device Fujitsu Technology Solutions... -
Page 10: Important Notes
Use only the mains adapter which is intended for use with the device, see chapter "Technical data ", Page Make sure that the rated current of the mains adapter is not higher than that of the power system to which you connect the mains adapter. Fujitsu Technology Solutions... -
Page 11: Transporting The Device
Use disinfectant wipes to clean the keyboard and the mouse. Energy saving, disposal and recycling Disposal Energysaving Recycling Drivers& UtilitiesDVD User DocumentationDVD Further information can be found on the "Drivers & Utilities" DVD. Fujitsu Technology Solutions... -
Page 12: Fcc Class B Compliance Statement
• Consult the dealer or an experienced radio/TV technician for help. Fujitsu Technology Solutions GmbH is not responsible for any radio or television interference caused by unauthorized modifications of this equipment or the substitution or attachment of connecting cables and equipment other than those specified by Fujitsu Technology Solutions GmbH. -
Page 13: Getting Started
1 = SmartCard reader 5 = USB ports (Universal Serial Bus) 2 = Indicator for SmartCard reader 6 = ON/OFF switch 3 = Flash memory access 7 = Headphones port, audio output (Line Out) 4 = Microphone jack Fujitsu Technology Solutions... -
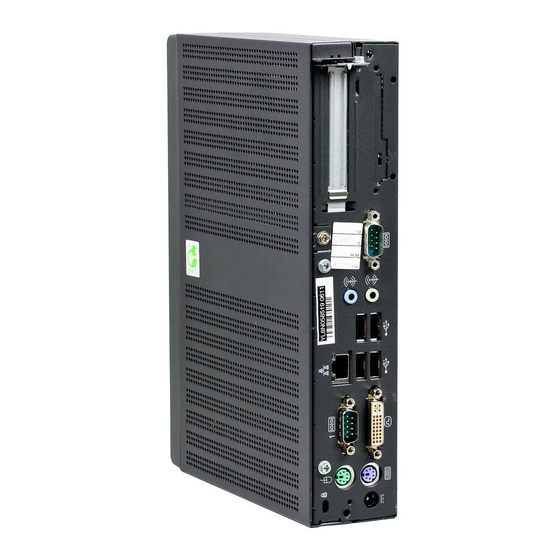
Page 14: Rear View
4 = USB ports (Universal Serial Bus) 11 = RJ45 socket (Local Area Network) 5 = DVI-I monitor port 12 = Audio input line in 6 = PS/2 keyboard port 13 = PCI slot 7 = DC input jack (DC IN) Fujitsu Technology Solutions... -
Page 15: Setting Up The Device
Proceed as follows to operate the device in the vertical operating position: ► Disconnect the cables if required. ► Push the device onto the foot in the direction of the arrow. ► If necessary, reconnect any cables that were previously disconnected. Fujitsu Technology Solutions... -
Page 16: Horizontal Operating Position
► Place the device on its upper side on a sturdy, flat and clean surface. ► Position the base feet on the underside of the device. ► Screw on the base feet with the screws (1). ► If necessary, reconnect any cables that were previously disconnected. Fujitsu Technology Solutions... -
Page 17: Connecting External Devices
► Switch off all affected devices. Cable, ► Remove all power plugs from the grounded mains outlets. ► Unplug all data communication cables from the appropriate sockets. ► Disconnect all of the cables from the device and from the external devices. Fujitsu Technology Solutions... -
Page 18: Ports On The Device
► Plug the data cable into the monitor port of the device. Depending on the expansion stage of your machine and your monitor, you can also connect the data cable to the DVI or HDMI interface. ► Plug the monitor power cable into the grounded mains outlet. Fujitsu Technology Solutions... -
Page 19: Connecting The Mouse
For an exact description of how to connect external devices to the corresponding port, please see the external device documentation. Port settings Parallelport Serialport, You can change the port settings (e.g. address, interrupt) in the BIOS Setup. Fujitsu Technology Solutions... -
Page 20: Connecting External Devices To The Usb Ports
► Connect the external line-in devices to the audio input. Connecting the mains adapter Mainsadapter ► Connect the mains adapter cable to the device. ► Connect the power cable to the mains adapter. ► Plug the power cable into a grounded mains outlet. Fujitsu Technology Solutions... -
Page 21: Connecting The Device To The Network (Lan)
Getting started Connecting the device to the network (LAN) ► Connect the 10/100/1000 Base T network cable to the RJ45 LAN port. Fujitsu Technology Solutions... -
Page 22: Operation
BIOS Setup will be started. Select one of the tabs to access other setting options in BIOS Setup. PXE system boot PXEsystem boot ► Switch the device on with the ON/OFF switch. ► When starting the system, press the key several times. The boot menu is displayed. ► Select the desired boot option. Fujitsu Technology Solutions... -
Page 23: Calling The Pxe System Boot Configuration Menu
Indicates the time in seconds for which the following message is Show displayed during the system boot: Message Time: Realtek RTL8139(X)/8130/810X Boot Agent Press Shift-F10 to configure ……. The settings are not effective until after saving and another PXE system boot. Fujitsu Technology Solutions... -
Page 24: System Expansions
An update of the BIOS may be required for a system expansion or hardware upgrade. Further information can be found in the BIOS help section or if necessary in the Technical Manual for the mainboard. Fujitsu Technology Solutions... -
Page 25: Information About Boards
The equipment and tools you use must be free of static charges. • Only touch or hold the boards by the edge or, if present, at the areas marked green (Touch Points). • Never touch pins or conductors on boards fitted with ESDs. Fujitsu Technology Solutions... -
Page 26: Opening The Casing
► Remove any connected wires which are in the way. ► Loosen the screws at the rear (1). ► Slide the casing cover in the direction of the arrow (2). ► Lift off the casing cover (3). Fujitsu Technology Solutions... -
Page 27: Closing The Casing
► Replace the casing cover on the device and push it backwards. ► Secure the casing cover with the two screws on the rear of the device. Make sure that the cables are not trapped between the casing and the components. ► Connect all the cables removed before. Fujitsu Technology Solutions... -
Page 28: Adding Memory
Installing a memory module ► Insert the memory module with the contacts and the recess (a) facing the slot (1). Memory expansion Memory module ► Carefully push the memory module downwards until you feel it click into place (2). Fujitsu Technology Solutions... -
Page 29: Installing The Pci Board
► Undo the screw (1) and cables on the cross piece which are in the way. ► Remove the cross piece (2). ► Insert the riser card in its slot (3). ► Refit the cross-beam. ► Undo the screw and remove the rear slot cover plate of the slot (4). Fujitsu Technology Solutions... - Page 30 (regulations on electromagnetic compatibility) to be complied with. ► Insert your PCI board on the riser card (1). ► Secure the lock with the screw (2) to secure the PCI board. ► Close the casing (see "Closing the casing", Page 23). Fujitsu Technology Solutions...
-
Page 31: Removing The Pci Board
(regulations on electromagnetic compatibility) to be complied with. ► Now reinstall the rear slot cover plate by inserting it in the installation slot from the inside and securing it with the screw (1). ► Close the casing (see "Closing the casing", Page 23). Fujitsu Technology Solutions... -
Page 32: Installing The Smartcard Reader
(5). ► Secure the SmartCard reader onto the carrier with the screws (6). ► Reinstall the cross piece and the PCI board (see "Installing the PCI board", Page 25). Fujitsu Technology Solutions... - Page 33 System expansions ► Close the casing (see "Closing the casing", Page 23). Make sure that the cables are not trapped between the casing and the components. Fujitsu Technology Solutions...
-
Page 34: Removing The Smartcard Reader
► Undo the screws (5). ► Lift the SmartCard reader from the securing bolt (6). ► Reinstall the cross piece and the PCI board (see "Installing the PCI board", Page 25). ► Close the casing (see "Closing the casing", Page 23). Fujitsu Technology Solutions... -
Page 35: Retrofitting The Dvi-D Monitor Port (Optional)
► Remove the cross piece (2). ► Remove the PCI board, (see chapter "Removing the PCI board", Page 27). ► If no PCI board is installed: Undo the screw of the slot cover (3) and remove the slot cover (4). Fujitsu Technology Solutions... - Page 36 ► Place the DVI-D monitor port in the slot (2). Ensure that you insert the lug (3) on the port correctly into the intended opening (4). ► Ensure that the locking lug (5) engages. ► Refit the cross piece. ► Close the casing. Fujitsu Technology Solutions...
-
Page 37: Replacing The Lithium Battery
The battery jumps out of the holder slightly. ► Remove the battery (2). ► Push the new lithium battery of the identical type into the holder (3) and press it down until it engages. ► Fasten the catch (4). Fujitsu Technology Solutions... -
Page 38: Technical Data
200 mm • rear min. 200 mm • min. 200 mm Condensation must be avoided during operation. Mains adapter Electrical data Rated voltage: 100 - 240 V Max. rated current: 1.7 A Rated frequency: 50 - 60 Hz Fujitsu Technology Solutions... - Page 39 Technical data Only the following adapters with Limited Power Source may be used: • S26113-E519-V55 Model: ADP-65HB AD • S26113-E519-V15 Model: 0335C2065 • S26113-E557-V55 Model: ADP-65JH AD • S26113-E557-V65 Model: PA-1650-65 Fujitsu Technology Solutions...
-
Page 40: Index
Parallel port 12 Device drivers, Serial port 12 Device, LAN 13 opening 18 LAN port 10 switching off 14 Line in 10 switching on 14 Line out 10 transporting 3 Line-out devices upgrades 16 connecting 12 Devices Fujitsu Technology Solutions... - Page 41 USB port 11 installing 21 USB port, removing 23 connecting devices 12 PCI slot 6 connecting keyboard 11 Ports 5, 10 connecting the mouse 11 Power-on indicator 5 USB ports 6 PS/2 keyboard port 6 User Documentation DVD 3 Fujitsu Technology Solutions...
- Page 42 Index Vertical operating position 7 Fujitsu Technology Solutions...